
Hi friends,
Sometimes Thanksgiving gets a little lost along the way to Christmas. I love the Fall season with all of its glorious colors and enjoy adding little Autumn touches to my home for the month of November. (I really start putting my Fall things out in October along with a few things for Halloween.) 😉
Disclosure: Some of the links on my site are affiliate links, meaning, at no additional cost to you, I will earn a small commission if you click through and make a purchase. As an Amazon Associate I earn from qualifying purchases.
I made this Halloween garland for my fireplace and now that it’s November I needed one that was a little less Halloween-y and a little more Fall-ish.
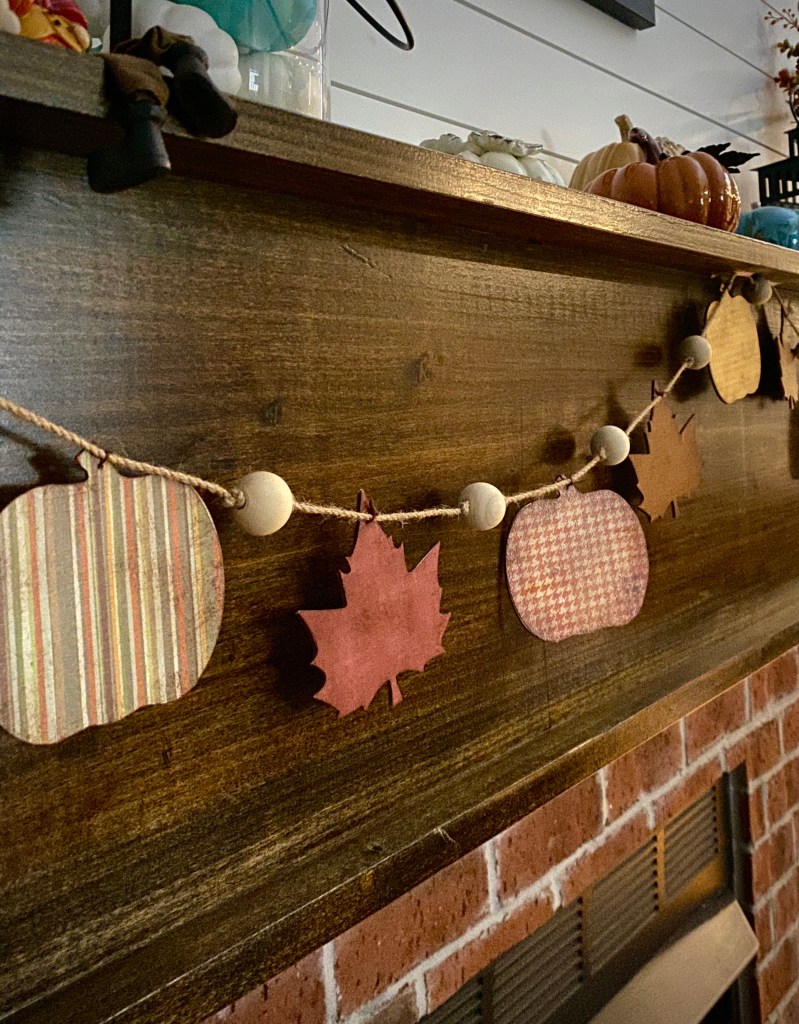
You’ll need some unfinished wood pumpkin and leaf ornaments – I used 5 of each. I picked mine up at Dollar Tree – but I did find these pumpkin and leaf ornaments on Amazon. You’ll also need 11 (1-inch) unfinished wood beads – I used beads similar to these, some natural twine, your favorite Fall colored scrapbook paper, and Mod Podge to glue the paper to the ornaments. You may also want some brown ink to distress the pumpkins and leaves a bit to add a little more dimension – I love this Memento Rich Cocoa dye ink.

Trace each shape on the back of the scrapbook paper and cut them out. Using a sponge brush with the Mod Podge, brush a thin layer onto the shape, place the cut scrapbook paper on the shape, and smooth out any bubbles. Let dry – it dries really quickly.
Next, dry brush a little of the Memento Rich Cocoa onto the the pumpkins and leaves using a stipple/stencil brush (this set has 4 different sizes). Apply a thin coat of the Mod Podge over the top and let dry. Using an awl or the tip of sharp scissors, punch through the paper in the hole of the ornament.
Once your shapes are ready, it’s time to make the garland! Cut a long length of twine, I cut mine about 8 feet. I started by tying a knot about 9 inches from one end of my twine. Then I threaded on a bead and tied a knot close to it to keep it from sliding on the twine. I tied another knot about 4 inches from the first bead, threaded on another bead, and tied a knot close to that one. Continue until all the beads are on the twine. Leaving about 9 inches, cut off any excess twine.

Then I tied the pumpkin and leaf shapes onto the twine between the beads using a thin brown twine I had in my craft stash and trimmed off the excess. Any thin, neutral color twine will work.
And here’s the finished garland!

I love how it looks on my mantel! 🍁

You can also tie ribbon onto the garland like I did in my Halloween Garland in this post for a little something extra.
A touch of Fall to warm up the season on the way to Thanksgiving! 🍁🍁🍁
Happy Crafting!
Anita


That’s so pretty! I never thought of rubbing ink on something like this to give it that rustic look. Pinning this so I can remember that tip. 😀
LikeLike
Thanks, Michelle! It’s such a great technique.
LikeLiked by 1 person
Pingback: 31 Best Fall Wood Crafts
Pingback: Decorating My Fireplace For Halloween and Fall | Creating Me