Thanks Mason Jar Card

This is such a fun set from Stampin’ Up. It’s called Jar of Love – it comes with 3 different sizes of jars and tons of accessories. There is also a coordinating die set called Everyday Jars Framelits to make it easy to cut out your jars and accessories. 

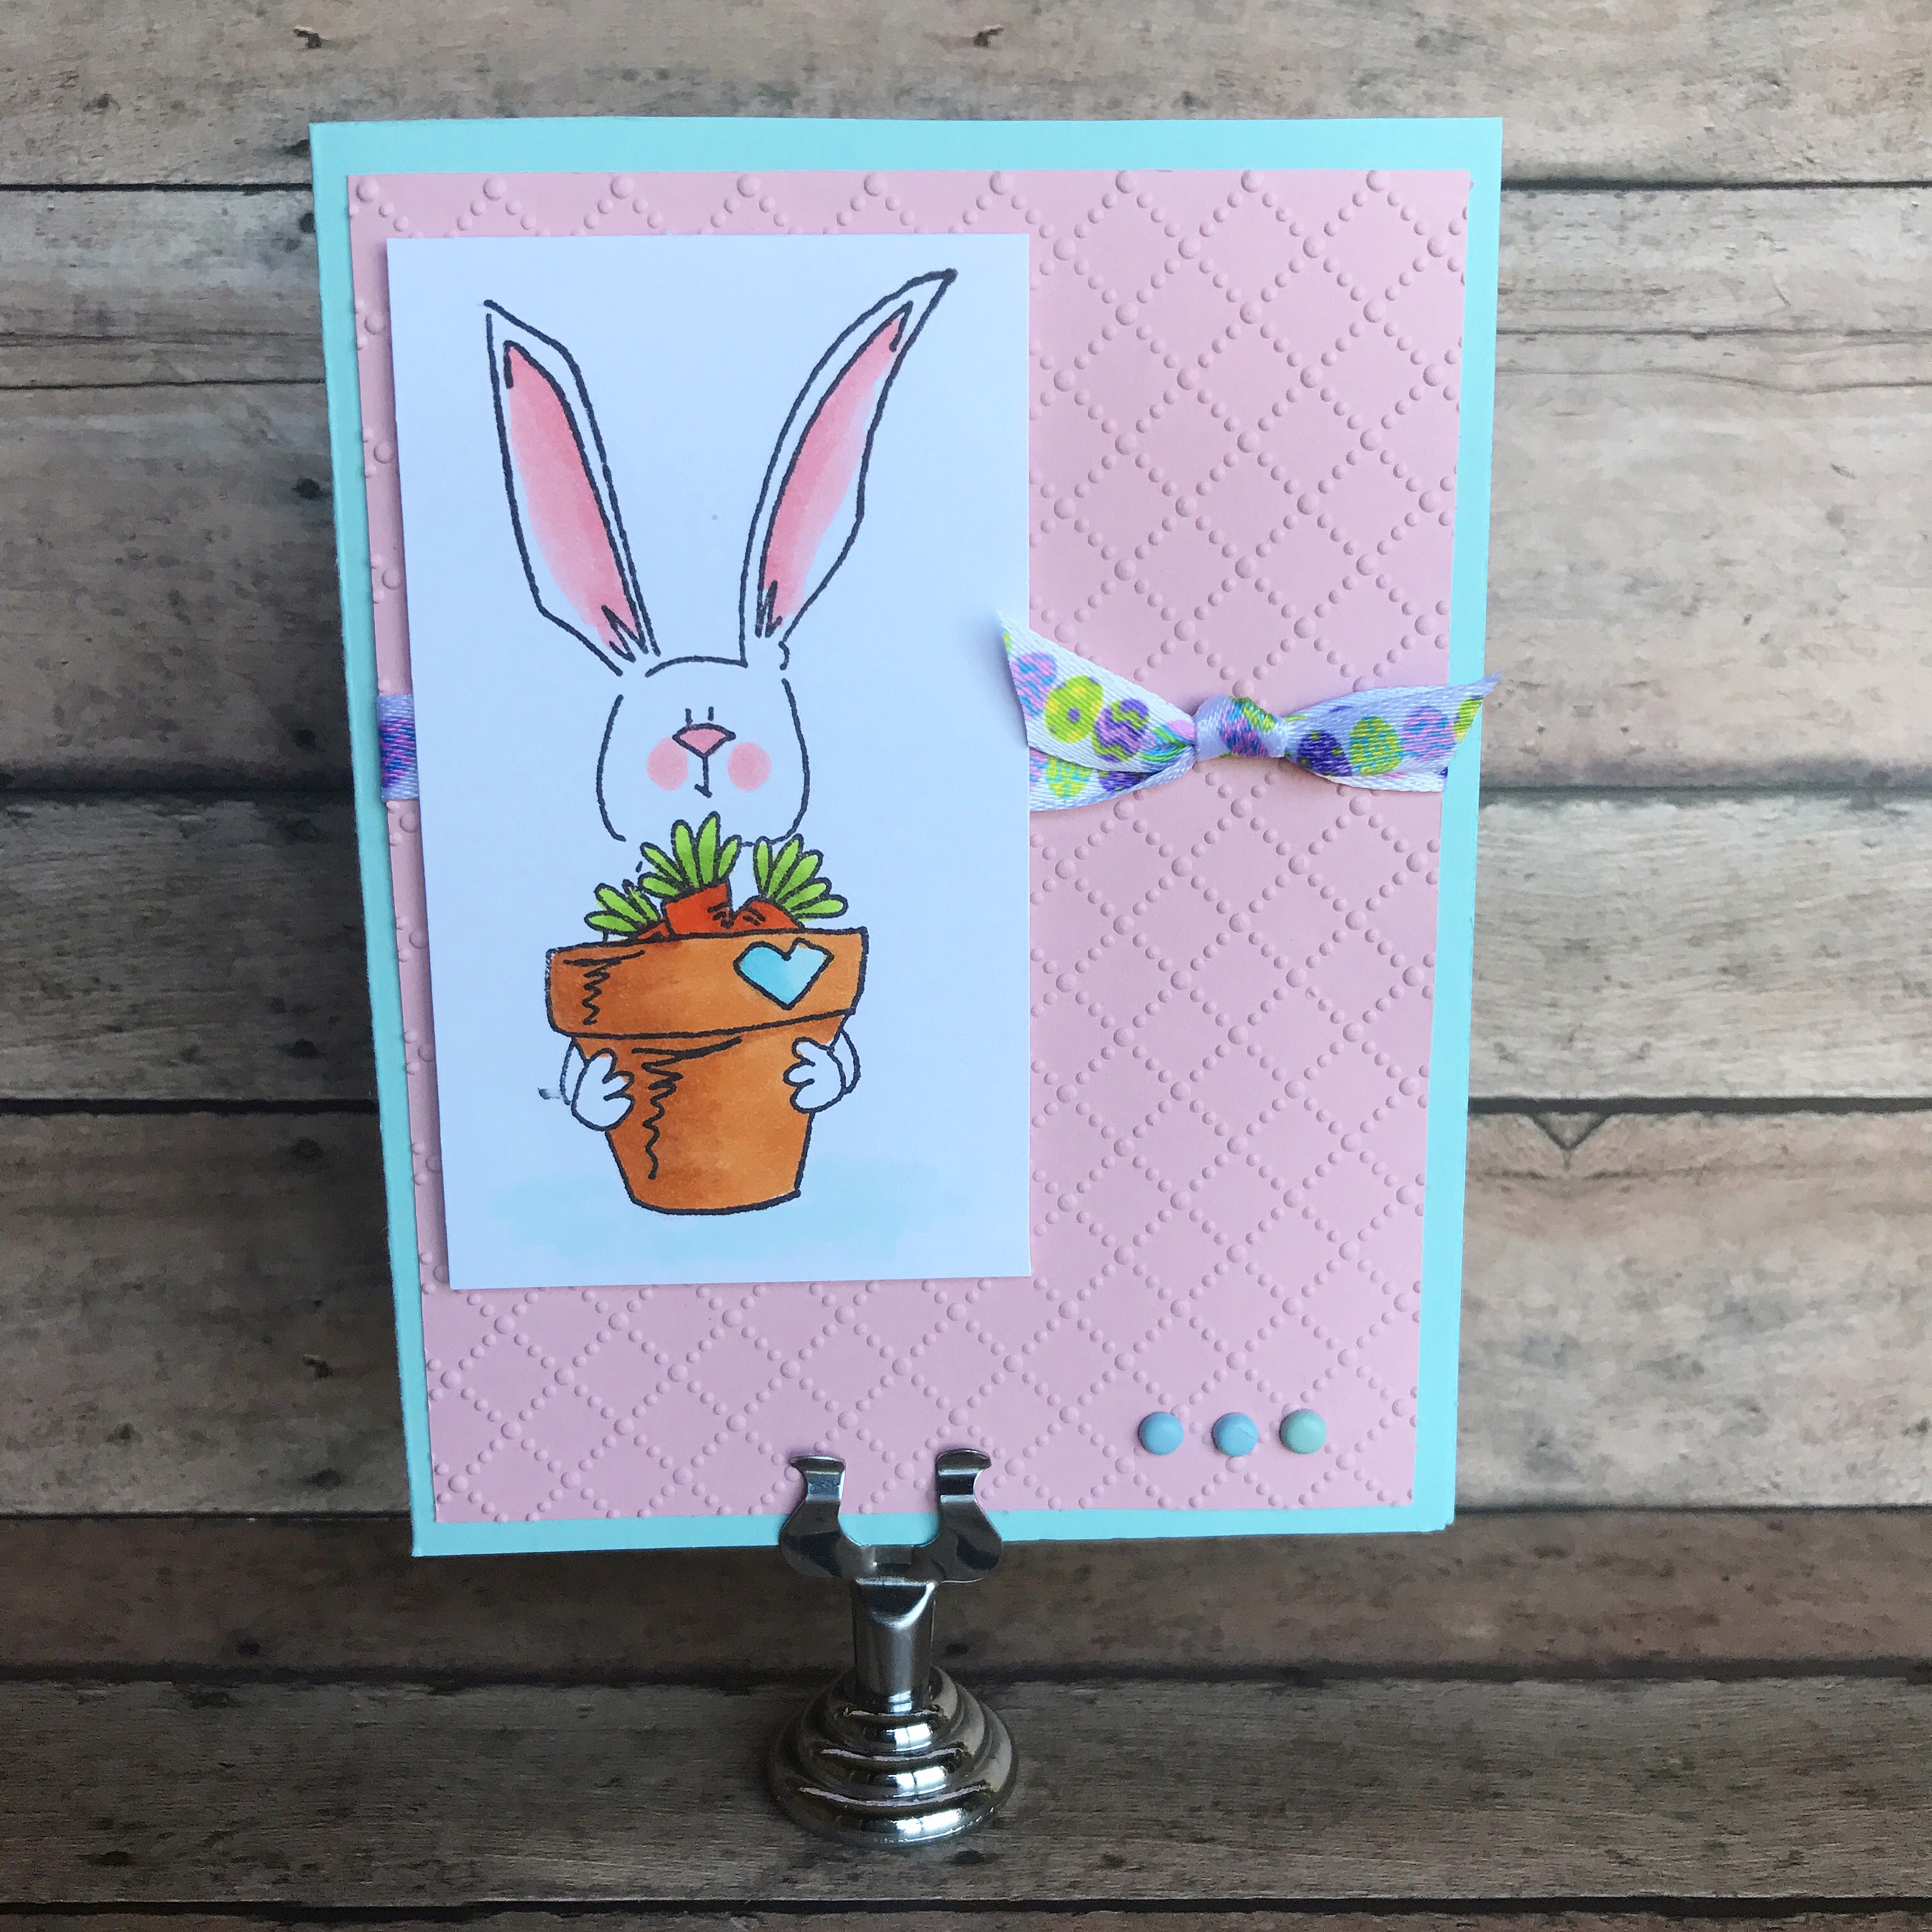
To make the card, stamp the largest jar with brown ink on white card stock. Color the jar with a very light turquoise Copic marker. Stamp “thanks” with raspberry ink inside the jar. Die cut the jar using the matching die set. Stamp the leaves 3 times with green ink on white card stock and die cut. Attach to the back of the jar.

Stamp a background (this one is an older one from Hero Arts – use whatever you have in your stash) with green ink on light green card stock. Emboss a piece of raspberry card stock with a woodgrain embossing folder (mine is a discontinued one from Stampin’ Up – woodgrain embossing folders are available from many other companies, like this one from Cuttlebug) and attach to the green card stock at an angle. Attach the piece to a white card. Attach the stamped jar to the card with foam tape. Attach a green ribbon bow and add 3 dew drops or gems to finish the card.

Thanks for stopping by,

Anita

Posted in Cards, Stamping | 5 Comments

Script Wall Expressions Decor

When we visited Magnolia Market at the Silos last December (you can read about our visit here), I fell in love with these Script Wall Expressions. They are handmade metal signs by JDH Iron Designs and each one looks just a little different. Also be sure to check out his website for all of the other amazing things he has to offer! If you are a fan of Fixer Upper, you’ve seen the wonderful custom designs Jimmy Don has made for Joanna and Chip. 🙂

If you can’t make the trip to Waco, TX, you can still get one of these Script Wall Expressions on the Magnolia Market website. There are 5 different words to choose from: Home, Inspire, Family, Fresh, and Gather. They look great alone on your wall, but here’s what I decided to do with mine. I chose the word Home…

I found this unfinished Slatted Panel with Rope Handle at Hobby Lobby. I liked that the edges were offset and also that the rope is attached on the back so it’s easy to hide if you want.

IMG_8315

I used 2 coats of chalky finish paint by Deco Art in the color Lace to paint the wood panel. Then I lightly dry-brushed it with dark brown acrylic paint to give it a distressed look.

IMG_8320

If you look closely, you can see the 2 tiny nails that I added to the panel so I could hang the word at an angle. And here’s how it looks all finished…

IMG_8321

I have my finished Script Wall Expression propped on my mantel, but it would also look great on the wall or on a shelf or on that perfect farmhouse cabinet you may have.

Thanks for stopping by,

Anita


Posted in Decor, Gifts | Leave a comment

DIY Mother’s Day Gift Ideas

Mother’s Day is Sunday, May 14th. Are you ready? Do you need a little inspiration? Here are a few links to some fun and easy DIY gifts I’ve made that your Mom, Mother-in-law, Grandmother  sister, or friend will love. Click on the photos for the info on making each gift idea.

These DIY Serving Dishes are so fun to make! 


Maybe a pretty Elastic Stretch Bracelet.


An Altered Canvas Clip Picture Frame to display her favorite photo. 

img_6391

A cute Laundry Room Wreath to make that chore a little brighter. 


Waffle Crochet Dishcloths to add a little color to her kitchen. 


Add her favorite flower to this cute Chalk Painted Bud Vase.

IMG_6388

A pretty Washer Pendant Necklace is always a good gift.

IMG_3909

And don’t forget the card! These cards aren’t your traditional Mother’s Day cards, but I think they would all be great. 🙂

IMG_4181

IMG_5843

img_7845

IMG_4821

img_5841

I hope these ideas give you a little inspiration to make something special for those lovely ladies in your life!

Thanks for stopping by,

Anita

Posted in Gifts | 1 Comment

A Few Days in the PNW

We were able to take a short visit to the Pacific Northwest, specifically Portland, OR and Bellingham, WA, in early April. I know there is so much more to see than we were able to in our short time, but here are a couple of highlights of the trip.

I visited the Tom McCall Waterfront Park in Portland, OR. It is a beautiful park on the banks of the Willamette River. It was a gorgeous sunny day – perfect for taking a stroll and enjoying the cherry blossom trees in full bloom.

IMG_8328

A couple of the sites around downtown Portland…

We headed north to Bellingham, WA to spend a little time with some precious friends – family really! 🙂

IMG_8241

Bellingham is so beautiful and we had so much fun! This is the Fairhaven Village Inn where we stayed during our visit. It was a great place – I highly recommend staying here if you ever find yourself in Bellingham…

So many fun and beautiful places in and near Bellingham…

Boulevard Park at sunset

Samish Overlook

And of course, these 2 little cuties and their parents were the best part of the trip!

We ate some wonderful food, had some great time with our friends, and only wish we could have stayed longer!! I’m sure we will find ourselves in that part of the country again…still so much to explore!!

Until next time…

IMG_8341

Thanks for stopping by,

Anita

Posted in Travel, Uncategorized | 2 Comments

Cute Bunny Card

This was one of the cards I made for Easter, but as I was looking at it, I thought that with just a little tweaking it would be great for other occasions too. 

Simply change the Easter egg ribbon to a flowered ribbon and it would make a great Spring card. Add a sentiment like “Happy Birthday” or “Thinking of You” for other great options. Or change the colors so it’s not quite so “Springy”. 


The stamp is Terra Cotta Bunny from Stampotique Originals. The embossing folder is Dotted Lattice from Taylored Expressions.

Stamp the bunny with black ink on white card stock and color with Copic markers. Emboss a panel of pink card stock and attach ribbon to the panel. Add 3 blue brads in the bottom right corner. Attach panel to a blue card. Attach stamped image with foam tape. 

Take another look at your stamps – you may be surprised at just how versatile they really are!

Thanks for stopping by,

Anita

Posted in Cards, Easter | Leave a comment

Broccoli Slaw

A sweet friend shared this recipe with me years ago and it has become one of my favorite side dish recipes. It goes great with ham, turkey, chicken, and just about anything you want to pair it with. It comes together quickly – just make sure to mix it up a couple of hours before you are ready to serve it so the ramen noodles have a chance to soften a bit. 

IMG_8296

Recipe for Broccoli Slaw

  • 3 tablespoons soy sauce
  • 6 tablespoons vinegar
  • 1/3 cup vegetable oil
  • 1/2 cup sugar
  • dash Worcestershire sauce

Whisk the above ingredients together well.

  • 10 – 12 ounce package broccoli slaw (in the produce department near the bagged salads)
  • 2 packages ramen noodles
  • 3/4 cup slivered almonds
  • 4 green onions, chopped

Break the ramen noodles while still in the package. (I hit them a few times with my meat tenderizer.) Discard the seasoning packet or save it for another use. Toss together broccoli slaw, broken ramen noodles, almonds, and onions. Pour dressing over all and mix well. Refrigerate and let it sit for a couple of hours for the noodles to soften.

I have also used Splenda in place of the sugar and it works wonderfully. And it’s a great recipe for your next potluck or those picnics that will be coming now that the weather is warming up. Easy to double, too! Enjoy!!

Thanks for stopping by,

Anita

Posted in Recipes | Leave a comment

Easy Blocks Baby Blanket

Seems like I am always crocheting a baby blanket. 😊 So it’s fun to find new patterns to work with. 

I made this one using this pattern from Lacy Crochet (lacycrochet.blogspot.com). It’s simply a coincidence that the blanket in the pattern is pink and so is mine! I had some pink worsted weight baby yarn in my stash and decided to use it before I chose the pattern to use. 😊


My blanket ended up with different dimensions than the one in the pattern. I used an H hook, but since I tend to crochet loosely, I ended up with a width of about 35 inches without the border. (The finished size of the blanket in the pattern in 40 x 31) So I decided to make my blanket square. I still followed the pattern, but stopped when my blanket measured 35 x 35 and then adddd the border according to the pattern directions. 

It turned out so pretty!! And the pattern is one of those that once you get started, it’s easy to crochet while watching your favorite movie. 

This blanket is going into my closet for the next sweet baby girl who enters our lives. 💕

Thanks for stopping by,

Anita

Posted in Crochet, Gifts | Leave a comment

Super Fast Easter Tag

There’s still time to make this super fast, super easy Easter tag to add to a special Easter basket or treat bag!

IMG_8008

This cute bunny is from the Sweet Thoughts of Spring set and the sentiment is from the Little Bunny for You set – both from Unity Stamp Company.

I stamped the bunny with black ink on a kraft tag. I used colored pencils to add a little color to the ears, heart, and flower. I stamped the sentiment with black ink and added some cute Easter egg ribbon. To finish it off, I tied it with some pink twine. 

And that’s it!! A cute tag in less than 5 minutes!! 🐰

I hope you enjoy a Happy, Blessed Easter!

Thanks for stopping by,

Anita


Posted in Cards, Easter | Leave a comment

Stamped Mini Muslin Bags

These cute little muslin bags were so fun to stamp on! I think they have a bit of vintage flair and work up so quickly. I found them at Hobby Lobby. They come in packs of 4 for $4.99. Get them when they are on sale for 50% off and they are a great deal! They measure about 3.5 inches by 4.5 inches – perfect size to fill with treats or a small gift. You can also find them here on Amazon if you need a larger quantity.

Cream Cotton Drawstring Bags

I used this Memento Luxe ink to stamp my images. It works great on the fabric and can be heat set if it is used on something that will be washed. Before I stamped on my bags, I put a small piece of card stock inside to make sure no ink would bleed through to the back of the bag.

IMG_8011

To add a little color to the stamped images, I used a small paint brush with my dye ink pads. You can also use brush markers to add color.

IMG_8012

Such cute images from Unity Stamp Company. The bunny above is Hunny Bunny. And the one below is Little Bunny for You. Seriously, they have the best stamps!! You need to check them out. 🙂

IMG_8013

I think I will be making more of these for other holidays, birthdays, and just because. The possibilities are endless and they are just so fun!!

Thanks for stopping by,

Anita

Posted in Easter, Gifts | 3 Comments

Happy, Hoppy Easter 

This little bunny is hopping by to wish you a Happy, Hoppy Easter!! 


The embossing folder and sentiment stamp are from Stampin’ Up (sadly both are discontinued). The bunny is also a discontinued die from A Muse Studio. The Stitched Circle Frame is from My Favorite Things. Companies change their products often – discontinuing some things so they can add new things. Get creative and use what you have!!

Die cut the bunny and use a black marker to add the eyes and nose. Using a sponge applicator, apply pink ink to the ears and around the edges. Using the circle frame die cut a circle from patterned paper and ink the edges with pink ink. Die cut the circle frame from white card stock. 

Emboss a panel of pink card stock with the embossing folder. Attach the ribbon and then attach the piece to a pink card. Attach the white circle frame to the card. Add the patterned paper circle to the card with foam tape. Attach the bunny to the circle with foam tape. Stamp the sentiment with pink ink on white card stock. Punch with a scalloped oval punch and attach to the card. 

This little card just makes me happy! 🐰

Thanks for stopping by,

Anita

Posted in Cards, Easter, Uncategorized | Leave a comment