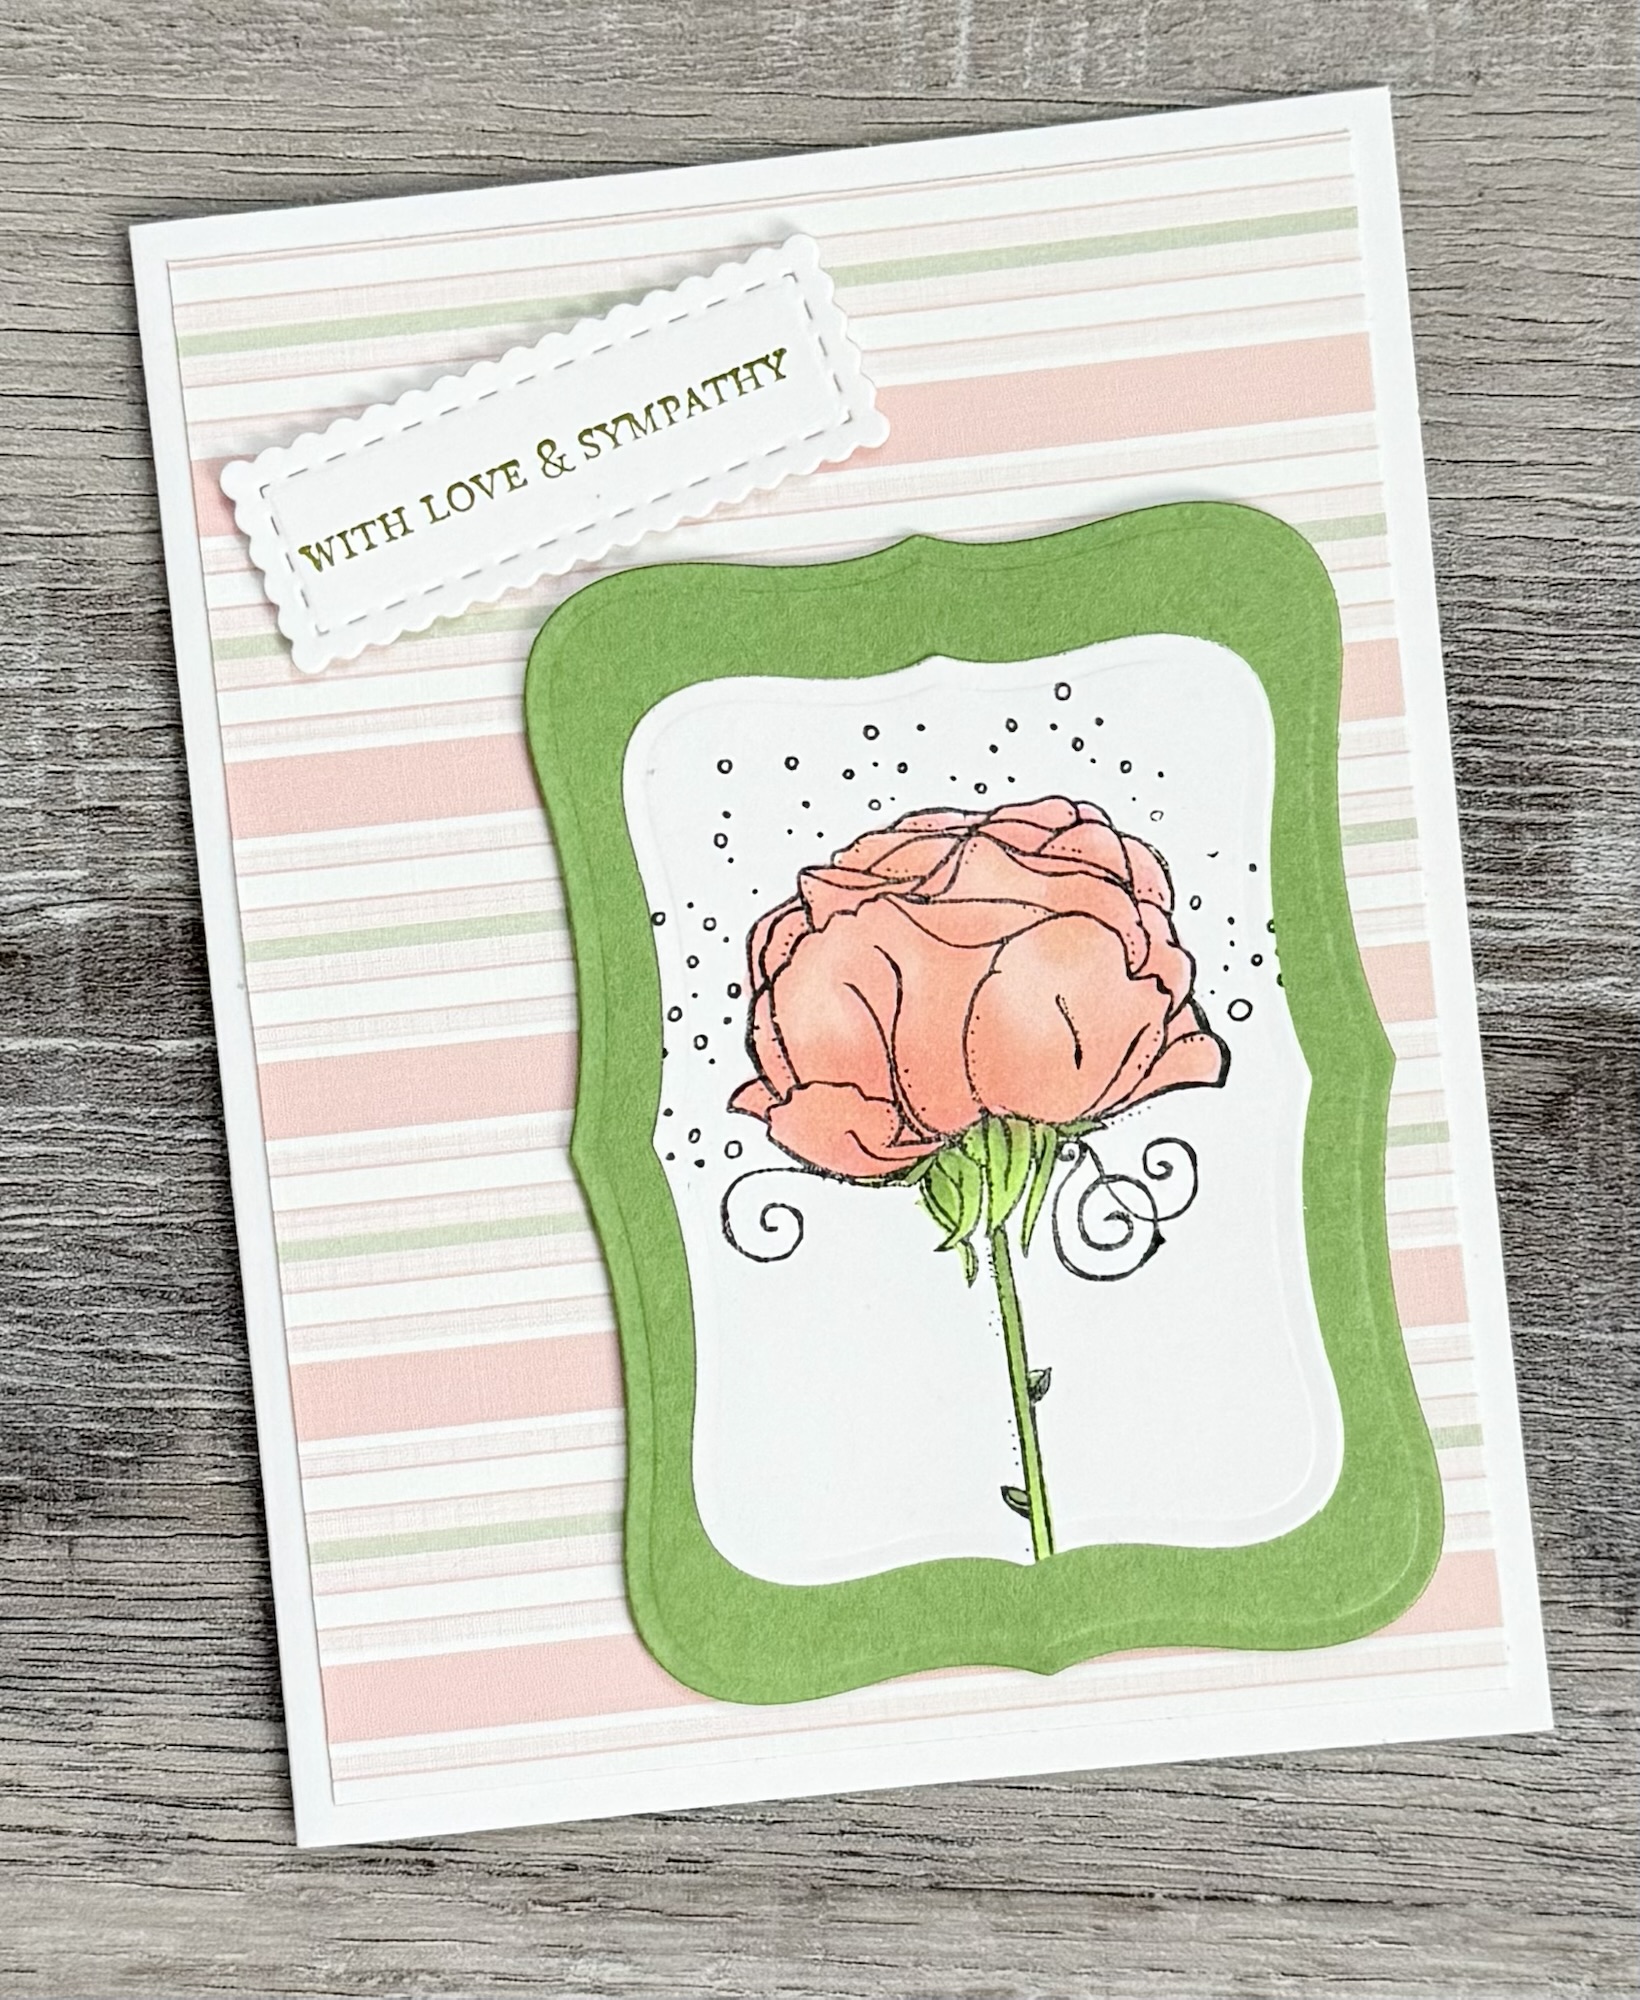
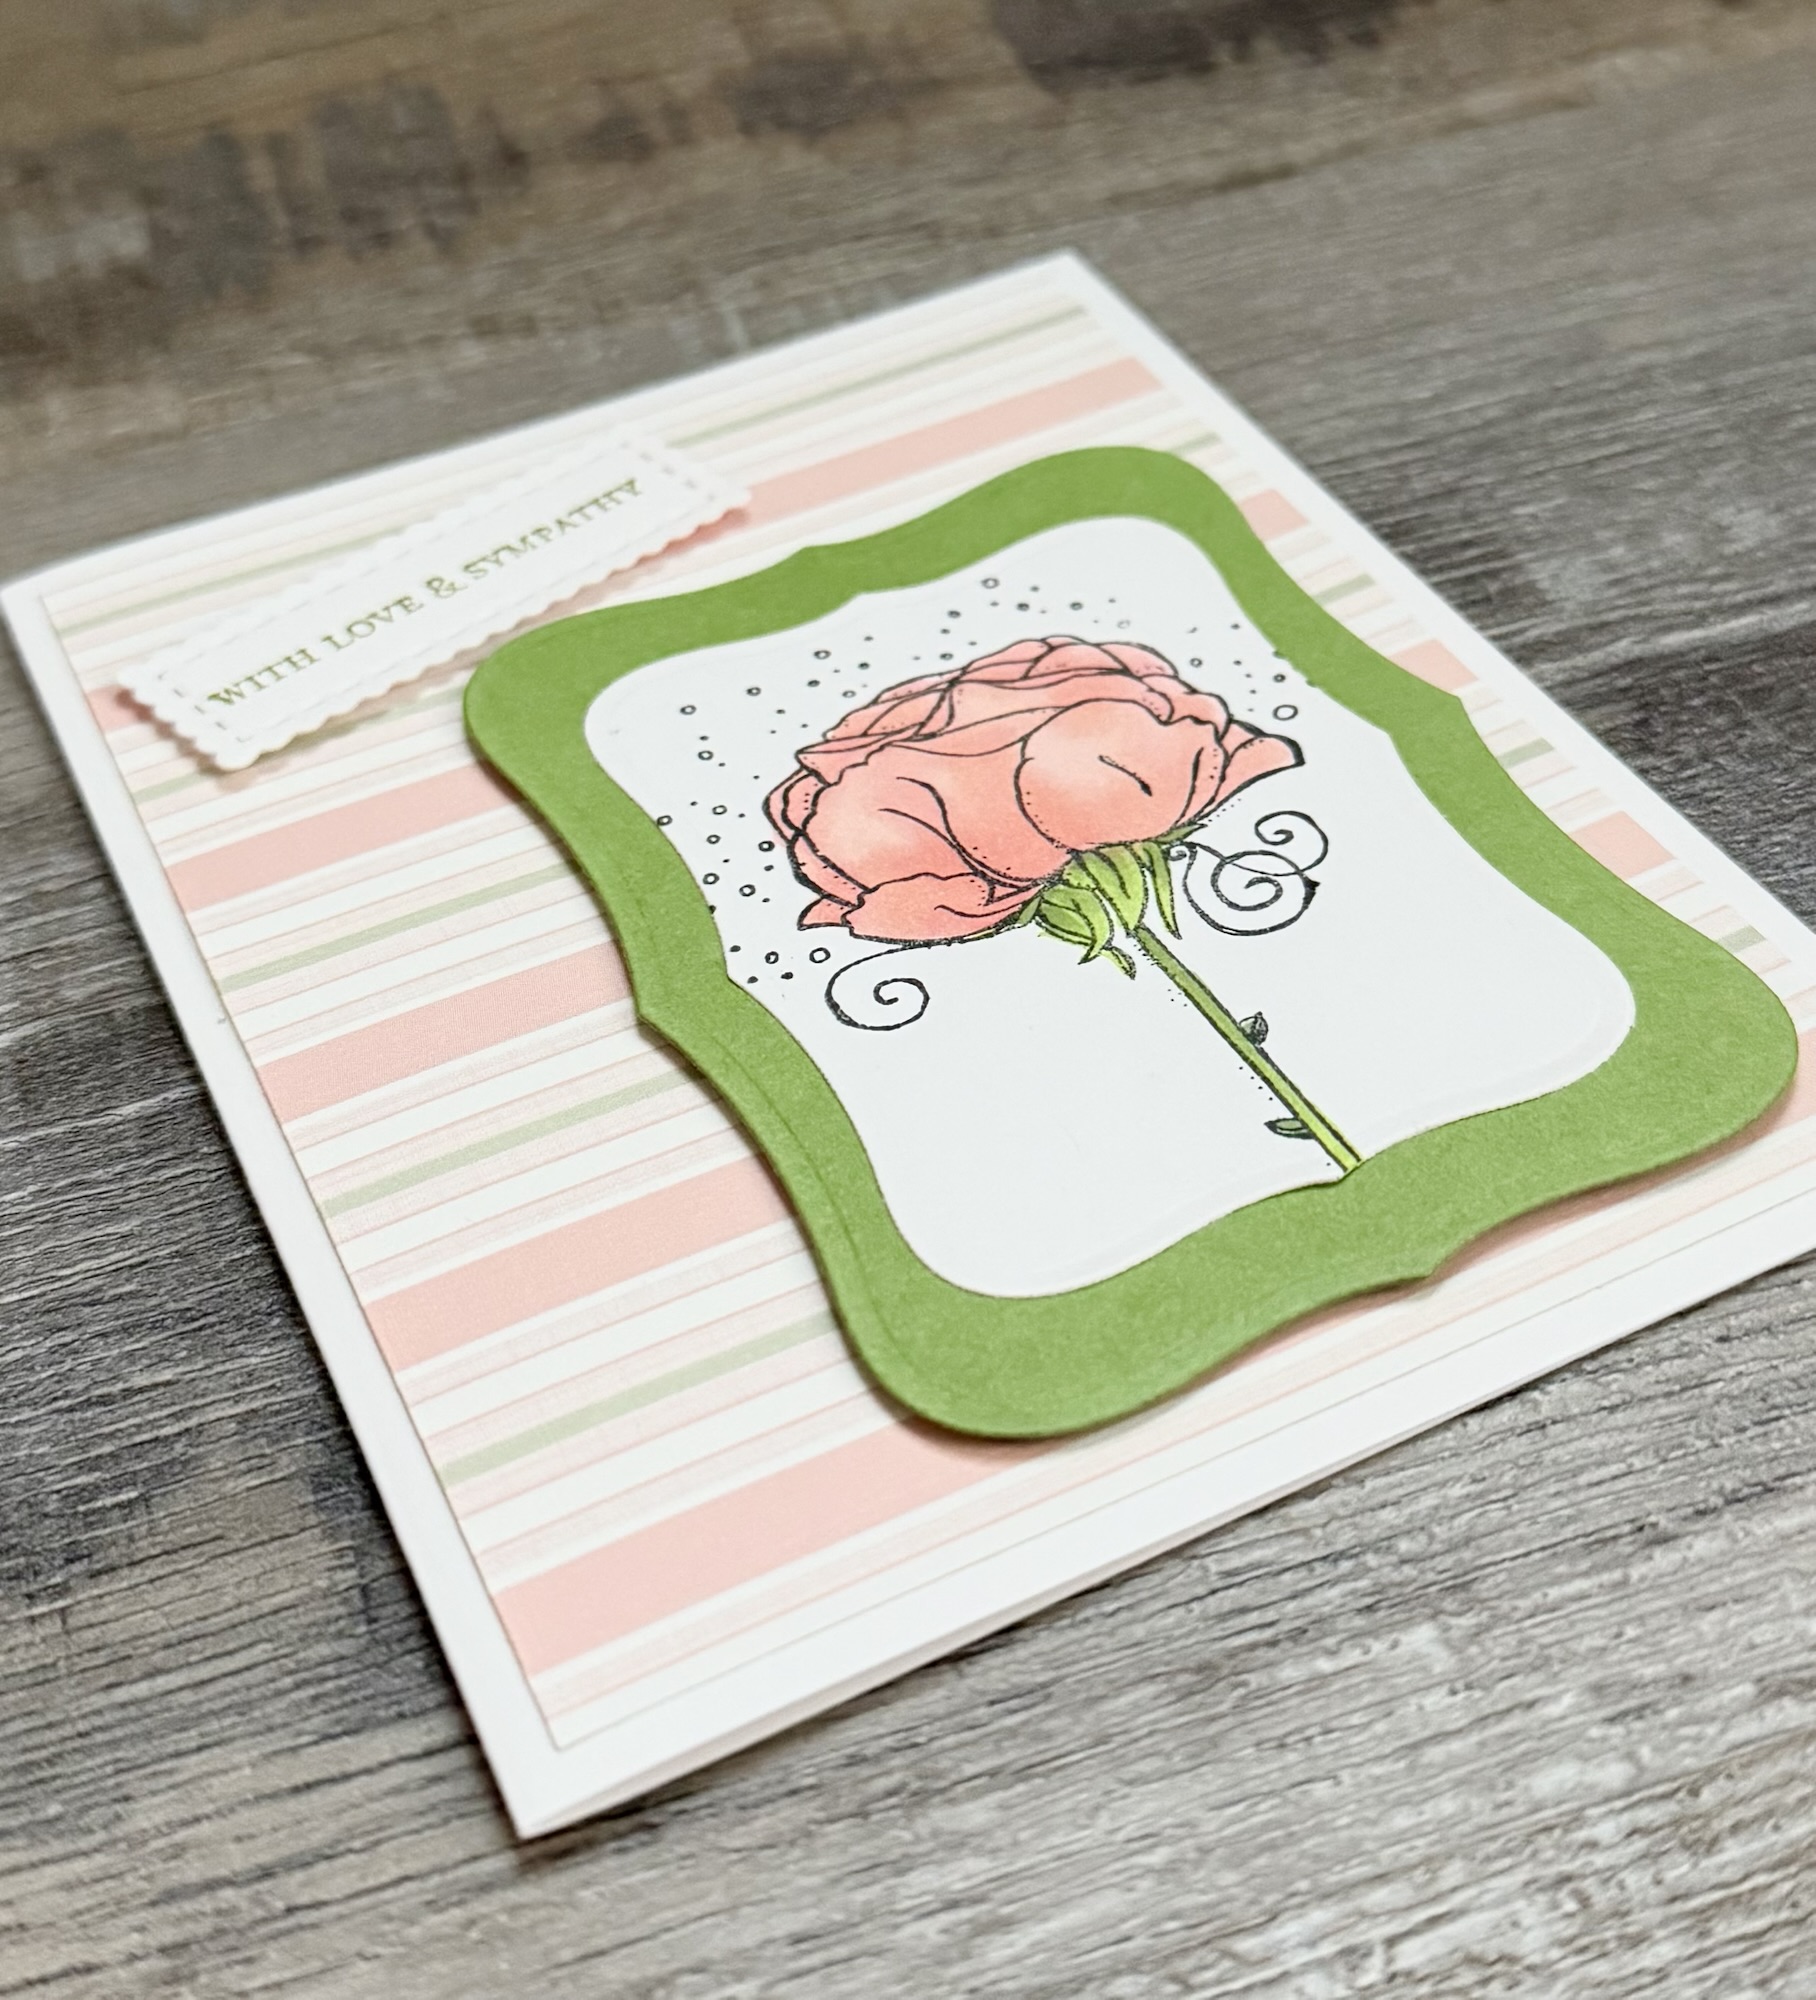
Sympathy cards are always difficult and it helps to have a few on hand when the need arises instead of trying to create them in the moment. I like to keep them simple and heartfelt.
Disclosure: Some of the links on my site are affiliate links, meaning, at no additional cost to you, I will earn a small commission if you click through and make a purchase. As an Amazon Associate I earn from qualifying purchases.
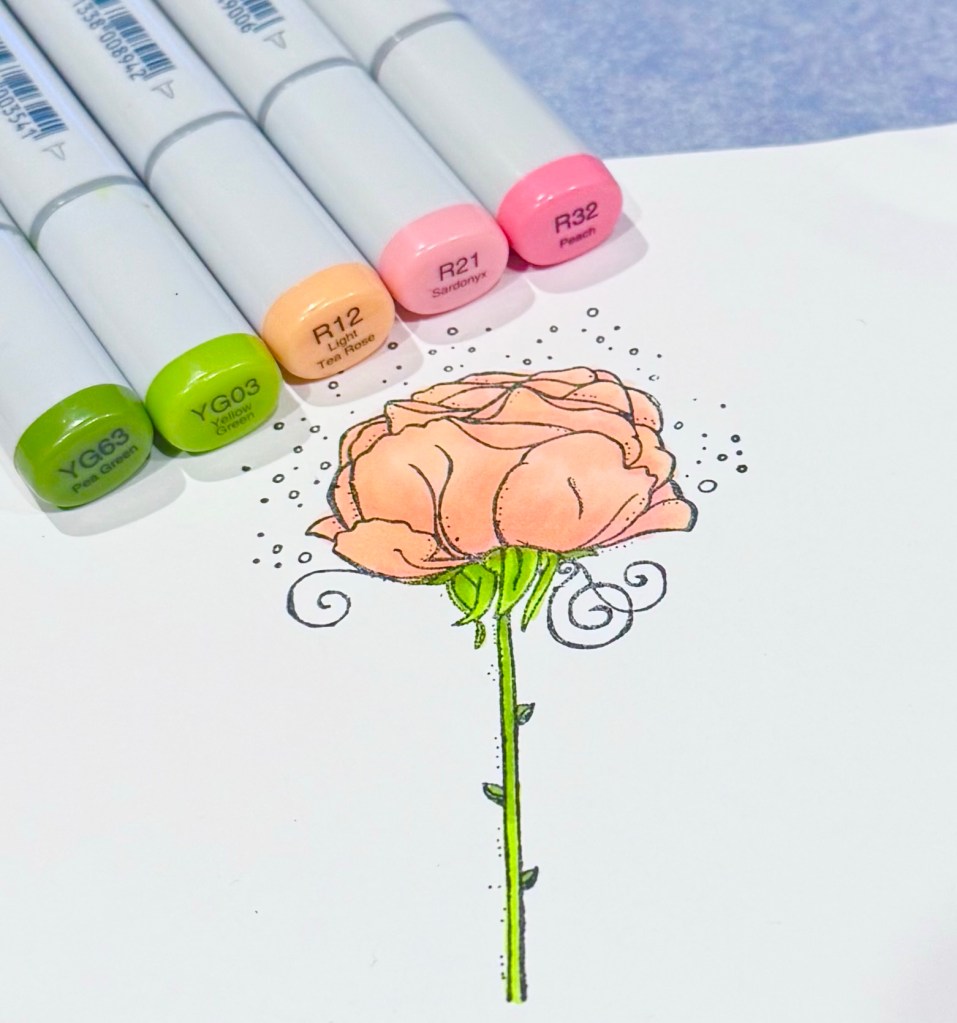
The rose stamp is from the Prefer to Smile stamp set from Unity Stamp Company. Unfortunately the set is no longer available. Any simple flower stamp in your collection would work great on this layout.
I added a piece of patterned paper to a white card and attached the stamped piece with foam tape. I stamped my sentiment with green ink on white card stock and die cut around it used these Scalloped & Stitched Sentiment Nesting Dies. The piece is attached to the card with foam tape. My sentiment is discontinued, use any heartfelt sentiment stamp in your collection.
This is a very simple and quick to make card. The layout would also work great for other cards – birthday, thinking of you, or just a note. Simply change the sentiment. You could also make a few cards without a sentiment to keep in your stash. Then as the need arises for a card, add an appropriate sentiment and you are good to go.
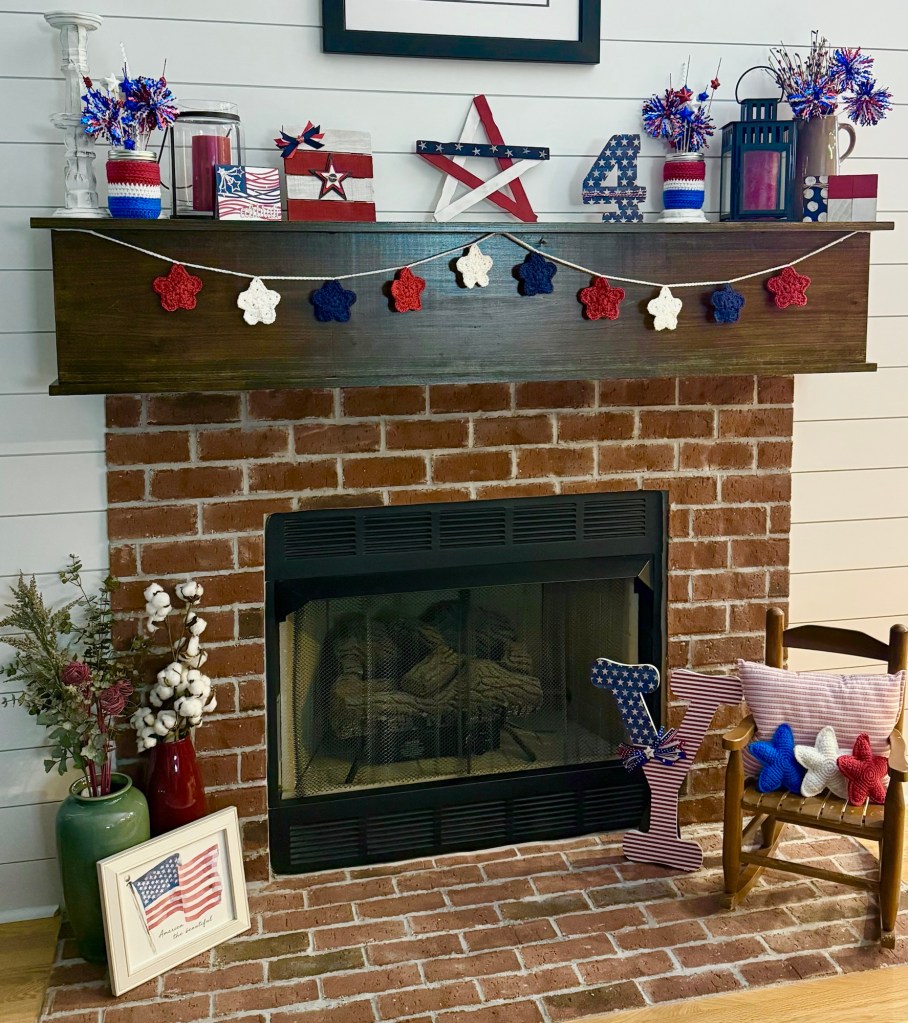
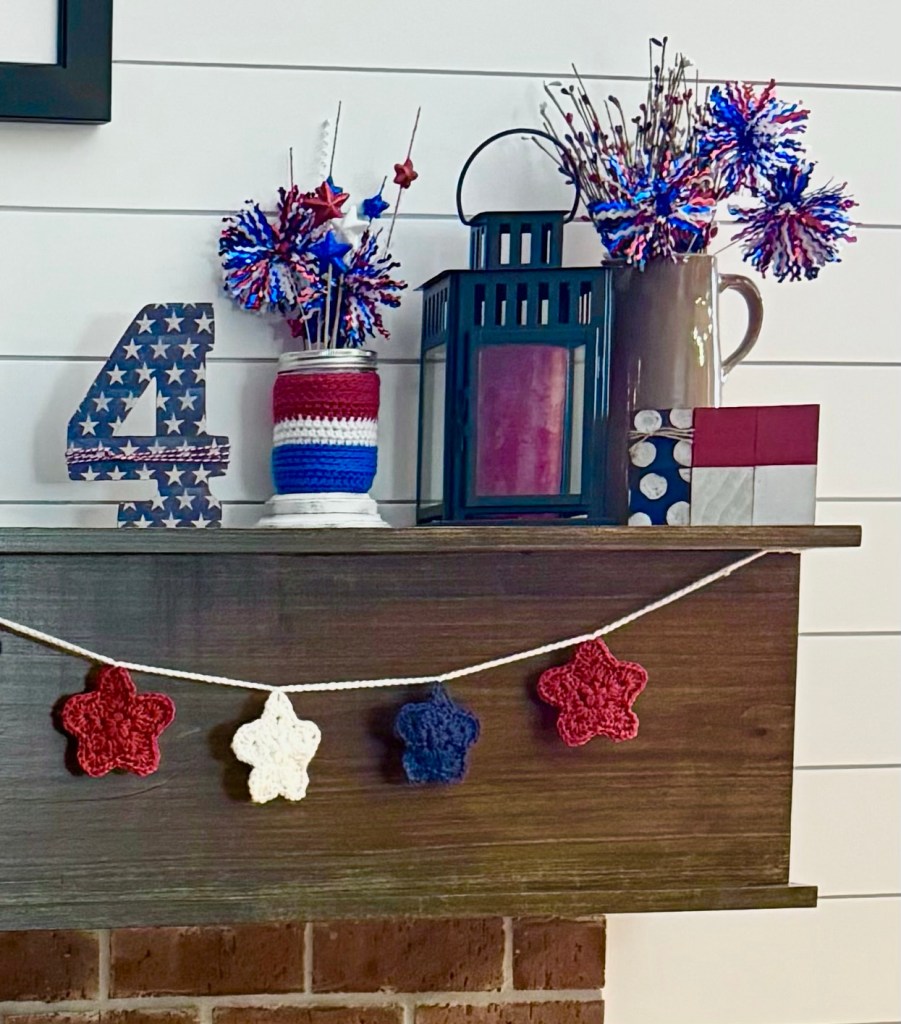
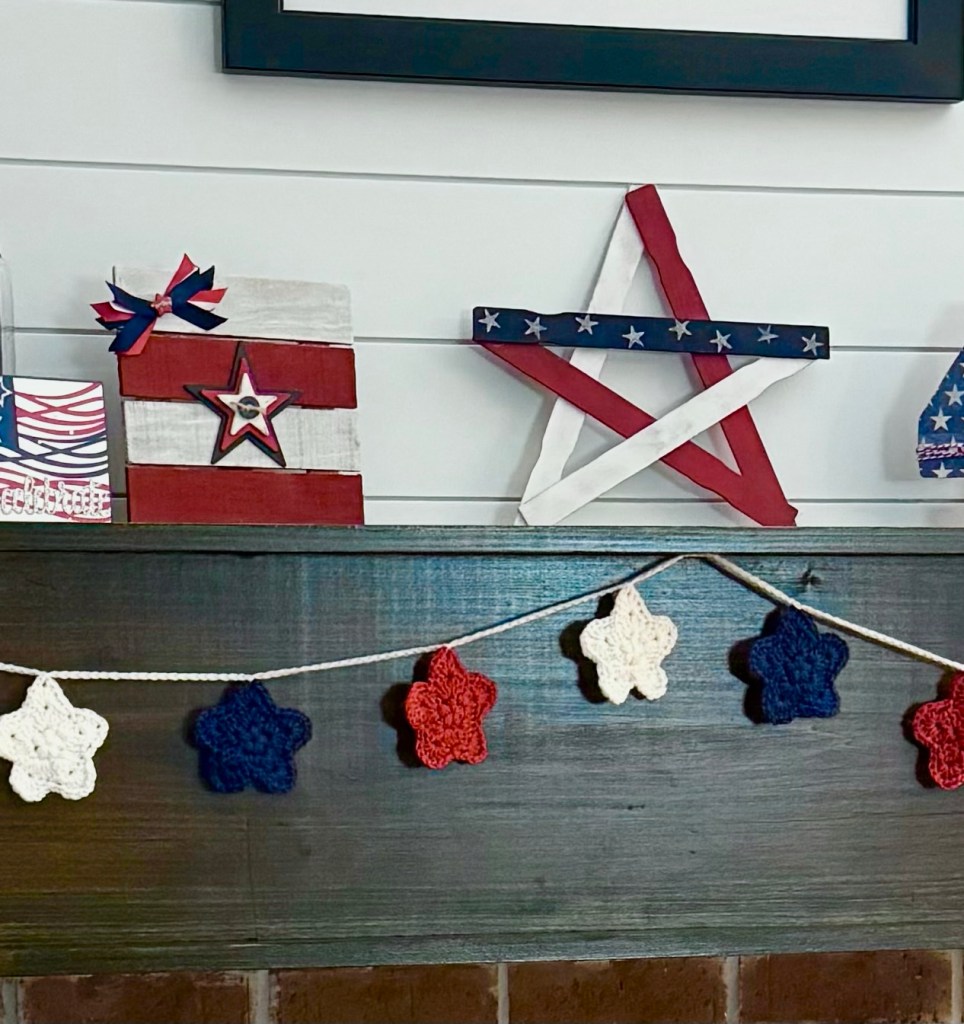
Do you decorate for the 4th of July in the USA? 🇺🇸 I like to decorate my fireplace mantel just for fun. 🙂 There are links below the photos for all the details on creating a few of your own patriotic pieces.❤️🤍💙
Disclosure: Some of the links on my site are affiliate links, meaning, at no additional cost to you, I will earn a small commission if you click through and make a purchase. As an Amazon Associate I earn from qualifying purchases.
I had some stone car coasters in my car and got tired of them sticking to the bottom of my cup due to condensation. I would pick up my cup and the coaster would fall off back into the cup holder – which can be a bit disconcerting when you’re driving along. 😳 The Crochet Cotton Car Coasters will absorb the condensation so that won’t happen. 😊 And you can toss them in the washer when they get dirty – I would skip the dryer and just let them air dry.
Disclosure: Some of the links on my site are affiliate links, meaning, at no additional cost to you, I will earn a small commission if you click through and make a purchase. As an Amazon Associate I earn from qualifying purchases.
These Crochet Cotton Car Coasters work up in just a few minutes – there are only 2 rounds! I made them with 3mm Natural Cotton Macrame Cord and an N/9mm crochet hook. I will say that the cord is stiffer than most yarns and it’s important to crochet loosely in order to get your hook into the stitches.
The pattern is below. I’ve also included links to free PDFs – one with photos and one without photos – in case you like to easily print the pattern.
Disclosure: Some of the links on my site are affiliate links, meaning, at no additional cost to you, I will earn a small commission if you click through and make a purchase. As an Amazon Associate I earn from qualifying purchases.
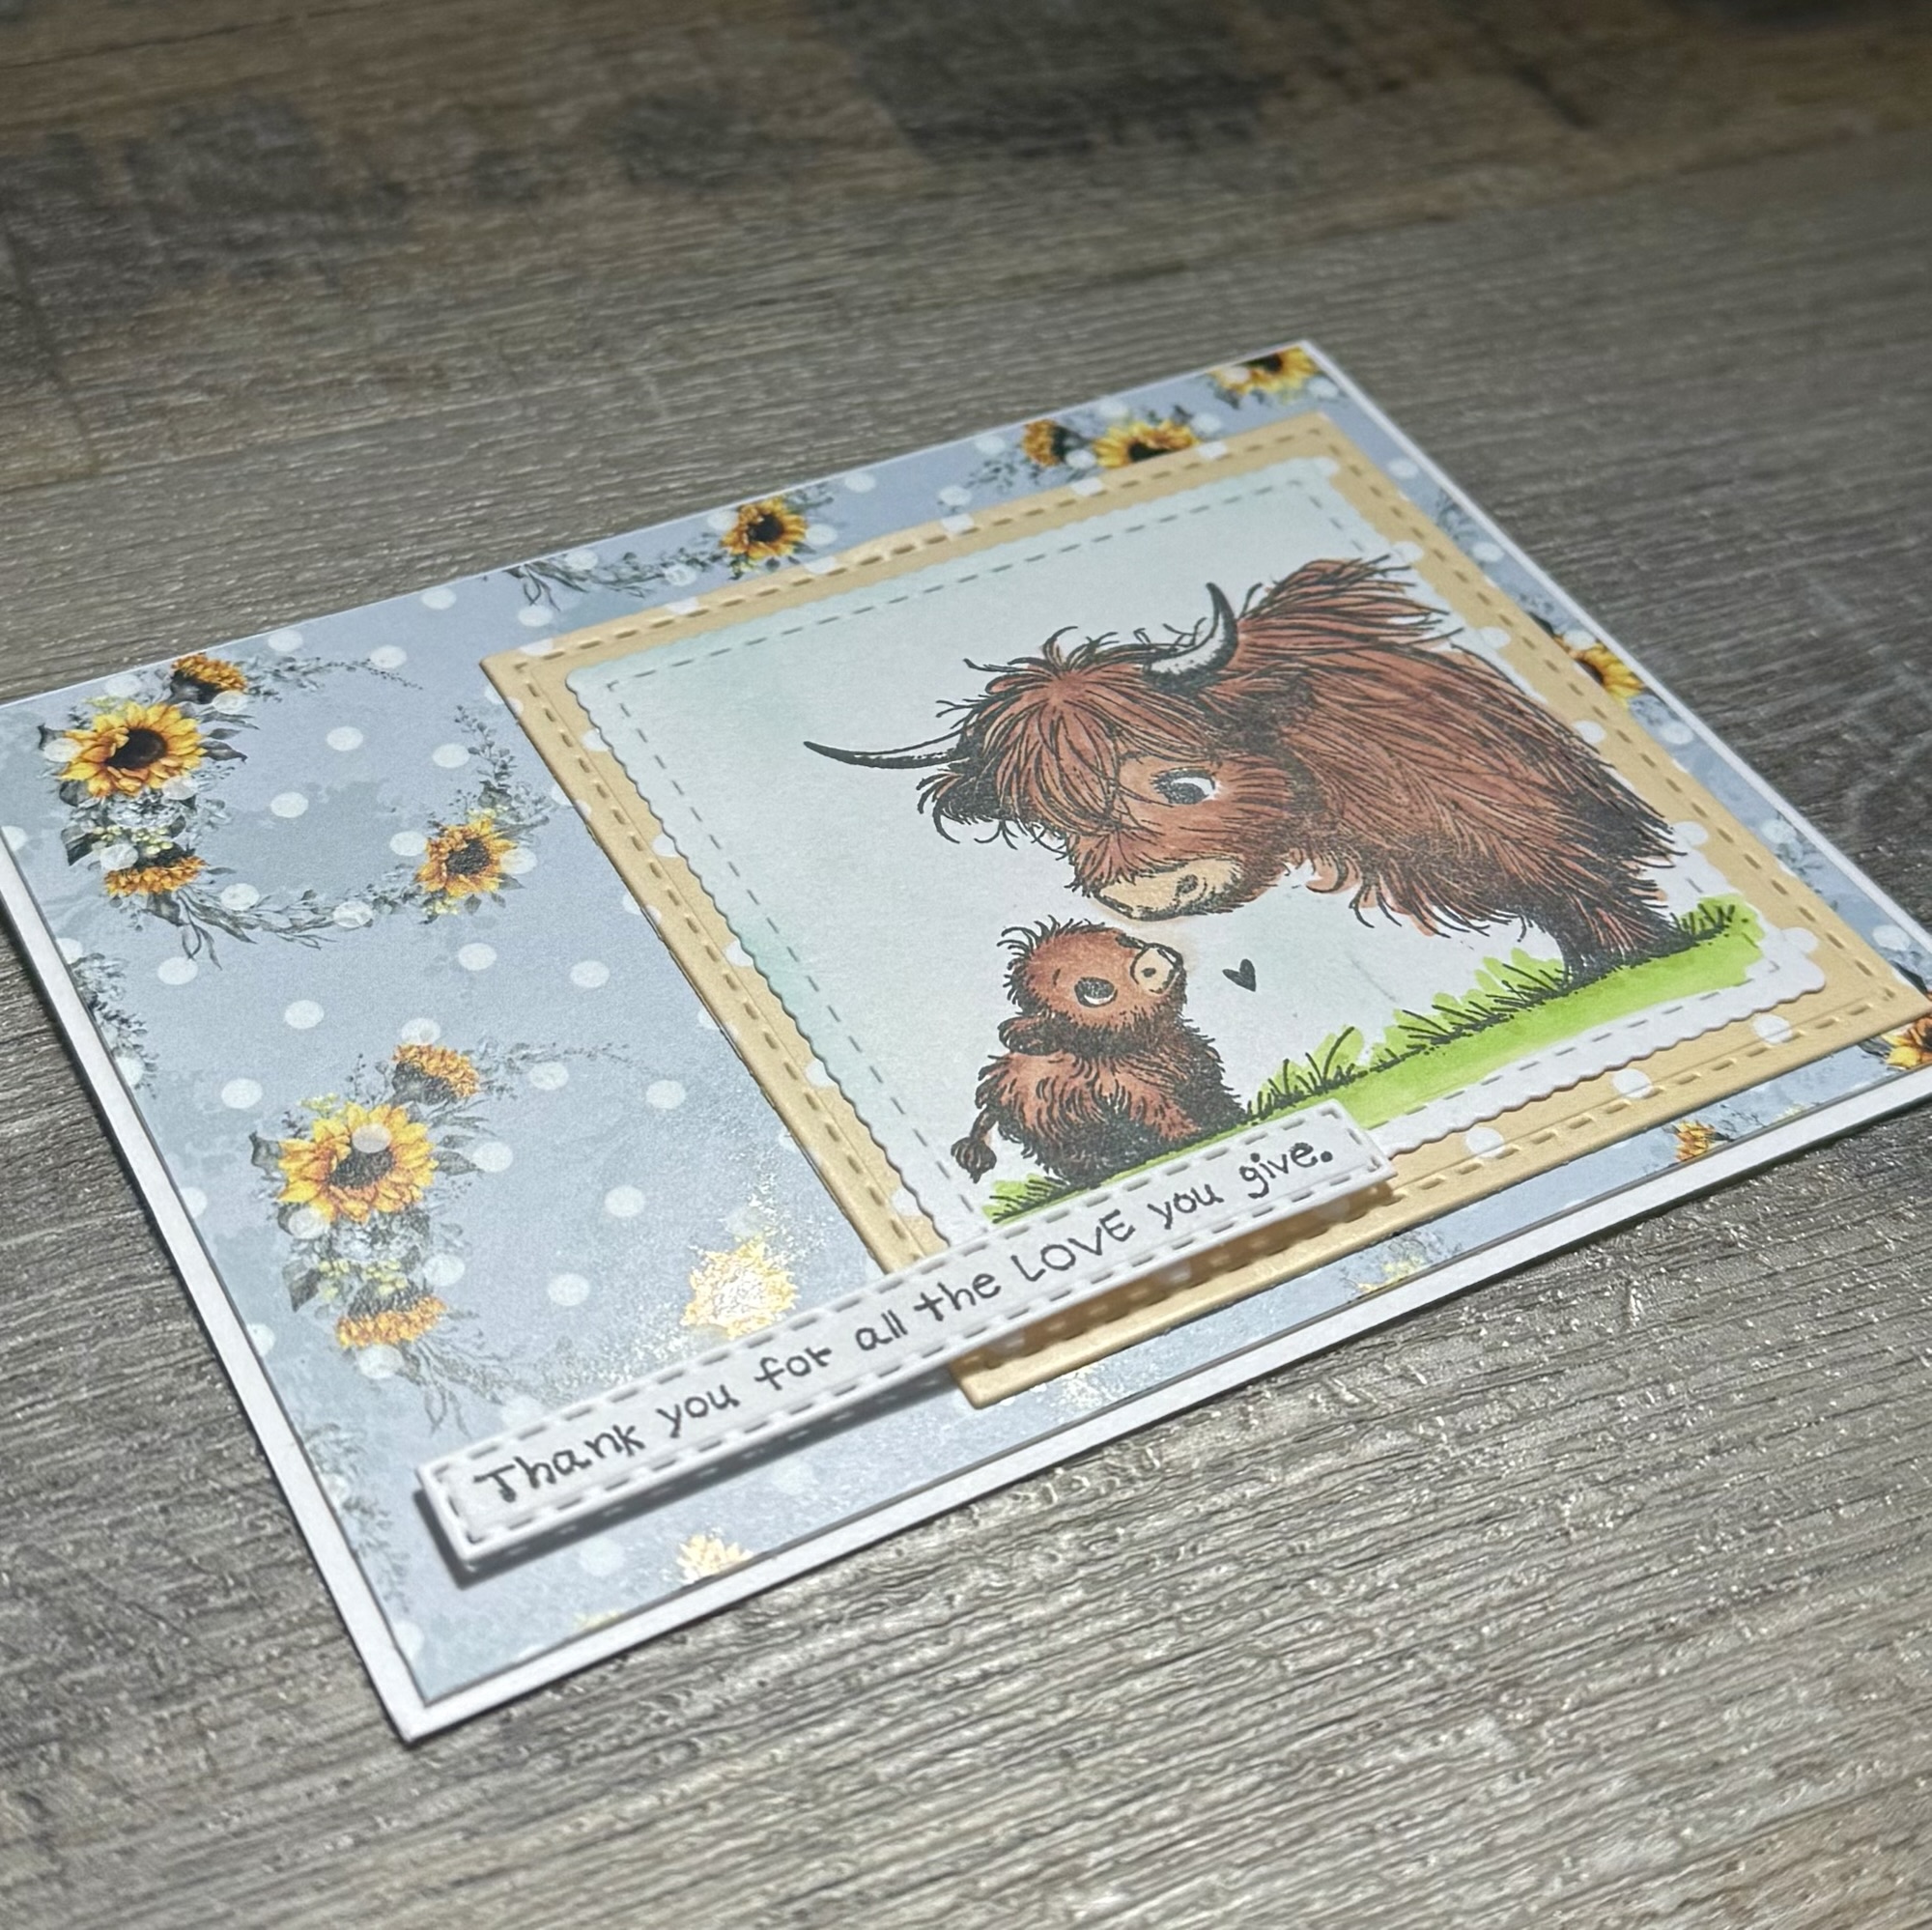
Using the same die set, I die cut a square of patterned paper from the Fields of Summer Paper Pack and layered the stamped image to it. I cut a piece of coordinating patterned paper from the same pack and attached it to a white card. The Highland Cow image is attached to the card over the patterned paper. The sentiment is part of the Forever Rooted set and I stamped it with black ink on white card stock. I die cut around it using these Scalloped & Stitched Sentiment Nesting Dies and attached it to the card with foam tape.
This was the card I gave to my Mom for Mother’s Day. I think this set would also be so sweet as a new baby card. 💛
Just an aside, we were able to see some Highland Cows on our trip to Scotland a couple of years ago. So fun to see them out in the fields! 😊
One of the easiest ways to fluff up your decor for different seasons is to print out some fun seasonal art and add it to your favorite frame. It’s also super inexpensive!
Disclosure: Some of the links on my site are affiliate links, meaning, at no additional cost to you, I will earn a small commission if you click through and make a purchase. As an Amazon Associate I earn from qualifying purchases.
I found this free patriotic printable at The Cottage Market. 🇺🇸 This particular printable has 4 different backgrounds and 2 sizes to choose from. I printed it onto white card stock and adjusted the size on my printer to fit my frame. Super quick and easy! The Cottage Market has tons of free printables to choose from for all kinds of decor.
Another one of my favorite sites to find free printable is On Sutton Place. Let me know if you have any other sites you love for finding free printables!
Hobby Lobby has canvas bags in all different sizes – some with zippers and some without. They are a blank canvas just waiting for your creative touch. 😊
Disclosure: Some of the links on my site are affiliate links, meaning, at no additional cost to you, I will earn a small commission if you click through and make a purchase. As an Amazon Associate I earn from qualifying purchases.
This pouch measures 9 by 10.75 inches and has a zipper. I created this Crochet Mini Circle Granny Square Pouch pattern to fit the pouch. I used I Love This Yarn in White and Key Lime with H/5mm and I/5.5mm crochet hooks to stitch up my pouch. 🧶
You can find the pattern below. There are also links to free PDFs – one with photos and one without.
Crochet Mini Circle Granny Square Pouch
Materials needed:
Worsted Weight (4) yarn – I used I Love This Yarn in Key Lime and White
H/5mm crochet hook
I/5.5mm crochet hook
Canvas zippered bag measuring 9 by 10.75 inches (from Hobby Lobby)
To make the granny square section of the bag, I followed this Circle Granny Square Pattern to make 6 squares using an H/5mm crochet hook.
Join the squares together so they will slip over the bag. I sewed them together using just the back loops of each square. Fasten off and weave in the ends. Set this aside. You will join it to the bag later.
Pattern for the main part of the bag.
Stitches used US terms:
Chain – ch
Single Crochet – sc
Half Double Crochet – hdc
Slip Stitch – ss
For the main part of the pouch, use an I/5.5mm crochet hook.
Note: chains at the beginning of rounds do not count as stitches.
Round 1: ch 34. sc in 2nd ch from hook and next 33 ch. Turn your work and working on the other side of beginning ch, sc in each sc across. Join with ss to first sc. (66 stitches)
Rounds 2-8: ch 1 (does not count as a stitch). hdc in same stitch as ss and each stitch around. Join with ss to first hdc. (66 stitches)
Round 9: ss into same stitch as ss and next 2 stitches. Line up the granny square piece and ss around to attach it to the main part of the pouch. Fasten off
Round 10: Attach white yarn to the top corner of the right granny square. ch 1. (does not count as a stitch) hdc in same stitch where you attached the yarn and in each stitch around. Making sure to have 11 stitches across each square. Join with ss to first hdc. (66 stitches)
Rounds 11-17: ch 1 (does not count as a stitch). hdc in same stitch as ss and each stitch around. Join with ss to first hdc. (66 stitches)
Change to Key Lime.
Round 18: ch 1 (does not count as a stitch). hdc in same stitch as ss and each stitch around. Join with ss to first hdc. (66 stitches)
The next Round will make the handles.
Round 19: ch 1. (does not count as a stitch) sc in same stitch as ss and in next 18 stitches. ch 14. Skip the next 10 stitches. sc in next 23 stitches. ch 14. Skip 10 stitches. sc in last 4 stitches. Join with ss to first sc. (74 stitches)
Round 20: ch 1. (does not count as a stitch) sc in same stitch as ss and in each stitch and chain around. Join with ss to first sc. (74 stitches)
Rounds 21-22: ch 1. (does not count as a stitch) sc in same stitch as ss and in each stitch around. Join with ss to first sc. (74 stitches)
Fasten off and weave in ends.
Slip canvas pouch into crocheted piece. Working in sections, apply fabric hot glue around the top of the pouch and adhere crocheted piece at Row 18 (the hdc row of Key Lime), being careful to not get glue on the zipper.
This is the fabric hot glue that I used on my crochet pouch. I also have this hot glue gun that I only use with the fabric glue so my regular hot glue doesn’t mix with the fabric glue.
This Crochet Mini Circle Granny Square Pouch is great for packing essentials for a trip, taking along a small crochet project, using as a gift bag, or carrying your iPad and notebook.
This cute pouch can be made in any color combo or even in one solid color. It works up fairly quickly and would make a great gift! 🎁
I pulled out a couple of my older stamps to create this quick and easy card.
Disclosure: Some of the links on my site are affiliate links, meaning, at no additional cost to you, I will earn a small commission if you click through and make a purchase. As an Amazon Associate I earn from qualifying purchases.
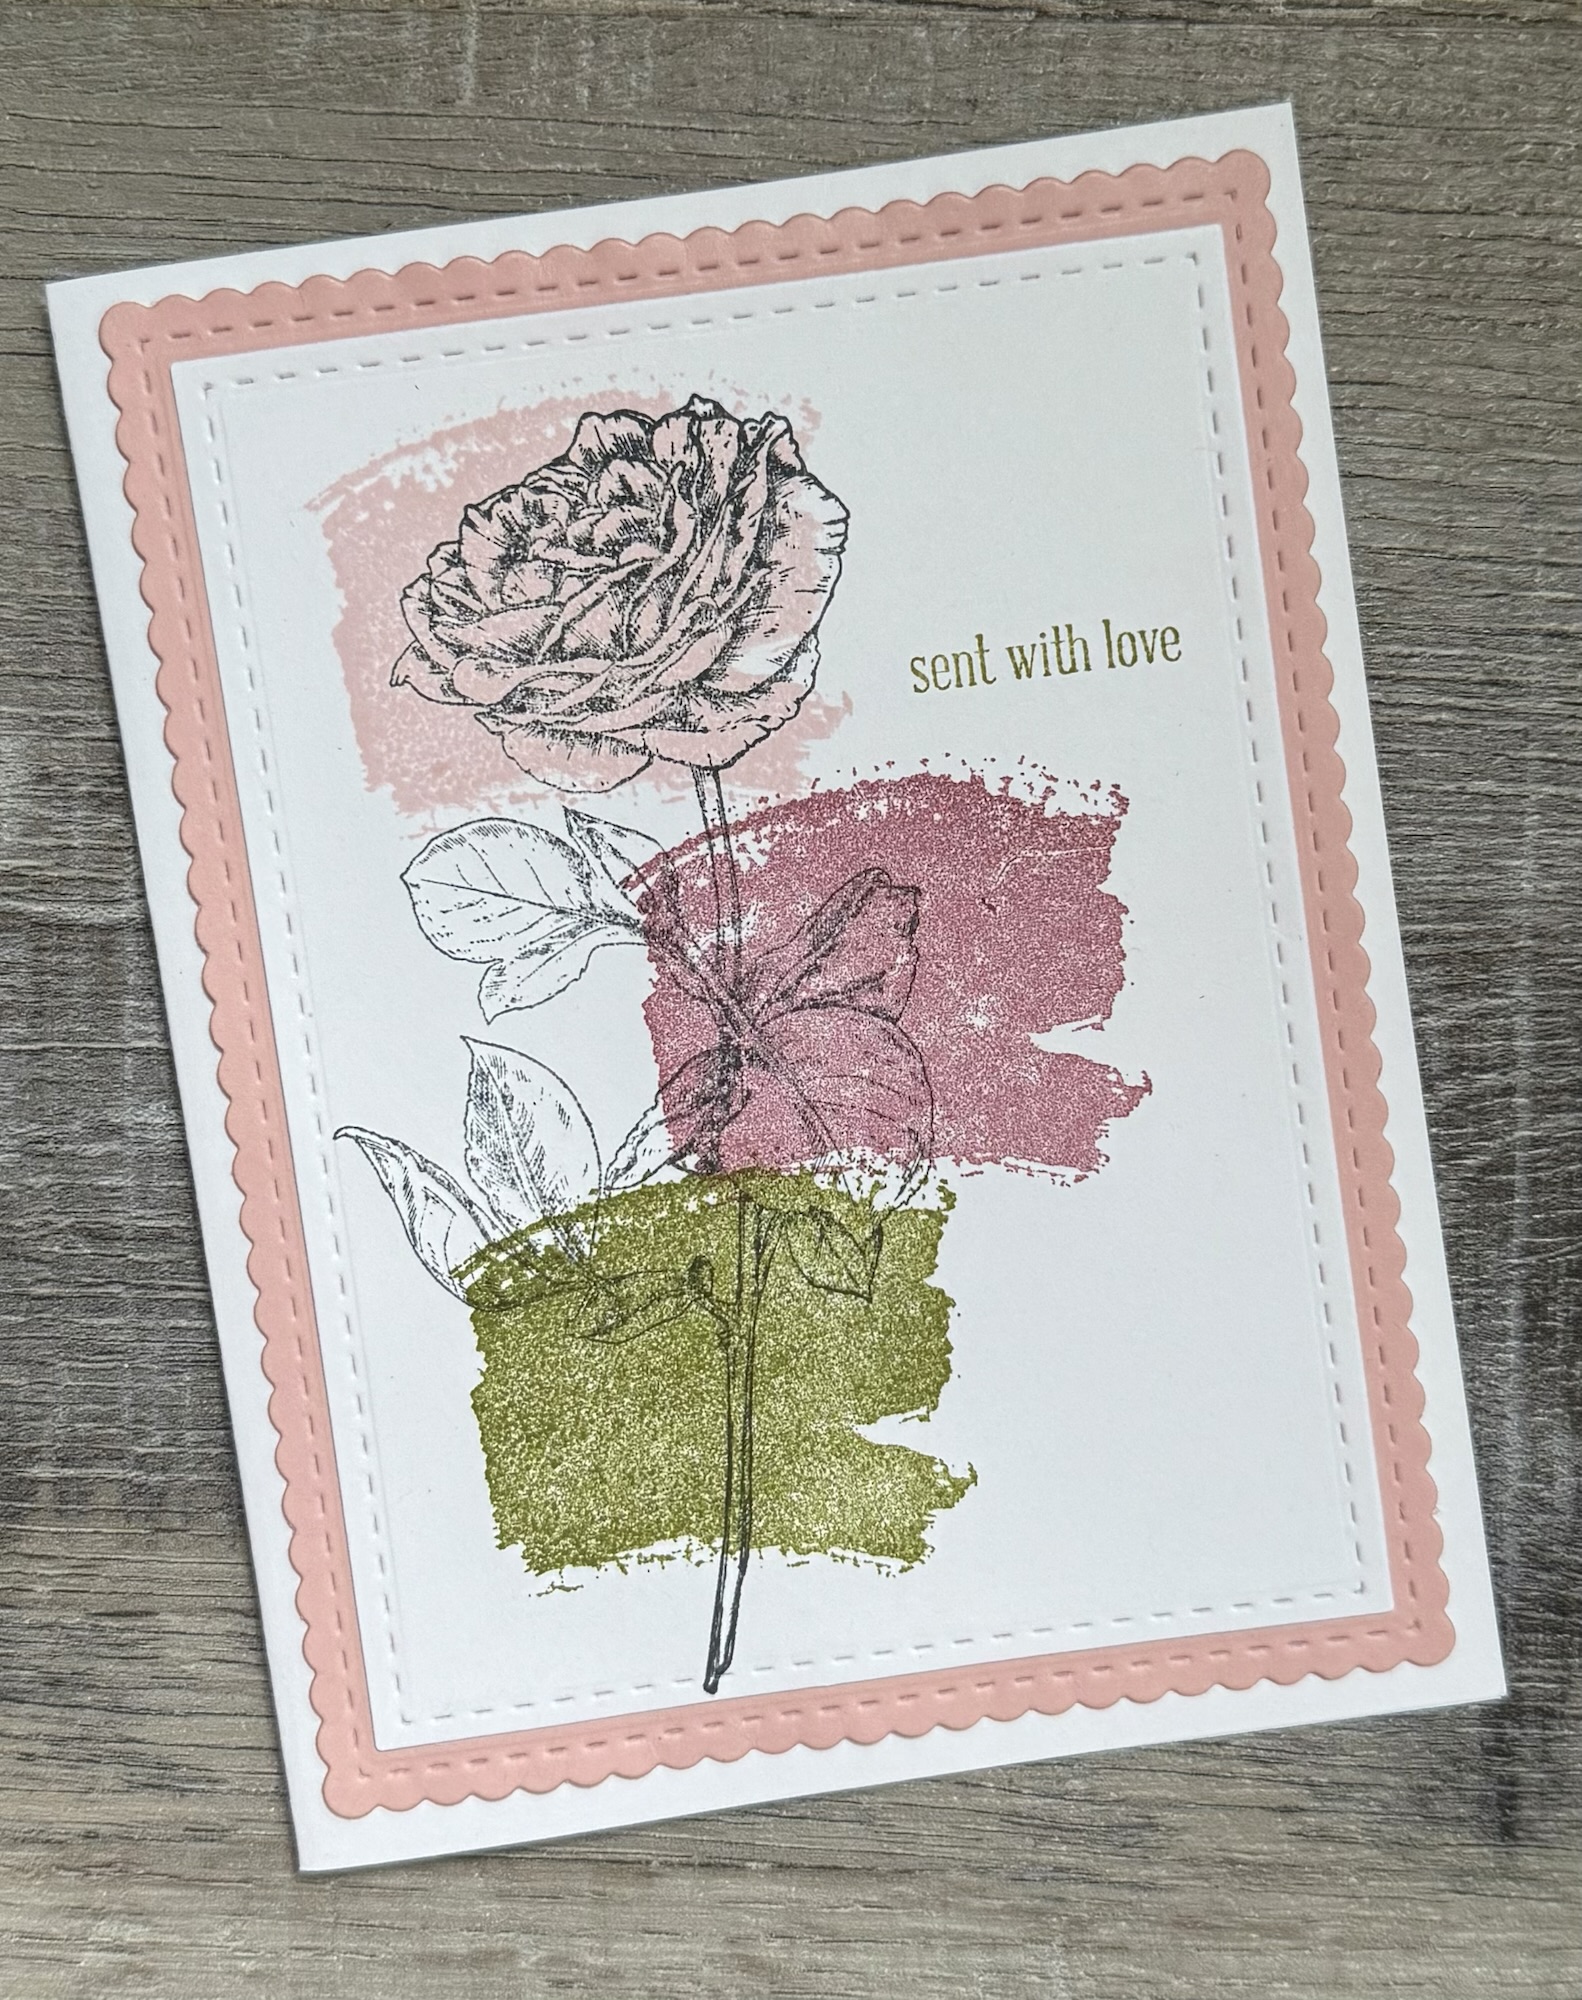
The rose is from the Lovely Reminder stamp set from Unity Stamp Company and it is still available. The abstract swoosh is from a long discontinued set from Stampin’ Up called Work of Art. I think you could create a similar look by dragging a small ink cube across your card stock. The sentiment is also from a discontinued set from Stampin’ Up, but you could use any sentiment you have in your collection.
I stamped the swoosh with 3 different colors of ink on white card stock. Then I stamped the rose with Memento Tuxedo Black ink over the swooshes. I used my Misti Stamping Tool to line up the rose image so I could re-ink the stamp and stamp it twice to get a little darker image. The sentiment is stamped with the green ink that I used on the bottom swoosh.
Using these Scallops & Rectangles Nesting Dies, I die cut around the image and layered the piece to pink card stock die cut with the same set. The piece is attached to a white card.
This is a super quick card to make. You can use any flower image in your collection to achieve a similar look. Go through your stamp collection and pull out some of your older stamps you haven’t used in a while. You may fall in love with them all over again! 😊
Disclosure: Some of the links on my site are affiliate links, meaning, at no additional cost to you, I will earn a small commission if you click through and make a purchase. As an Amazon Associate I earn from qualifying purchases.
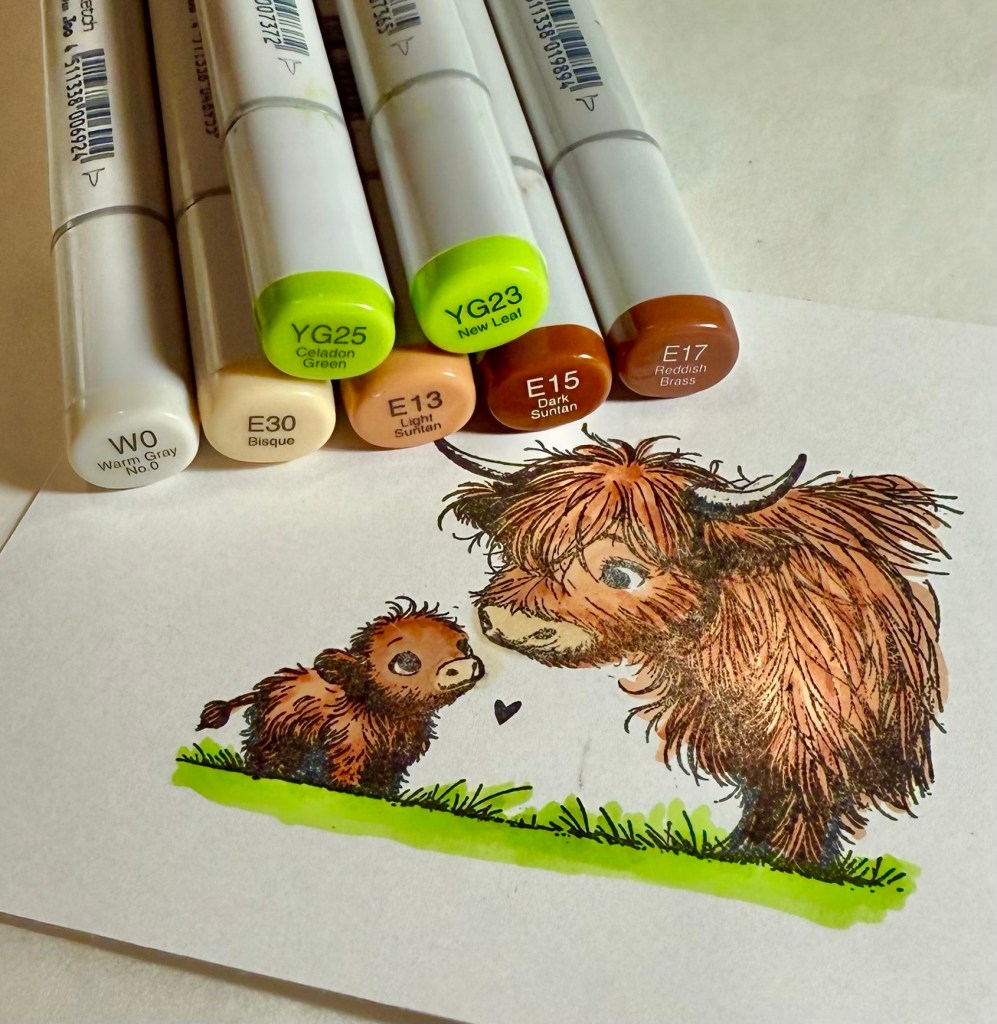
My sweet little reindeer stamp and matching die are from the 2024 Advent calendar from Unity Stamp Company. This little cutie is no longer available, but any of your favorite small Christmas stamps would work great on this layout.
I stamped the reindeer with Memento Tuxedo Black ink on white card stock, colored it with Copic markers, and die cut around it with the matching die.
Following the measurements on the sketch, I cut 8 (1-1/8 inch) squares of patterned paper and attached them to red card stock. Then I attached the piece to a white card.
Using these Scallops & Circles Nesting Dies, I die cut circles from red and white card stock and layered them together. They are attached to the card with foam tape. I stamped “Merry Christmas” with red ink on white card stock and die cut around it with these Scalloped & Stitched Sentiment Nesting Dies. Both the reindeer and the sentiment are attached to the card with foam tape. My “Merry Christmas” stamp has been a part of my collection forever and is no longer available – use your favorite Christmas sentiment from your collection on your card.
I’ve been creating Christmas cards (about 6 of each design) each month to be ready for the busy holiday season. You can find my other cards so far this year in these posts: January, February, March, and April.
This layout could be used for so many different occasions – just change the colors, image, and sentiment. 😊
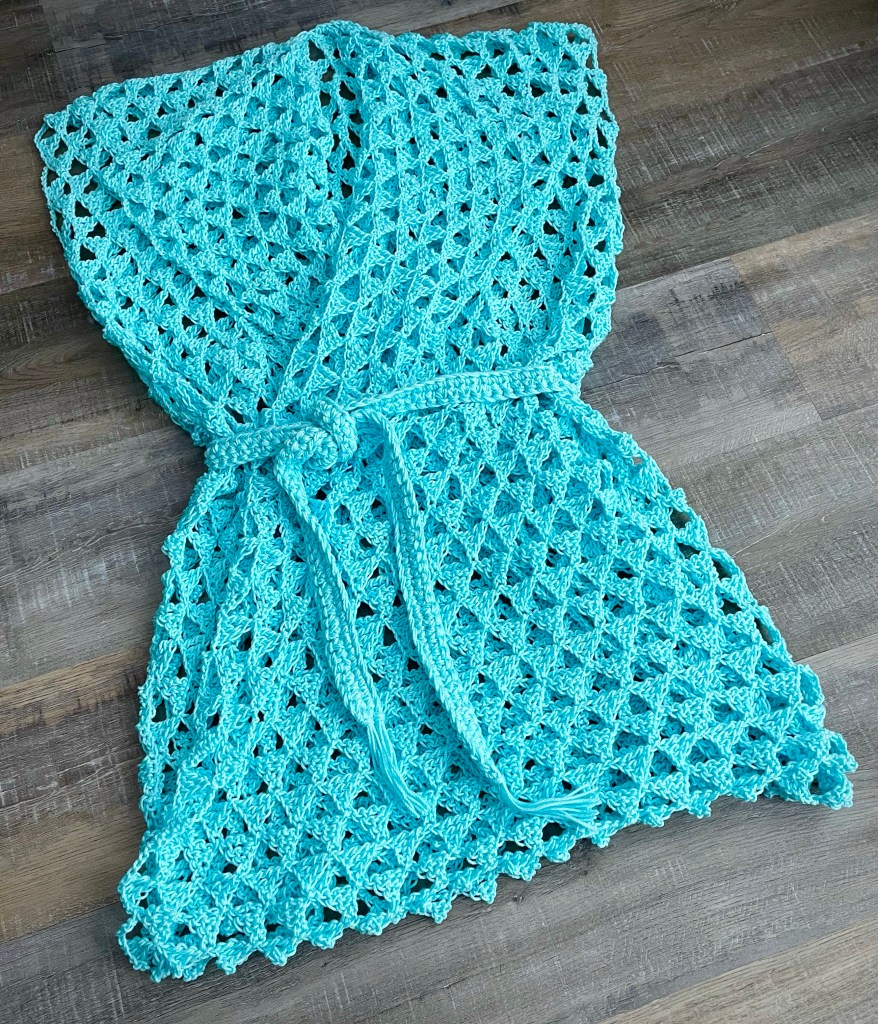
I shared this post on this cute Beach Cardi Coverup a few years ago and wanted to share it with you again! The pattern is by Wilmade and you can find a link to it below. There is also a link below if you want to buy a kit that includes the pattern and the yarn you need to make the coverup. The Lion Brand 24/7 cotton yarn comes lots of different colors and holds up beautifully. My coverup still looks brand new after several summers and trips to the beach.
Here’s the original post…
It’s getting close to beach and pool time! ☀️ That means it’s time to make a new swimsuit coverup. 🙂
This is a fun pattern from Wilmade.com for the Beach Cardi Coverup. It’s a great beginner pattern and she includes sizes S-5XL! The coverup is made from 3 rectangles that are sewn together. She includes instructions for an optional belt. My belt is a bit different – I’ve included instructions on what I did below.
Disclosure: Some of the links on my site are affiliate links, meaning, at no additional cost to you, I will earn a small commission if you click through and make a purchase. As an Amazon Associate I earn from qualifying purchases.
I used Lion Brand 24/7 Cotton yarn in Aqua with a J/6mm hook to stitch up my Beach Cardi. I love this color because it reminds me of Summer and the blue waters of the ocean. But if this isn’t your color, no worries – the yarn comes in lots of other colors! You can order a Crochet Kit here in your choice of size and color of yarn and it includes the free digital download of the pattern.
It’s perfect to wrap yourself in on those windy beach days or when you head in to your favorite beachside restaurant for lunch. It’s also great while you’re lounging at the pool sipping your favorite cold drink.🥤
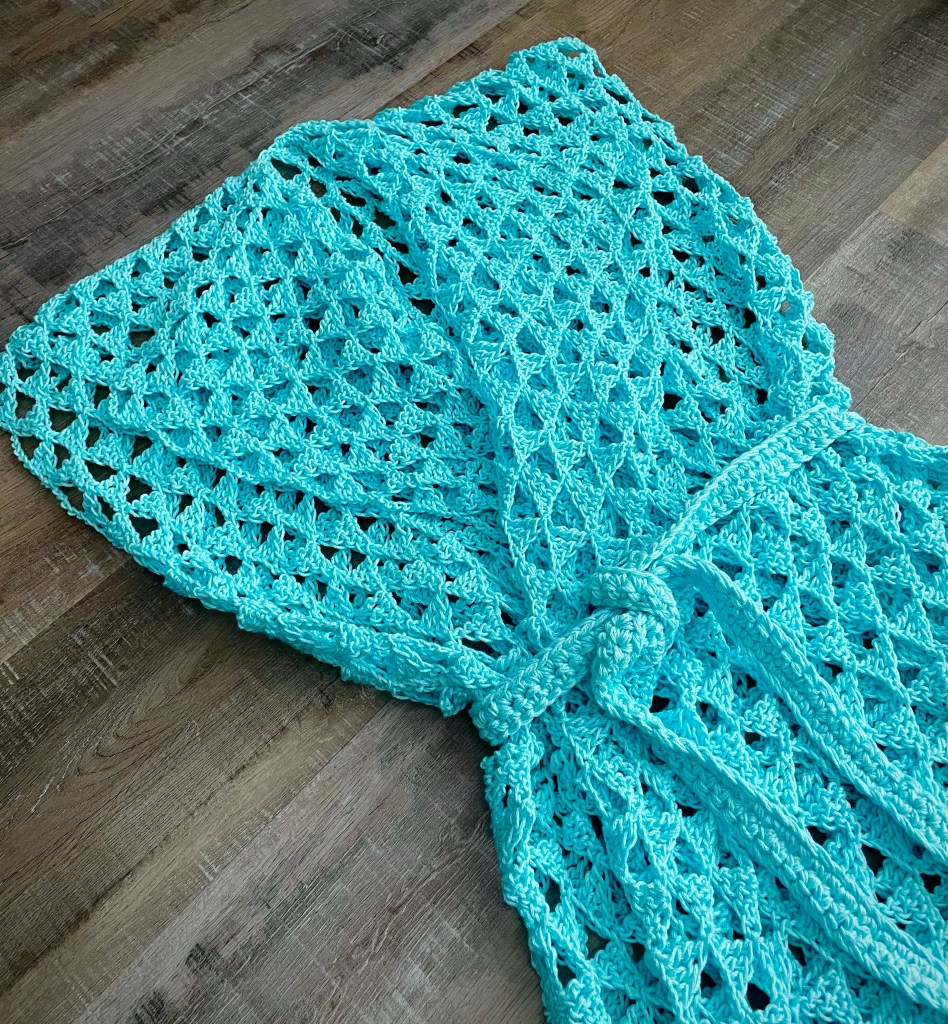
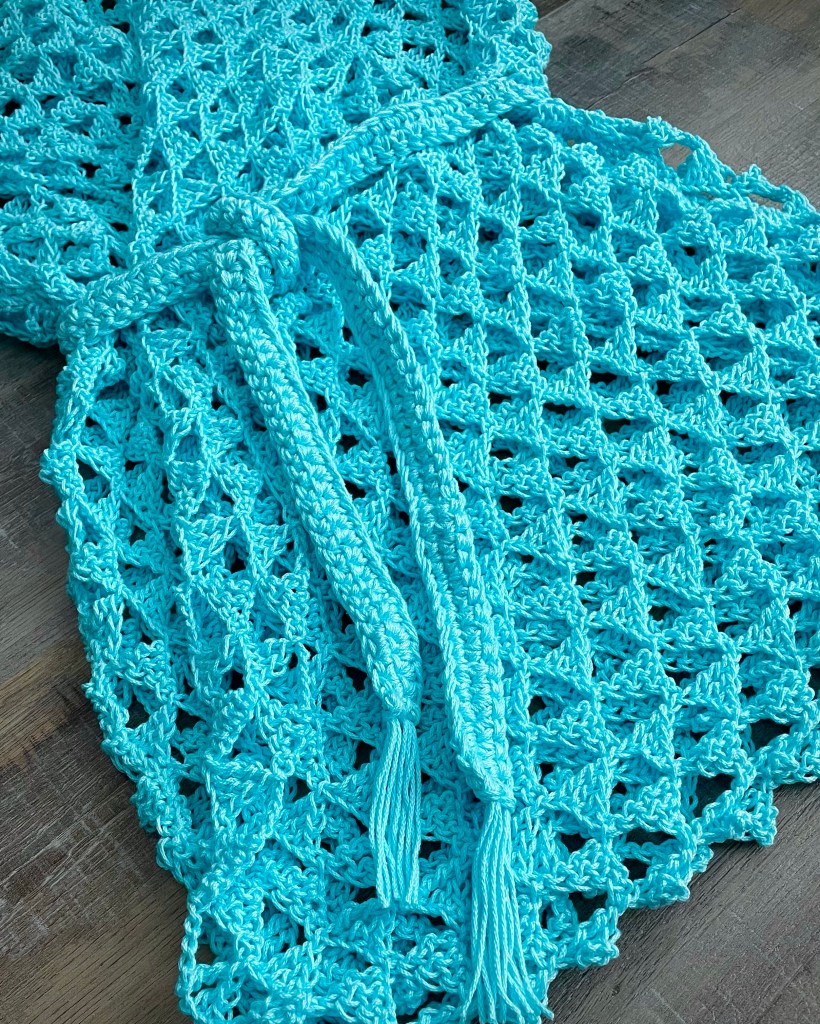
To make my belt, I held 3 strands of yarn together and made a chain according to the pattern. Then I worked a single crochet in the 2nd chain from the hook and in each chain across. At the end of the row, I turned, chained 1, and worked a single crochet in each stitch across. Then I fastened off and wove in the ends.
I added fringe to both ends of my belt – using 2 sets of 3 strands of yarn folded in half on each end.
You can find other photos along with a video and links to a printable PDF over on Wilmade.com. She also has patterns for beautiful shawls, hats, and other wearables – you should check out her site. 🙂
This was a fun and easy pattern to make. Looking forward to wearing it on our beach trip to Destin, FL. ☀️
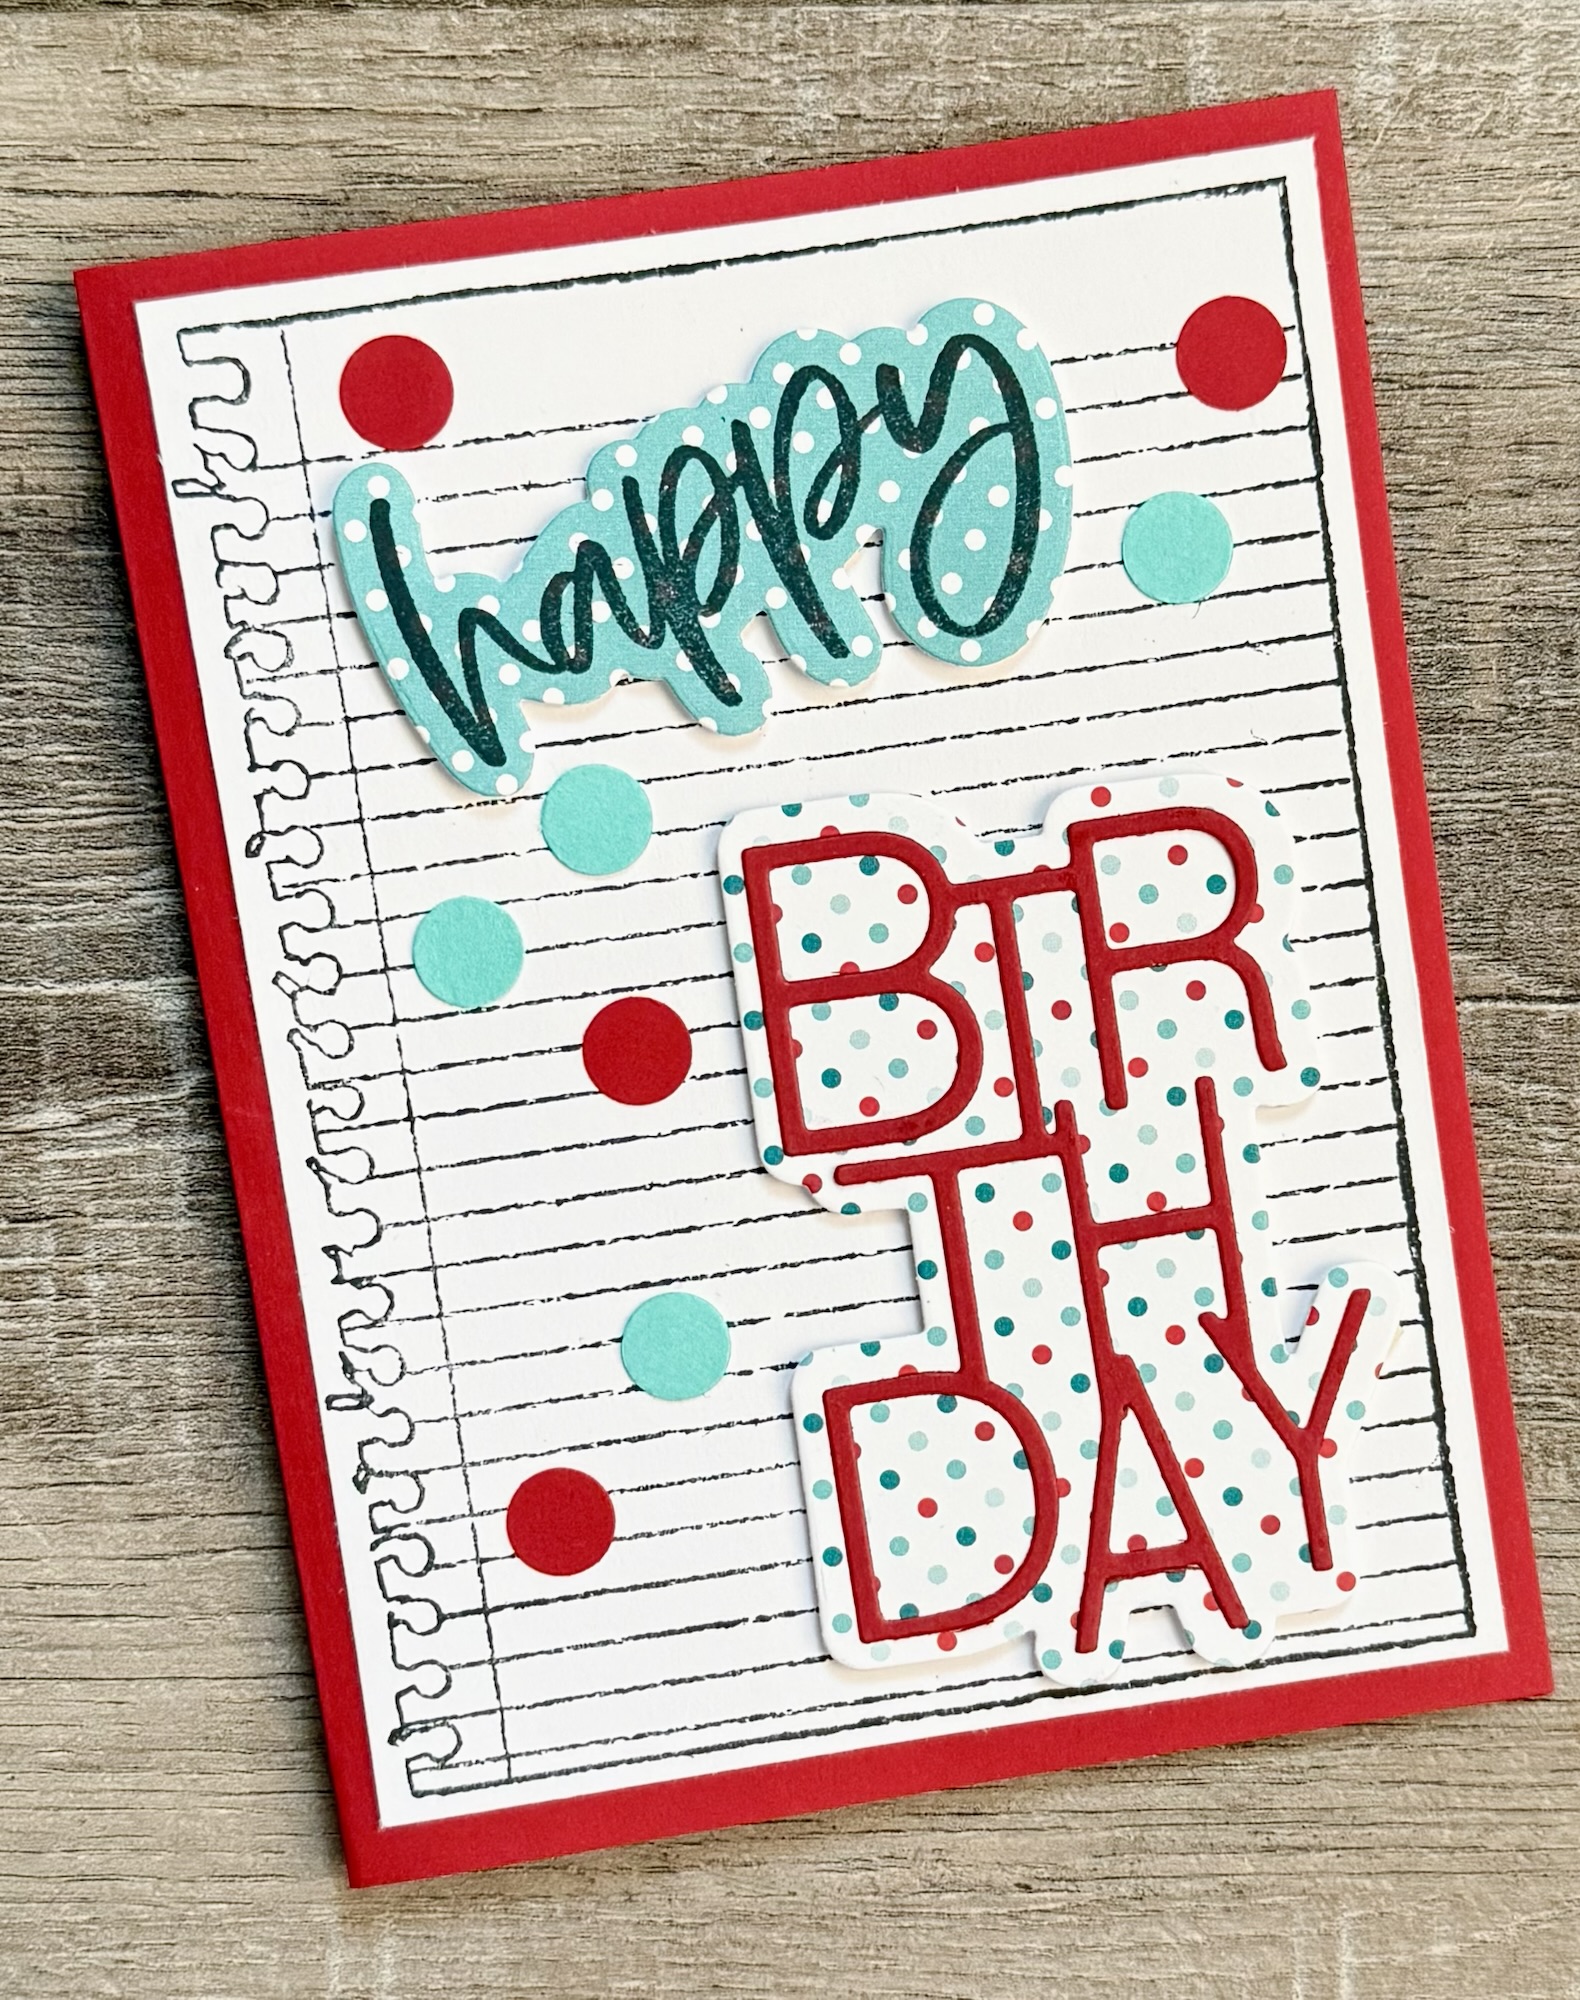
I love the way this birthday card turned out! Sometimes an idea in my head really does turn out when I create it. 😉
Disclosure: Some of the links on my site are affiliate links, meaning, at no additional cost to you, I will earn a small commission if you click through and make a purchase. As an Amazon Associate I earn from qualifying purchases.
I stamped the word “happy” on turquoise patterned paper and die cut it with the matching die. You can find the stamp here and the die here.
I used the Say It Big die set to die cut “birthday” from red card stock and the background from patterned paper. I love this Quickie Glue Pen for attaching thin due cuts. Both words are attached to the card using foam tape.
I punched 3/8 inch circles from red and turquoise card stock and scattered them randomly on the card.
This is a great layout to use for just about anyone! It can be done in any color scheme and is a great way to send birthday wishes. 🎈
Disclosure: Some of the links on my site are affiliate links, meaning, at no additional cost to you, I will earn a small commission if you click through and make a purchase. As an Amazon Associate I earn from qualifying purchases.