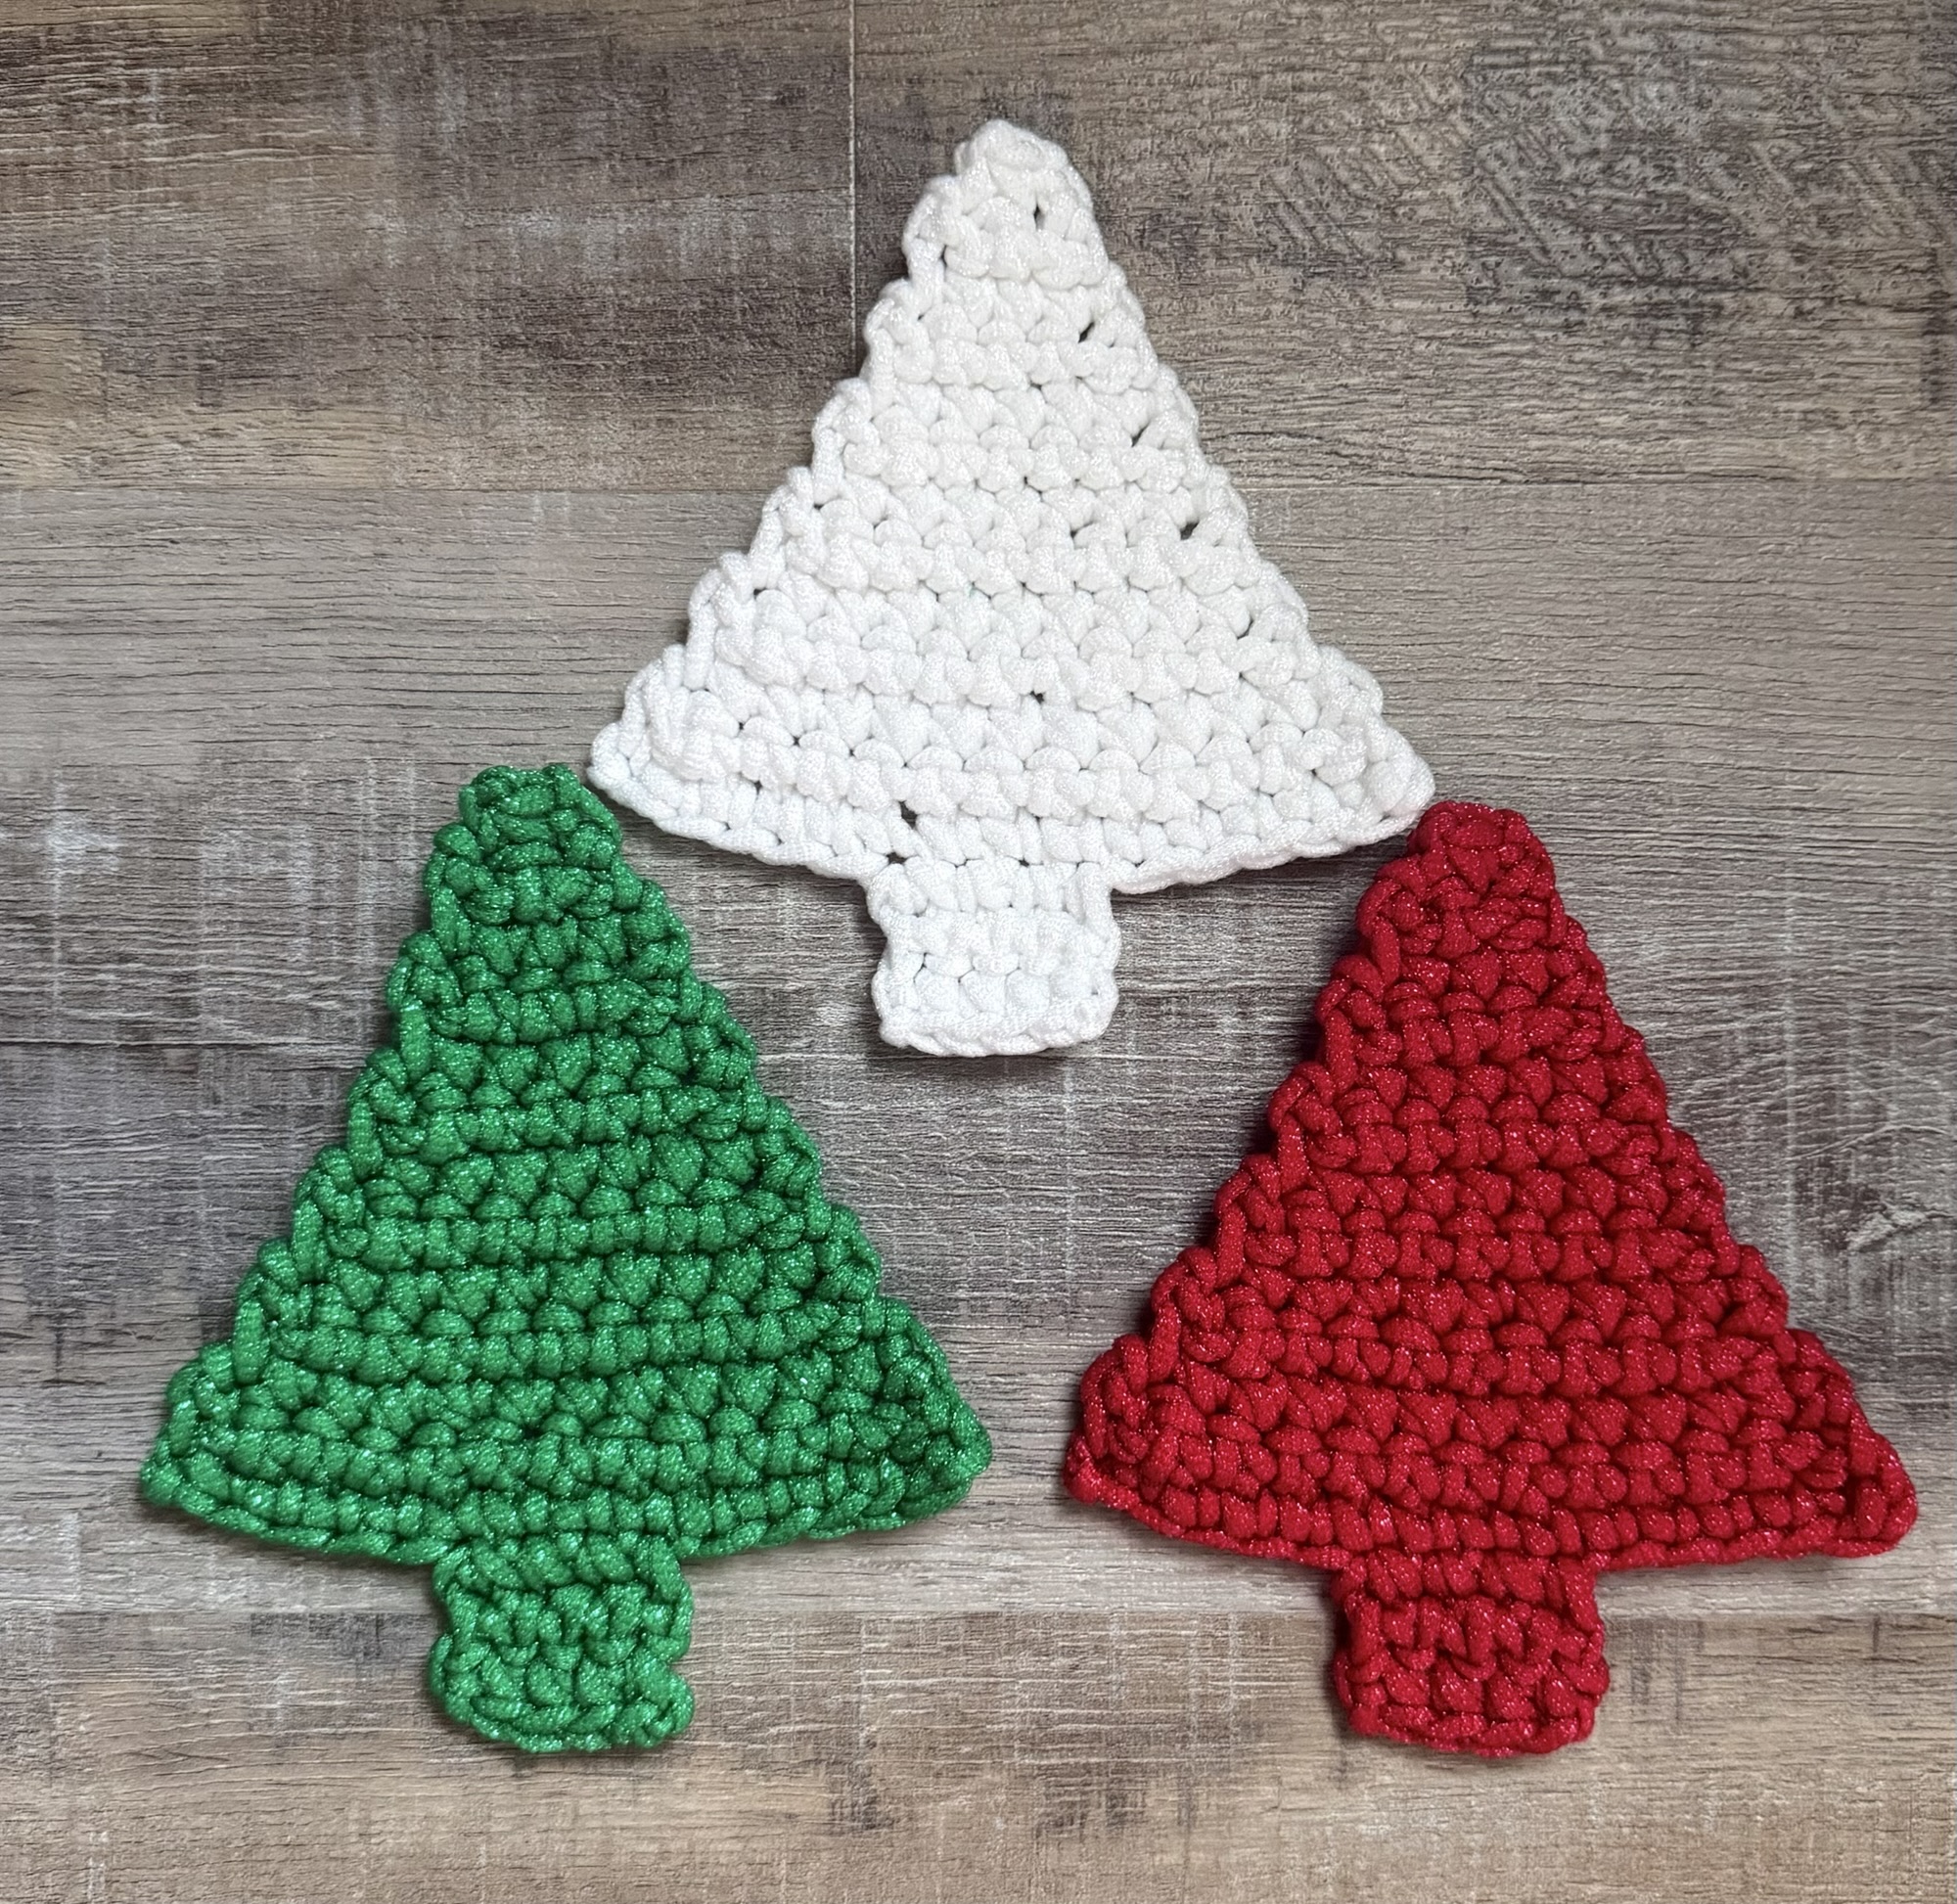
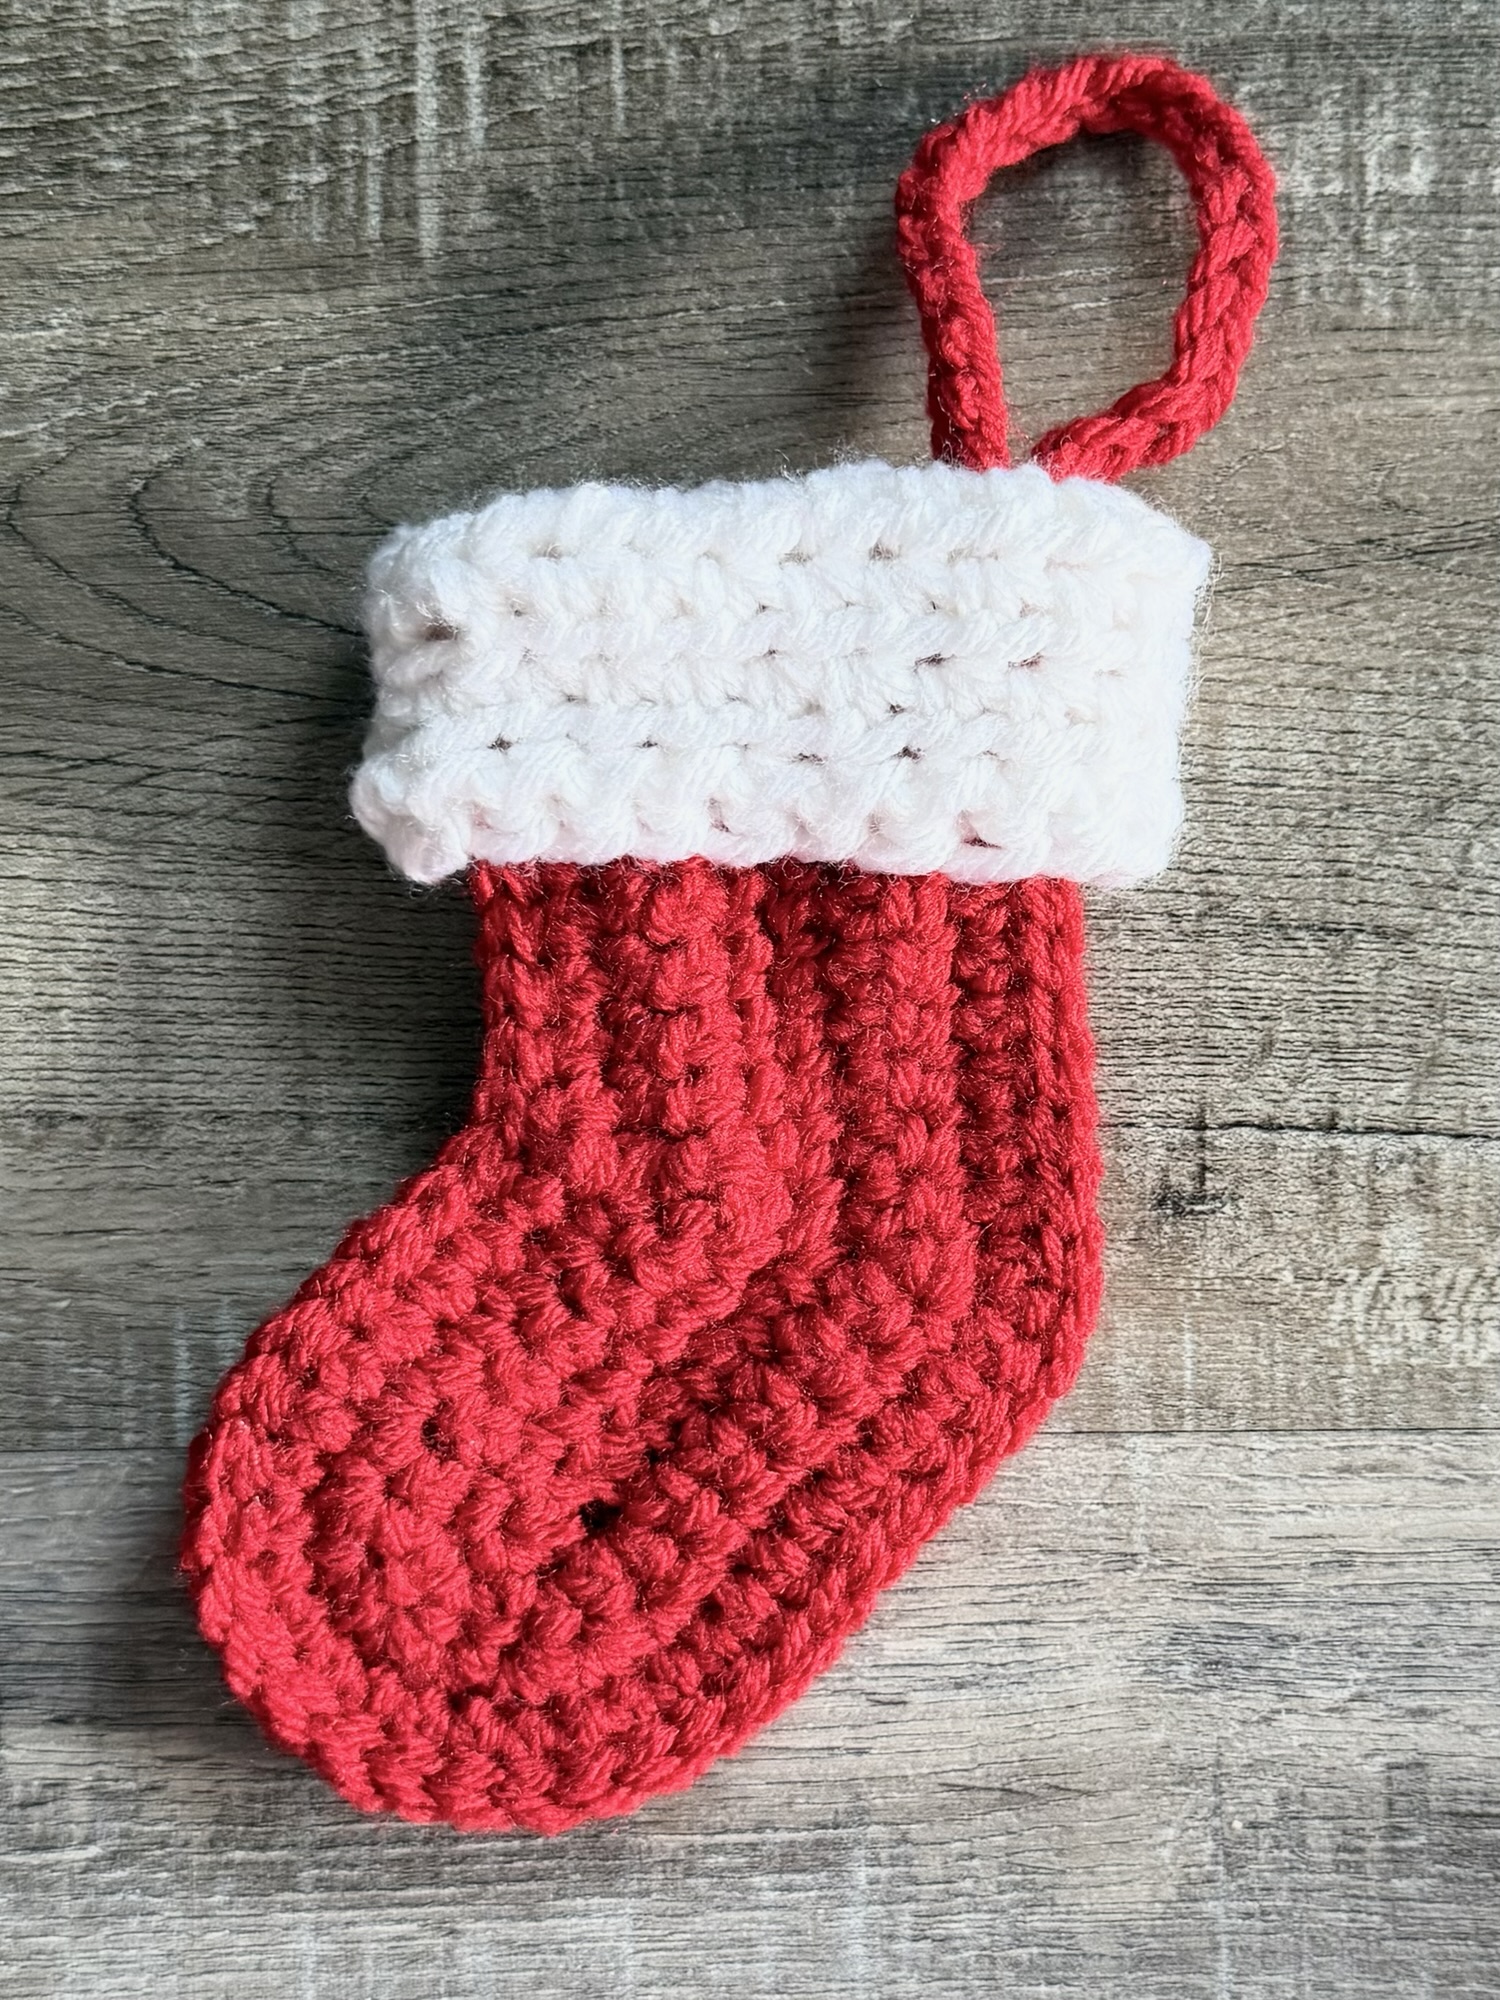
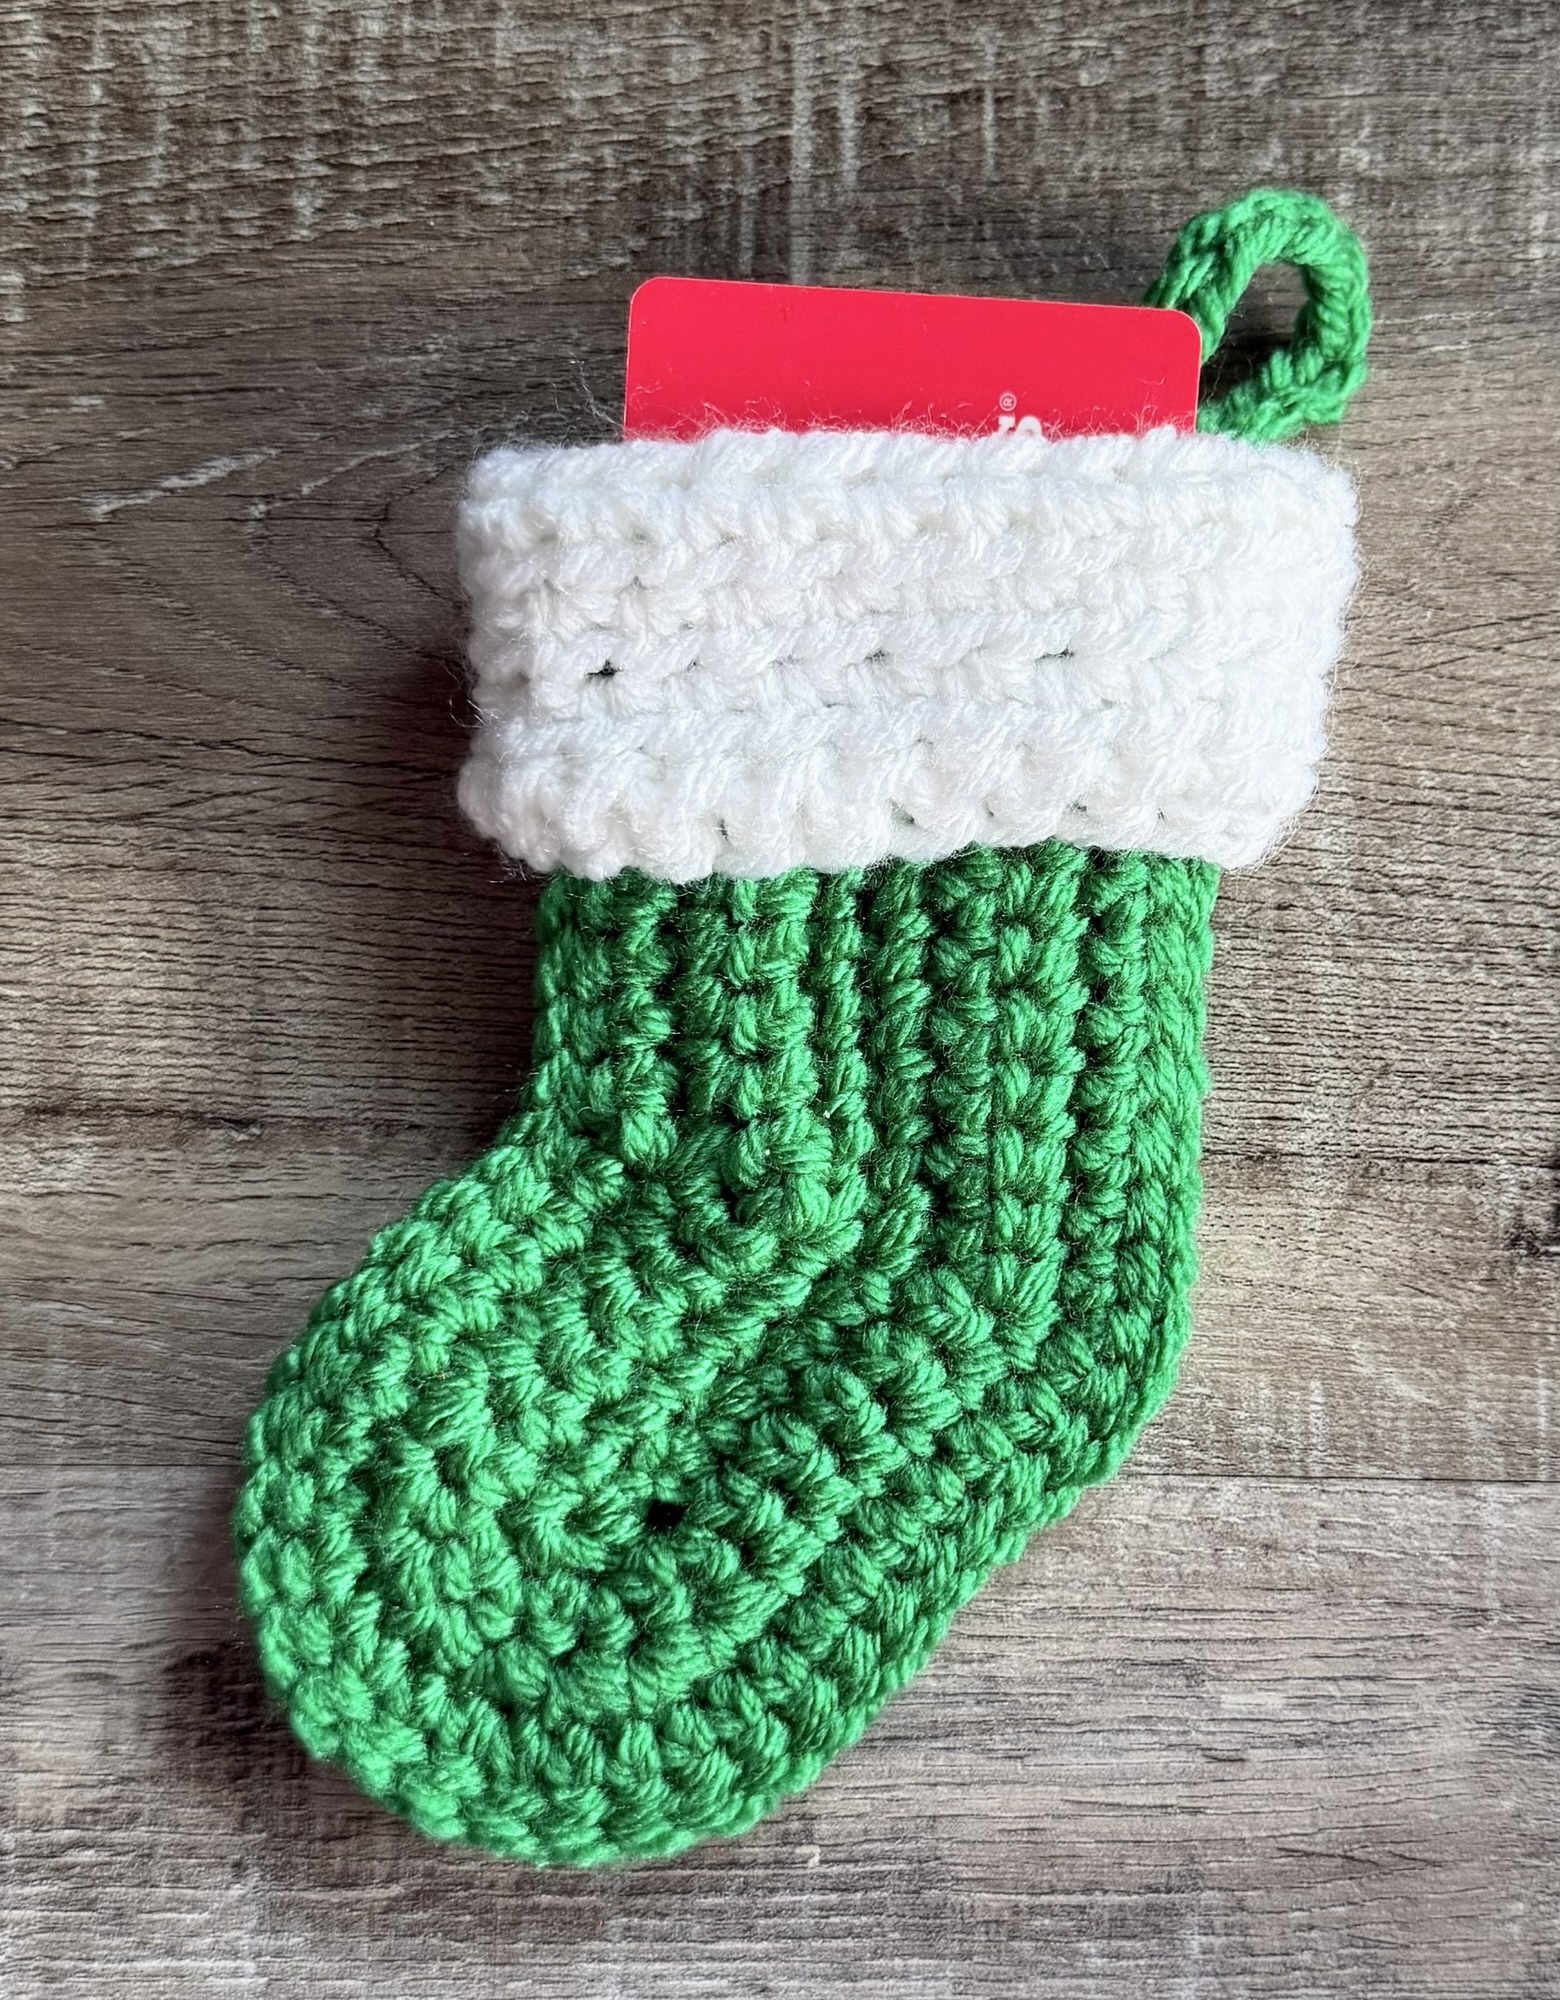
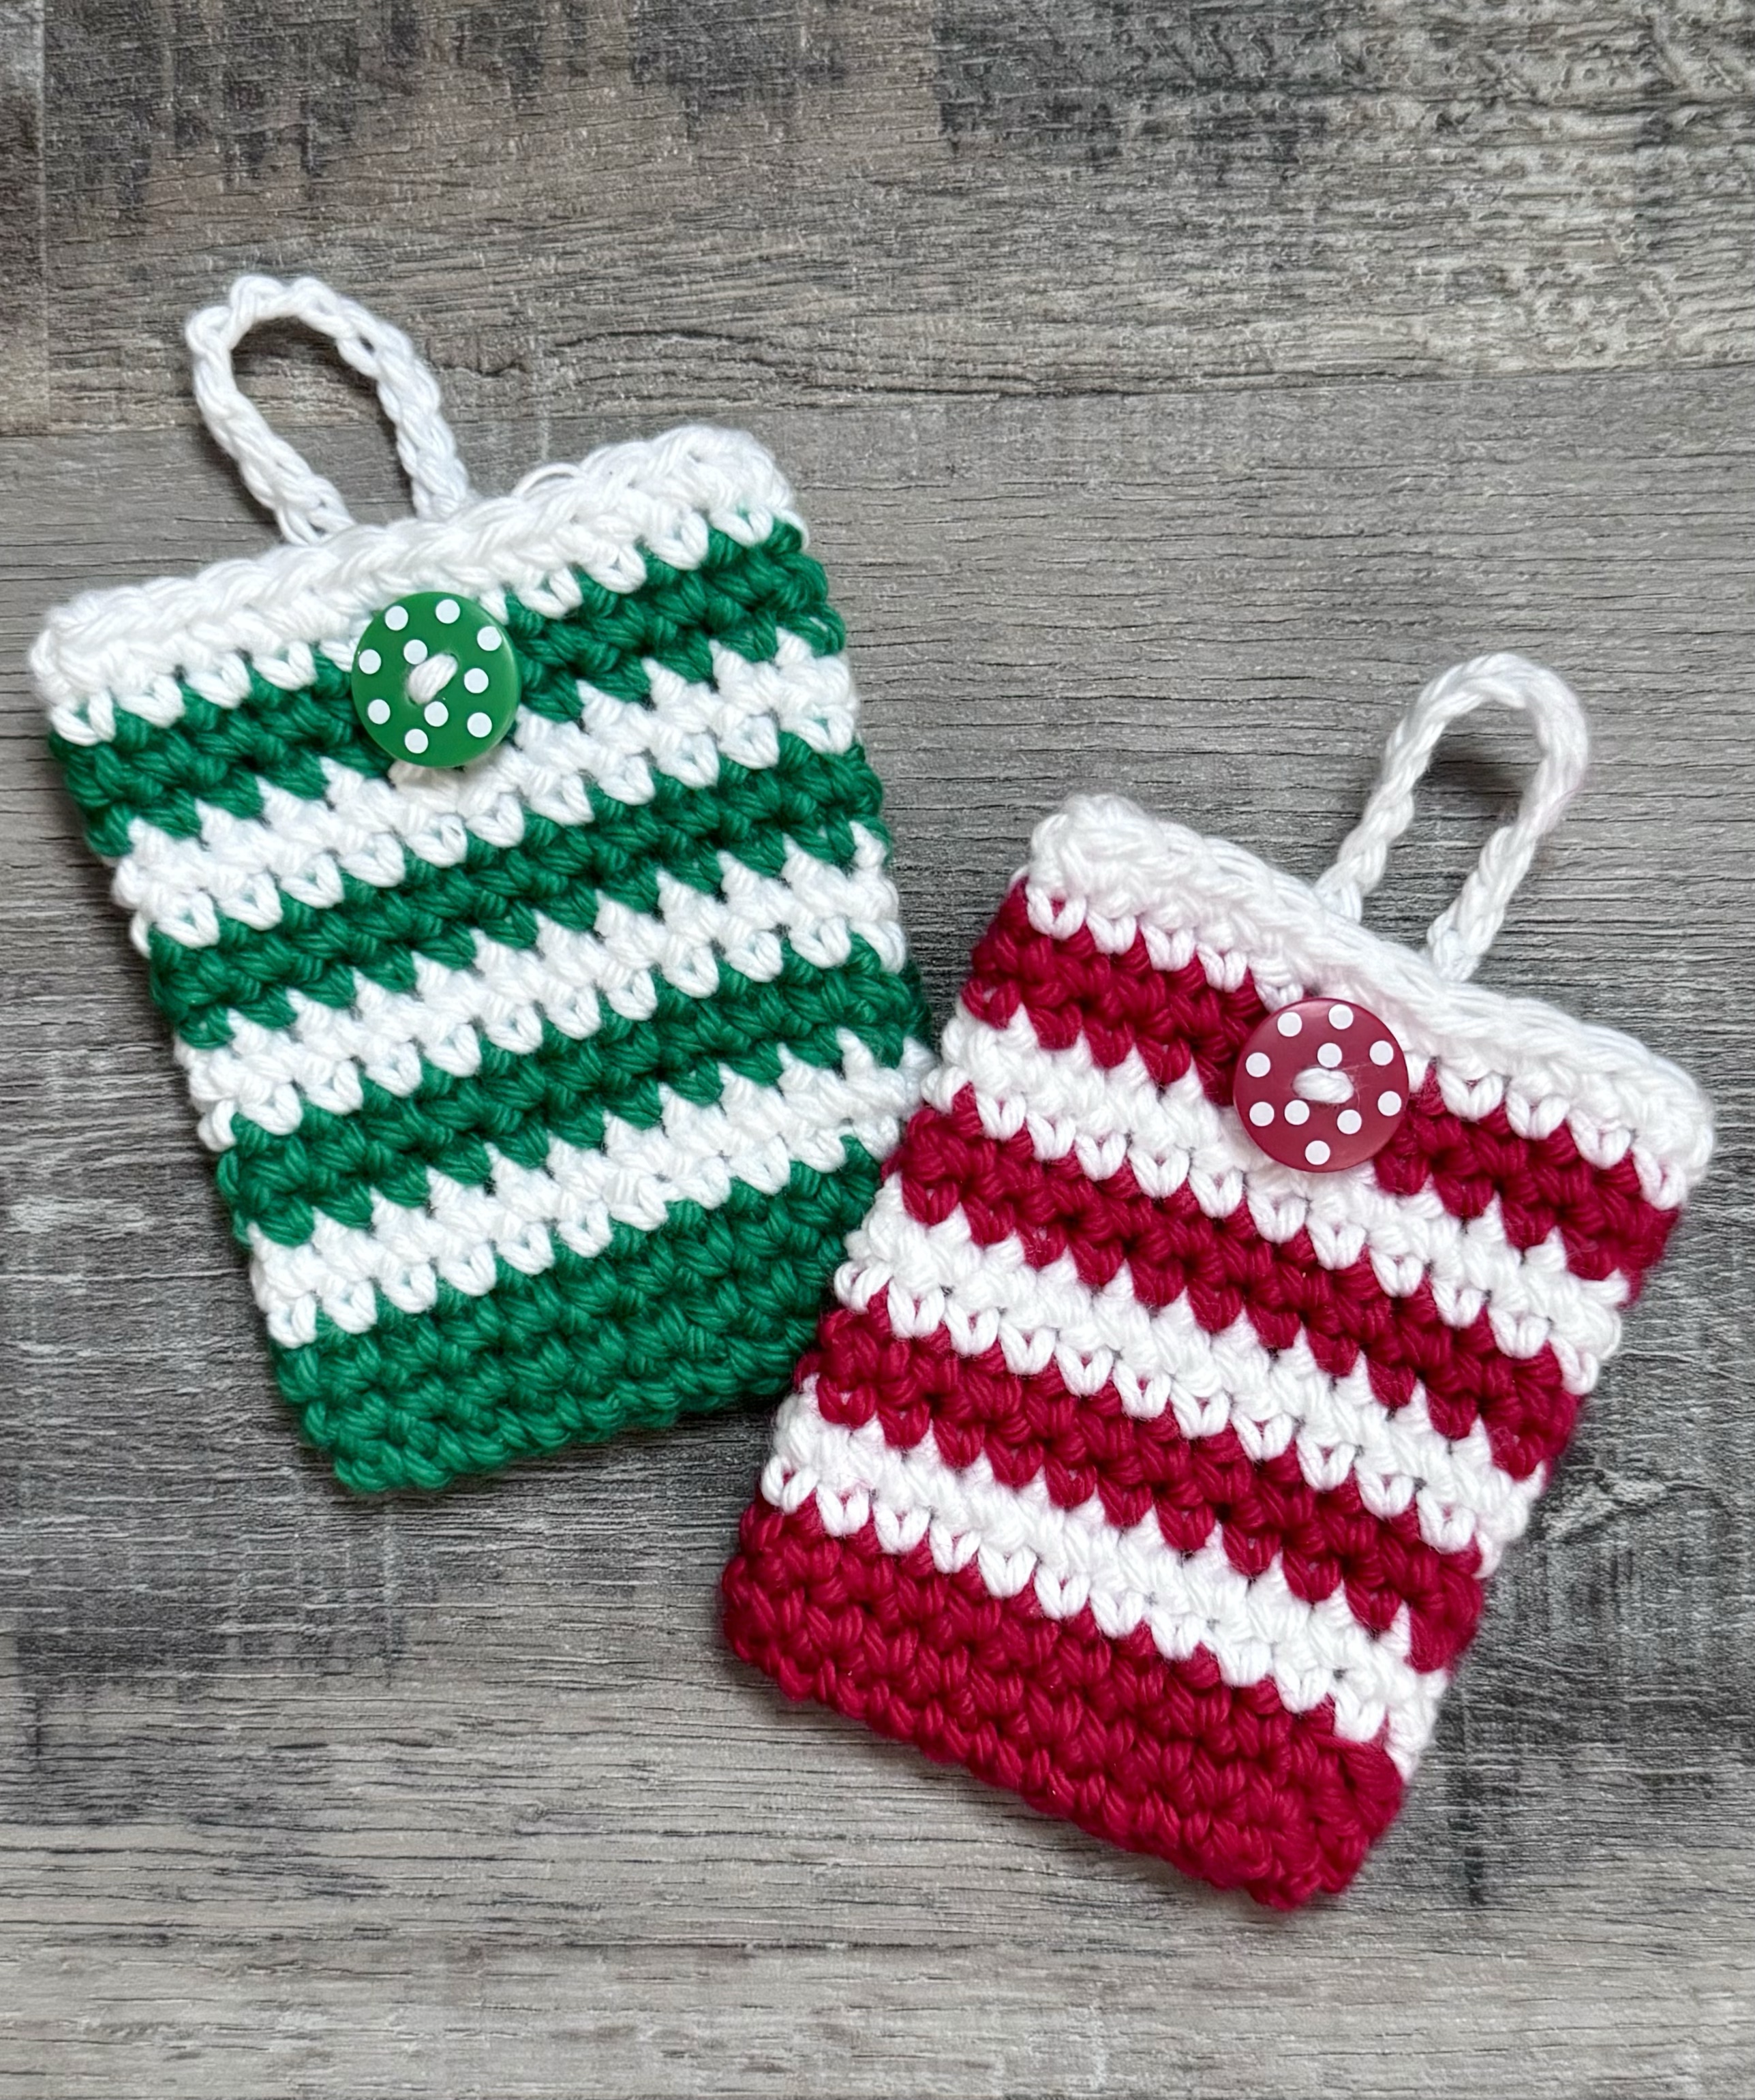
These fun Patriotic Wood Popsicles will add a cute whimsical touch to your patriotic decor. They were so fun to paint! 🙂
Disclosure: Some of the links on my site are affiliate links, meaning, at no additional cost to you, I will earn a small commission if you click through and make a purchase. As an Amazon Associate I earn from qualifying purchases.
The unfinished wood popsicles are from Hobby Lobby and measure about 4 inches by 1.5 inches and are about 1/2 inch thick. They come in a package of 6 for $6.99 – but I got them for 40% so they $4.19. Hobby Lobby puts their supplies for various crafts on sale about every other week, so watch for sales on the items you need.
You’ll also need acrylic paint in red, white, blue, and light brown, a sanding block or sandpaper, and various ribbons.
I used masking tape (you can also use painter’s tape) to tape off the sections and painted each section of red, white, and blue with 2 coats of paint. Then I painted the stick with the light brown. To give them a bit of a rustic look, I lightly sanded each popsicle. I tied 2 different ribbons in a double knot around each stick to finish them.
They turned out so cute! ❤️🤍💙 I think they will look cute grouped in a bowl or basket. I think I’m going to add them to my dough bowl along with my Patriotic Rag Balls.
You could also paint these in bright colors, maybe add polka dots or vertical stripes, and they would be fun for your decor all Summer long!☀️
Have you been thinking about making a new patriotic wreath for your front door? This clothespin wreath is really easy to make and could be a fun project to do with the kids.
I started out by clipping the clothespins around the wreath to figure out how many I would need – I needed 68 to fit my wreath. Then to mimic the 13 stripes on the USA flag, I set aside 28 clothespins to paint red and 24 to paint white (4 for each stripe). That left me with 16 to paint blue. Depending on the size of the wreath form you choose, just adjust the number of clothespins you’ll need for each section.
I painted the wreath form white, along with 24 clothespins and 10 stars. Then I painted 28 clothespins red and painted 16 blue. I used two coats of paint on everything. You could also use spray paint which would cut down the time to create this wreath quite a bit. I had the acrylic paint in my craft stash so I just used what I had on hand.
After everything is dry, simply clip the clothespins on the wreath creating the stripes by using 4 red alternating with 4 white. Add the blue clothespins and glue the stars to the blue section. I used E6000 clear adhesive to glue on my stars. I finished the wreath with a couple coats of a matte sealing spray.
Disclosure: Some of the links on my site are affiliate links, meaning, at no additional cost to you, I will earn a small commission if you click through and make a purchase. As an Amazon Associate I earn from qualifying
I stamped the image with Memento Tuxedo Black Ink on white card stock and colored it with Copic markers. Using this Make a Tag die set, I die cut around the image and layered it to pink card stock die cut with the same set. I added a hole reinforcement – from the same die set – cut from pink card stock and tied on a piece of aqua/white bakers twine.
To make the card, I used a dot embossing folder to emboss a piece of aqua card stock and attached it to a white card. I attached a strip of flowered patterned paper to the card and then attached the tag with foam tape. I stamped “happy birthday” with pink ink on white card stock, die cut around it with these Scalloped & Stitched Sentiment Nesting Dies, and attached it to the card.
A bright and colorful way to send birthday wishes any time of the year! 🌷
This year in the USA, we are celebrating 250 years on July 4th! 🇺🇸 I created a “USA 250” sign to add to my patriotic decor this year.
Disclosure: Some of the links on my site are affiliate links, meaning, at no additional cost to you, I will earn a small commission if you click through and make a purchase. As an Amazon Associate I earn from qualifying purchases.
I found my sign at Hobby Lobby on sale – it measures about 17 inches by 9.25 inches. My letters (3.5 inches) and numbers (2.5 inches) are also from Hobby Lobby. Other supplies I used are acrylic paint in red, white, blue, and brown, red and blue star patterned scrapbook paper, red and white beads, and some natural twine – this all came from my stash in my craft room. 🙂
I traced the USA letters on the back of the patterned paper and cut them out. Using Mod Podge, I attached the cutouts to the front of each letter. Then I added a thin coat to Mod Podge over the top.
I painted the frame of my sign with 2 coats of red paint. I also painted the entire back of the frame red to give it a finished look, but this is totally optional. Once dry, I painted the inside of the frame with 2 coats of white paint. I painted the numbers with 2 coats each of red, white, and blue.
To make the sign look a little rustic, I dry brushed the sign, letters, and numbers with brown paint. It also helped to hide any imperfections when painting the sign. 😉
I hot glued the letters to the center of the sign and the numbers to the frame.
To make the beaded hanger, I tied a knot at the end of a piece of natural twine leaving a short tail. Then I simply strung the beads onto the twine and tied a knot at the other end, again leaving a short tail. I used hot glue to attach the ends of the twine to the back of the frame – be careful not to burn your fingers! 😳 You can make your beaded hanger any length you want.
This project could be changed for so many different types of decor just by changing the letters and colors. It would make a cute sign with a child’s name, a family last name in colors to match your decor, a seasonal sign – Spring, Summer, Fall, Winter, Easter, Noel, Halloween – there are so many options! You may have to change the size of your letters to fit, but you can be so creative! 🙂
Just in time for all the warm weather activities, I have a Crochet Summer Tote Bag pattern to share with you today! It works up quickly holding 2 strands of worsted weight cotton yarn together. It is a great size to take to the pool, beach, or the farmer’s market this summer. 😎☀️🏖️
Disclosure: Some of the links on my site are affiliate links, meaning, at no additional cost to you, I will earn a small commission if you click through and make a purchase. As an Amazon Associate I earn from qualifying purchases.
The tote bag is completely washable, but here are a couple of tips. Wash it in cold water on a medium cycle and lay flat to dry. Also, add a Shout Color Catcher to the washer because cotton yarn sometimes wants to run – this will help keeping the colors from running into the white.
I used I Love This Cotton Yarn in Red, White, and Royalty with an N/9mm crochet hook to stitch up my Summer Tote Bag. You can find the pattern below along with a link to a free PDF if you’d like to easily print it. There is also a link to a free PDF without photos if you would prefer that.
Crochet Summer Tote Bag
Worsted weight (4) cotton yarn – I used I Love This Cotton in Red, White, and Royalty – Two (3.5 ounce) skeins of each color
Note: You will not use all of the Royalty or Red, but you will need more than one skein of each.
N/9mm hook
Stitches used: US terms
Chain – ch
Single crochet – sc
Half double crochet – hdc
Slip stitch – ss
Back loop only – blo
Note: Bag is crocheted using 2 strands of yarn held together
Ch 36 loosely with Royalty (holding 2 strands together)
Row 1: sc in the back bump of 2nd ch from hook and each ch across. Ch 1 and turn. (35 stitches)
Rows 2-5: sc in each stitch across. Ch 1 and turn. (35 stitches)
Row 6: sc in each stitch across. Ch 1. DO NOT TURN (35 stitches)
Begin working in rounds.
Round 1: Work 4 sc across end of rows. Work 2 sc in next stitch. sc in next 33 stitches. 2 sc in last stitch. Work 4 sc across end of rows. 2 sc in next stitch. sc in next 33 stitches. 2 sc in last stitch. Join with ss to 1st sc. (82 stitches)
Round 2: ch 1. sc in blo only of same stitch as ss and in each stitch around. Join with ss to 1st sc. (82 stitches)
Round 3: ch 1. Skip stitch that has the ss. sc in next stitch and in each stitch around, ending with final sc in skipped sc at the beginning of the round. Join with ss to 1st sc. (82 stitches)
Round 4: ch 1. sc in same stitch as ss and in each stitch around. Join with ss to 1st sc. (82 stitches)
Round 11: ch 2. Skip stitch that has the ss. hdc in next stitch and each stitch around, ending with the final hdc in skipped stitch at the beginning of the round. Join with ss to 1st hdc. (82 stitches)
Round 12: ch 2. hdc in same stitch as ss and in each stitch around. Join with ss to 1st hdc. (82 stitches)
Round 33: ch 1. Skip stitch that has ss. sc in next 13 stitches. Ch 40. Skip next 14 stitches. sc in next 28 stitches. Ch 40. Skip next 14 stitches. sc in next 12 stitches. End the round with a sc in the stitch that was skipped at the beginning of the round. Join with ss to first sc. (134 stitches)
Round 34: ch 1. sc in same stitch as ss and each sc and ch around. Join with ss to first sc. (134 stitches)
Round 35: ch 1. Skip stitch that has the ss. sc in next stitch and in each stitch around, ending with the final sc in skipped stitch at the beginning of the round. Join with ss to first sc. (134 stitches)
Round 36: ch 1. sc in same stitch as ss and in each stitch around. Join with ss to first sc. (134 stitches)
Round 37: ch 1. Skip stitch that has the ss. sc in next stitch and in each stitch around, ending with the final sc in skipped stitch at the beginning of the round. Join with ss to first sc. (134 stitches)
Fasten off and weave in ends.
Finished tote measures approximately 17 inches wide by 15 inches tall plus handles and about 2.5 inches across the bottom.
It’s Graduation season! 🎓 I needed to make bunch of graduation cards this year so I chose a simple layout that I could use for all of them.
Disclosure: Some of the links on my site are affiliate links, meaning, at no additional cost to you, I will earn a small commission if you click through and make a purchase. As an Amazon Associate I earn from qualifying purchases.
I stamped a graduation cap with Memento Tuxedo Black ink on white card stock. I punched around it with an oval punch and layered it to a larger oval punched from black card stock. My stamp is an old one from Stampendous, but it’s discontinued. ☹️ You can also use any simple graduation stamp you have in your collection.
To make the card, I embossed a piece of white card stock with a graduation cap embossing folder (similar to this). Using these Deckle & Stitches Nesting Dies, I die cut the piece and layered it to black card stock die cut with the same set. The piece is attached to a white card.
I attached a “class of 2026” ribbon that I found at Hobby Lobby to the card. The stamped image is attached to the card at a slight angle. To finish the card, I added 3 gold sequins.
No bake cookies are so quick and easy to make – and they’re yummy, too! 😋
Disclosure: Some of the links on my site are affiliate links, meaning, at no additional cost to you, I will earn a small commission if you click through and make a purchase. As an Amazon Associate I earn from qualifying purchases.
This recipe is called No Bake Avalanche Cookies and you can find the recipe here at Cookies & Cups. They are super easy to make with just a few ingredients.
Add the crispy rice cereal and marshmallows to a large bowl, melt the peanut butter and white chocolate (I melted mine in the microwave), stir together, pour over the cereal and marshmallows, and mix well.
Drop by spoonfuls onto a parchment paper lined baking sheet. I added some colorful sprinkles over the top of my cookies and then put them into the fridge until they were firm. You can make your cookies any size you want. I used a cookie scoop for my cookies.
You’ll want to store these cookies in a cool place so they don’t get too soft – in the fridge is great! You can eat them right out of the fridge or let them warm up a tad before eating them.
If you like peanut butter, I think you will love these cookies! 😋
Crochet spa cloths stitch up quickly and make a great gift! I’m sharing a couple of my favorite patterns if you need a last minute Mother’s Day or Teacher gift idea.🧶
Disclosure: Some of the links on my site are affiliate links, meaning, at no additional cost to you, I will earn a small commission if you click through and make a purchase. As an Amazon Associate I earn from qualifying purchases.
Just click on each pictures or the links below to go to the posts with the free patterns.
Add a couple of spa cloths along with body wash or handmade soap to a cute basket for a thoughtful gift. You could also include a gift card to a favorite store or coffee shop.
An added bonus – since these spa cloths are stitched with cotton yarn, they can also be used as dishcloths! 😊
Disclosure: Some of the links on my site are affiliate links, meaning, at no additional cost to you, I will earn a small commission if you click through and make a purchase. As an Amazon Associate I earn from qualifying purchases.
Using these Scallops & Squares Nesting Dies, I die cut around the image and layered it to blush card stock die cut with the same set. The piece is then attached to a green card. To finish the card I attached 3 light green Dew Drops.
I used this card for a bridal shower, but with this sentiment or one of the other 2 in the set, it could be a perfect card for almost any happy occasion.
I managed to get my monthly Christmas card for April created with a couple of days to spare! 🎄You can find my other monthly Christmas card creations so far this year in these posts: January, February, and March.
Disclosure: Some of the links on my site are affiliate links, meaning, at no additional cost to you, I will earn a small commission if you click through and make a purchase. As an Amazon Associate I earn from qualifying purchases.
To make the card, I embossed a piece of red card stock with a snowflake embossing folder (similar to this) and then die cut it with these Scallops & Rectangles Nesting Dies. I attached the piece to a white card and added a strip of green gingham patterned paper. The Santa image is attached over the top. The sentiment is stamped with red ink on white card stock, die cut with these Scalloped & Stitched Sentiment Nesting Dies, and attached it to the card.
Have you started creating your Christmas cards yet? I promise you will be so glad if you start on them now! 🎄
Disclosure: Some of the links on my site are affiliate links, meaning, at no additional cost to you, I will earn a small commission if you click through and make a purchase. As an Amazon Associate I earn from qualifying purchases.