Disclosure: Some of the links on my site are affiliate links, meaning, at no additional cost to you, I will earn a small commission if you click through and make a purchase. As an Amazon Associate I earn from qualifying purchases.
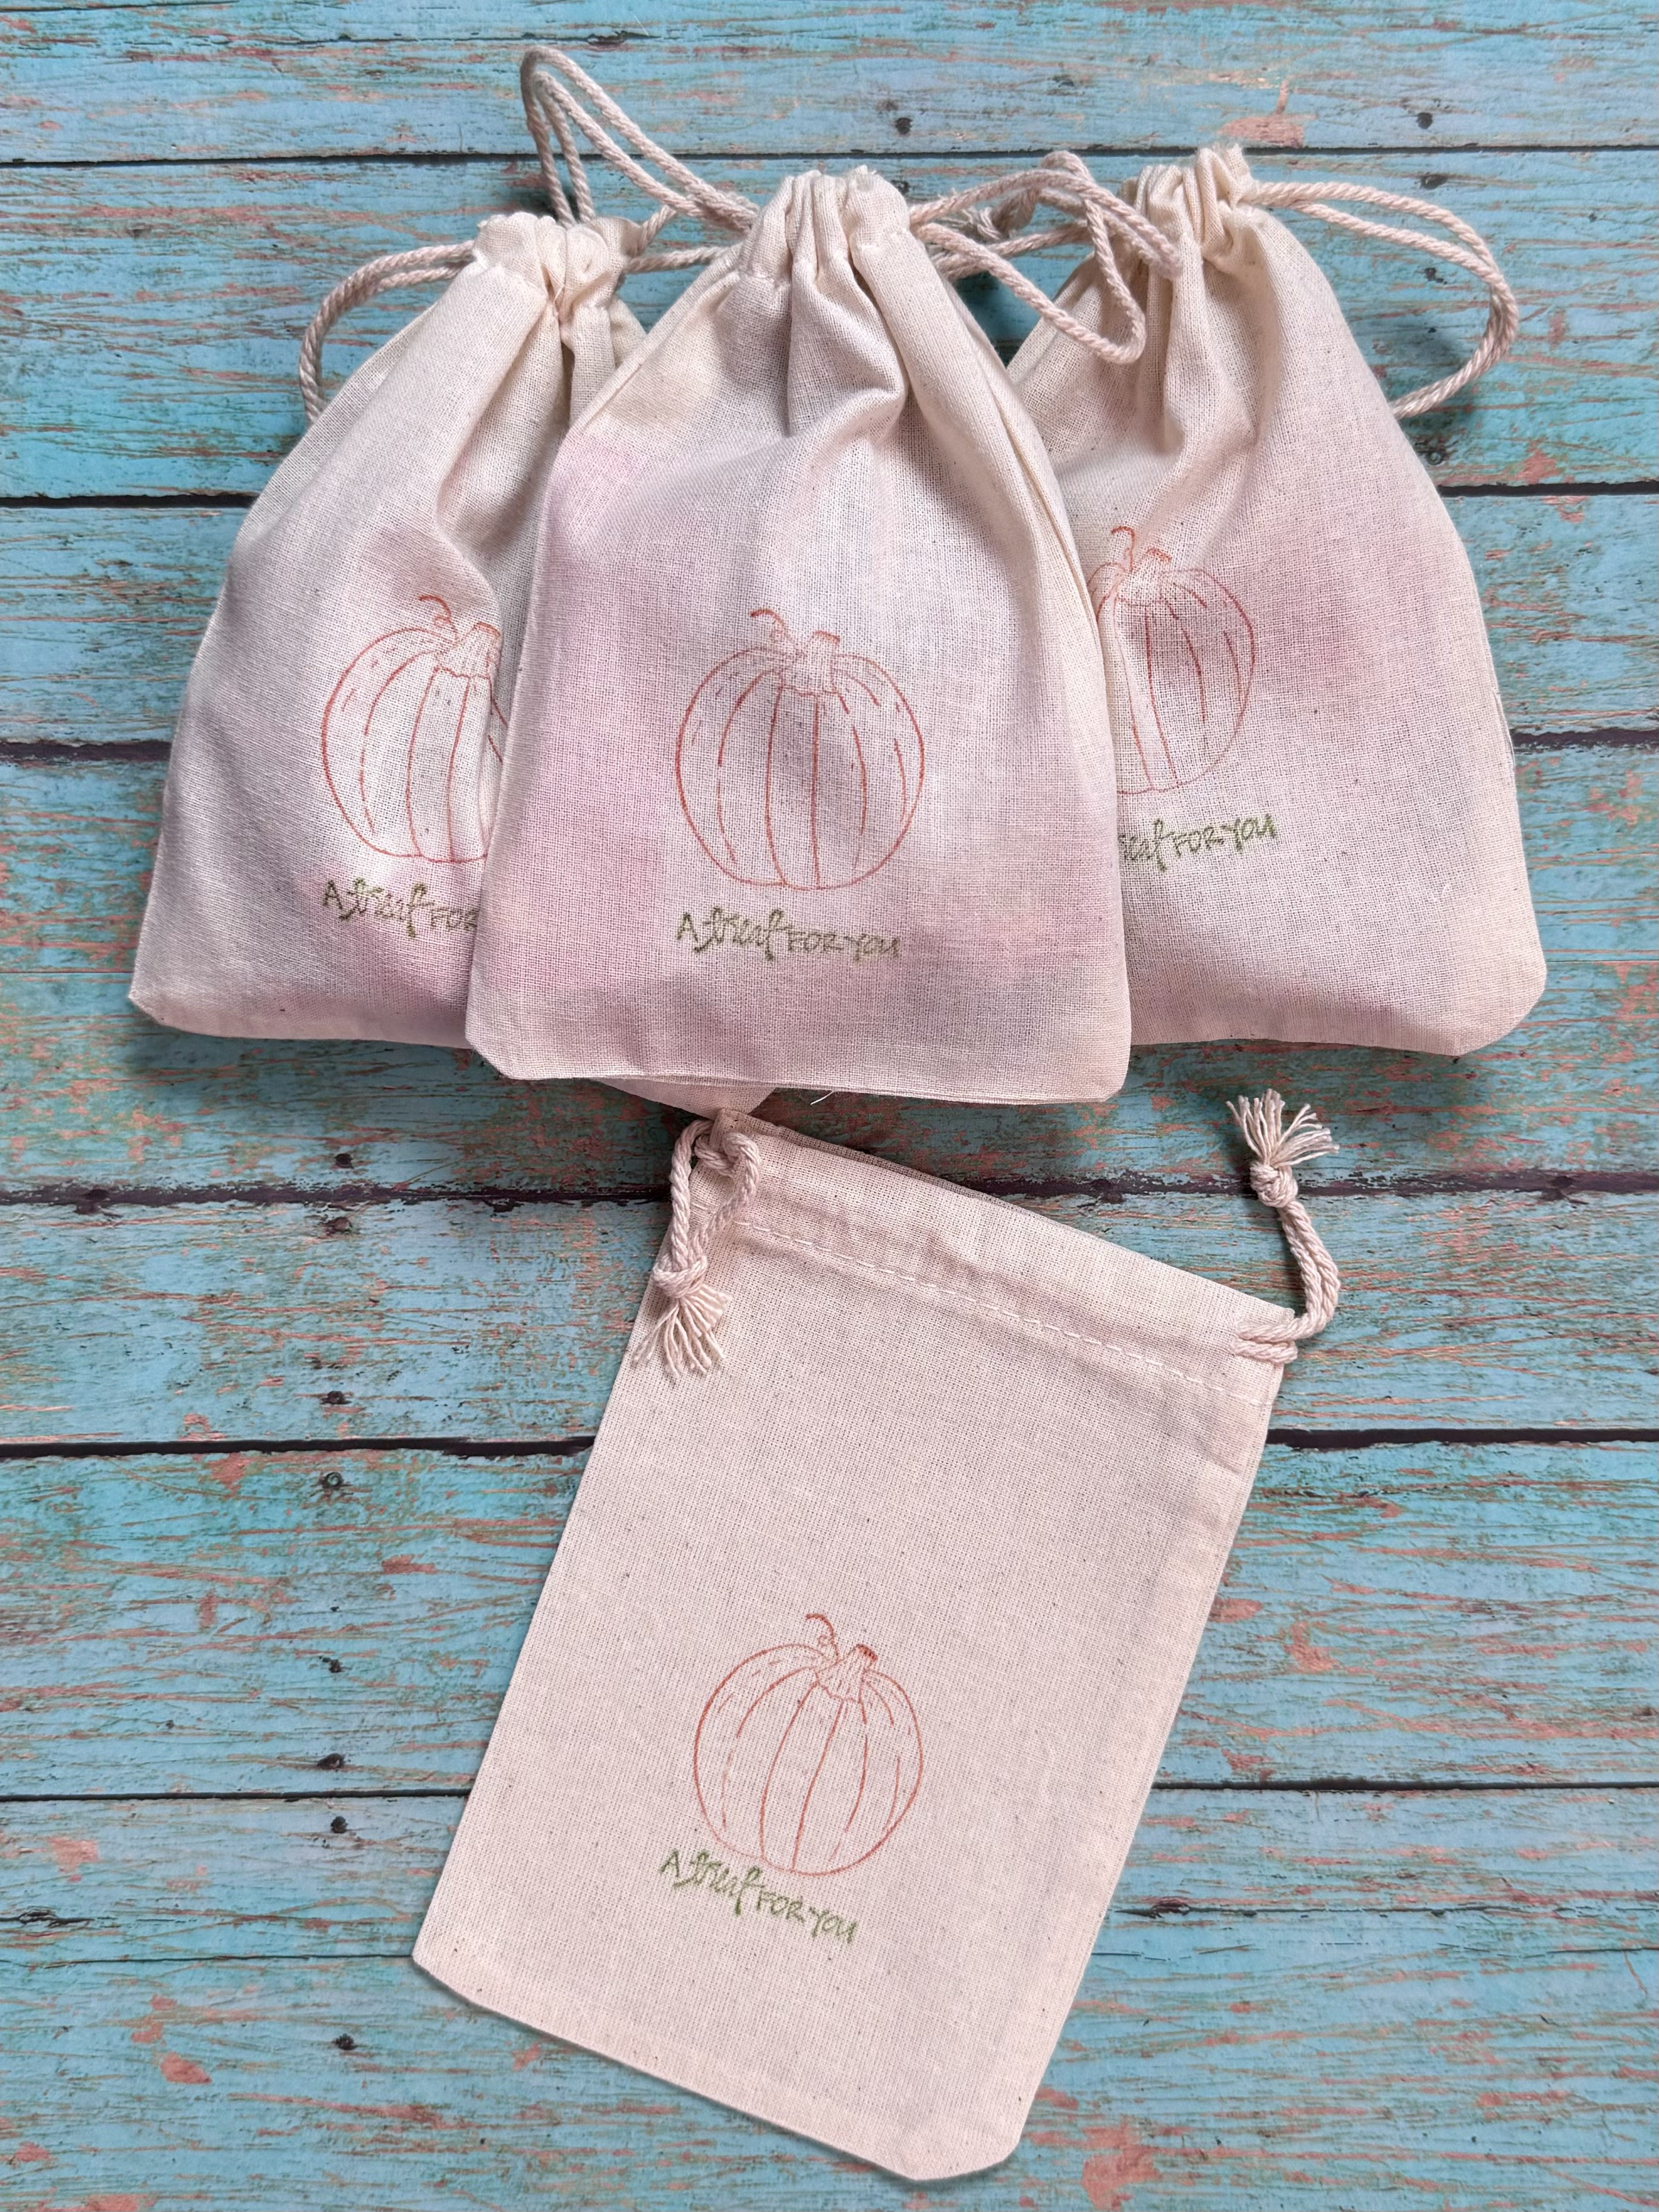
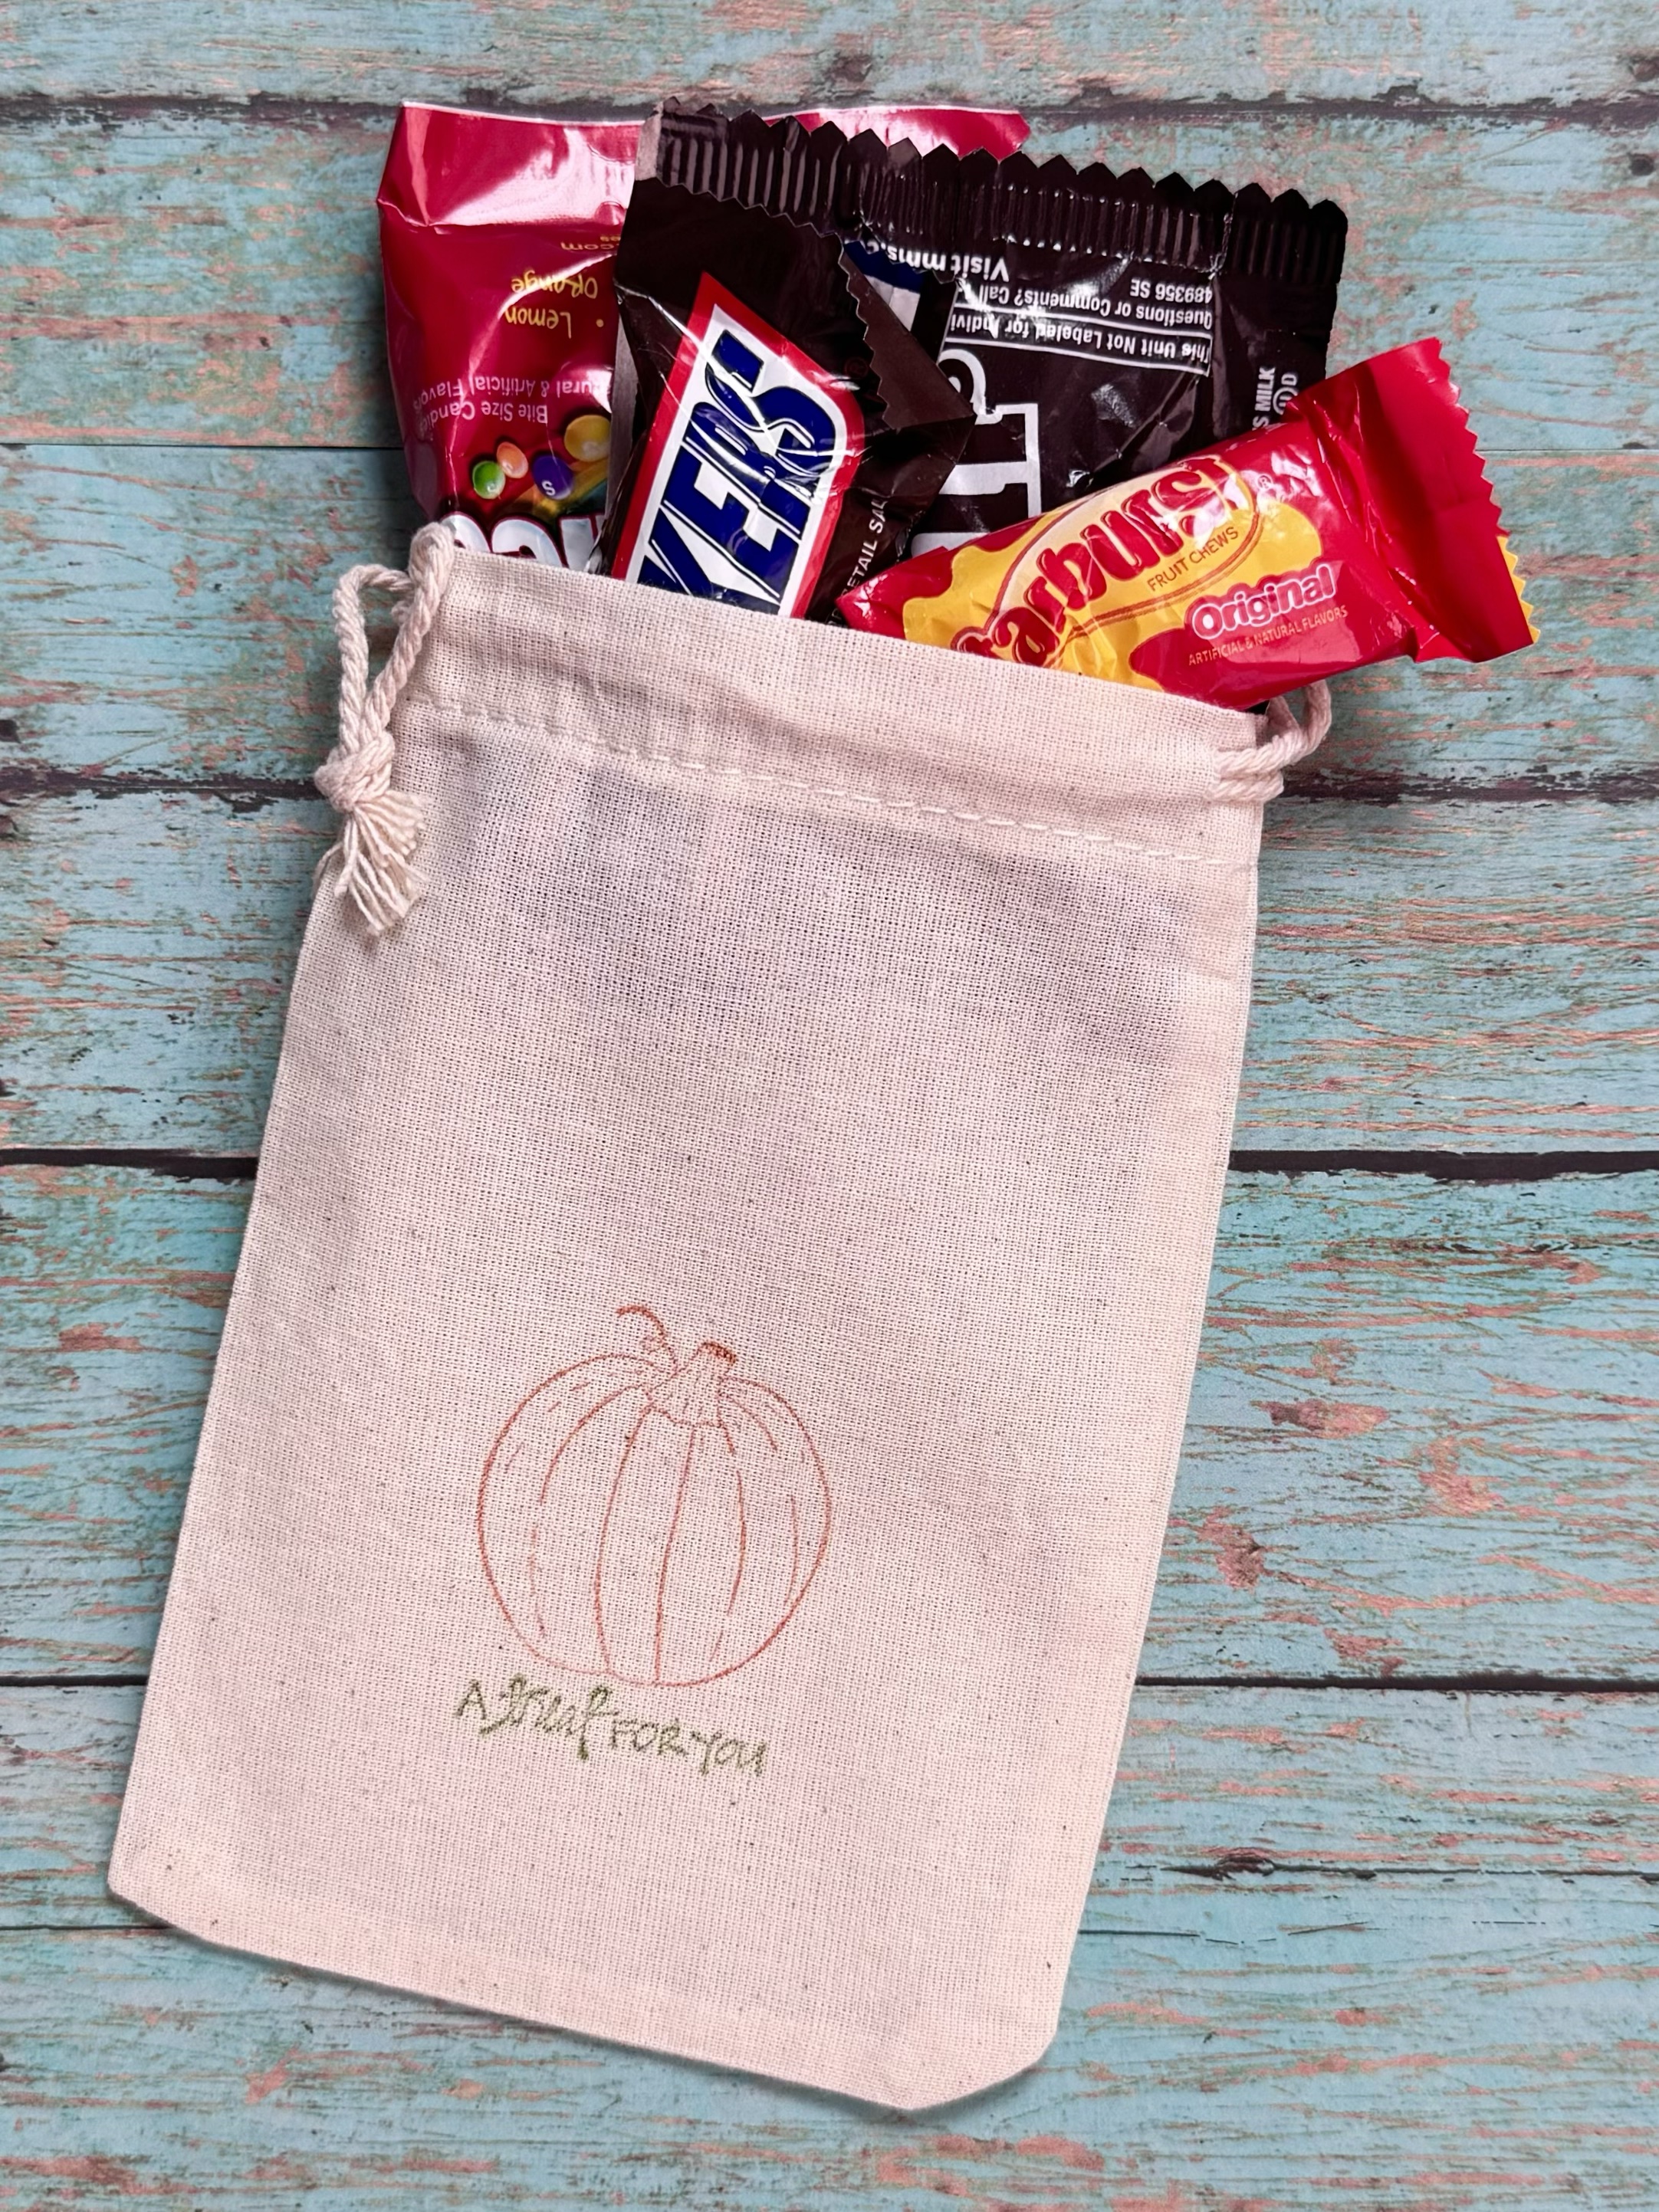
I wanted the bags to work for the entire Fall season so I used a pumpkin stamp rather than a Jack-O-Lantern. Of course, you can totally use a Halloween themed stamp instead! 🎃
Both my pumpkin and sentiment stamps are older discontinued stamps from my collection. This set from Hero Arts has a smilier pumpkin stamp. This set by Photoplay has some fun Halloween sentiments. And this set also by Photoplay has some great Fall sentiments. Any simple stamp and Fall sentiment from your collection will work on your bags.
I used dye ink to stamp my pumpkin with orange ink (this is a similar orange ink) and my sentiment with green ink (this is a similar green ink). I slipped a piece of scrap card stock into my bags before stamping to make sure the ink didn’t go through to the back of my bags. So quick and easy!
You can stamp a lot of these bags in just a few minutes and they make giving a treat a little more fun! 🎃🍁🍂
Disclosure: Some of the links on my site are affiliate links, meaning, at no additional cost to you, I will earn a small commission if you click through and make a purchase. As an Amazon Associate I earn from qualifying purchases.
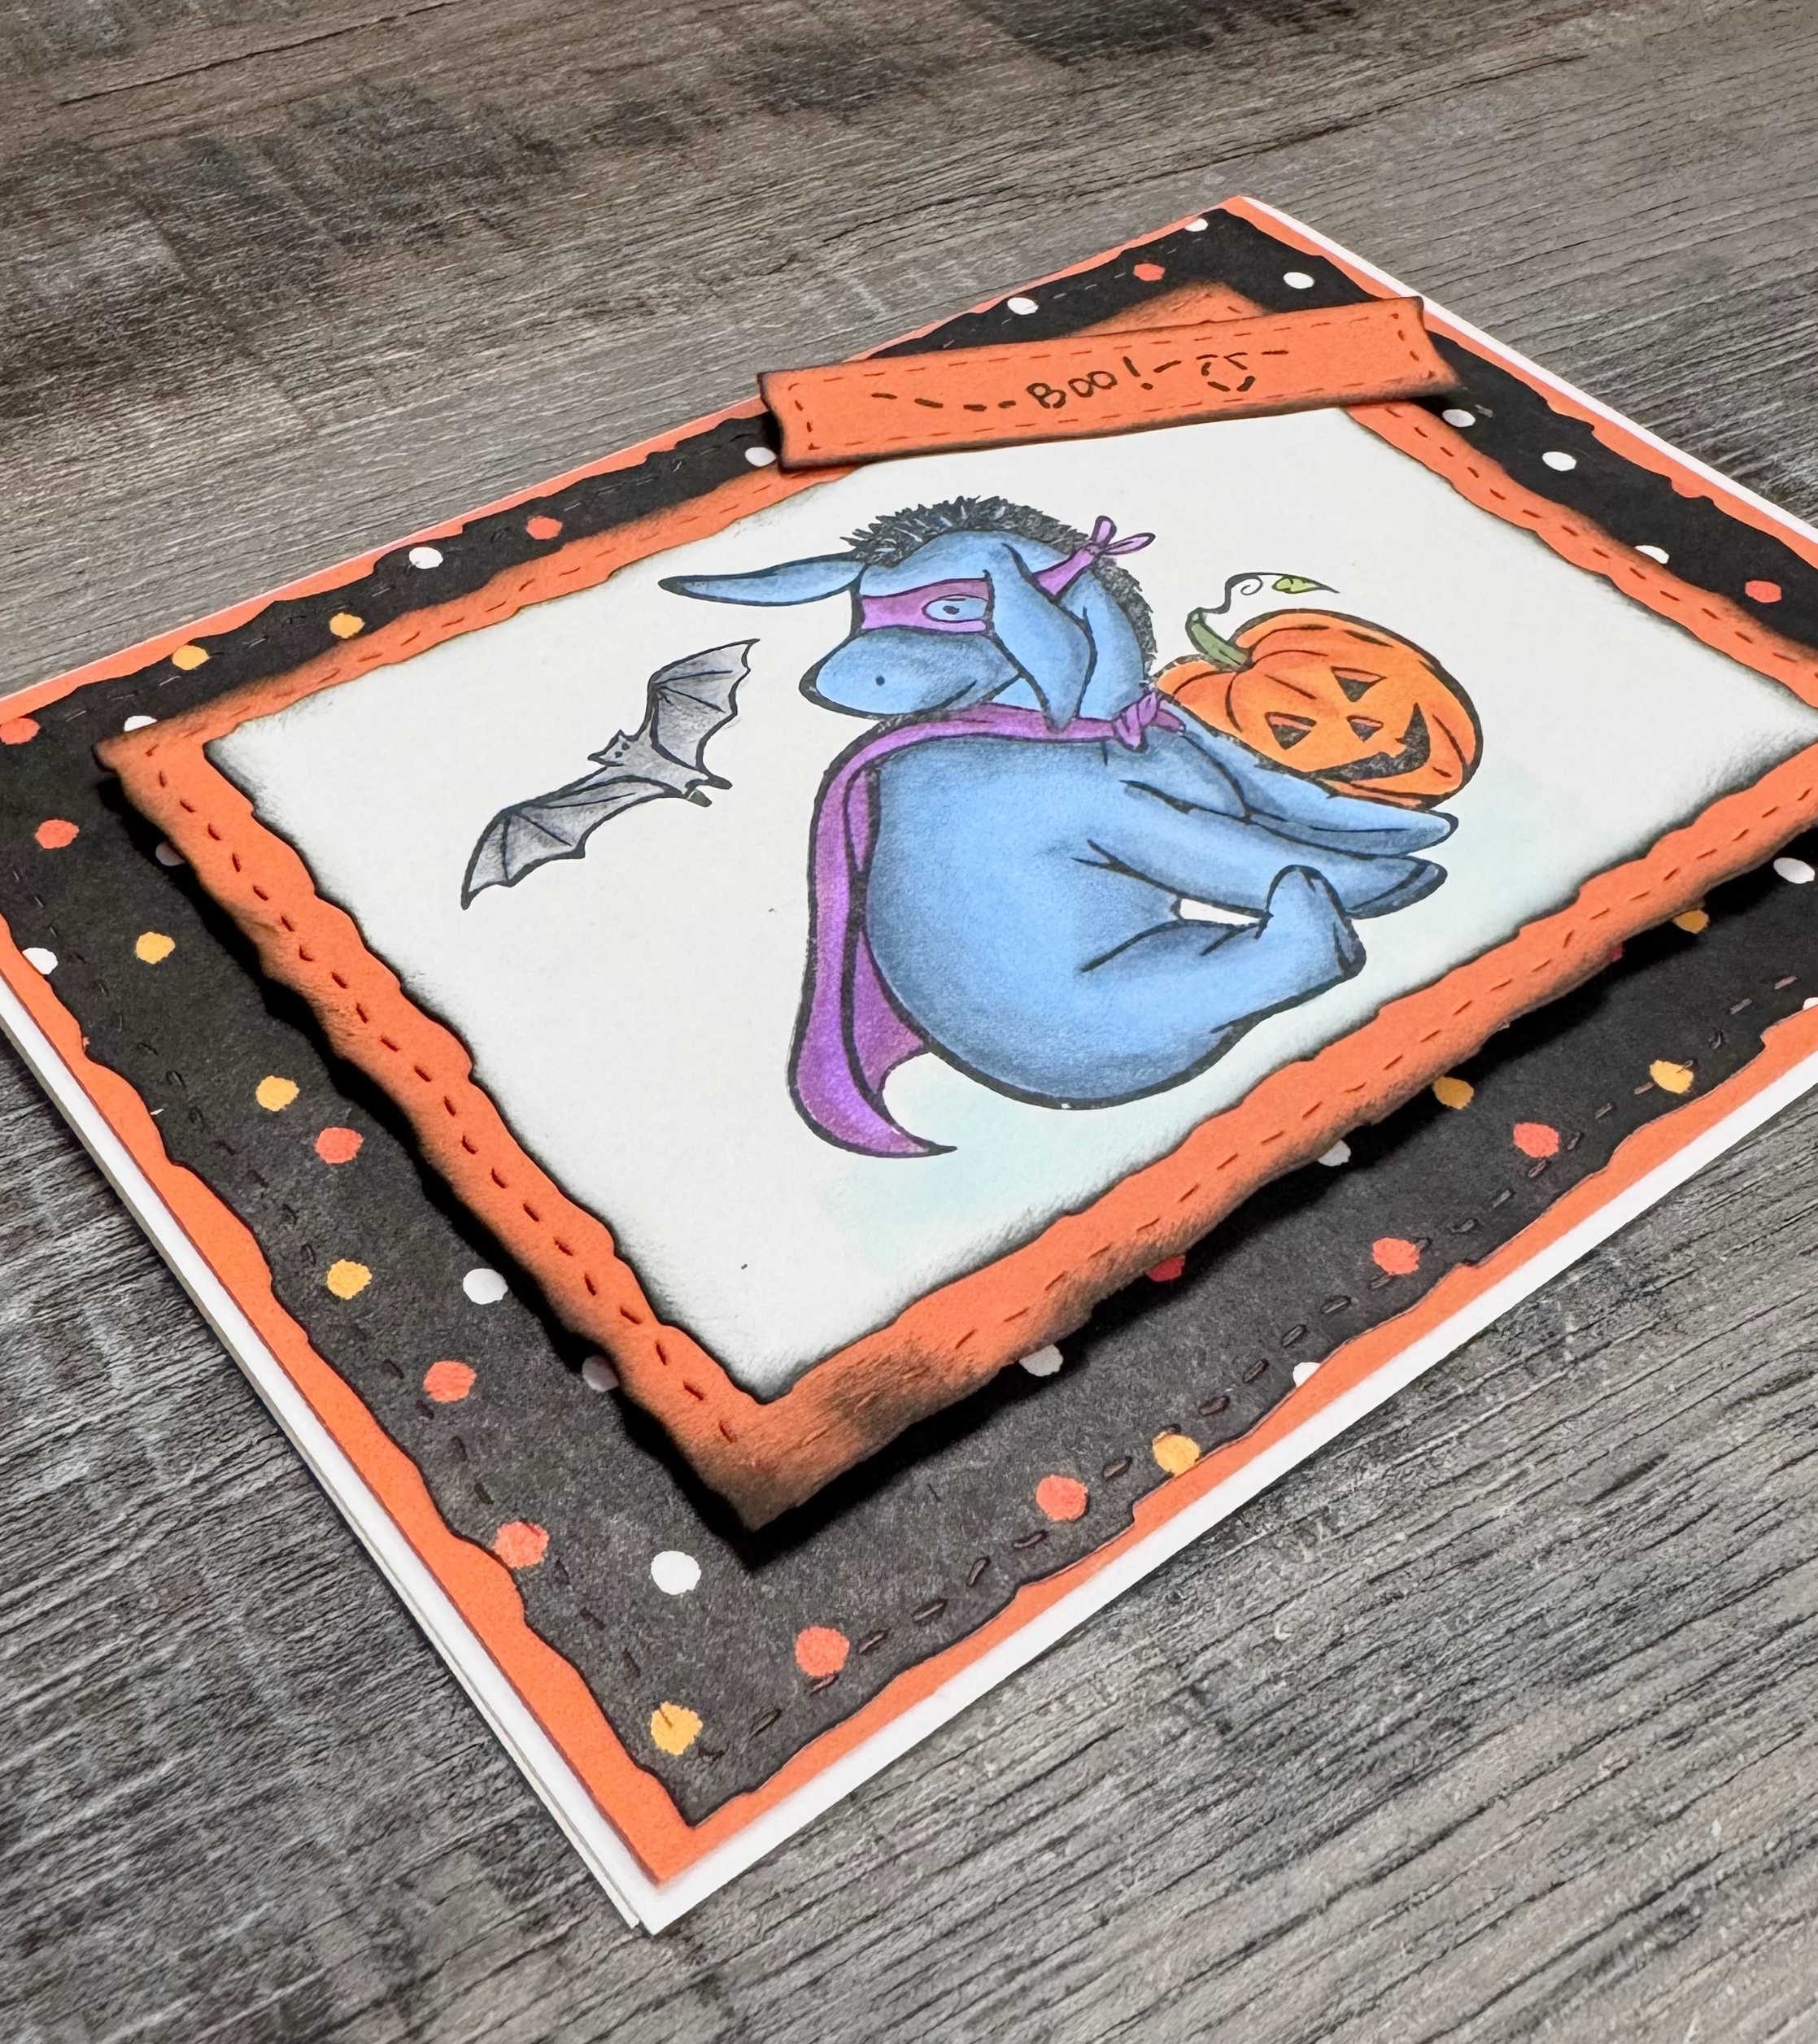
I stamped Eeyore with Memento Tuxedo Black ink on white card stock and colored it with Copic markers. I used the Deckle & Stitches Nesting Die Set from Unity Stamp Company to cut around the image. I used the same die set to cut a piece from orange card stock and patterned paper. I applied black to the edges of the stamped piece and the orange card stock using a sponge dauber and then attached the stamped piece to the card stock. I attached a piece of orange card stock to a white card, leaving a small border of the card showing, and attached the patterned paper. The stamped image is attached to the card with foam tape.
My “boo” stamp is an older discontinued stamp that I had in my collection. Any of your smaller Halloween sentiment stamps would work great. (This set has some fun sentiments.) I stamped it with black ink on orange card stock, die cut around it with the same die set I used on Eeyore, and inked the edges of the piece with black ink. I attached it to the corner of the Eeyore piece.
Such a fun card using one of my favorites! Eeyore always makes me smile. 🎃
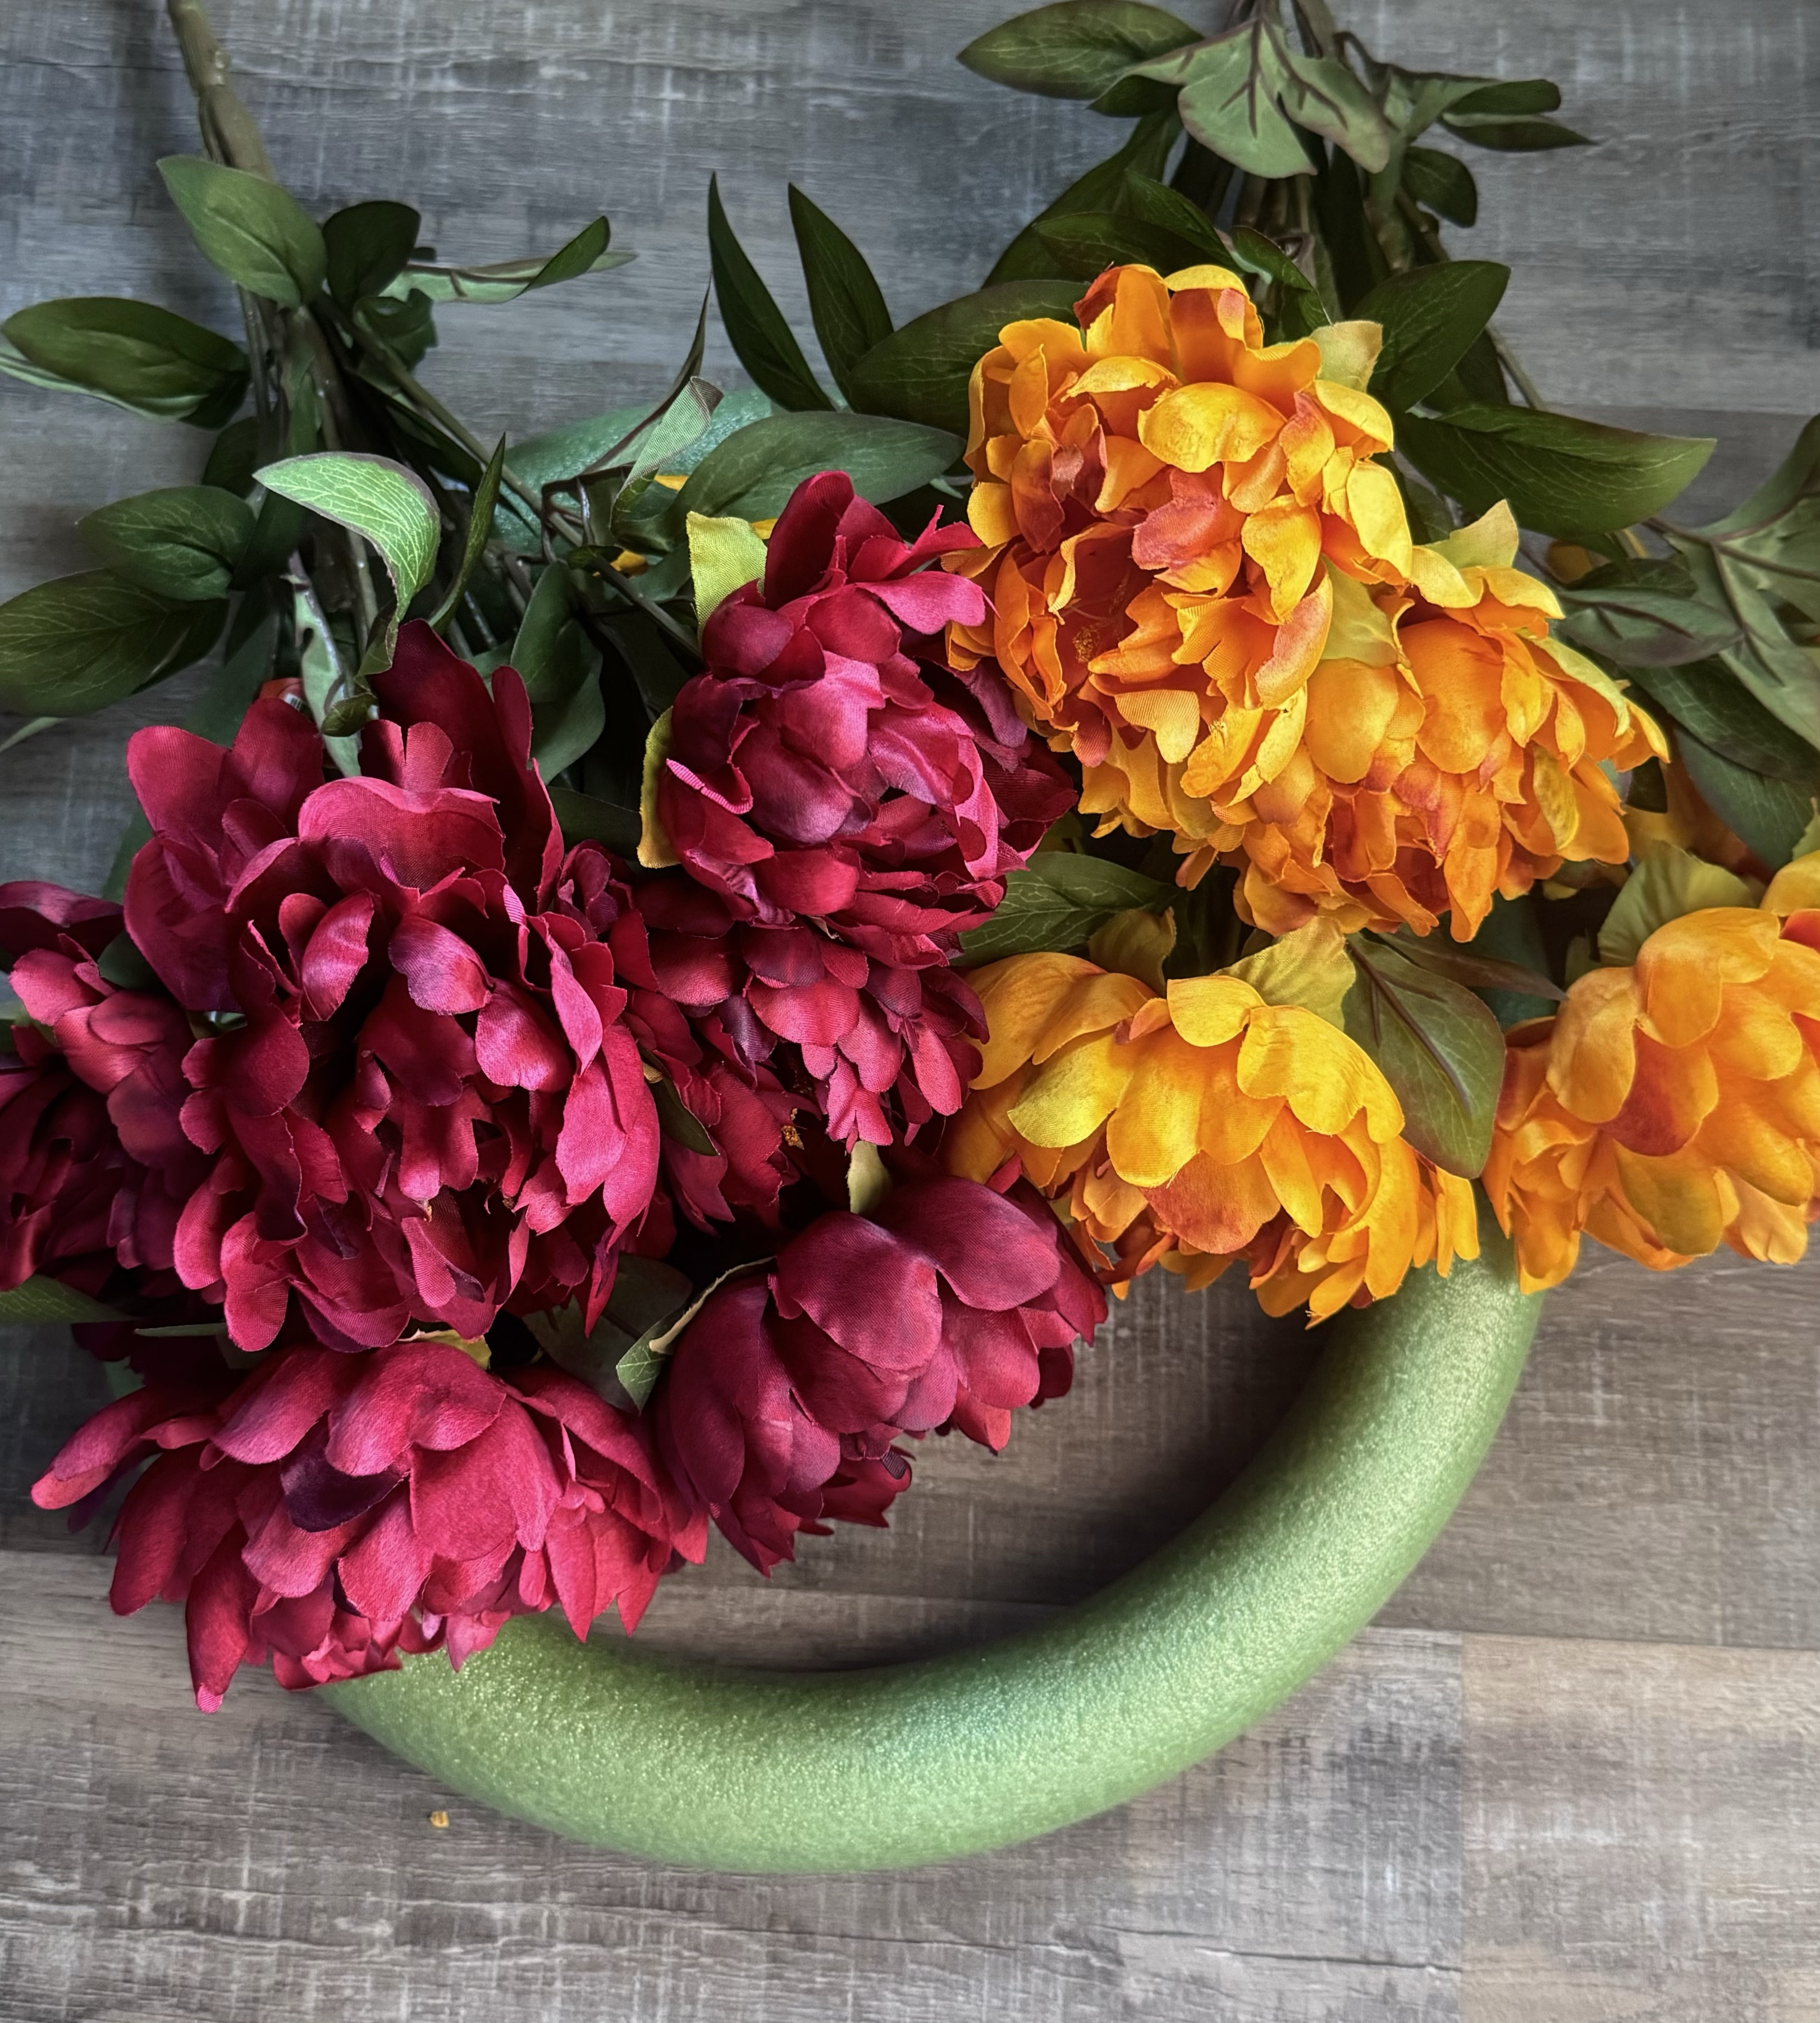
When I pulled out my Fall decorations, I noticed that my front door wreath had seen better days. My door faces east, so it gets the morning sun and my wreath had really faded over the last couple of years. I wanted to make a new one, but wanted it to be simple. I came up with this Fall Flower Wreath and you can make it in less than 30 minutes! 😊
Disclosure: Some of the links on my site are affiliate links, meaning, at no additional cost to you, I will earn a small commission if you click through and make a purchase. As an Amazon Associate I earn from qualifying purchases.
This is one of the easiest wreaths to make. All you need is a floral wreath form (mine measures 15.6 inches), your favorite flower stems (I got floral bushes with several flowers on each one), and your glue gun.
First you’ll want to clip off your flowers with wire cutters, leaving a small portion of the stem as shown in the right picture below. Next poke it into your wreath to make a hole and push the flower flush with the wreath form, making sure it doesn’t go out through the back of the wreath. If the stem is too long, just trim a little more off. Pull the flower out, add a little hot glue to the stem (I forgot to take a pic of that 🙃), and push it back into the hole on the wreath form. Continue around your wreath until it is completely covered. I pinned a small piece of ribbon to the back of my wreath for hanging.
This is my wreath on my front door. Very simple, but it is just what I had in mind. 🙂 I had the hardest time getting the true colors of my flowers in my pictures. The actual colors are somewhere in-between the picture above and the picture below. But they really are the rich colors of Fall. 🍁🍂🍁
There are so many possibilities with making a wreath this way. Pick your favorite flowers in your favorite colors and you can have a new wreath for your front door in less than 30 minutes. 😊
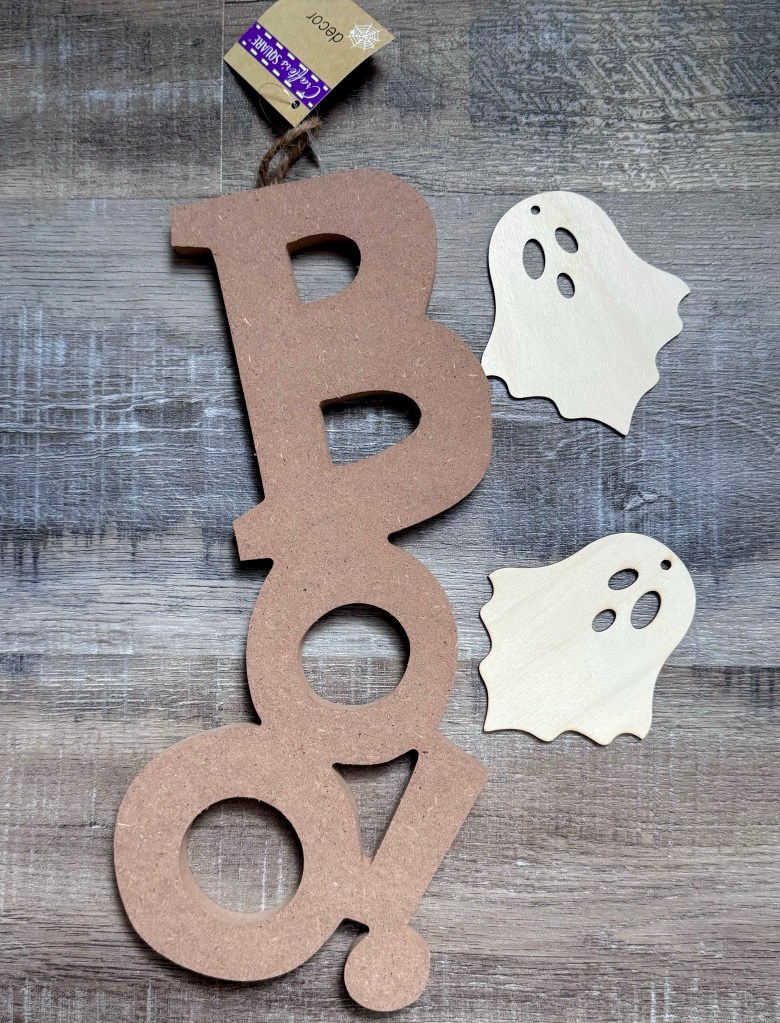
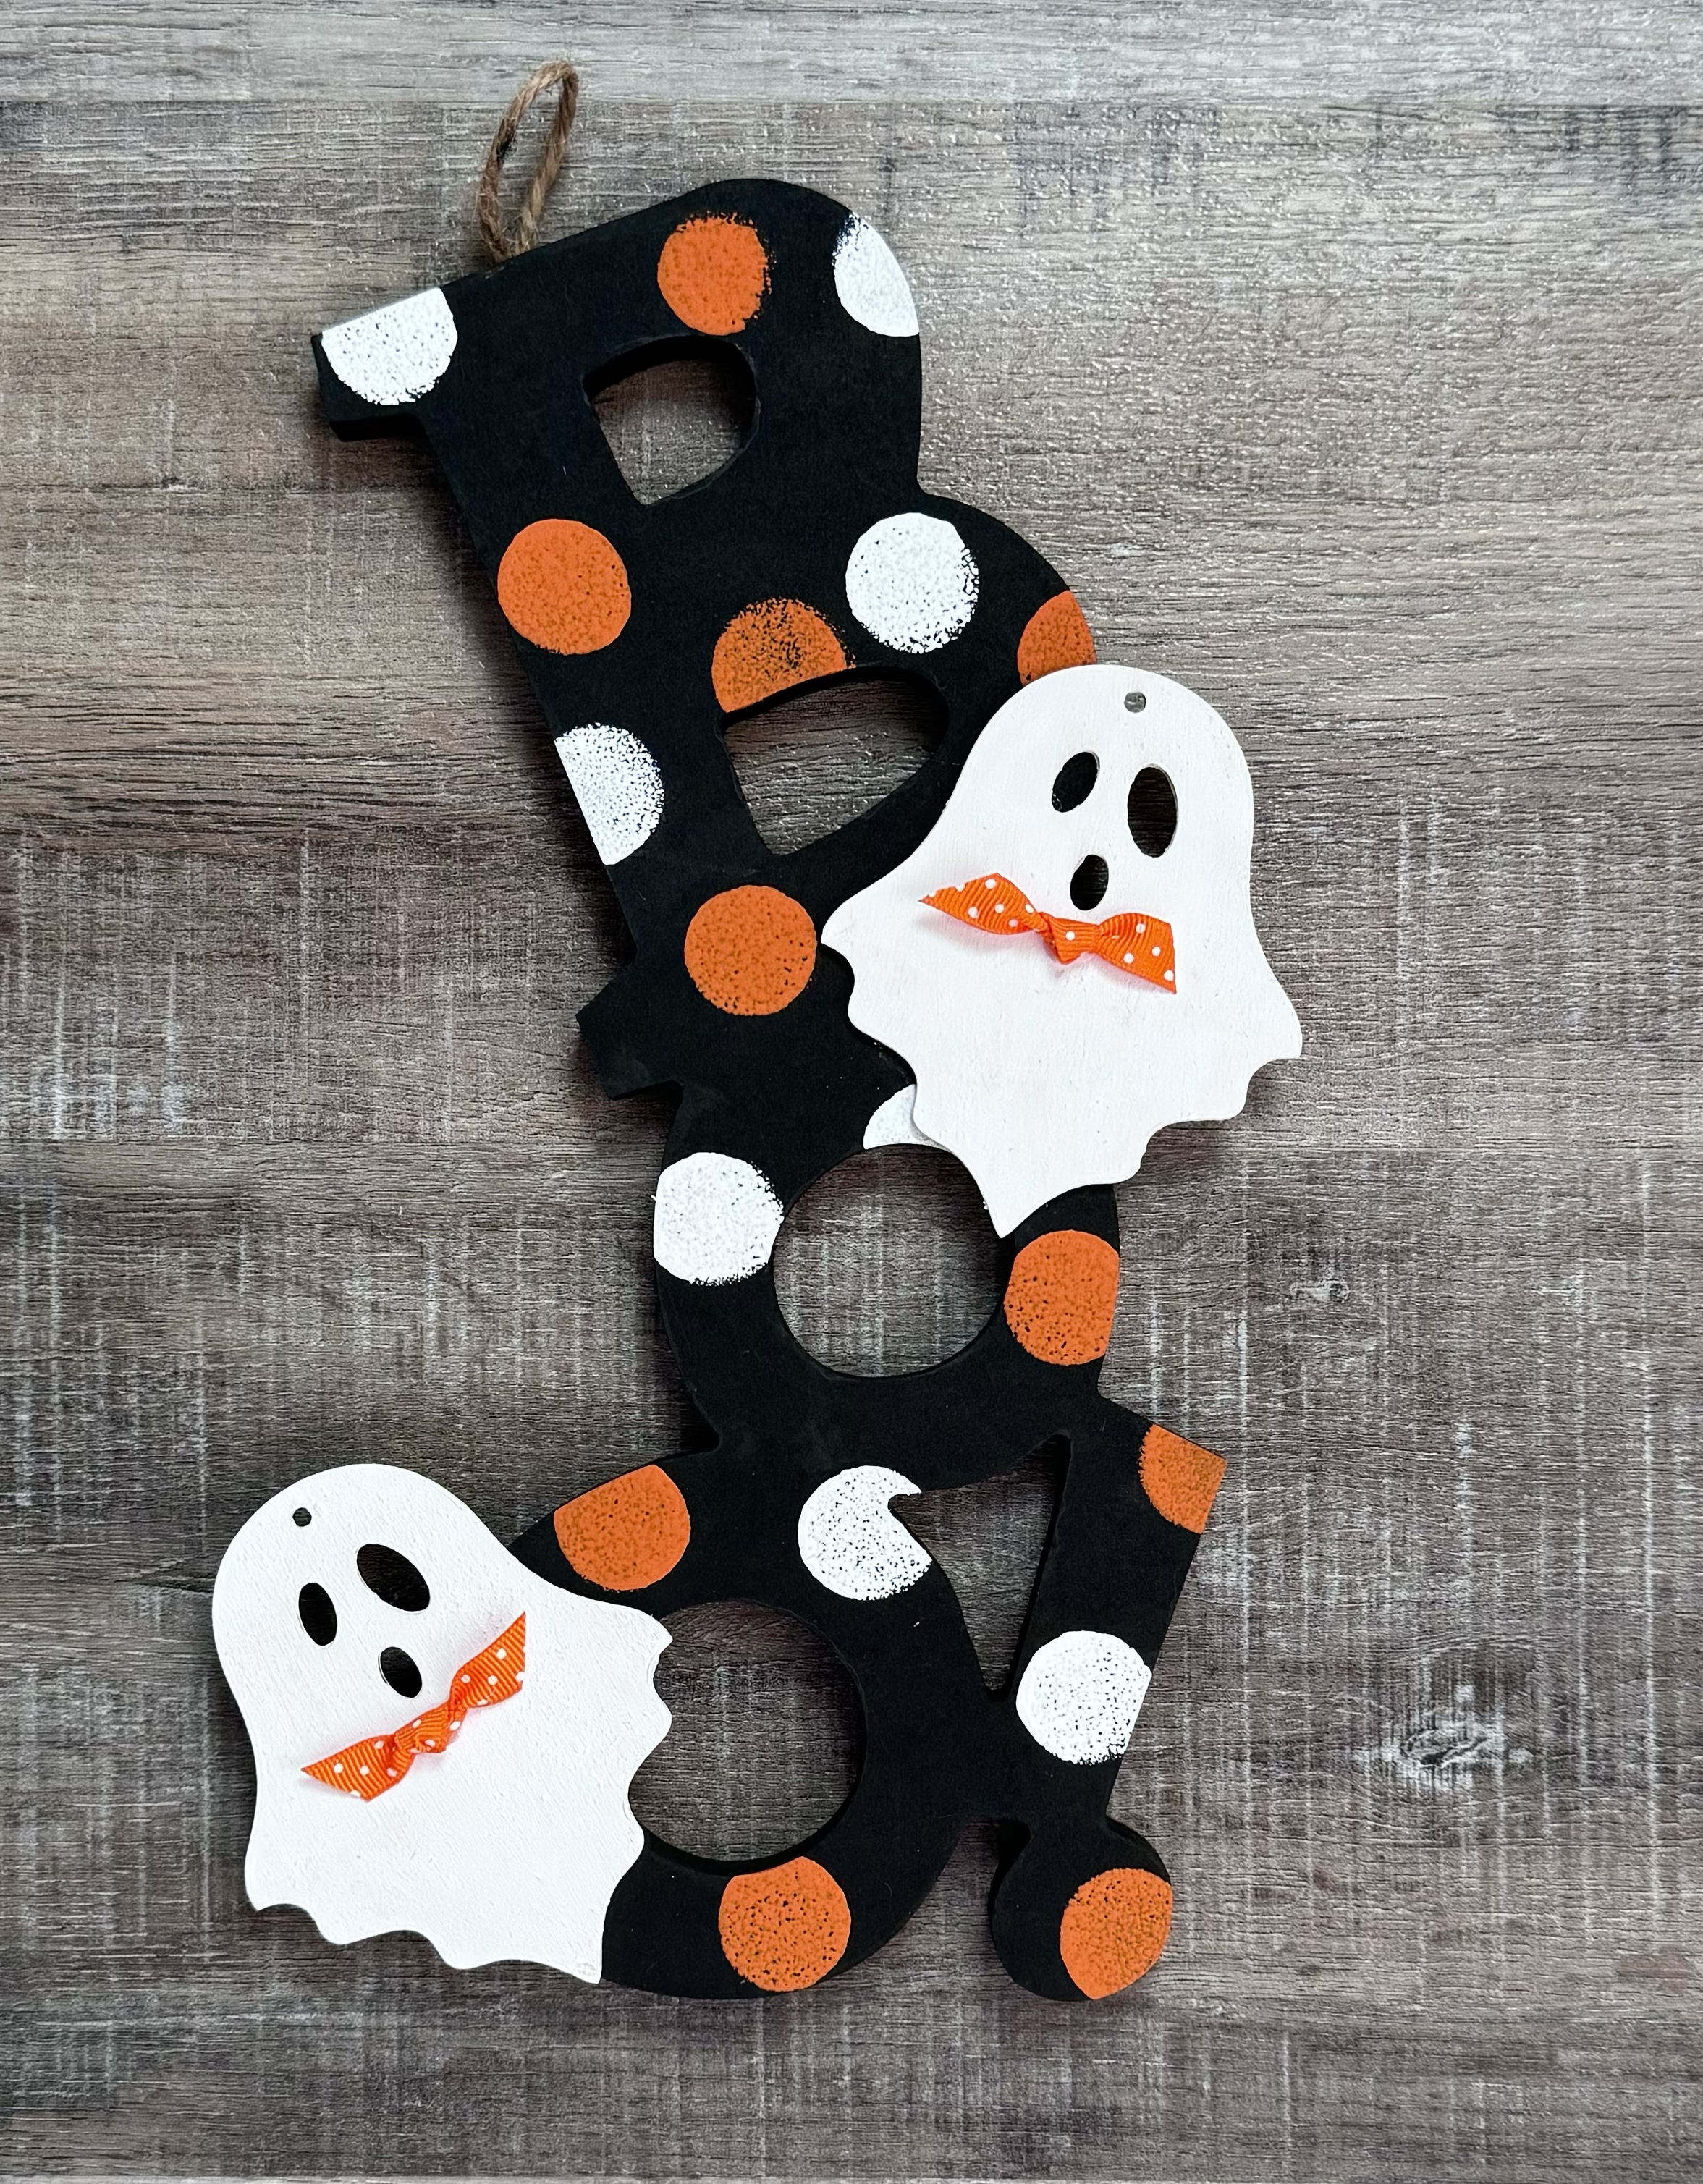
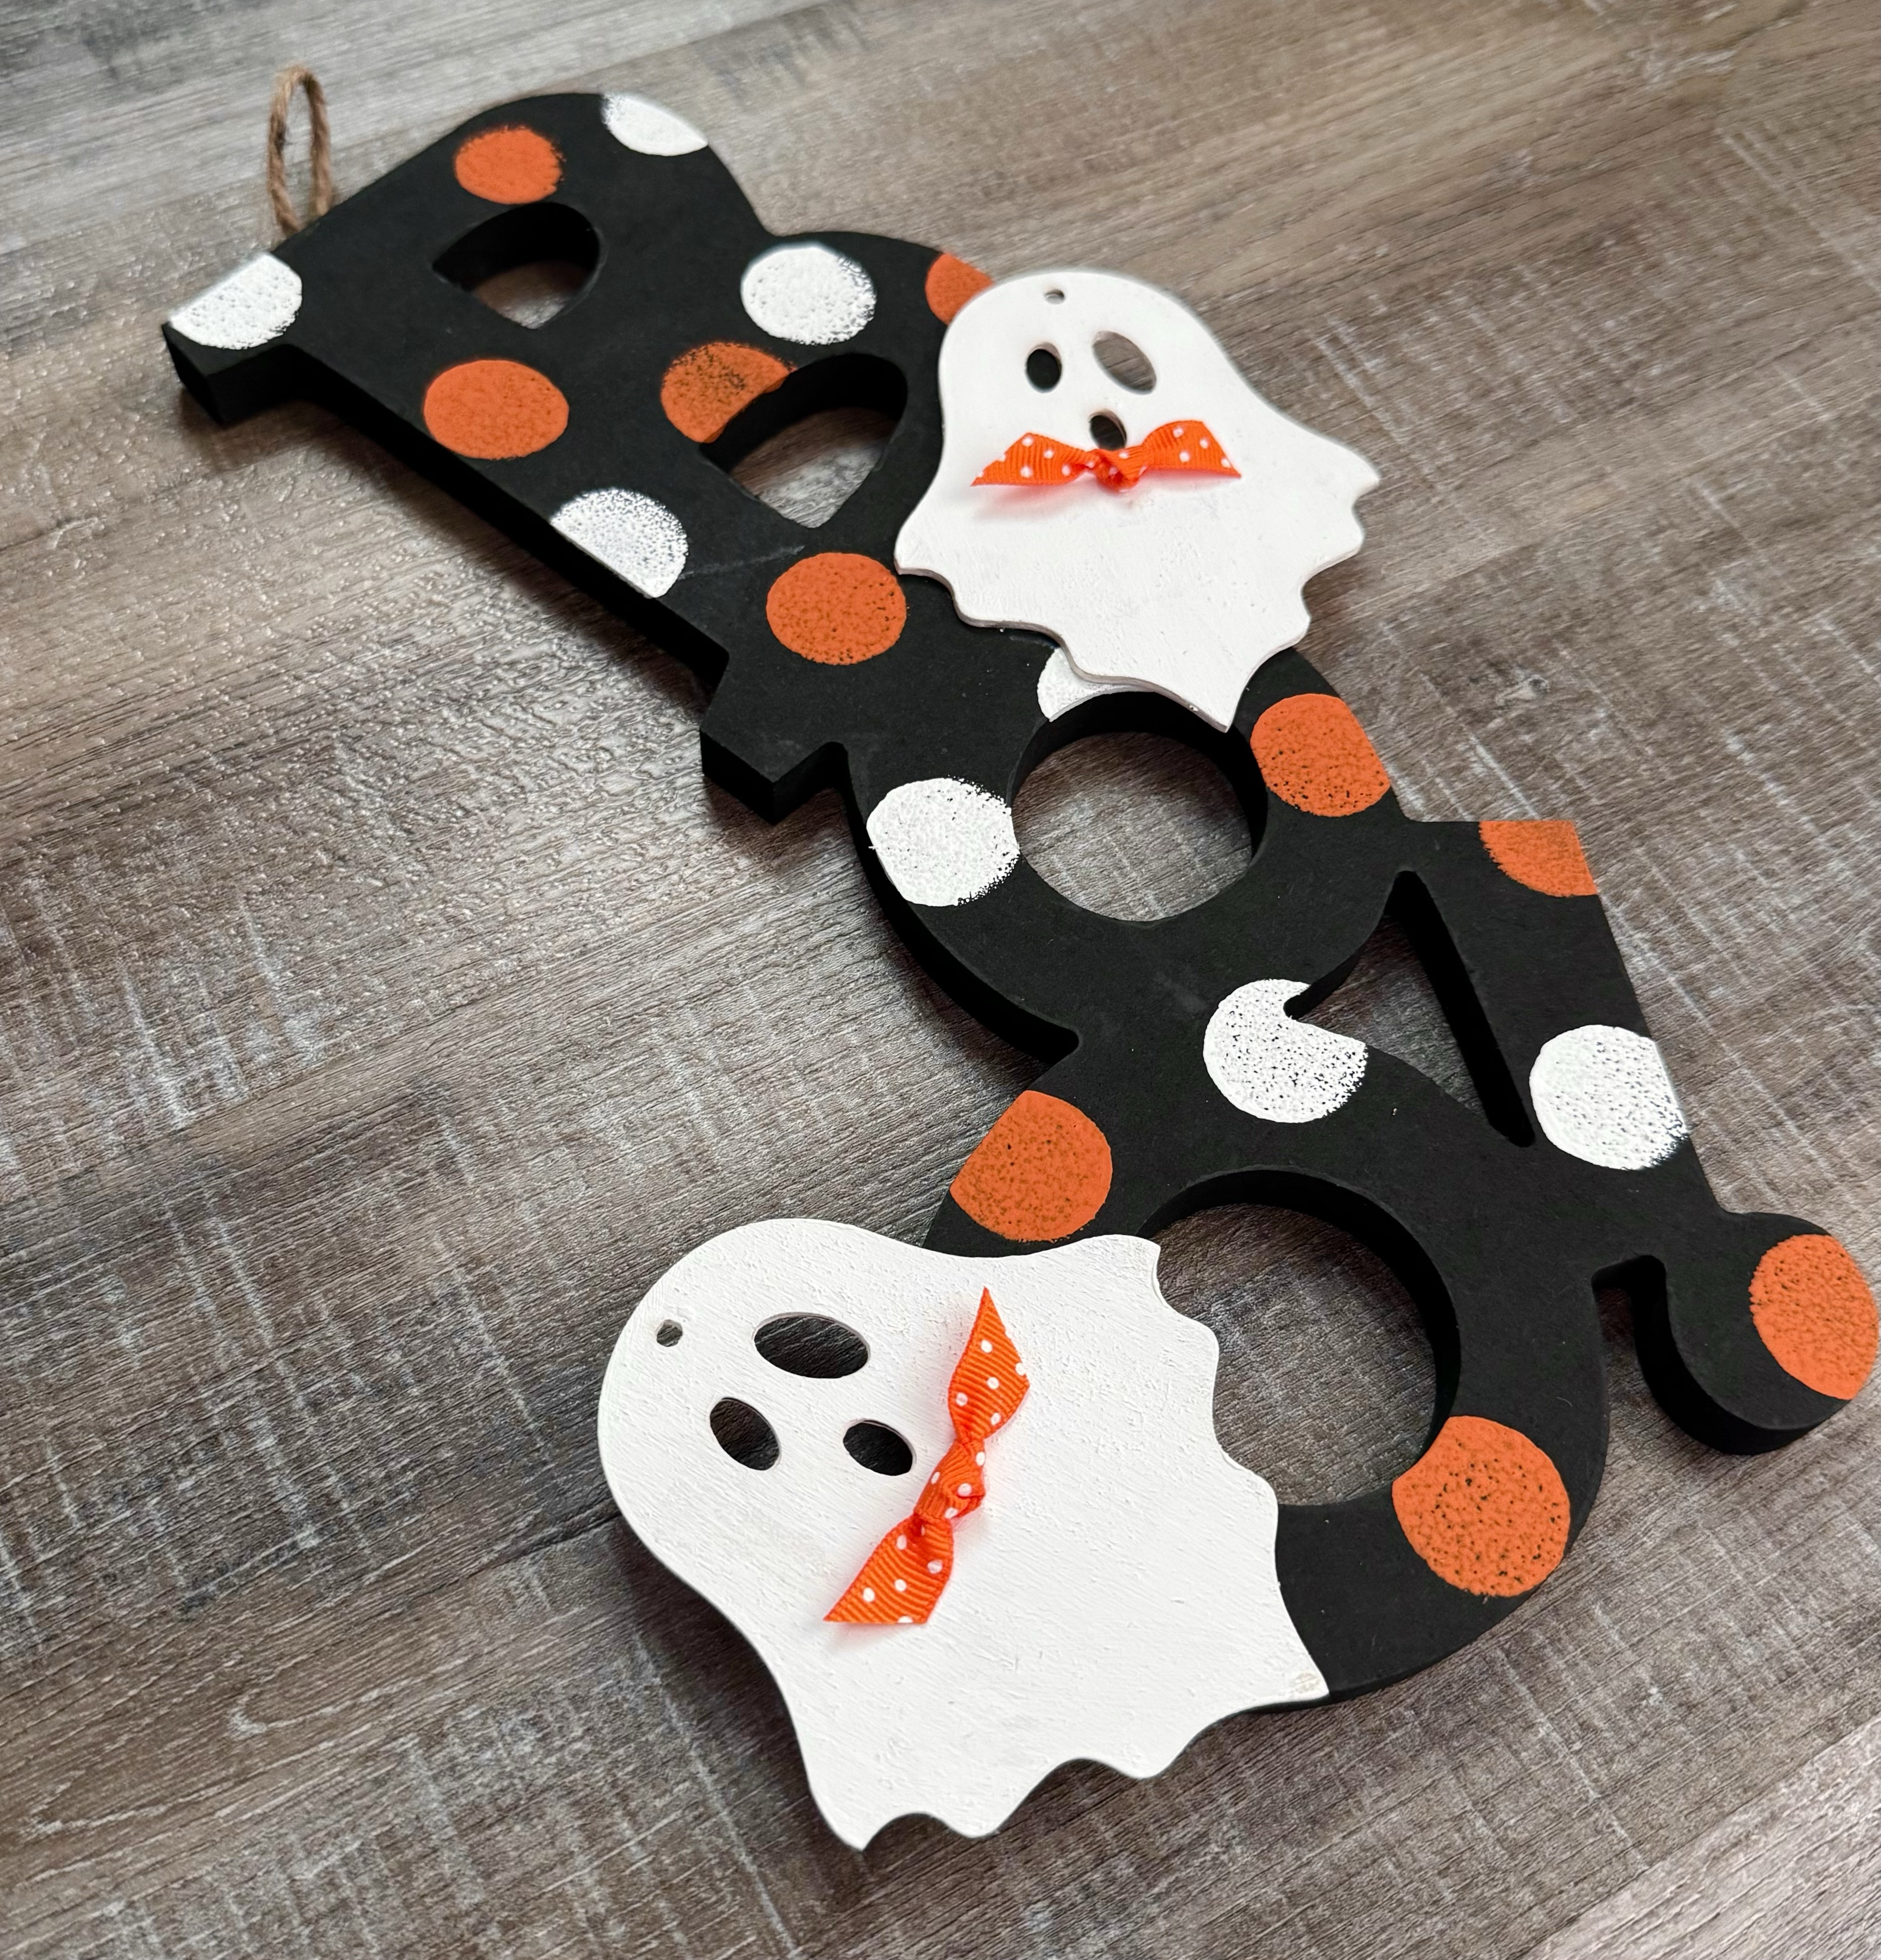
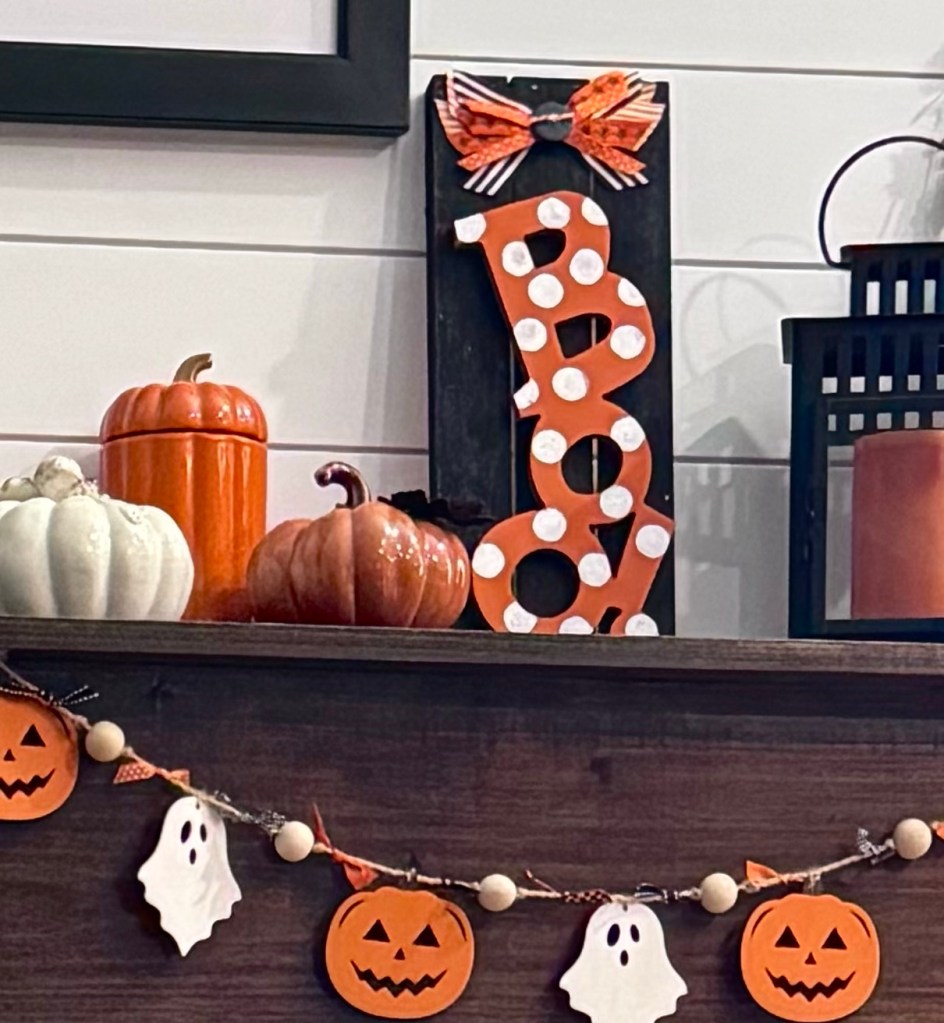
This Boo! sign and little ghost ornamnets came from Dollar Tree. They have had them in the Fall for several years, but I’m not sure if they had them this year. My local Dollar Tree has been kind of hit or miss with things lately and I didn’t see them. But I had them in my craft stash so I pulled them out to make a fun Halloween Boo! sign. 👻👻
Disclosure: Some of the links on my site are affiliate links, meaning, at no additional cost to you, I will earn a small commission if you click through and make a purchase. As an Amazon Associate I earn from qualifying purchases.
I painted the word with black acrylic paint and painted the little ghosts with white acrylic paint. (Need to stock up your craft room? This is a great set of acrylic paints.) Once the paint was dry, I used a small round sponge dabber from this set and randomly applied white and orange dots to the BOO! I used E6000 clear adhesive to glue the ghosts to the word. I tied orange dotted ribbon into a tiny knot and glued them to ghosts as little bow ties.
It turned out super cute! It has an attached twine hanger for putting it on your wall or door. You can also prop it up on a shelf or your mantel – you might want to remove the twine hanger or tuck it behind the top of the “B”. (I forgot to do that in the pic on the right above!) 🙃
A few years ago, I used the BOO! in another project. You can see it in this post.
This is a fun project that you can make in an hour or so. It will be a cute addition to your Halloween decor. 👻👻
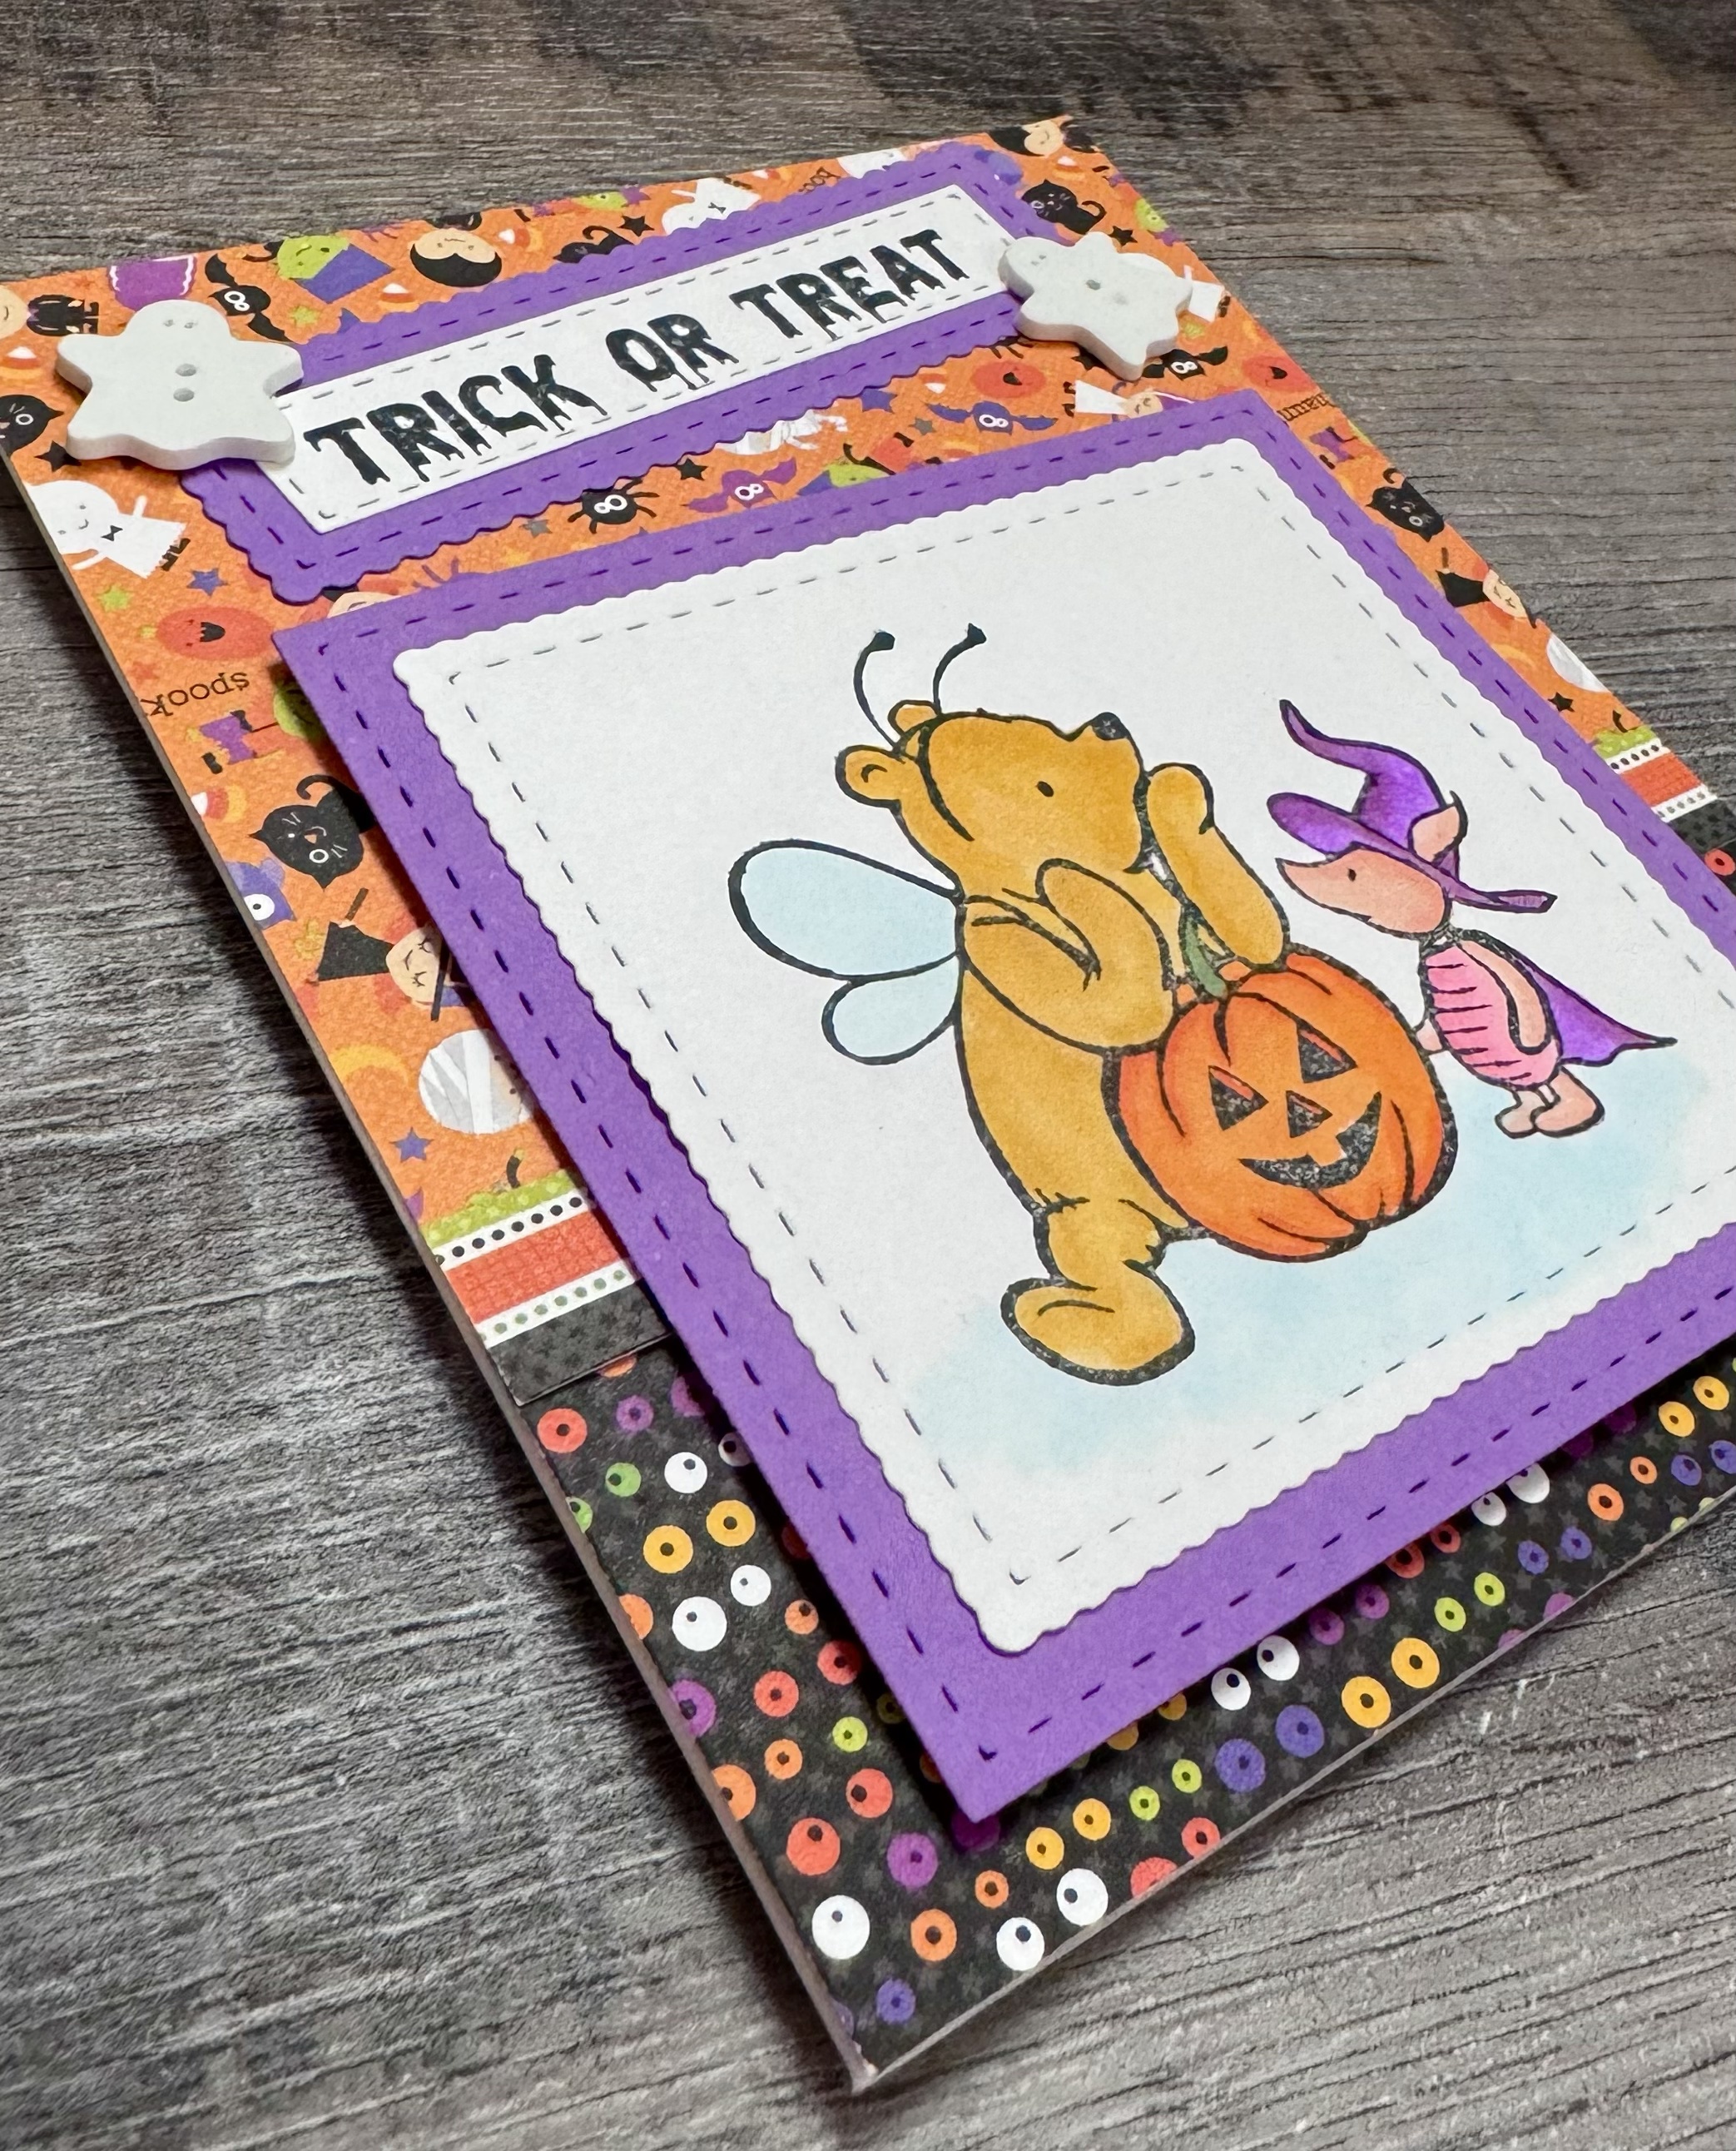
How could you not give a treat to sweet Pooh and Piglet? They are so cute all dressed up and ready for candy. 🎃
Disclosure: Some of the links on my site are affiliate links, meaning, at no additional cost to you, I will earn a small commission if you click through and make a purchase. As an Amazon Associate I earn from qualifying purchases.
I trimmed 2 pieces of coordinating patterned paper and attached them to the front of a white card. Then I added a strip of a 3rd patterned paper over the seam where the other 2 pieces came together.
Pooh and Piglet are attached to the card using foam tape. The sentiment is attached directly to the card. I finished it off with 2 ghost buttons I had in my craft stash.
Pooh and Piglet will always bring a smile – and they’re so cute in their Halloween costumes! 🎃
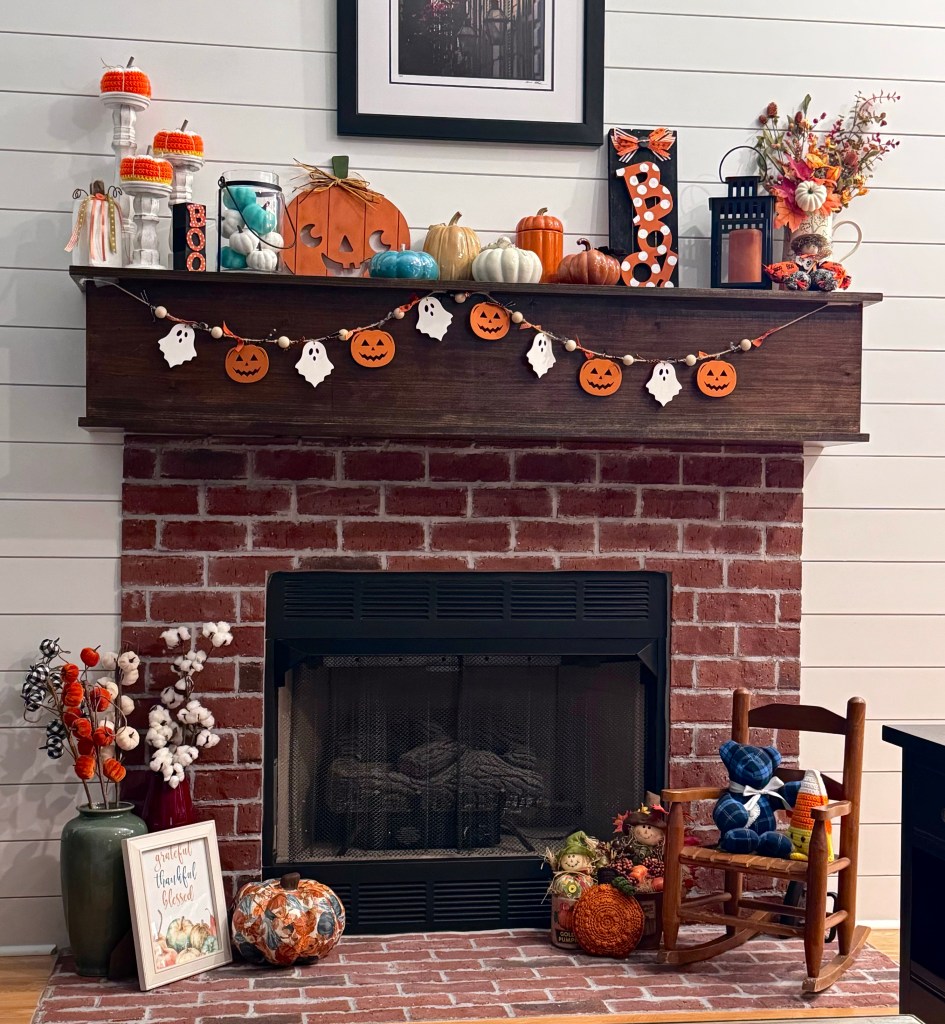
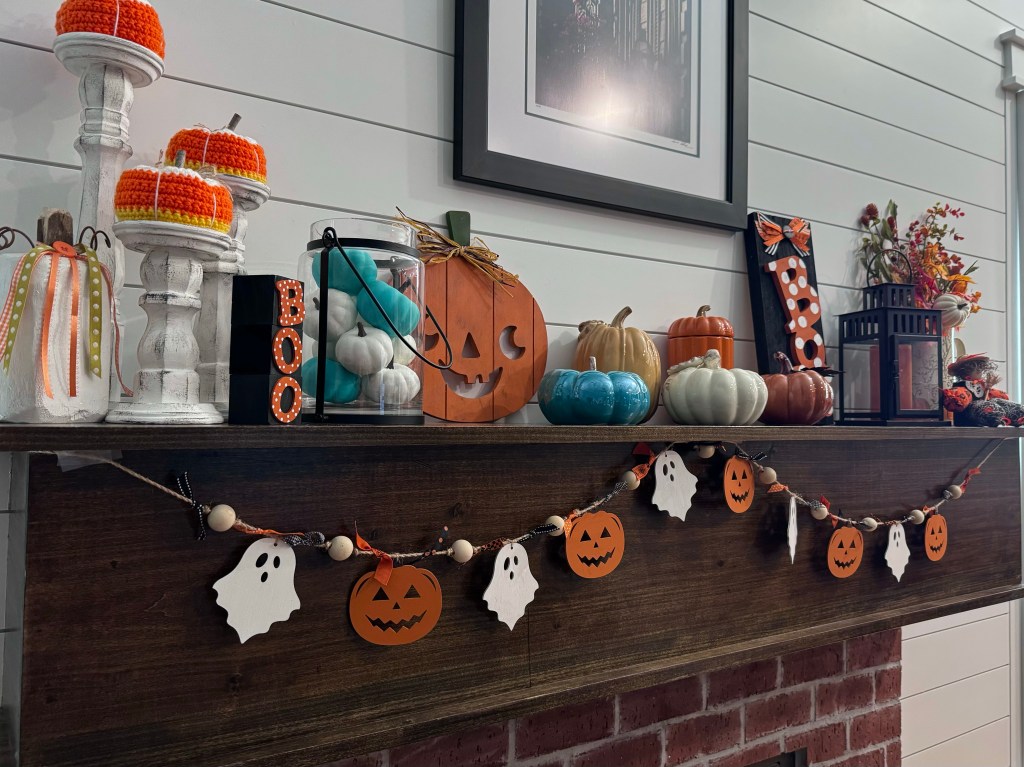
Do you like to decorate for the Fall season? Except for Christmas, it’s my favorite season to decorate for. 🍁🍂🎃 I love the rich colors and despite what my husband says, you can never have too many pumpkins. 😉
Disclosure: Some of the links on my site are affiliate links, meaning, at no additional cost to you, I will earn a small commission if you click through and make a purchase. As an Amazon Associate I earn from qualifying purchases.
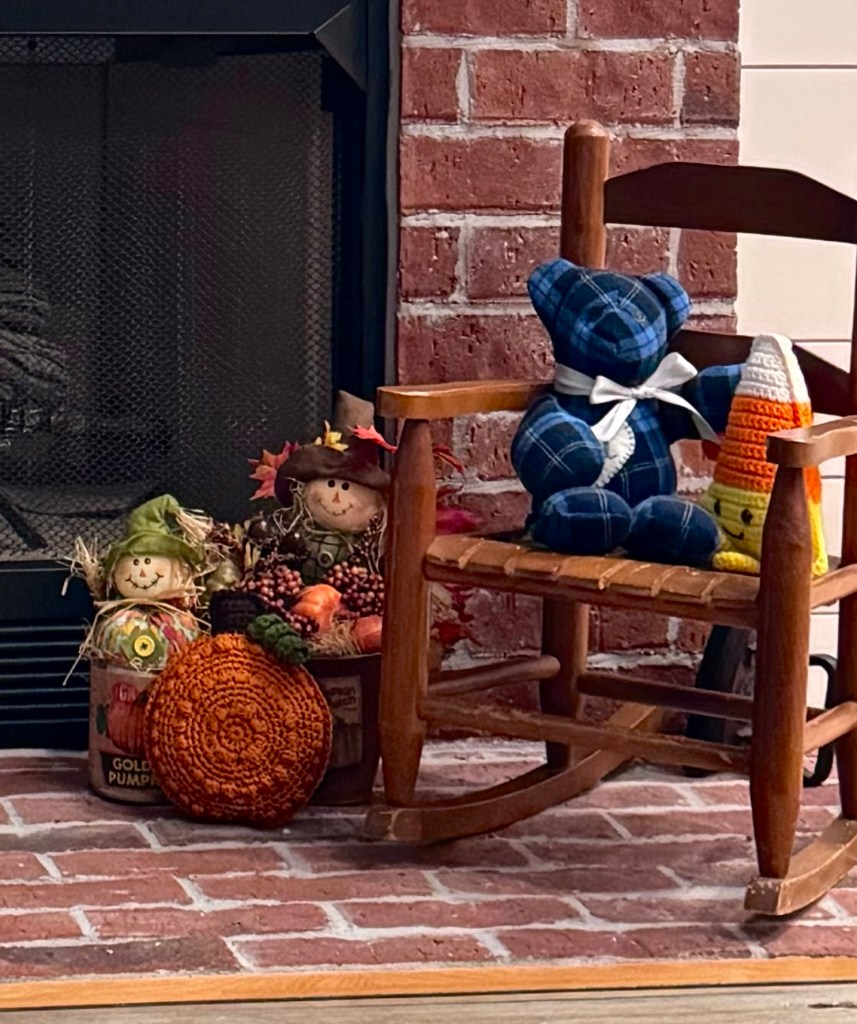
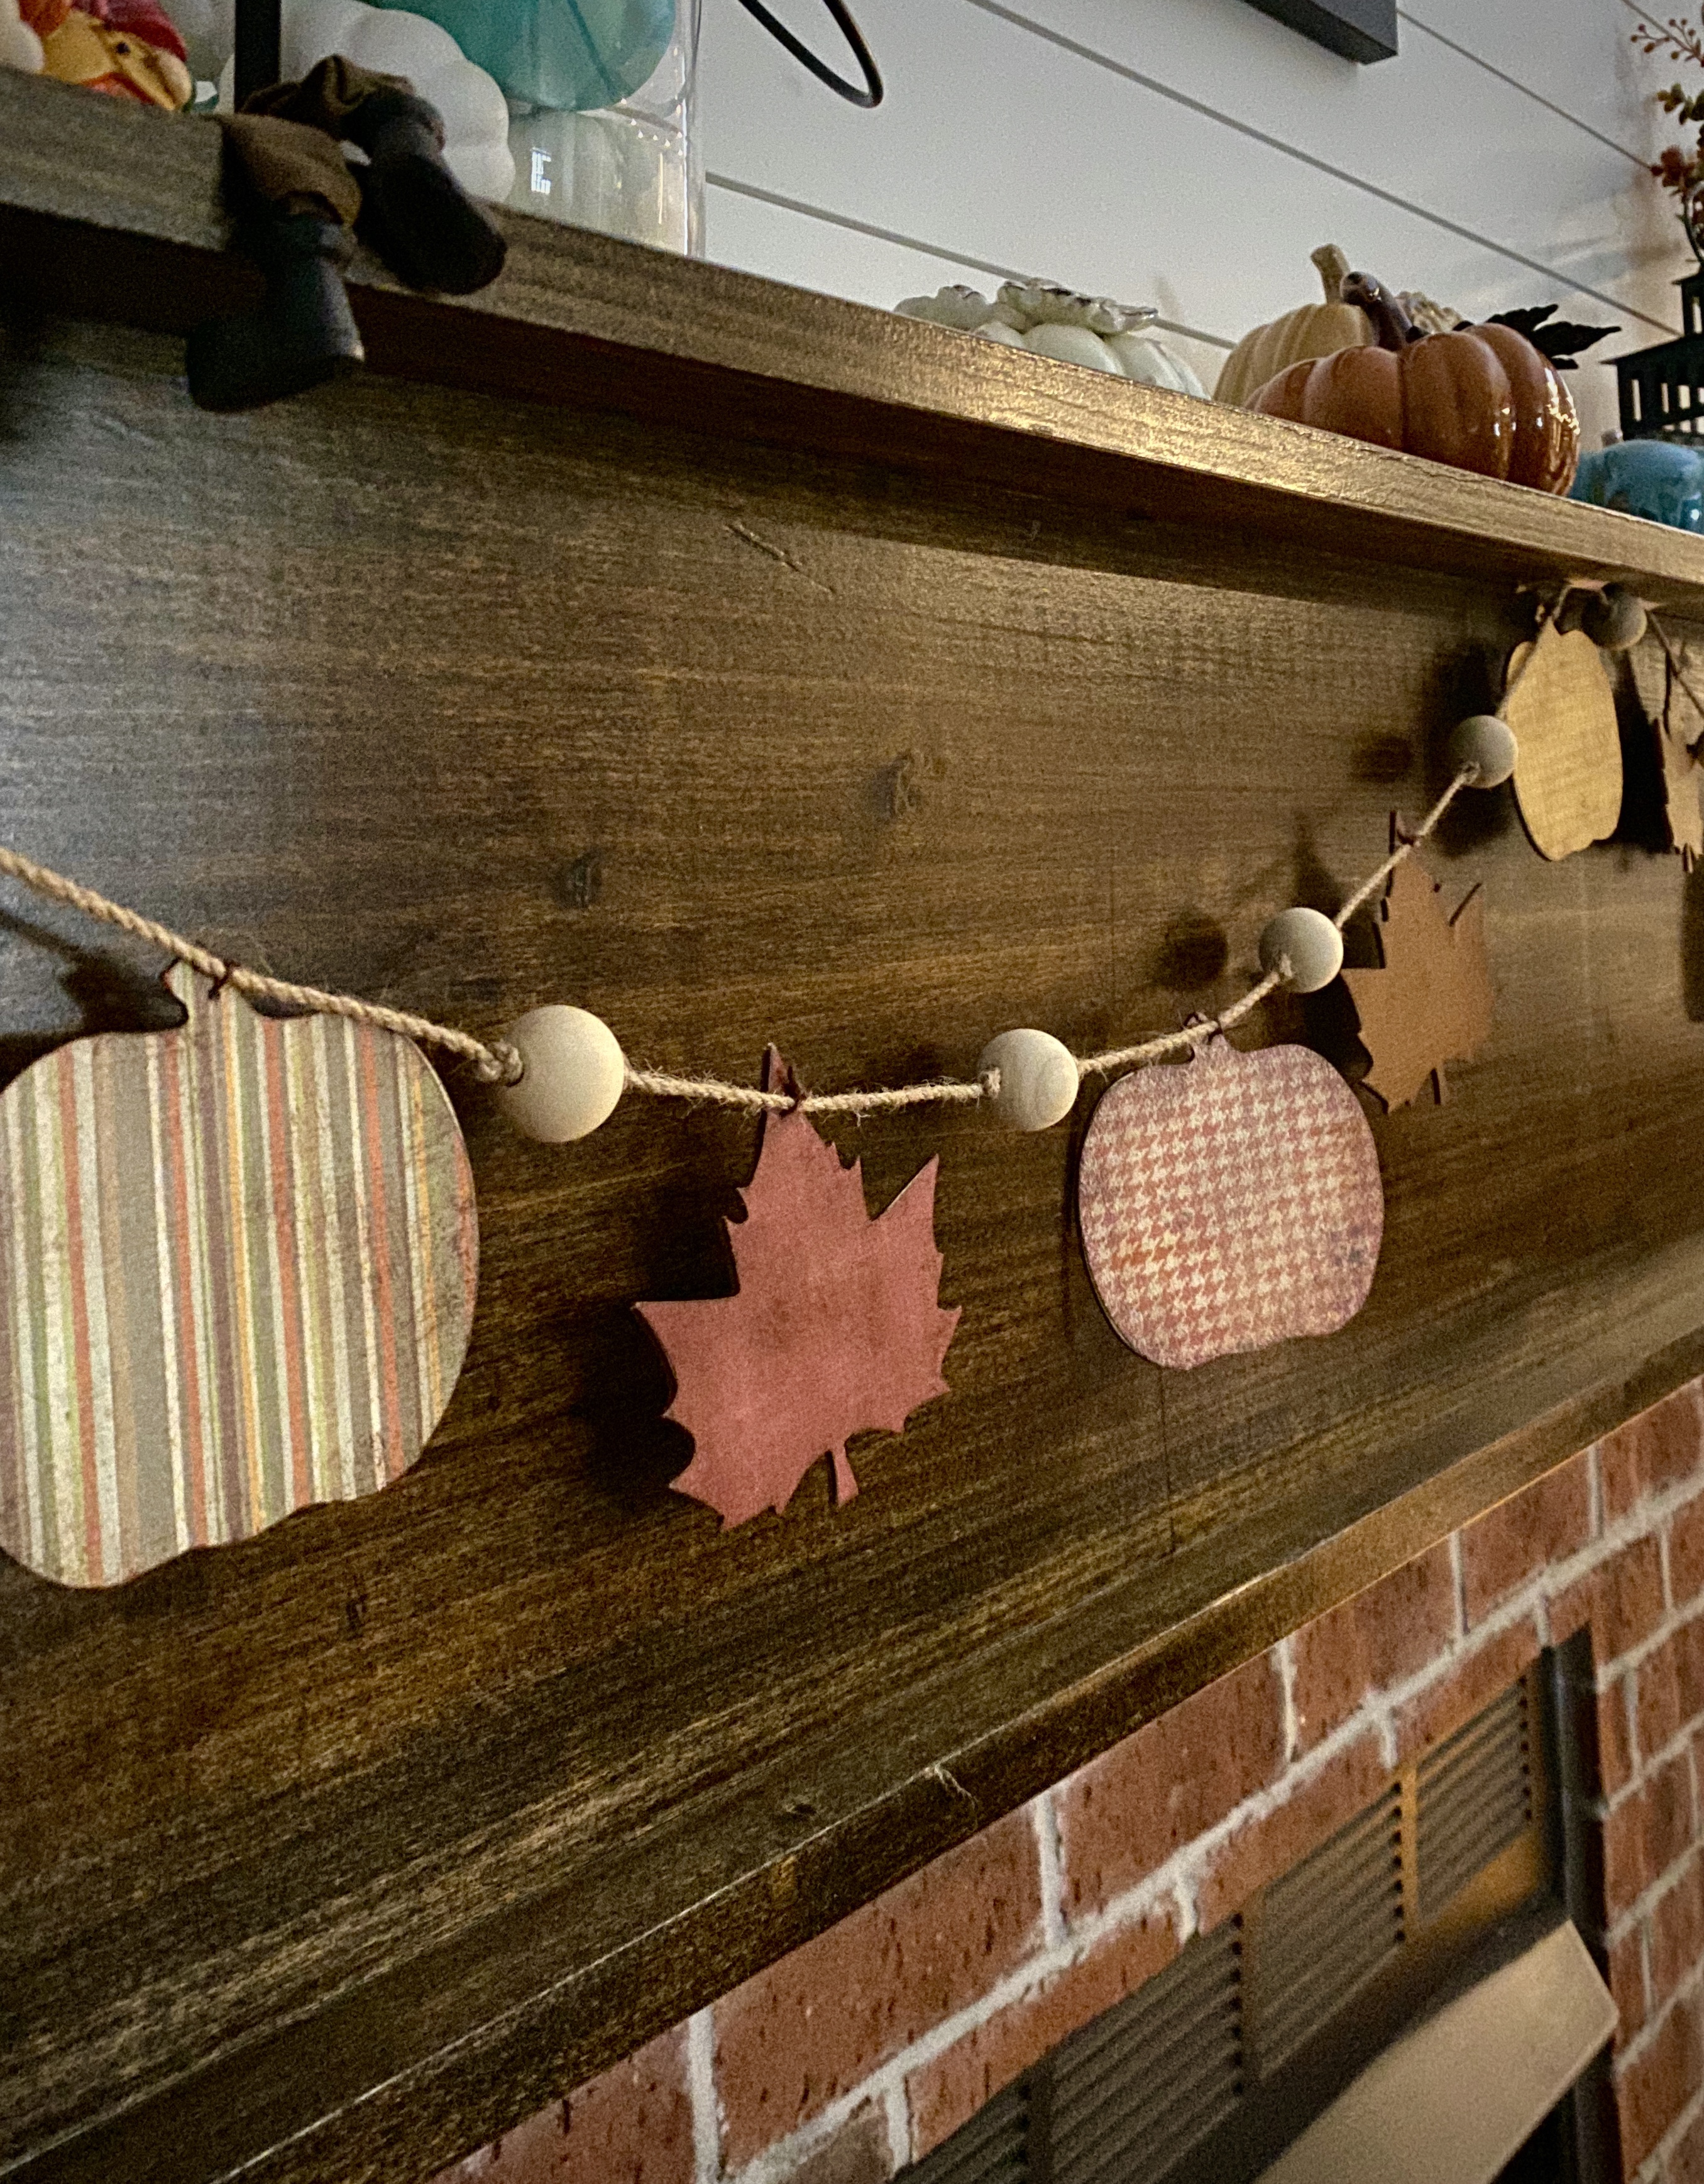
I do a little decorating for Halloween, but my collection of Fall decor is much larger. 😉 You can see my mantel below all decked out for Halloween. When November 1st comes around, I’ll put away the Jack-O-Lanterns along with the other Halloween things and add in any Fall decor I haven’t already put out.
Here are a few closer pictures of some of my Fall craft projects. I’ll include links to posts with all the details on how to make them. 😊
On November 1st, I’ll change my Halloween Garland out for this Fall Garland until it’s time to decorate for Christmas. This year is going by so fast!! 🍂🍁
I hope you enjoyed this little peek into my Fall decor and that I’ve inspired you to create something fun for your home! 🎃🍁🍂
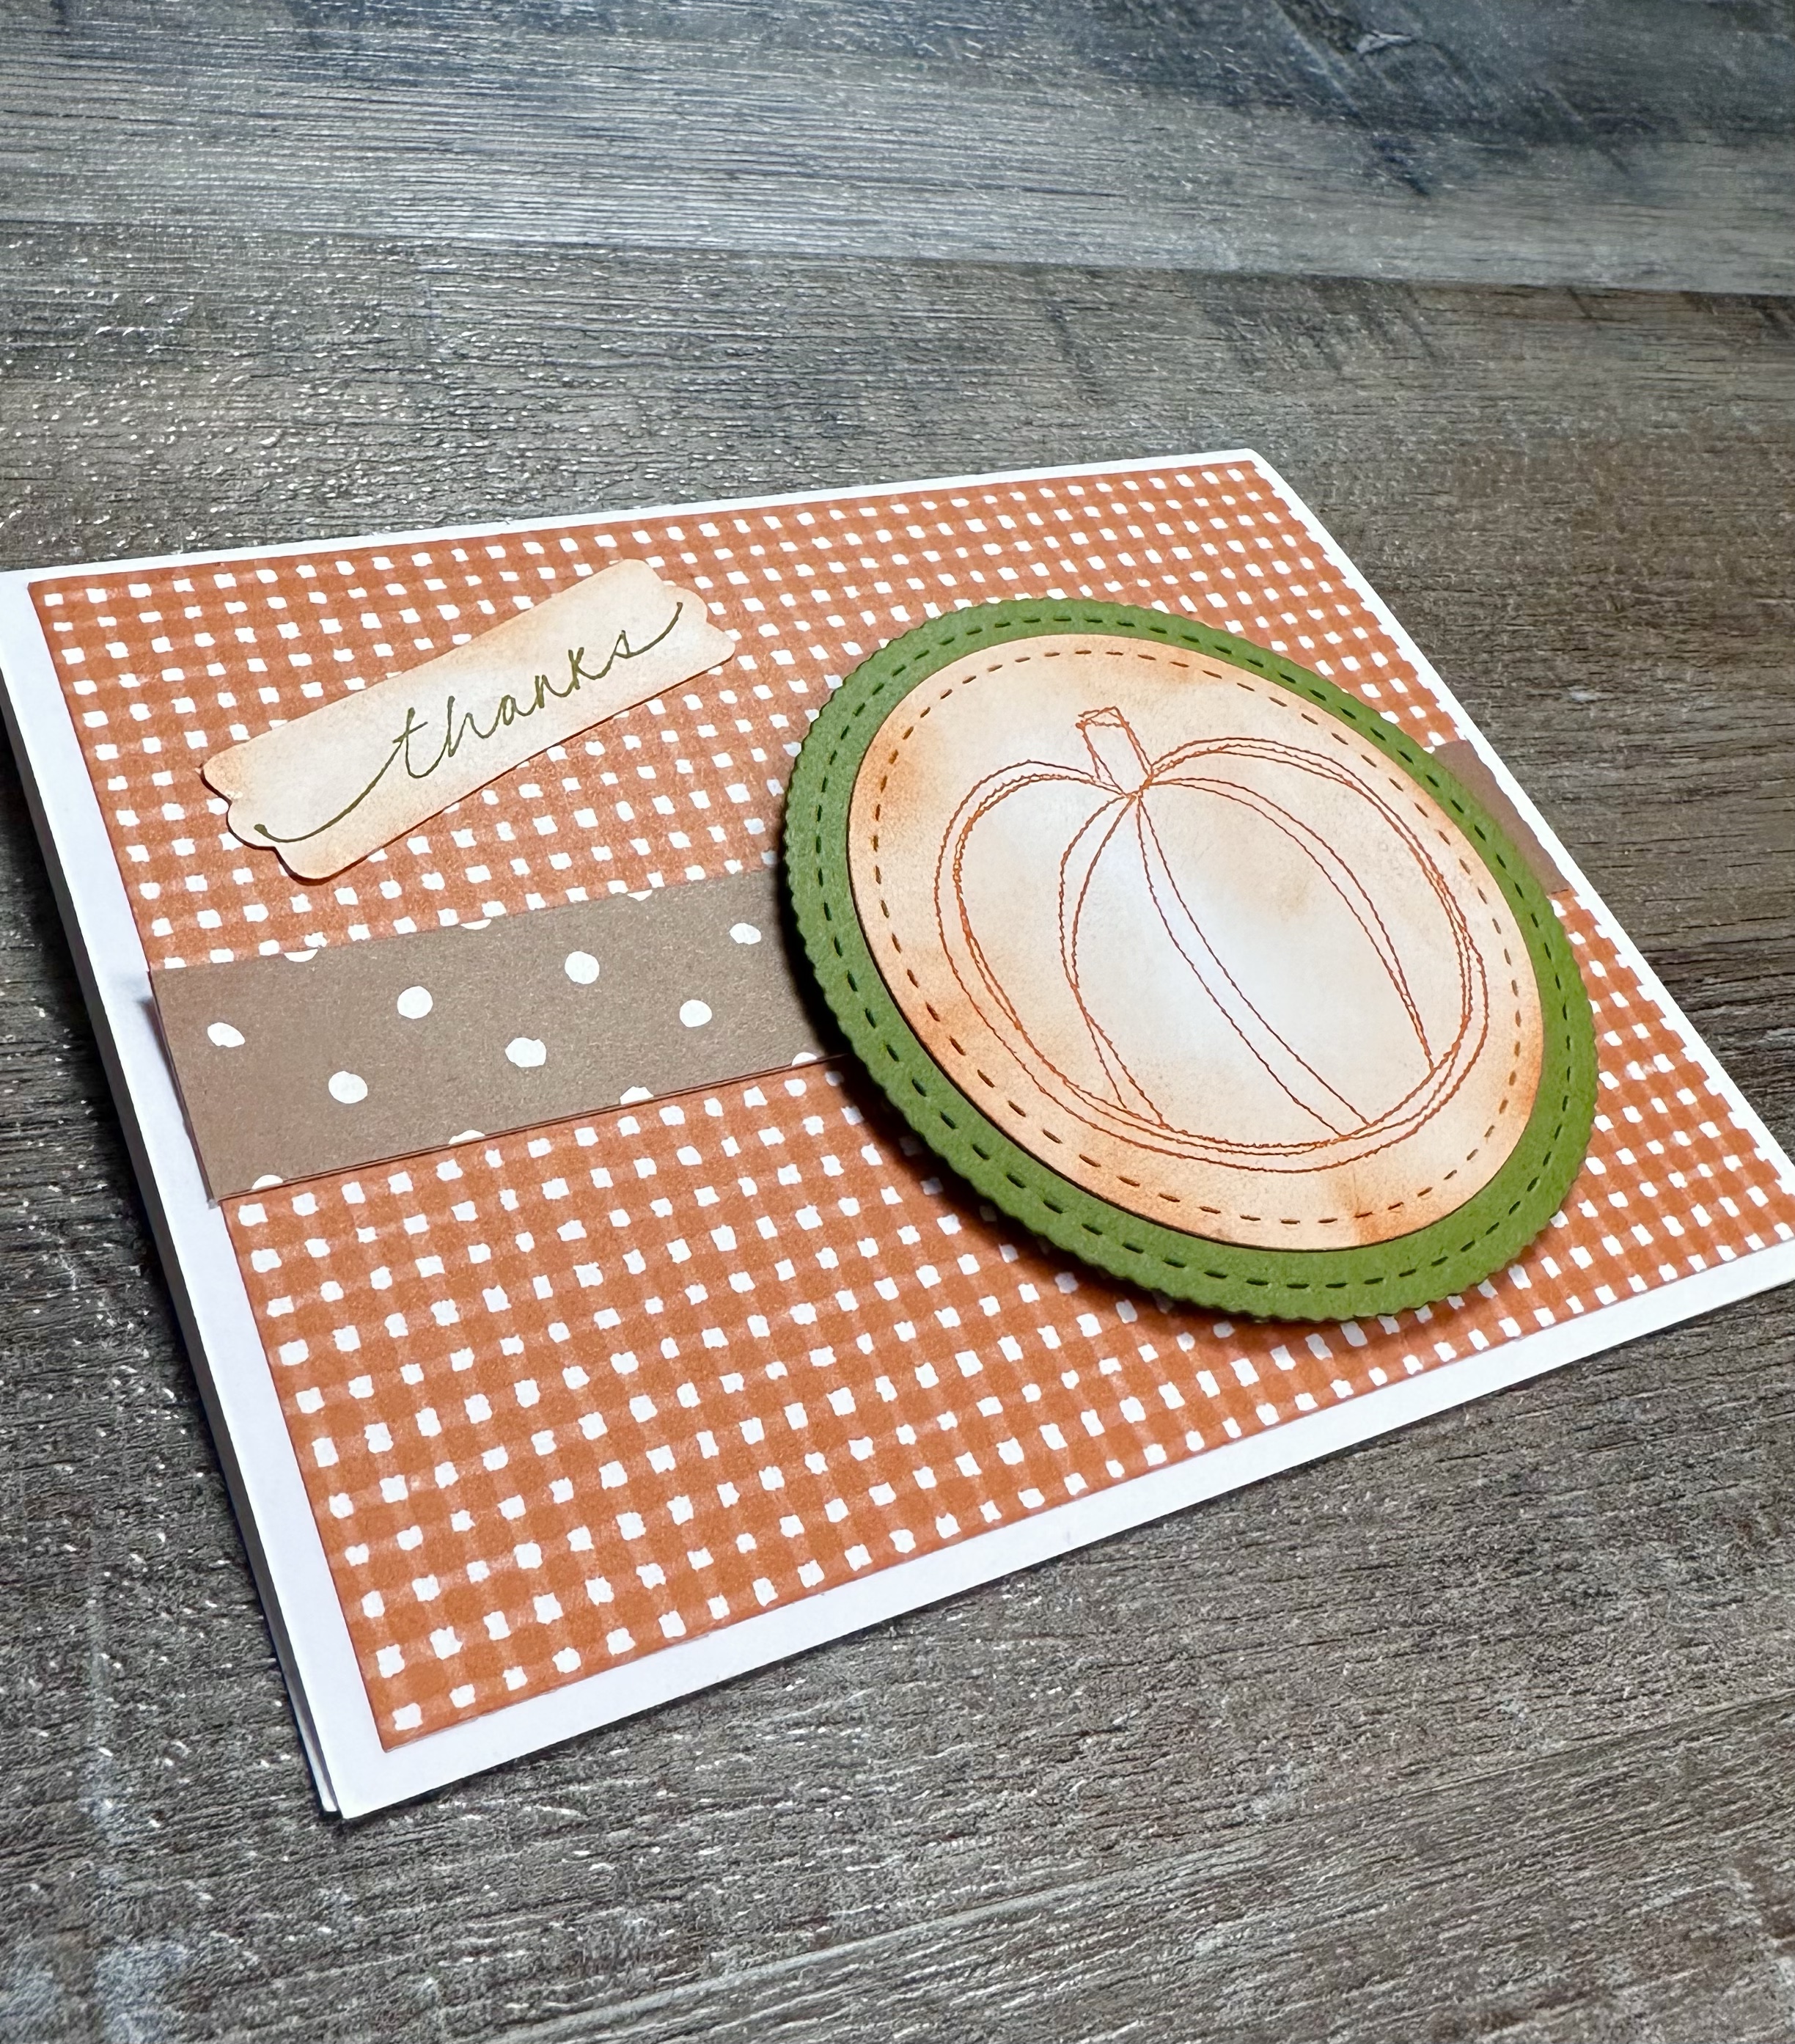
This clean and simple Fall Thank You Card comes together quickly. It will only take a few minutes to make and sometimes simple is just the thing!
Disclosure: Some of the links on my site are affiliate links, meaning, at no additional cost to you, I will earn a small commission if you click through and make a purchase. As an Amazon Associate I earn from qualifying purchases.
I stamped “thanks” with green ink on white card stock, punched around it with a label punch, and brushed on orange ink. Both the stamp and punch I used are no longer available, but this stamp is similar. And this punch can make any length banner. Or use your favorite sentiment and punch from your collection.
I attached a piece of orange patterned paper to a white card and added a strip of coordinating patterned paper. I attached the pumpkin to the card with foam tape and then attached the sentiment to the card.
This layout can work for any type of card by simply changing the main stamped image, sentiment, or color scheme. It’s a great layout if you need a quick card. 😊
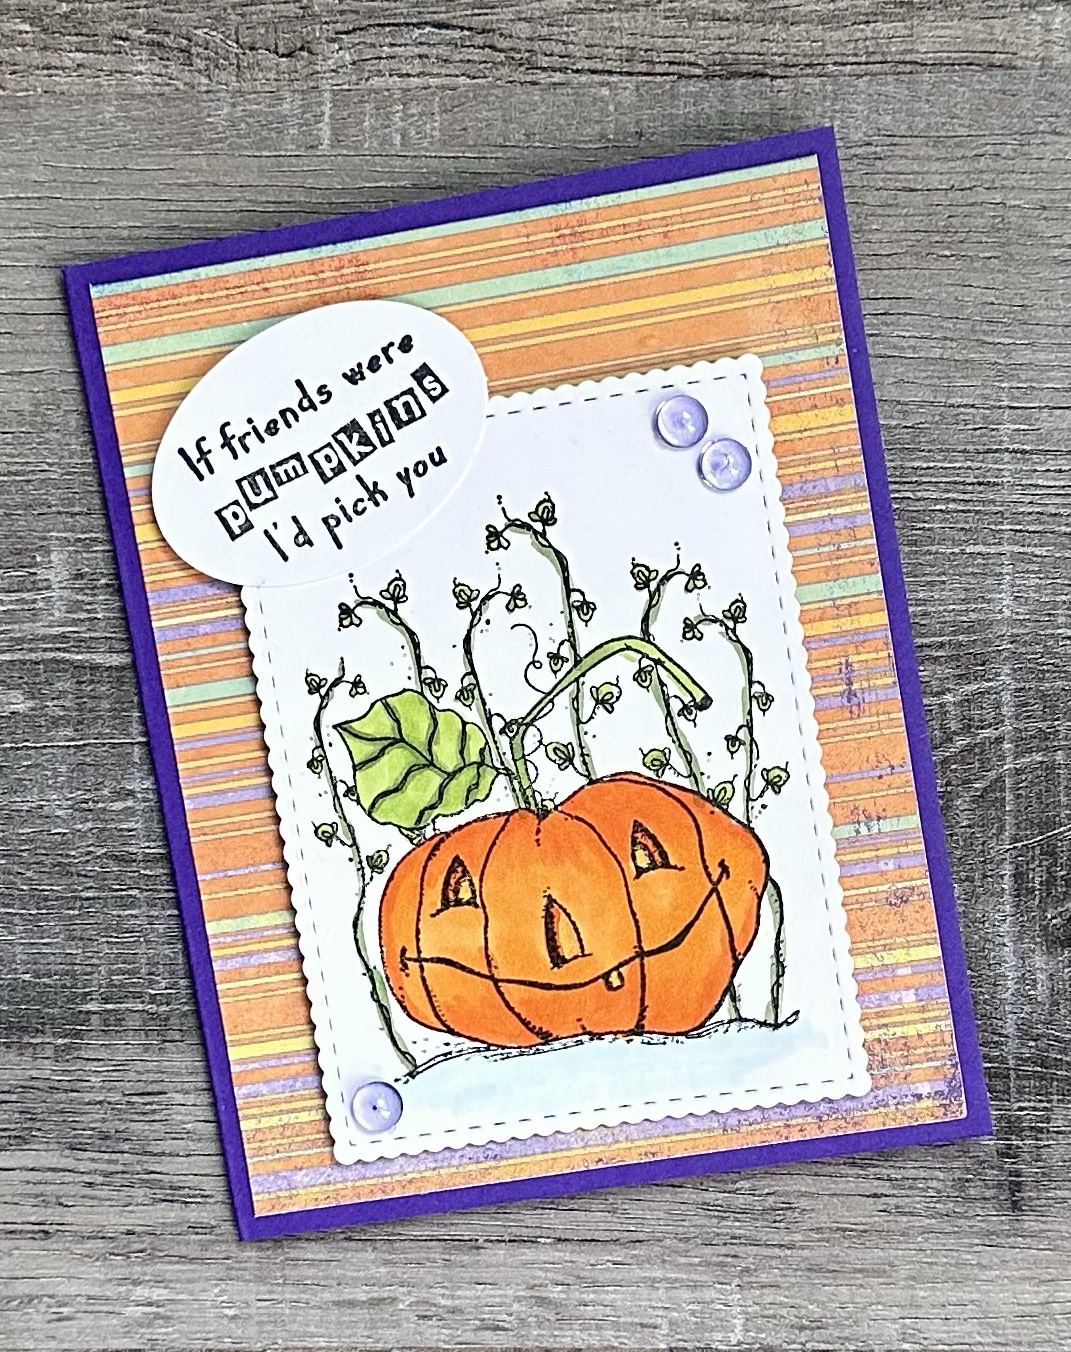
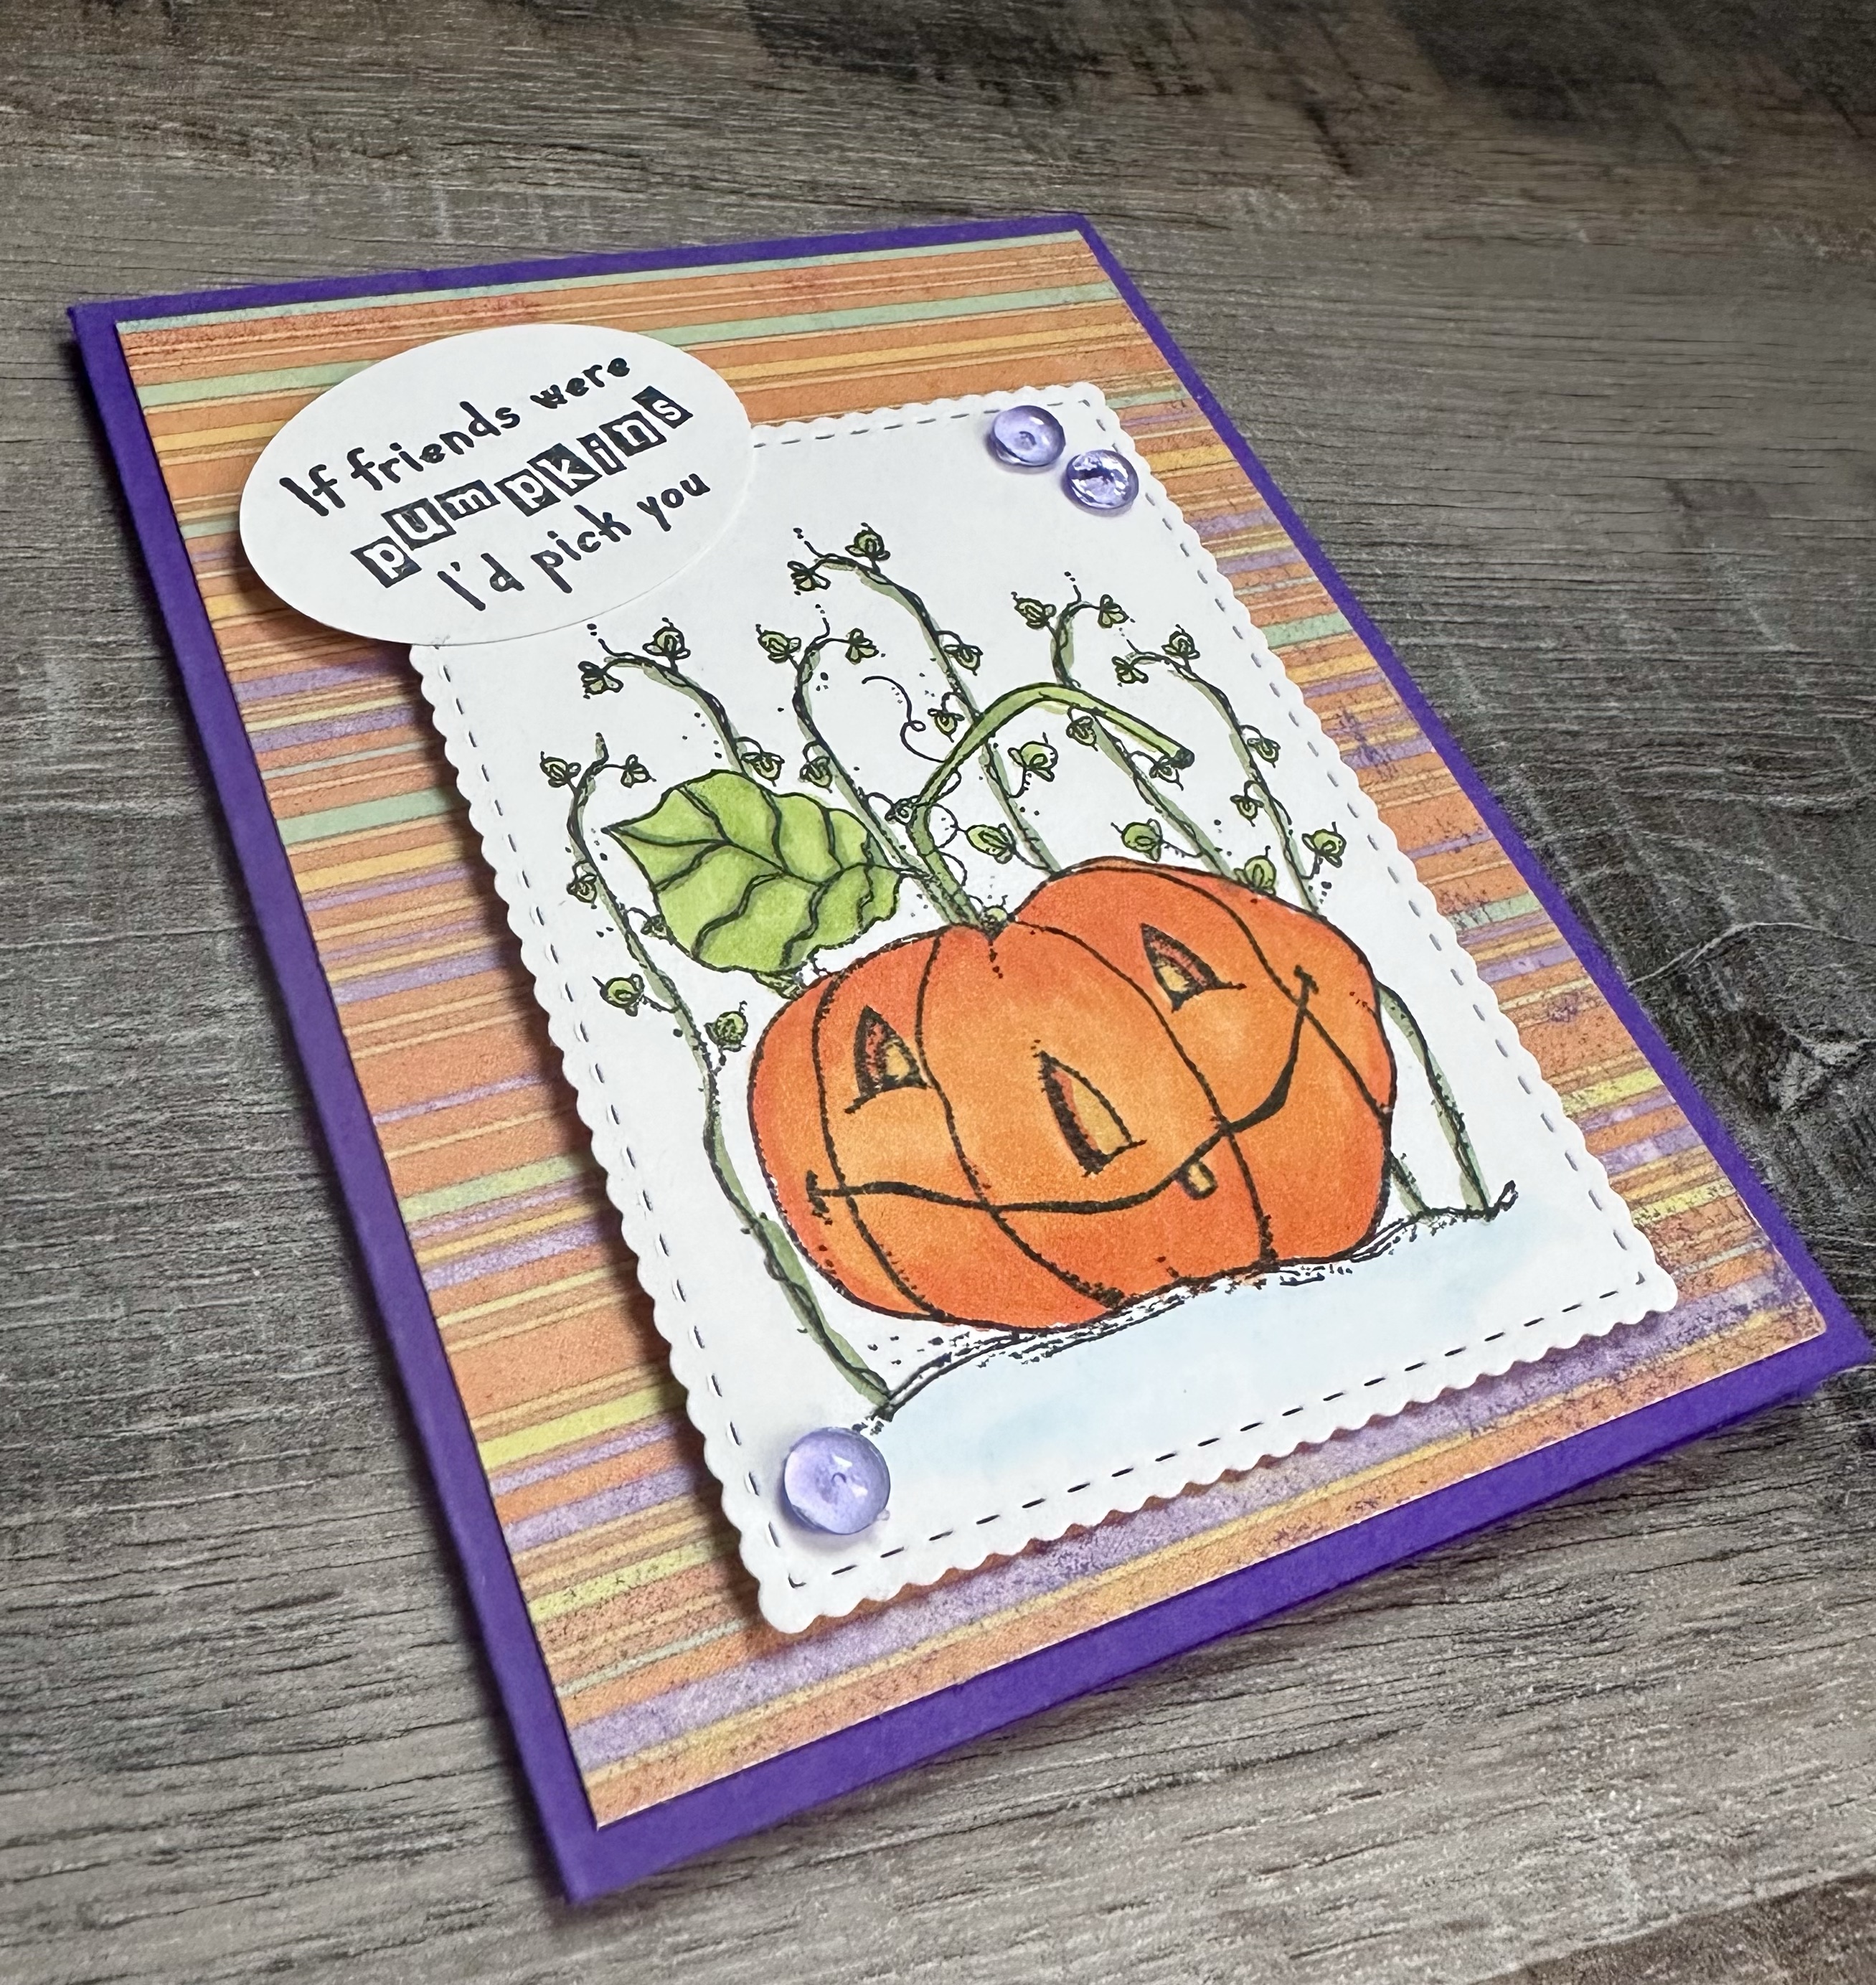
Disclosure: Some of the links on my site are affiliate links, meaning, at no additional cost to you, I will earn a small commission if you click through and make a purchase. As an Amazon Associate I earn from qualifying purchases.
I attached a piece of patterned paper to a purple card. The pumpkin image is attached to the card with foam tape. The sentiment is attached to the upper left corner of the pumpkin piece. To finish the card, I added 3 purple Dew Drops.
What a fun way to send your friends a little Halloween smile! 🎃
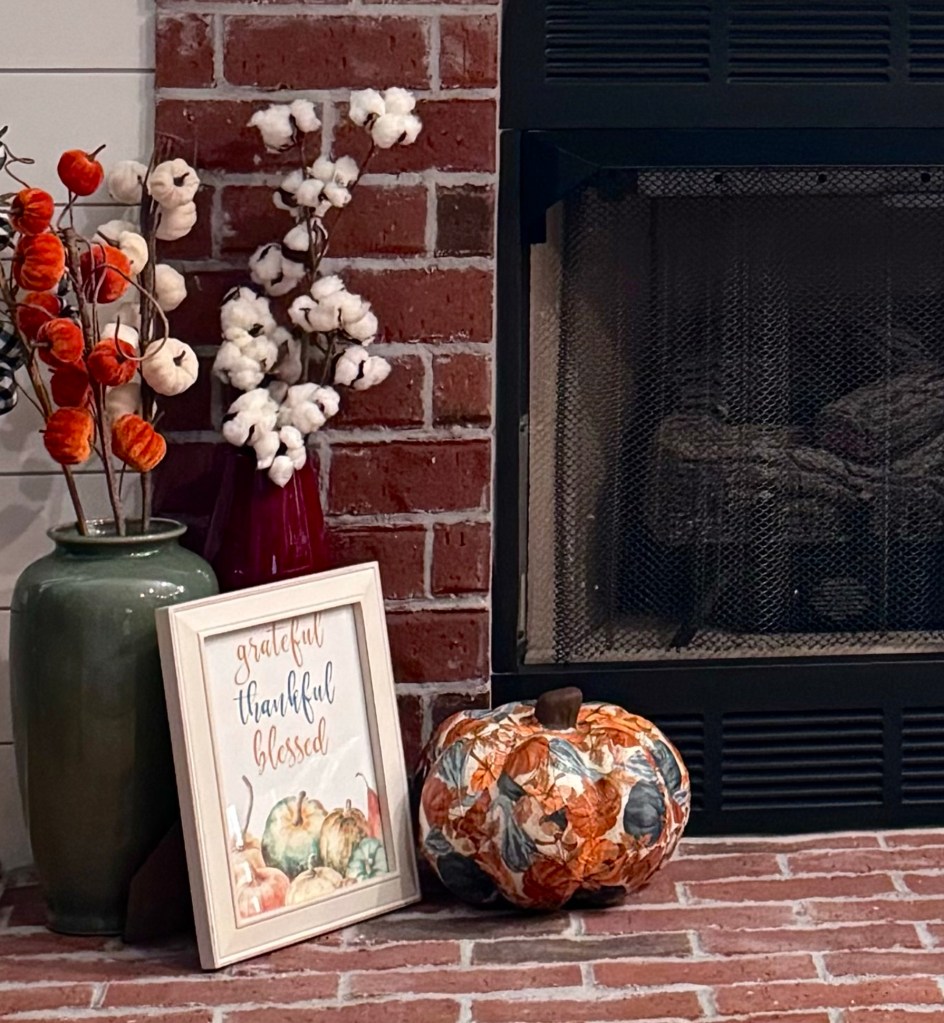
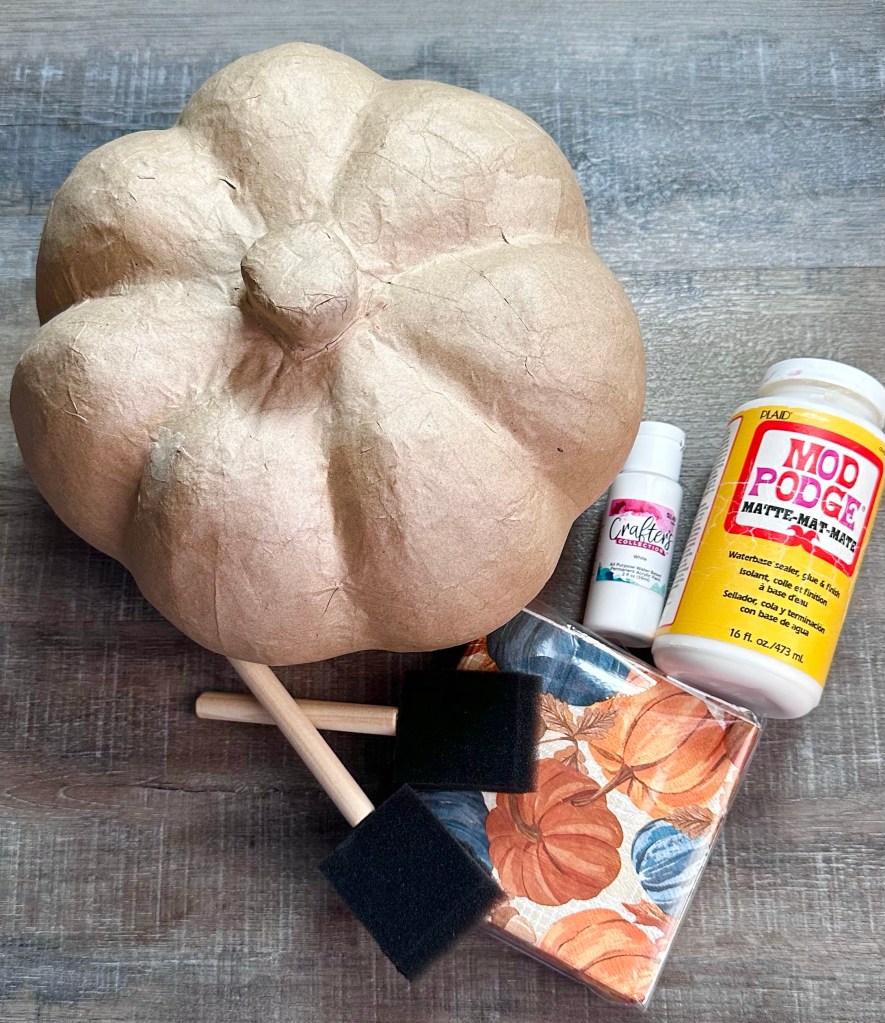
I bought one of these Paper Mache Pumpkins from Hobby Lobby a couple of years ago and painted it – you can see it in this post. I got another one this year and thought I’d try my hand at some decoupage. The pumpkins are approximately 9.75 inches wide and about 7.5 inches tall. I haven’t done decoupage in such a long time and it was so fun!
Disclosure: Some of the links on my site are affiliate links, meaning, at no additional cost to you, I will earn a small commission if you click through and make a purchase. As an Amazon Associate I earn from qualifying purchases.
I found these pretty Fall napkins at Hobby Lobby to use on my pumpkin. You’ll also need Mod Podge and optional white acrylic paint.
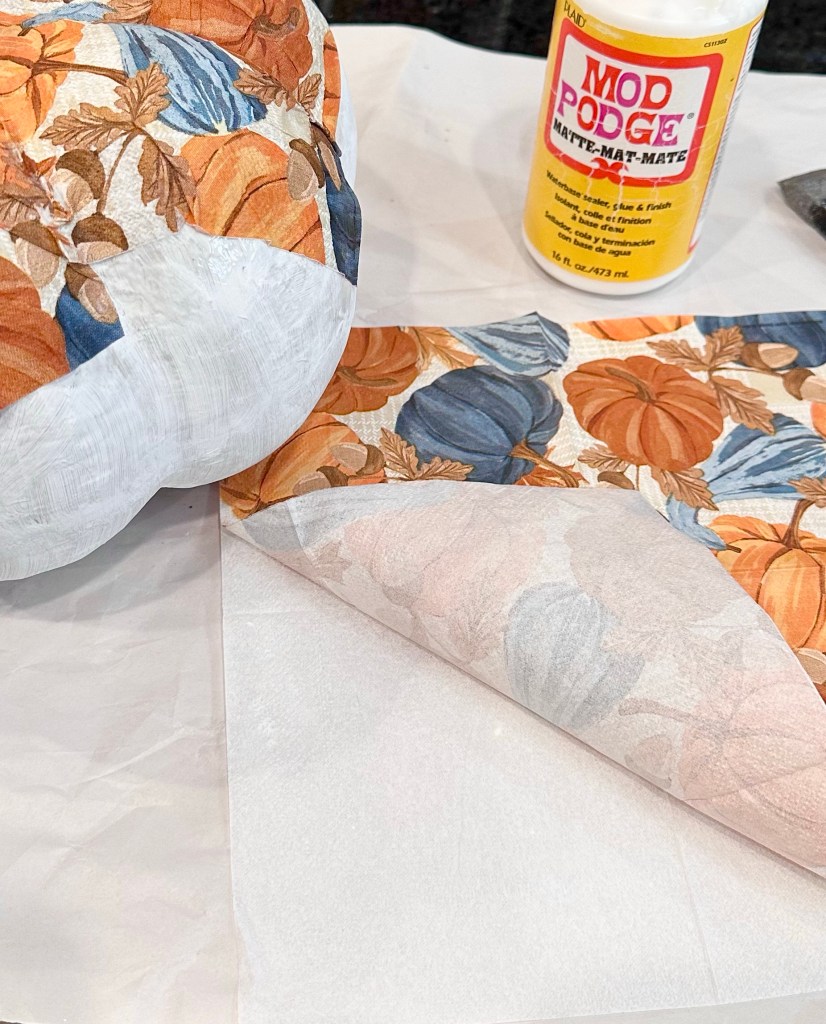
First I painted my pumpkin with one coat of white acrylic paint using a foam brush. This is totally optional. I wanted to make sure the tan color of the pumpkin didn’t show through the napkin. Depending on the colors in the napkin, this may not be needed.
Prepare your napkins by separating the top printed layer from the other layers. My napkins only had 2 layers, some have 3. Just make sure to only have the top printed layer.
I cut my napkin into fourths. Then using a foam brush I applied Mod Podge to my pumpkin, working in small sections at a time. I smoothed the pieces of the napkin onto the pumpkin adding Mod Podge as needed. I didn’t worry too much about any wrinkles because the surface of the pumpkin isn’t smooth. I cut a few smaller pieces of napkin to fill in as needed to avoid overlapping too much.
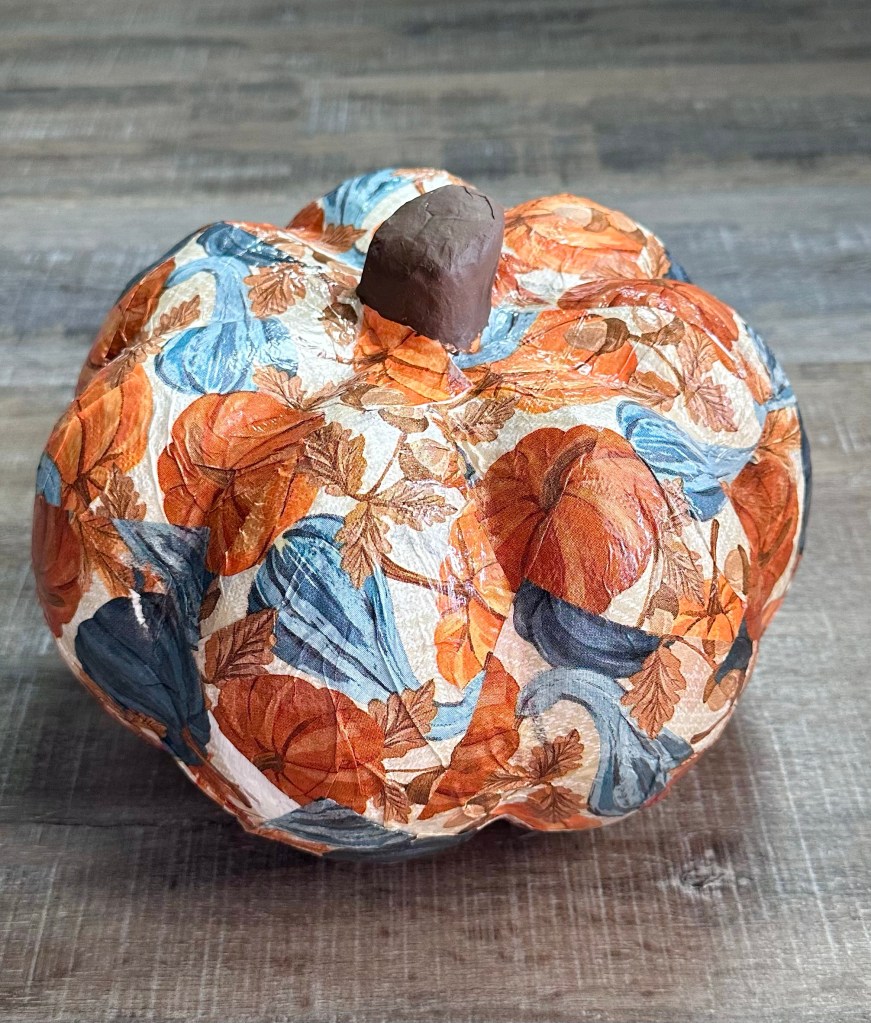
Once the entire pumpkin is covered, let it dry completely. Then brush a layer of Mod Podge over the entire pumpkin (except the stem) to seal it. I painted the stem of the pumpkin with brown acrylic paint once it was dry.
It’s a fun addition to my Fall decor! There are so many Fall napkins to choose from with lots of different patterns and colors. You can have your Paper Mache Pumpkin finished in just a couple of hours and it will look so pretty on your Fall table.
Candy Corn – you either love it or hate it! I happen to love it 😋, but even if you don’t you’re sure to love this easy to make Crochet Candy Corn Pumpkin. The pattern is quick to make and will add a little whimsy to your Fall decor.
Disclosure: Some of the links on my site are affiliate links, meaning, at no additional cost to you, I will earn a small commission if you click through and make a purchase. As an Amazon Associate I earn from qualifying purchases.
The Crochet Candy Corn Pumpkin is made with worsted weight yarn and an H/5mm crochet hook. I used I Love This Yarn in Yellow and White and a double strand of I Love This Yarn Sport Weight for the Orange because the worsted weight didn’t have the shade I wanted. You can use your favorite worsted weight yarn to stitch up your pumpkins.
The pattern is below and there’s also a link to a free PDF for easy printing.
Crochet Candy Corn Pumpkin
Worsted Weight Yarn – I used I Love This Yarn in Yellow and White. For the orange, I used 2 strands held together of I Love This Yarn Sport Weight Orange because the worsted weight didn’t have the color I wanted.
H/5mm crochet hook
Poly-fil
Yarn needle
Stitches used in US terms:
Foundation Single Crochet – fsc
Single Crochet – sc
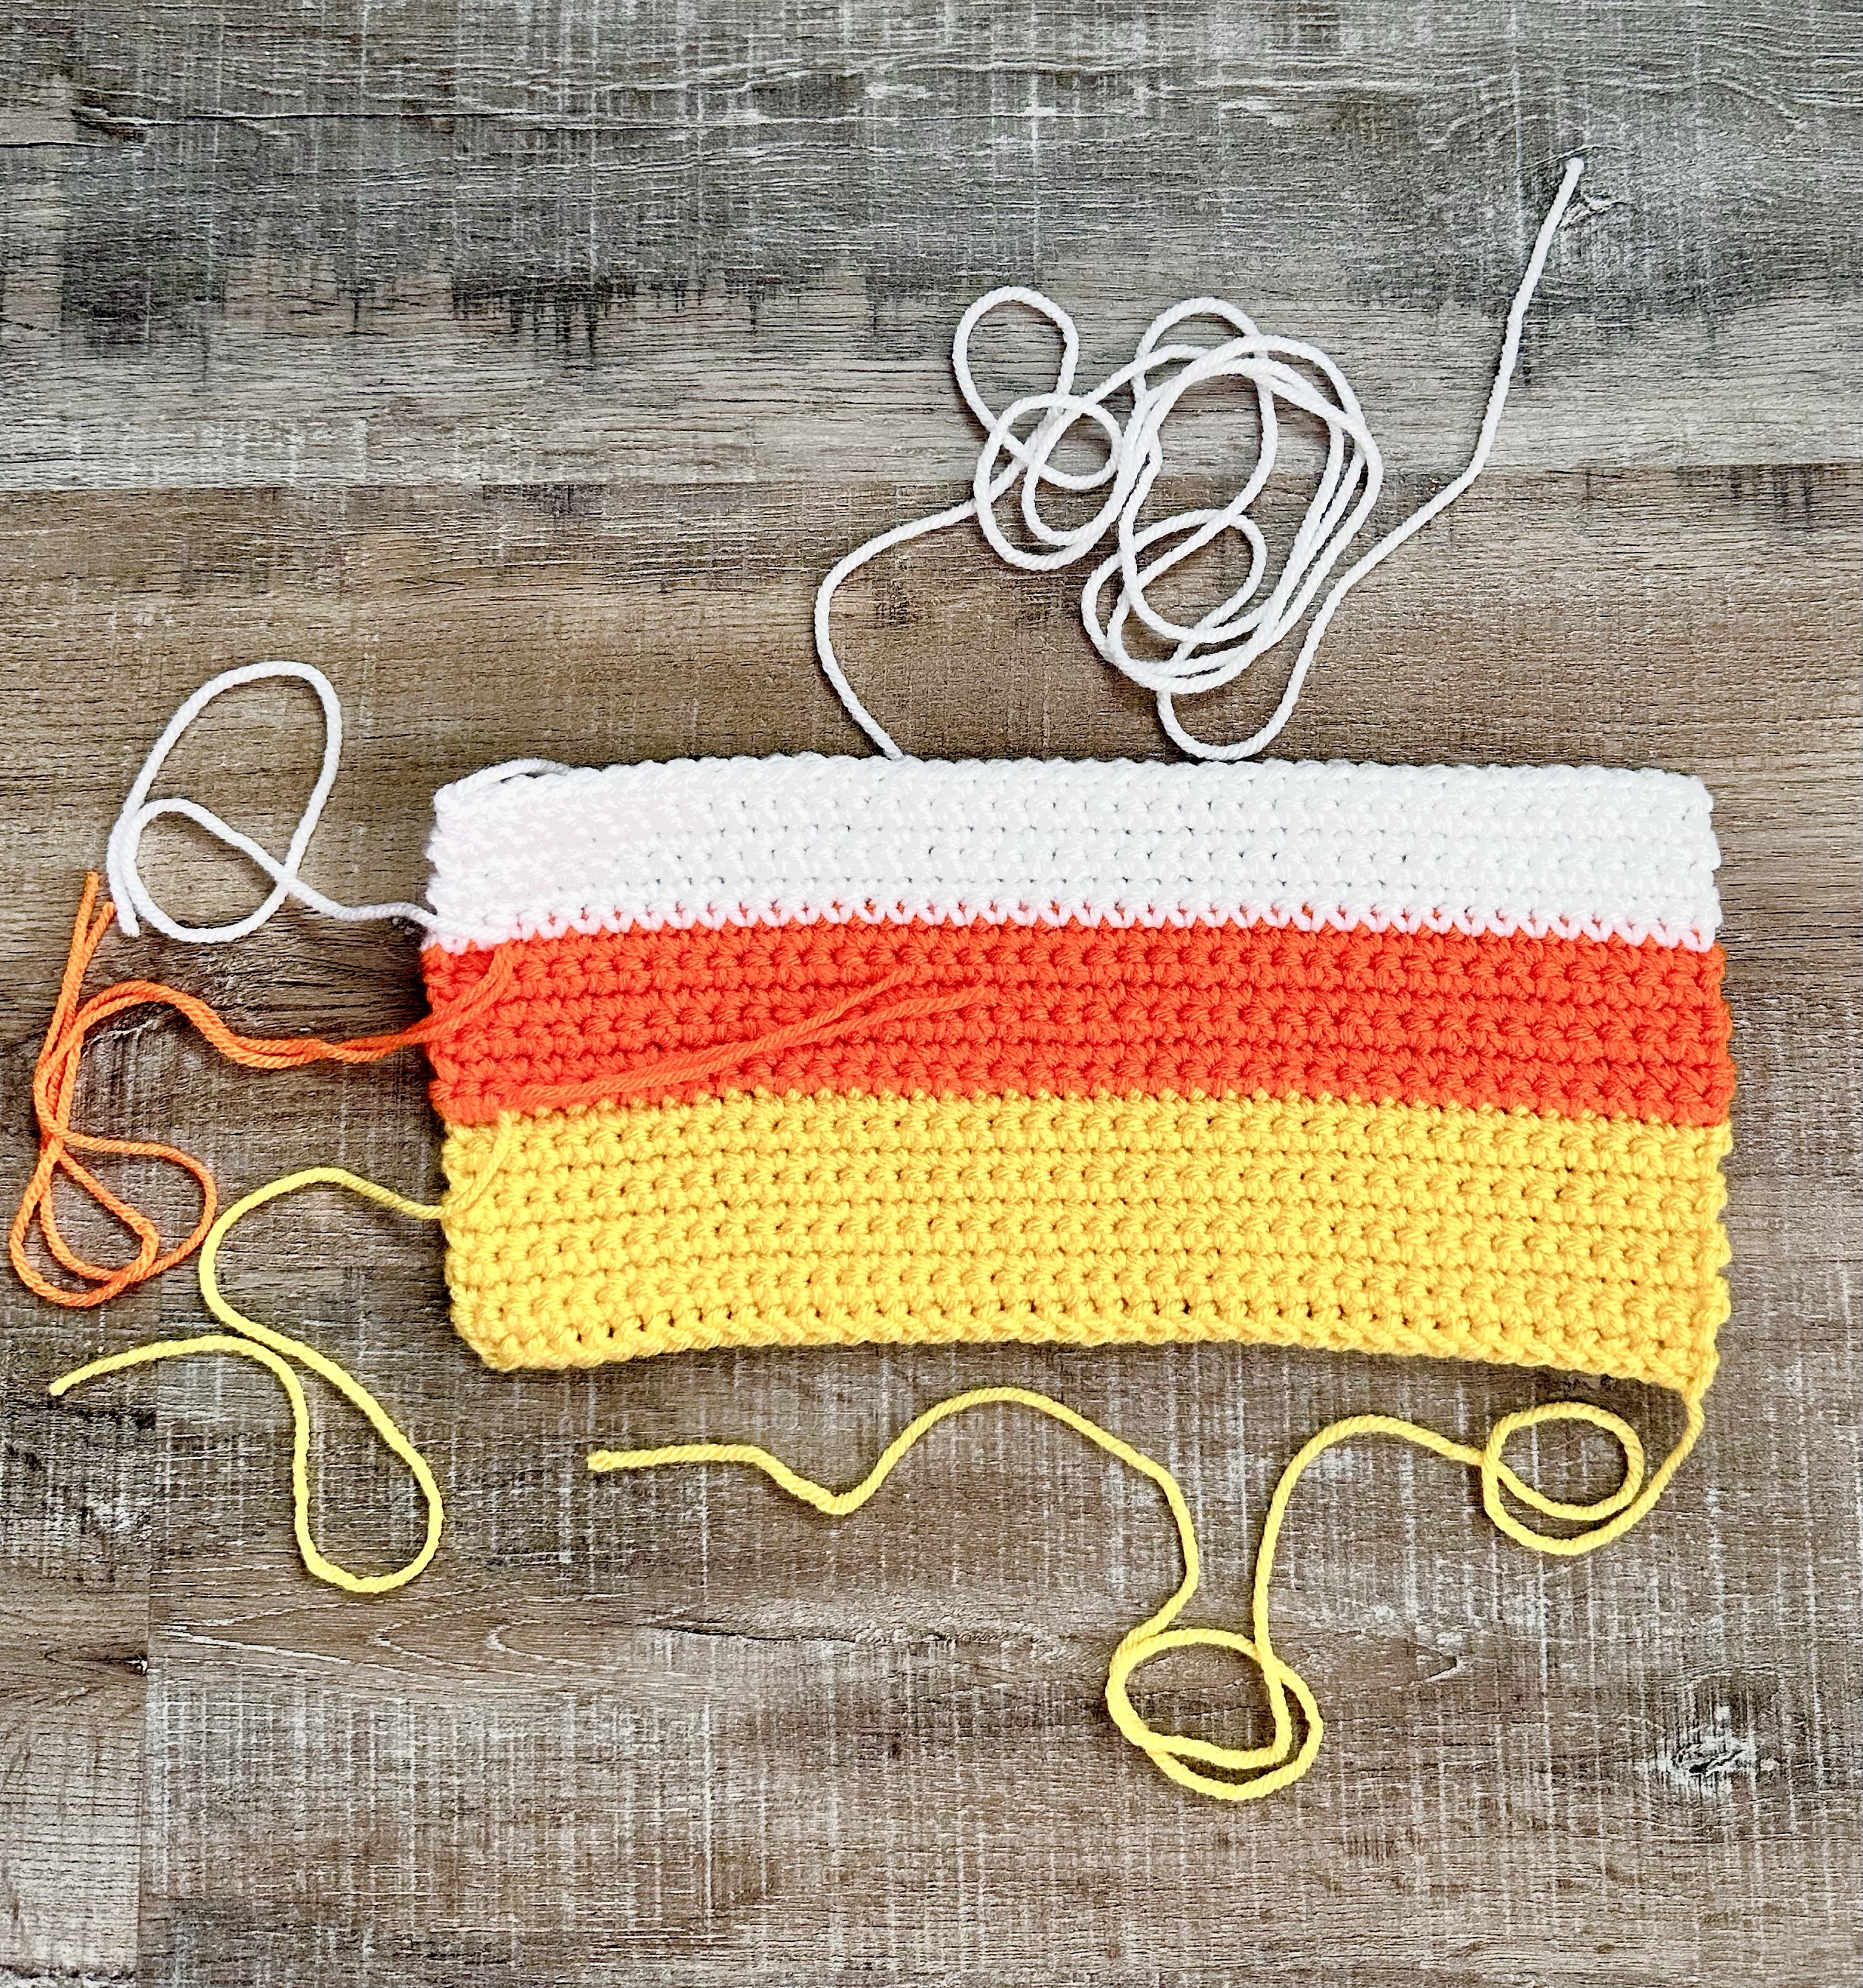
Row 1: with Yellow, work 40 fsc, leaving a long tail at the beginning for a running stitch for gathering the bottom of the pumpkin. Turn. (40 stitches)
Rows 2-9: ch 1. sc in each stitch across. Turn. (40 stitches)
Change to Orange, leaving a long tail of yellow for sewing.
Rows 10-15: ch 1. sc in each stitch across. Turn. (40 stitches)
Change to White leaving a long tail of the White at the beginning and ALSO leaving a long tail of Orange for sewing.
Rows 16-21: ch 1. sc in each stitch across. Turn. (40 stitches)
Fasten off leaving a VERY LONG tail for a running stitch and to add shaping to pumpkin.
This is how your piece will look after Row 21. I wove in the shorter tails of orange before sewing the ends together.
Fold piece in half and whip stitch edges together, using the yarn tails of each color. Fasten off and weave in ends of each color after sewing.
Turn piece so seam is on the inside. You will still have a long tail of yellow at the beginning and a very long tail of white at the end.
Using the long tail of Yellow from the beginning, run a gathering stitch around the bottom of the pumpkin. Pull tightly to close the pumpkin and run a few stitches back and forth across the opening to make sure it is completely closed. Fasten off and weave in end.
Stuff pumpkin with poly-fil and gather the top in the same manner, using the very long tail of White. Do not cut the yarn.
Shaping the Pumpkin:
Using your yarn needle, draw the white yarn through the center top of the pumpkin to center bottom of the pumpkin. You’ll have to squish your pumpkin to get the needle through. Wrap the yarn around to the top of the pumpkin and pull it through again, pulling it tightly to form a “ridge”. Do this 5 or 6 times to give the pumpkin “ridges” for the pumpkin shape. Tie it off tightly at the bottom after the last wrap around and weave in your end.
Glue a small stick to the center top of the pumpkin for the stem. Tie with natural twine or ribbon if you’d like. I used E6000 clear adhesive to glue my sticks to the center of my pumpkins.
The finished pumpkins measure about 4 inches across and 2.75 inches tall before adding the stem.
You can easily make this cute pumpkin in a single color, too. Make several in all orange and all white to add to the candy corn pumpkins. Fill up a dough bowl with all of your pumpkins for a cute centerpiece. You can also adjust the size of your pumpkins by adding or subtracting stitches from your starting foundation row and adding or subtracting the number of rows.
I used pieces of sticks from my yard to make the stems of my pumpkins. Pieces of cinnamon sticks would also work – and they would smell good, too!
By the way, why isn’t there a candy corn emoji?? 🤷🏼♀️
Disclosure: Some of the links on my site are affiliate links, meaning, at no additional cost to you, I will earn a small commission if you click through and make a purchase. As an Amazon Associate I earn from qualifying purchases.