Mini Ornament Christmas Tree Plaque

Hi friends,

I have a cute, quick, little Christmas project for you today. It’s super easy and takes only a few minutes to make!

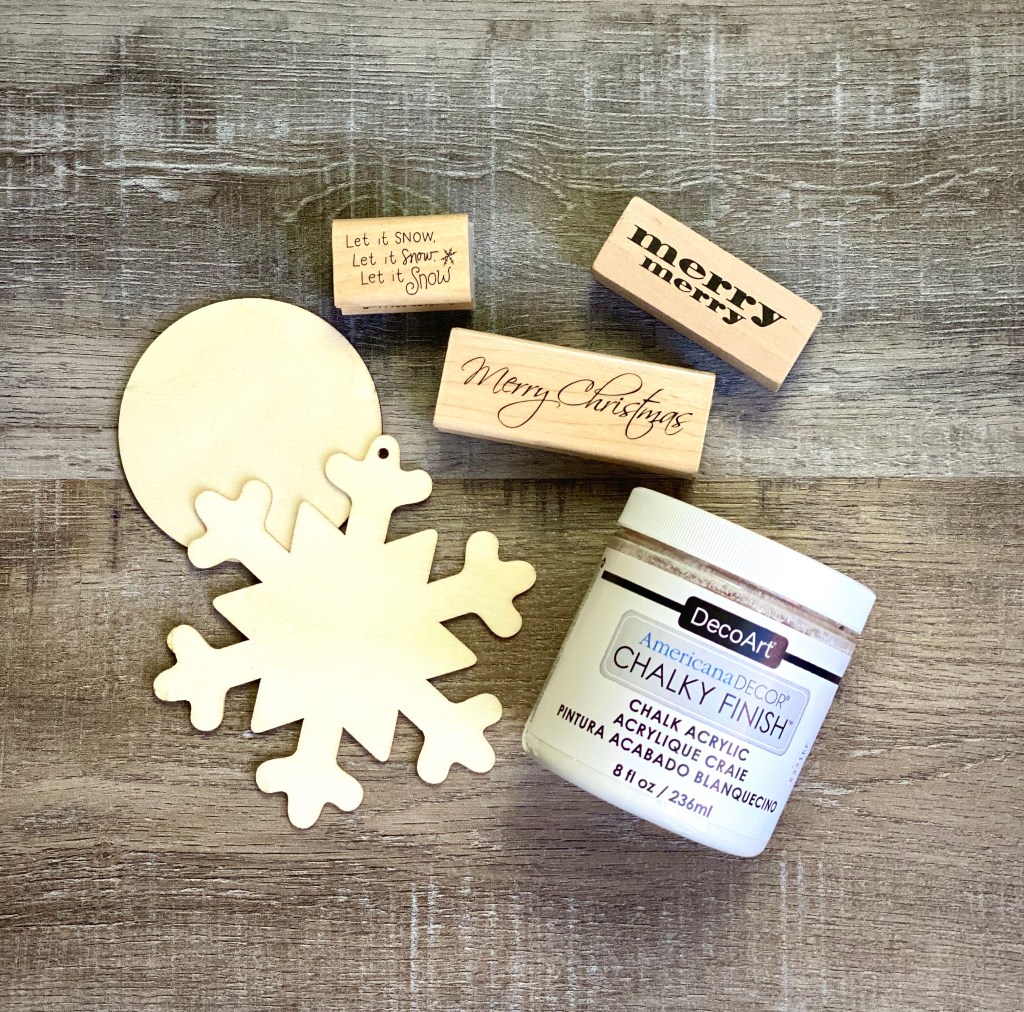
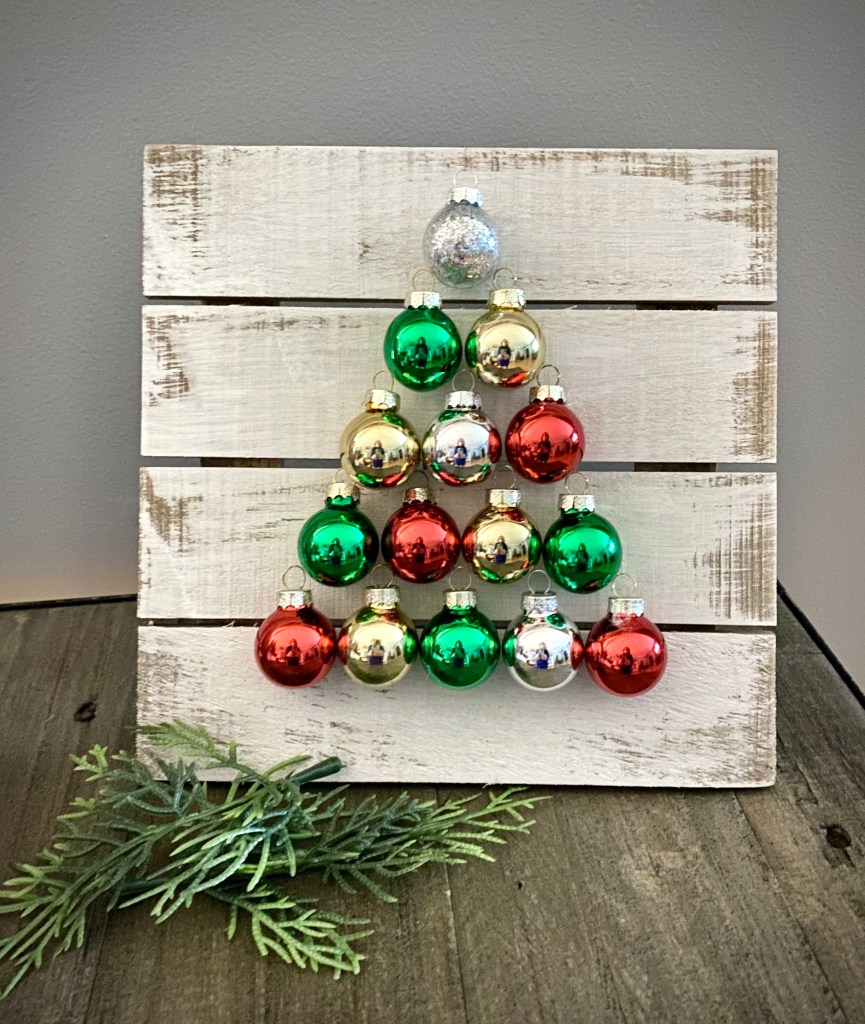
You’ll need 15 mini Christmas ornaments – I found mine at Target. You’ll also need a wood plaque. I found mine at Hobby Lobby – it measures 8 by 8 inches. It has an easel back as well as a sawtooth hanger, so it can sit on a tabletop or hang on your wall. (I think it was only $3.99 – maybe $4.99. Don’t forget to use your coupon!) I used this white chalky finish paint on my project – I like how it helps the ornaments pop! You could also use white acrylic paint.

Disclosure: Some of the links on my site are affiliate links, meaning, at no additional cost to you, I will earn a small commission if you click through and make a purchase. As an Amazon Associate I earn from qualifying purchases.

First paint a thin layer of white paint onto the plaque, feathering it out toward the edges so it’s not completely covered. Let that dry a couple of minutes while you decide what color order you want to make your tree. I had another box of ornaments that isn’t in the picture so that’s why there are some silver ornaments in my tree even though they aren’t showing in the box above. 🙂

I used my hot glue gun to glue my ornaments to the plaque. Center the middle ornament of the bottom row and glue in place. Be sure to hold it there for a few seconds for the glue to cool so it doesn’t roll away! Then glue on the rest of the ornaments, building around the first one.

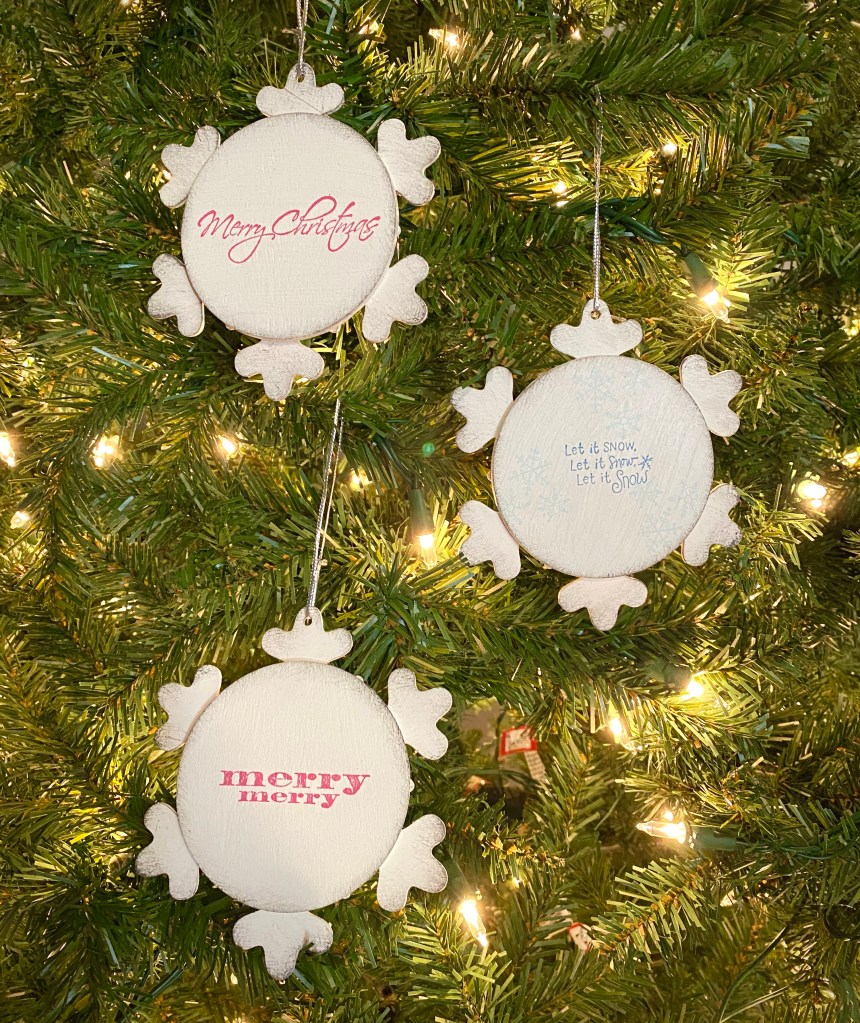
And that’s all there is to it! Told you it was easy and quick! 🎄

Happy Crafting!

Anita

Posted in Christmas, Decor, Gifts | Tagged , , , | 7 Comments

Mini Hand-Stamped Christmas Gift Bags

Hi friends,

Do you struggle with creative ways to give gift cards or cash for Christmas? I love to make those gifts a little more special by giving them in a fun way and not just in a card. These cute little Hand-Stamped Christmas Gift Bags are super quick and easy to make – you can make as many as you need in just a few minutes!🎄🎄🎄

Disclosure: Some of the links on my site are affiliate links, meaning, at no additional cost to you, I will earn a small commission if you click through and make a purchase. As an Amazon Associate I earn from qualifying purchases.

I found the muslin bags here on Amazon. They are 4 by 5.8 inches and are the perfect size to add a gift card or cash along with a chocolate or two. 🙂

I used Memento Luxe Mixed Media Ink in Pear Tart to stamp my tree and Memento Luxe Mixed Media ink in Rose Bud to stamp “Merry Christmas”. I slipped a piece of card stock into the bag before I stamped my images just to be sure the ink didn’t bleed through onto the back of the bag. The stamps I used are older ones I have had in my collection for a long time – use your favorites to create your own gift bags.

Super fast, super easy and it adds just a little something extra to your gift! 🎄

Happy Stamping!

Anita

Posted in Christmas, Gifts, Stamping | Tagged , , | 5 Comments

Wood Snowflake Ornaments

Hi friends,

I have a really fun and simple Wood Snowflake Ornament to share with you today. ❄️

This would be such a fun project to make with the kids – they could give them to their friends for Christmas and have a day of making memories as they create with you. 🙂

Disclosure: Some of the links on my site are affiliate links, meaning, at no additional cost to you, I will earn a small commission if you click through and make a purchase. As an Amazon Associate I earn from qualifying purchases.

You’ll need some wood snowflake ornaments (mine are about 4 1/2-inches), wood circles (mine are 3-inches), white and gray chalk or acrylic paint, Christmas/Winter rubber stamps with ink pads, adhesive to glue the circles to the snowflakes, and matte sealing spray.

Here are links to some of the supplies I used…

Paint both sides of the snowflake and circle with 2 coats of white paint, letting it dry between coats. Stamp the sentiments/snowflakes onto the circles. Dry brush some of the gray paint onto the snowflakes and circles. Glue the circle to the center of the snowflake. Spray a light coat of matte sealing spray on both sides of the ornament. Attach your favorite cord or ribbon for hanging.

Here they are all finished and hanging on my tree…

Have Fun and Happy Crafting! ❄️❄️❄️

Anita

Posted in Christmas, Gifts, Stamping | Tagged , , | 1 Comment

Crafty Christmas Gift Ideas

Hi friends,

It’s officially Christmas shopping season! 🎄 Have you started yet?

I thought I would share some of my favorite gift ideas for your crafty friends and family. I’ve included ideas for crochet lovers, paper crafters, rubber stampers, and a couple for general crafting. I hope these ideas will give you a little inspiration and make your shopping just a bit easier. Or maybe share this with your loved ones so they know what’s on your wish list. 😊🎄

Disclosure: Some of the links on my site are affiliate links, meaning, at no additional cost to you, I will earn a small commission if you click through and make a purchase. As an Amazon Associate I earn from qualifying purchases.

Crochet Gift Ideas…

These Clover Crochet Hooks are great! This set includes sizes B/2.25mm through J/6mm. I love mine!

Large-Eye Blunt Needles and Stitch Markers make great stocking stuffers!

This Crochet Key Chain or these Stork Scissors would come in handy…

A yarn bowl is great to keep your yarn from rolling away! I have to admit that I don’t own one – but this one is pretty and I may have to add it to my own list 😉

And for the crocheter who has everything…the Clover Yarn Cutter Pendant!

Here are a few ideas for paper crafters, rubber stampers, and general crafters…

I absolutely adore these Blender Brushes from Taylored Expressions – they are amazing and work so well adding ink to your project. You can also get a Storage Caddy so they are handy on your crafting desk.

TE Blender Brushes

The Misti Stamp Tool is such a great tool for positioning stamps just where you want them and so good for stamping multiple cards with the same image.

A Stamping Pad gives you the perfect surface to stamp your images. And Acrylic Stamping Blocks are a must for unmounted or clear stamps.

I love Memento Dye Ink pads! These Finger Sponge Daubers are a great tool for applying ink to your projects.

A good ruler is always a welcome crafting tool. I like this clear Westcott ruler – I use mine all the time!

And finally, a good pair of detail scissors is a must!

And there you have it – a few ideas to get your gift giving juices flowing. 🙂

Happy Shopping!

Anita

Posted in Cards, Christmas, Crochet, Gifts, Stamping | Tagged , | Leave a comment

Happy Thanksgiving

Hi friends,

Happy Thanksgiving! I hope you are able to spend some time today with family and friends.

I am thankful for so much! One thing I am especially thankful for is the support you all have given my little blog. 🙂 I love sharing my creative side with you and can’t thank you enough for continuing to take a minute out of your busy day to stop by and see what I’m up to.

Disclosure: Some of the links on my site are affiliate links, meaning, at no additional cost to you, I will earn a small commission if you click through and make a purchase. As an Amazon Associate I earn from qualifying purchases.

I made this fun little card using the Cuddlebug Turkey from Unity Stamp Company. He is stamped with Memento Tuxedo Black ink on white card stock and colored with Copic markers. I embossed a panel of brown card stock with the Scattered Leaves embossing folder from Taylored Expressions. I tied some brown and white baker’s twine around the panel and attached it to a card made from kraft card stock. The stamped image is attached to the card with foam tape.

Feeling Thankful!!

Anita

Posted in Cards, Fall, Stamping | Tagged , | 2 Comments

Crochet Candy Cane Cup Cozy

Hi friends,

Here’s a super quick and easy Crochet Candy Cane Cup Cozy pattern that works up in just minutes! The thing I like about cozies with buttons is that you can adjust it to fit any size cup, bottle, or can – no worries about it slipping off or not being big enough. (I have another cozy pattern for Fall here.)

Disclosure: Some of the links on my site are affiliate links, meaning, at no additional cost to you, I will earn a small commission if you click through and make a purchase. As an Amazon Associate I earn from qualifying purchases.

Grab your favorite cotton yarn and whip up a few of these. Add a cup, some cocoa mix, and a candy cane or two for a fun gift – great for teachers, friends, babysitters or anyone you’d like to give a little something for Christmas!

If you need it, this is a great video on Foundation Single Crochet.

Crochet Candy Cane Cup Cozy

I Love This Cotton Yarn in White and Red

G/4mm hook

Stitches used US terms:

Foundation single crochet – fsc

Chain – ch

Back loop only – blo

Double crochet – dc

Pattern:

Row 1: With red, work 40 fsc. Turn. (40 stitches)

Row 2: Ch 1. Sc in blo across. Turn. (40 stitches)

Change to White at the end of Row 2.

Row 3: Ch 3 (counts as first dc). Skip first stitch, dc in next stitch and each stitch across. (40 stitches)

Rows 4-5: Ch 3 (counts as first dc). Skip first stitch, dc in next stitch and each stitch across, ending with last dc in top of ch 3 of previous row. Turn. (40 stitches)

Change to red at the end of Row 5.

Row 6: Ch 1. Sc in each stitch across ending with last sc in top of ch 3 of previous row. Turn.

Row 7: Ch 1. Sc in blo across. Turn. (40 stitches)

Change to White at the end of Row 7.

Row 8: Ch 3 (counts as first dc). Skip first stitch, dc in next stitch and each stitch across. (40 stitches)

Rows 9-10: Ch 3 (counts as first dc). Skip first stitch, dc in next stitch and each stitch across, ending with last dc in top of ch 3 of previous row. Turn. (40 stitches)

Change to red at the end of Row 10.

Row 11: Ch 1. Sc in each stitch across ending with last sc in top of ch 3 of previous row. Turn.

Row 12: Ch 1. Sc in blo across. Turn. (40 stitches)

Fasten off and weave in ends.

Attach 2 buttons to one end in the center of each white section.

Here’s a PDF for easy printing. 🙂

If you’re more of a spearmint fan, you could make these in white and green. 🙂

Happy Stitching!

Anita

Posted in Christmas, Crochet, Gifts | Tagged , , | 2 Comments

Unbelievably Easy Grape Jelly Meatballs

Hi friends,

Ok…these meatballs are so easy to make that I almost didn’t post about them. Because everyone knows about them, right??? But just in case someone doesn’t, I decided to write up a quick post. 🙂

Disclosure: Some of the links on my site are affiliate links, meaning, at no additional cost to you, I will earn a small commission if you click through and make a purchase. As an Amazon Associate I earn from qualifying purchases.

All you need is a 2 pound bag of frozen meatballs, a 10 oz jar of chili sauce, 1 and 1/2 cups grape jelly – and your slow cooker (this is mine and I love it!).

Add the frozen meatballs to your slow cooker. Mix the chili sauce and grape jelly together and pour over the meatballs. Stir the mixture to coat all the meatballs. Set your slow cook to LOW and cook for 4 hours.

And that’s it! Super easy and very tasty. These make a great appetizer or even a main dish served over rice or noodles.

I’ve also seen these made with BBQ sauce instead of chili sauce. You can easily double the recipe if you need more for a a party or potluck.

This is a great recipe to take to all those holiday gatherings during this busy season!

If you are in need of a new slow cooker, I love my Ninja Auto-iQ Multi/Slow Cooker. You can slow cook, sear, steam, and bake all on your counter top!

Thanks for stopping by,

Anita

Posted in Recipes | Tagged | 4 Comments

Farmhouse Christmas Candles

Hi friends,

Are you ready to decorate for Christmas? 🎄It will be here before we know it! I have a super easy Farmhouse Christmas Candle for you today. You can make several of these in just a few minutes and they look so cute grouped together!

Disclosure: Some of the links on my site are affiliate links, meaning, at no additional cost to you, I will earn a small commission if you click through and make a purchase. As an Amazon Associate I earn from qualifying purchases.

Here’s what you’ll need…(I’ve included links below to some of the supplies I used)

Measure around your candle to get the circumference. Mine measured about 7 inches. Cut a piece of the Craft Jute Webbing about an inch longer – I cut mine to 8 inches. Hot glue one edge of the webbing to the candle. Wrap the webbing tightly around the candle and hot glue the other end, overlapping the first edge.

Wrap the natural jute twine around the webbing 4 to 5 times and tie tightly with a double knot, leaving long ends. Tie on the bell and trim any excess twine. If desired, slip a piece of greenery under the twine.

A simple, cute Farmhouse addition to your Christmas decor! They would also be a great hostess gift during the holiday season.

Happy Crafting!

Anita

Posted in Christmas, Decor | Tagged , , | 7 Comments

Super Easy Spinach Dip

Hi friends,

Are you in charge of appetizers for Thanksgiving dinner? I have an incredibly easy, tasty recipe that takes just minutes to mix up. And it tastes better if you make it ahead of time – so make it a day early!

Disclosure: Some of the links on my site are affiliate links, meaning, at no additional cost to you, I will earn a small commission if you click through and make a purchase. As an Amazon Associate I earn from qualifying purchases.

Here’s what you’ll need to make this yummy Spinach Dip.

1 cup sour cream, 1 cup mayonnaise, 1 (10 oz) package frozen chopped spinach, and 1 package dry vegetable soup mix – I use Knorr vegetable soup mix.

Thaw the spinach according to package directions – just thaw, don’t cook it! Squeeze out as much liquid as you can. I squeeze it with paper towels – you want it to be really dry.

Mix the sour cream and mayonnaise together in a bowl. Stir in the vegetable soup mix and spinach. Mix well and refrigerate for several hours.

Serve this yummy dip with crackers and vegetables. Of course, you can easily double this recipe if you need to.

You can also serve this dip in a bread bowl made from Hawaiian bread (or your favorite bread). Tear the bread you’ve taken out of the loaf into bite sized pieces and serve alongside.

Super fast. Super easy. Super tasty!

Thanks for stopping by,

Anita

Posted in Recipes | Tagged | 2 Comments

Hand-Stamped Muslin Thanksgiving Favor Bags

Hi friends,

These little Hand-Stamped Muslin Thanksgiving Favor Bags turned out so cute and are a cinch to make!

Disclosure: Some of the links on my site are affiliate links, meaning, at no additional cost to you, I will earn a small commission if you click through and make a purchase. As an Amazon Associate I earn from qualifying purchases.

I found my muslin drawstring bags here at Amazon. These are 4 by 5.8 inches and come in a package of 50. They were $13.99 at the time I ordered them – so only about 28 cents per bag!! They also come in 3 other sizes – one smaller and 2 larger – if you want a different size. I did have to iron them a little before I stamped them to get a few wrinkles out.

It’s so easy to stamp on these bags. I used orange and brown dye ink to stamp the pumpkin and sentiment. Memento Rich Cocoa dye ink is my favorite brown and this Pinkfresh Studio Clementine dye ink is a great orange.

Slip a piece of scrap card stock into the bag before stamping so the ink doesn’t bleed through the bag. I didn’t have any issues with this, but better to be safe! Using your favorite pumpkin stamp, stamp the image onto the bag with orange ink. (This set from Honey Bee Stamps has some cute pumpkins, or this one from Concord and 9th is really nice.) Then stamp your favorite sentiment below with brown ink. (The “thankful” in the Concord and 9th set would be great, or this “Happy Thanksgiving” stamp would also work well.)

And that’s all there is to it! I really love the look of these – so cute and simple!

Fill them with some chocolates or other treats and they make the perfect little favor to give to friends and family on Thanksgiving – or even before to let them know you are thankful for them!

Happy Stamping!

Anita

Posted in Fall, Gifts, Stamping | Tagged , | 1 Comment