We are getting ready to do a major remodel of our kitchen so my Easter decor will have to stay boxed up this year. That makes me a little sad because I made this adorable Easter “Peeps” Wood Decor sign last year and I won’t be able to enjoy it this Spring. I’m doing the next best thing by sharing this post again with you so you can make your own fun little sign! 🐰
I found this pin on Pinterest and knew immediately I had to make my own version of the cute Easter “Peeps” decoration in the post!
I had some left over scraps of wood from our bathroom remodel and one of them was the perfect size. I painted it with 2 coats of white chalk finish paint and then dry brushed it with brown acrylic paint to give it a distressed look.
I die cut a stencil from a transparency sheet using the bunny die from Amuse Studio. The die set is discontinued, but a quick google search should find a template you can use to make your stencil (like this one). Using the stencil, I applied blue, pink, and green dye ink with a sponge dauber to make the bunnies. After the ink was dry, I used the handle of a small paint brush to make the eyes and nose with dark brown paint.
Here’s how it turned out… I just love it!!
If you’d like bolder colors for your bunnies, just use acrylic paint instead of ink.
I saw several crochet carrots on Pinterest, but nothing was quite what I was looking for. So what to do??? I made up my own little pattern! 🥕😊
I used worsted weight yarn and an H/5mm hook to stitch up my carrots. The specific yarns I used are Crafter’s Secret in Orange and I Love This Yarn in Keylime. Both are available from Hobby Lobby. And have you noticed they have been putting all their yarn on sale 30% off about every other week?!?! Every. Single. Skein. How fun is that?!?!
Here’s my take on the carrot treat bag.
Crochet Mini Carrot Treat Bag
Stitches used – (US terms):
Chain – ch
Single crochet – sc
Double crochet – dc
Slip stitch – ss
Note: chain 2 does not count as a stitch
Tip: At the beginning of each round, I worked a slip stitch into the next stitch before chaining 2. By doing this, it helps to keep the seam from going wonky and really helps to hide the seam. The first picture is without the slip stitch, the second is with it.
Rnd 1: Using Orange, begin with a magic ring. Ch 2, dc 6 times in ring. Join with a ss to first dc. Pull magic ring closed.
Rnd 2: ss into next dc, ch 2. Work 2 dc in same stitch, dc in next stitch. *2 dc in next stitch, 1 dc in next stitch* twice and join with ss to first dc of rnd. (9 stitches)
Rnd 3: ss into next dc, ch 2. Work 2 dc in same stitch, dc in next 2 stitches. *2 dc in next stitch, dc in next 2 stitches* twice and join with ss to first dc of rnd. (12 stitches)
Rnd 4: ss into next dc, ch 2. Work 2 dc in same stitch, dc in next 3 stitches. *2 dc in next stitch, dc in next 3 stitches* twice and join with ss to first dc of rnd. (15 stitches)
Rnd 5: ss into next dc, ch 2. Work 2 dc in same stitch, dc in next 4 stitches. *2 dc in next stitch, dc in next 4 stitches* twice and join with ss to first dc of rnd. (18 stitches)
Rnd 6: ss into next dc, ch 2. Work 2 dc in same stitch, dc in next 5 stitches. *2 dc in next stitch, dc in next 5 stitches* twice and join with ss to first dc of rnd. (21 stitches)
Rnd 7: ss into next dc, ch 2. Work 2 dc in same stitch, dc in next 6 stitches. *2 dc in next stitch, dc in next 6 stitches* twice and join with ss to first dc of rnd. (24 stitches) Change to Keylime.
Rnd 8: Using Keylime, ss into next dc, ch 1. Sc in same stitch and each stitch around. Join with ss to first sc of rnd. (24 stitches)
Rnd 9: ss into next sc, ch 1. Sc in same stitch and each stitch around. Join with ss to first sc of rnd. (24 stitches) Do not fasten off.
To make handle:
Row 1: ss into next sc, ch 1. Sc in same stitch and in next sc, (leaving the rest of the round unworked), ch 1. Turn.
Row 2-16: 1 sc in each of the 2 sc, ch 1. Turn.
Fasten off leaving a long tail. Sew the end of the handle to the opposite side of the carrot. Weave in ends.
These cute little carrots are perfect to fill with chocolate and other fun treats. They work up very quickly so you’ll have plenty of time to make as many as you need!
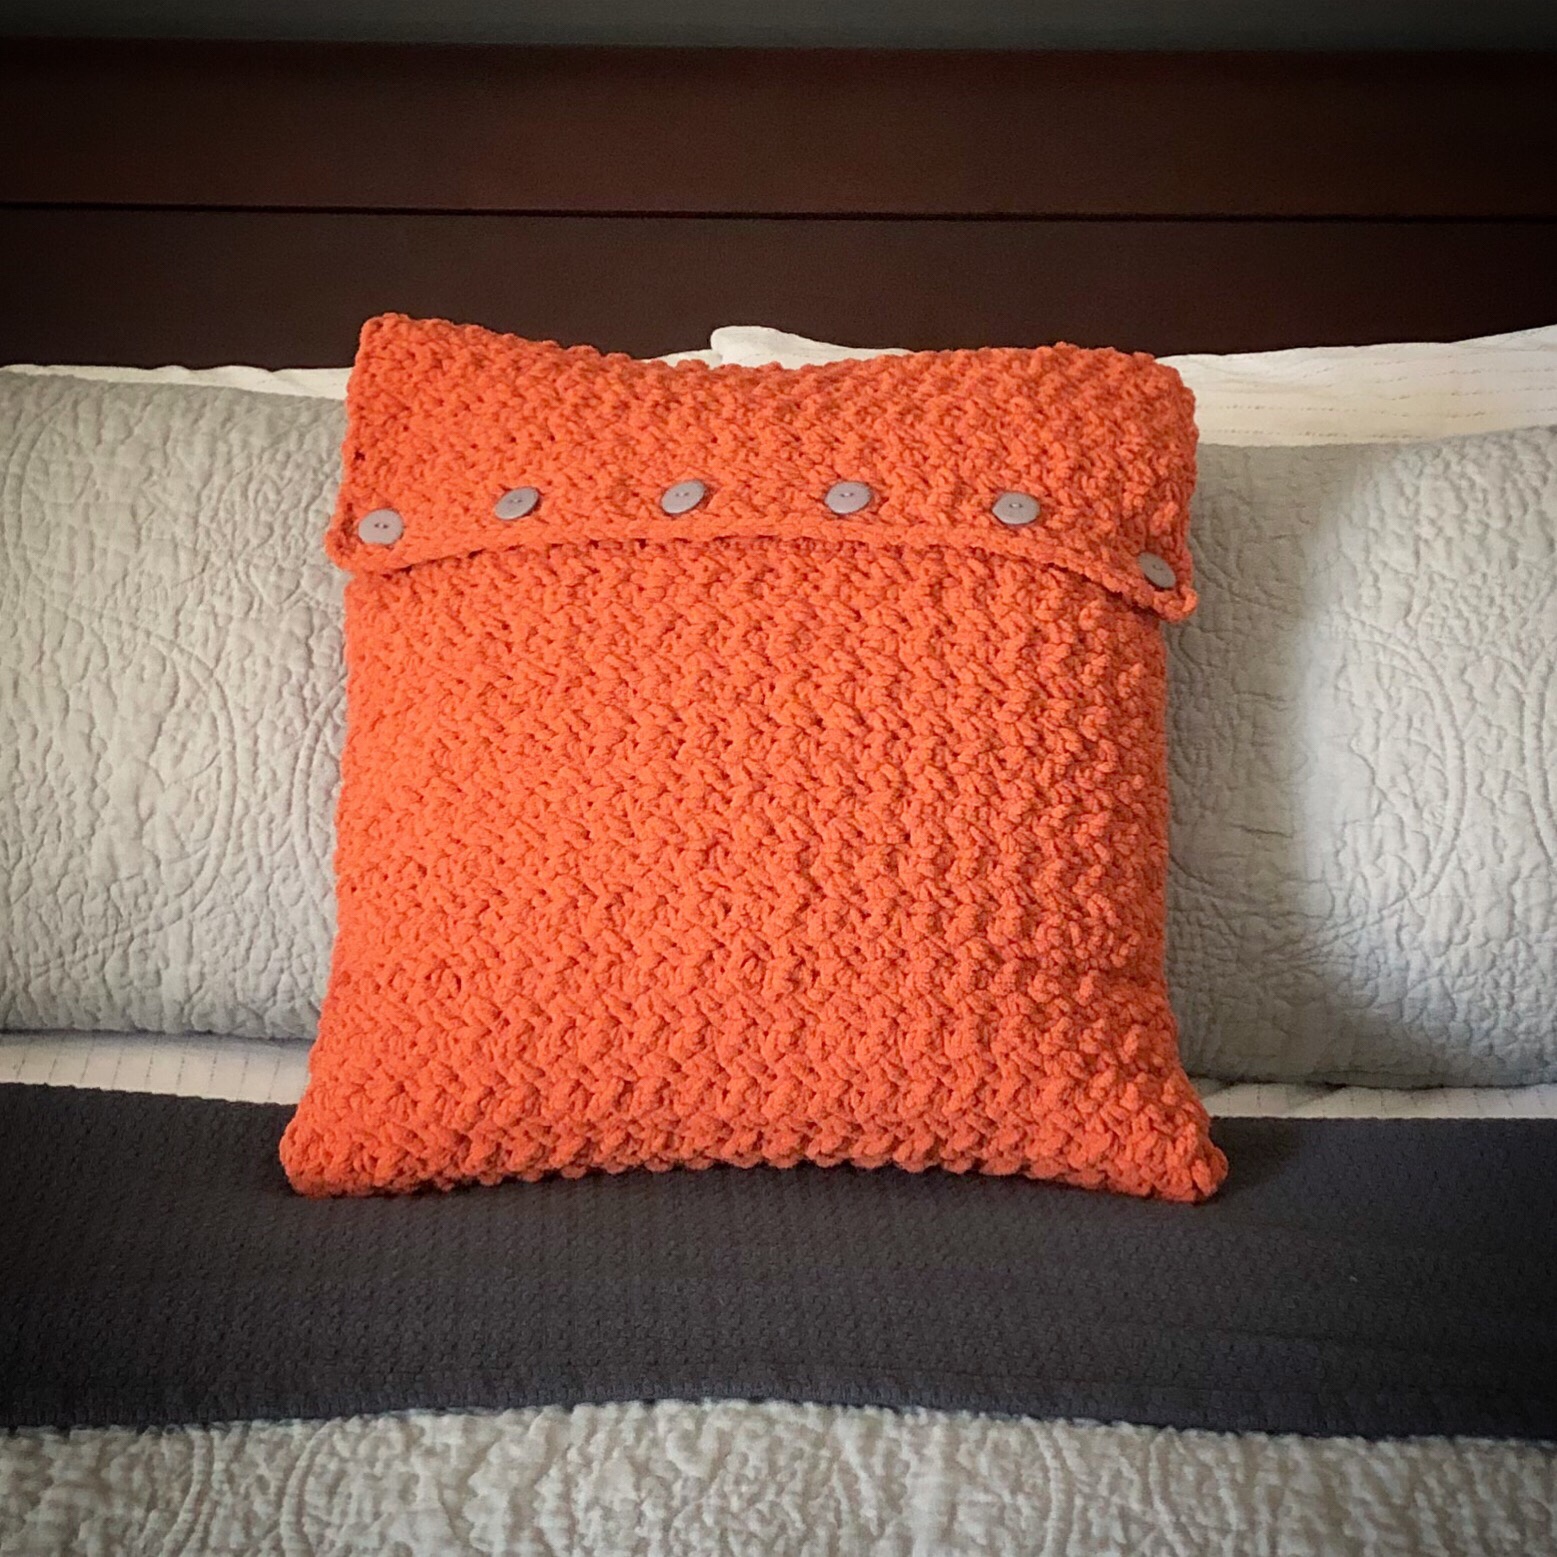
We recently updated our bedroom with new windows, new trim, plantation shutters, and a pretty dark gray paint on the walls. Of course, new bedding made its way into the room, too. 😉
Since the color scheme changed, I decided that a new crochet pillow cover or two would be fun to make. I already had a couple of pillow inserts to use. The only problem is they are big – 20-inches square – so I wanted to find a crochet pattern that would work with some chunky yarn. I thought something with texture would work great on a pillow that big. I found a great simple pattern here at Teal & Finch. I love this pattern because it is worked with bulky yarn and you can make it any size you need!
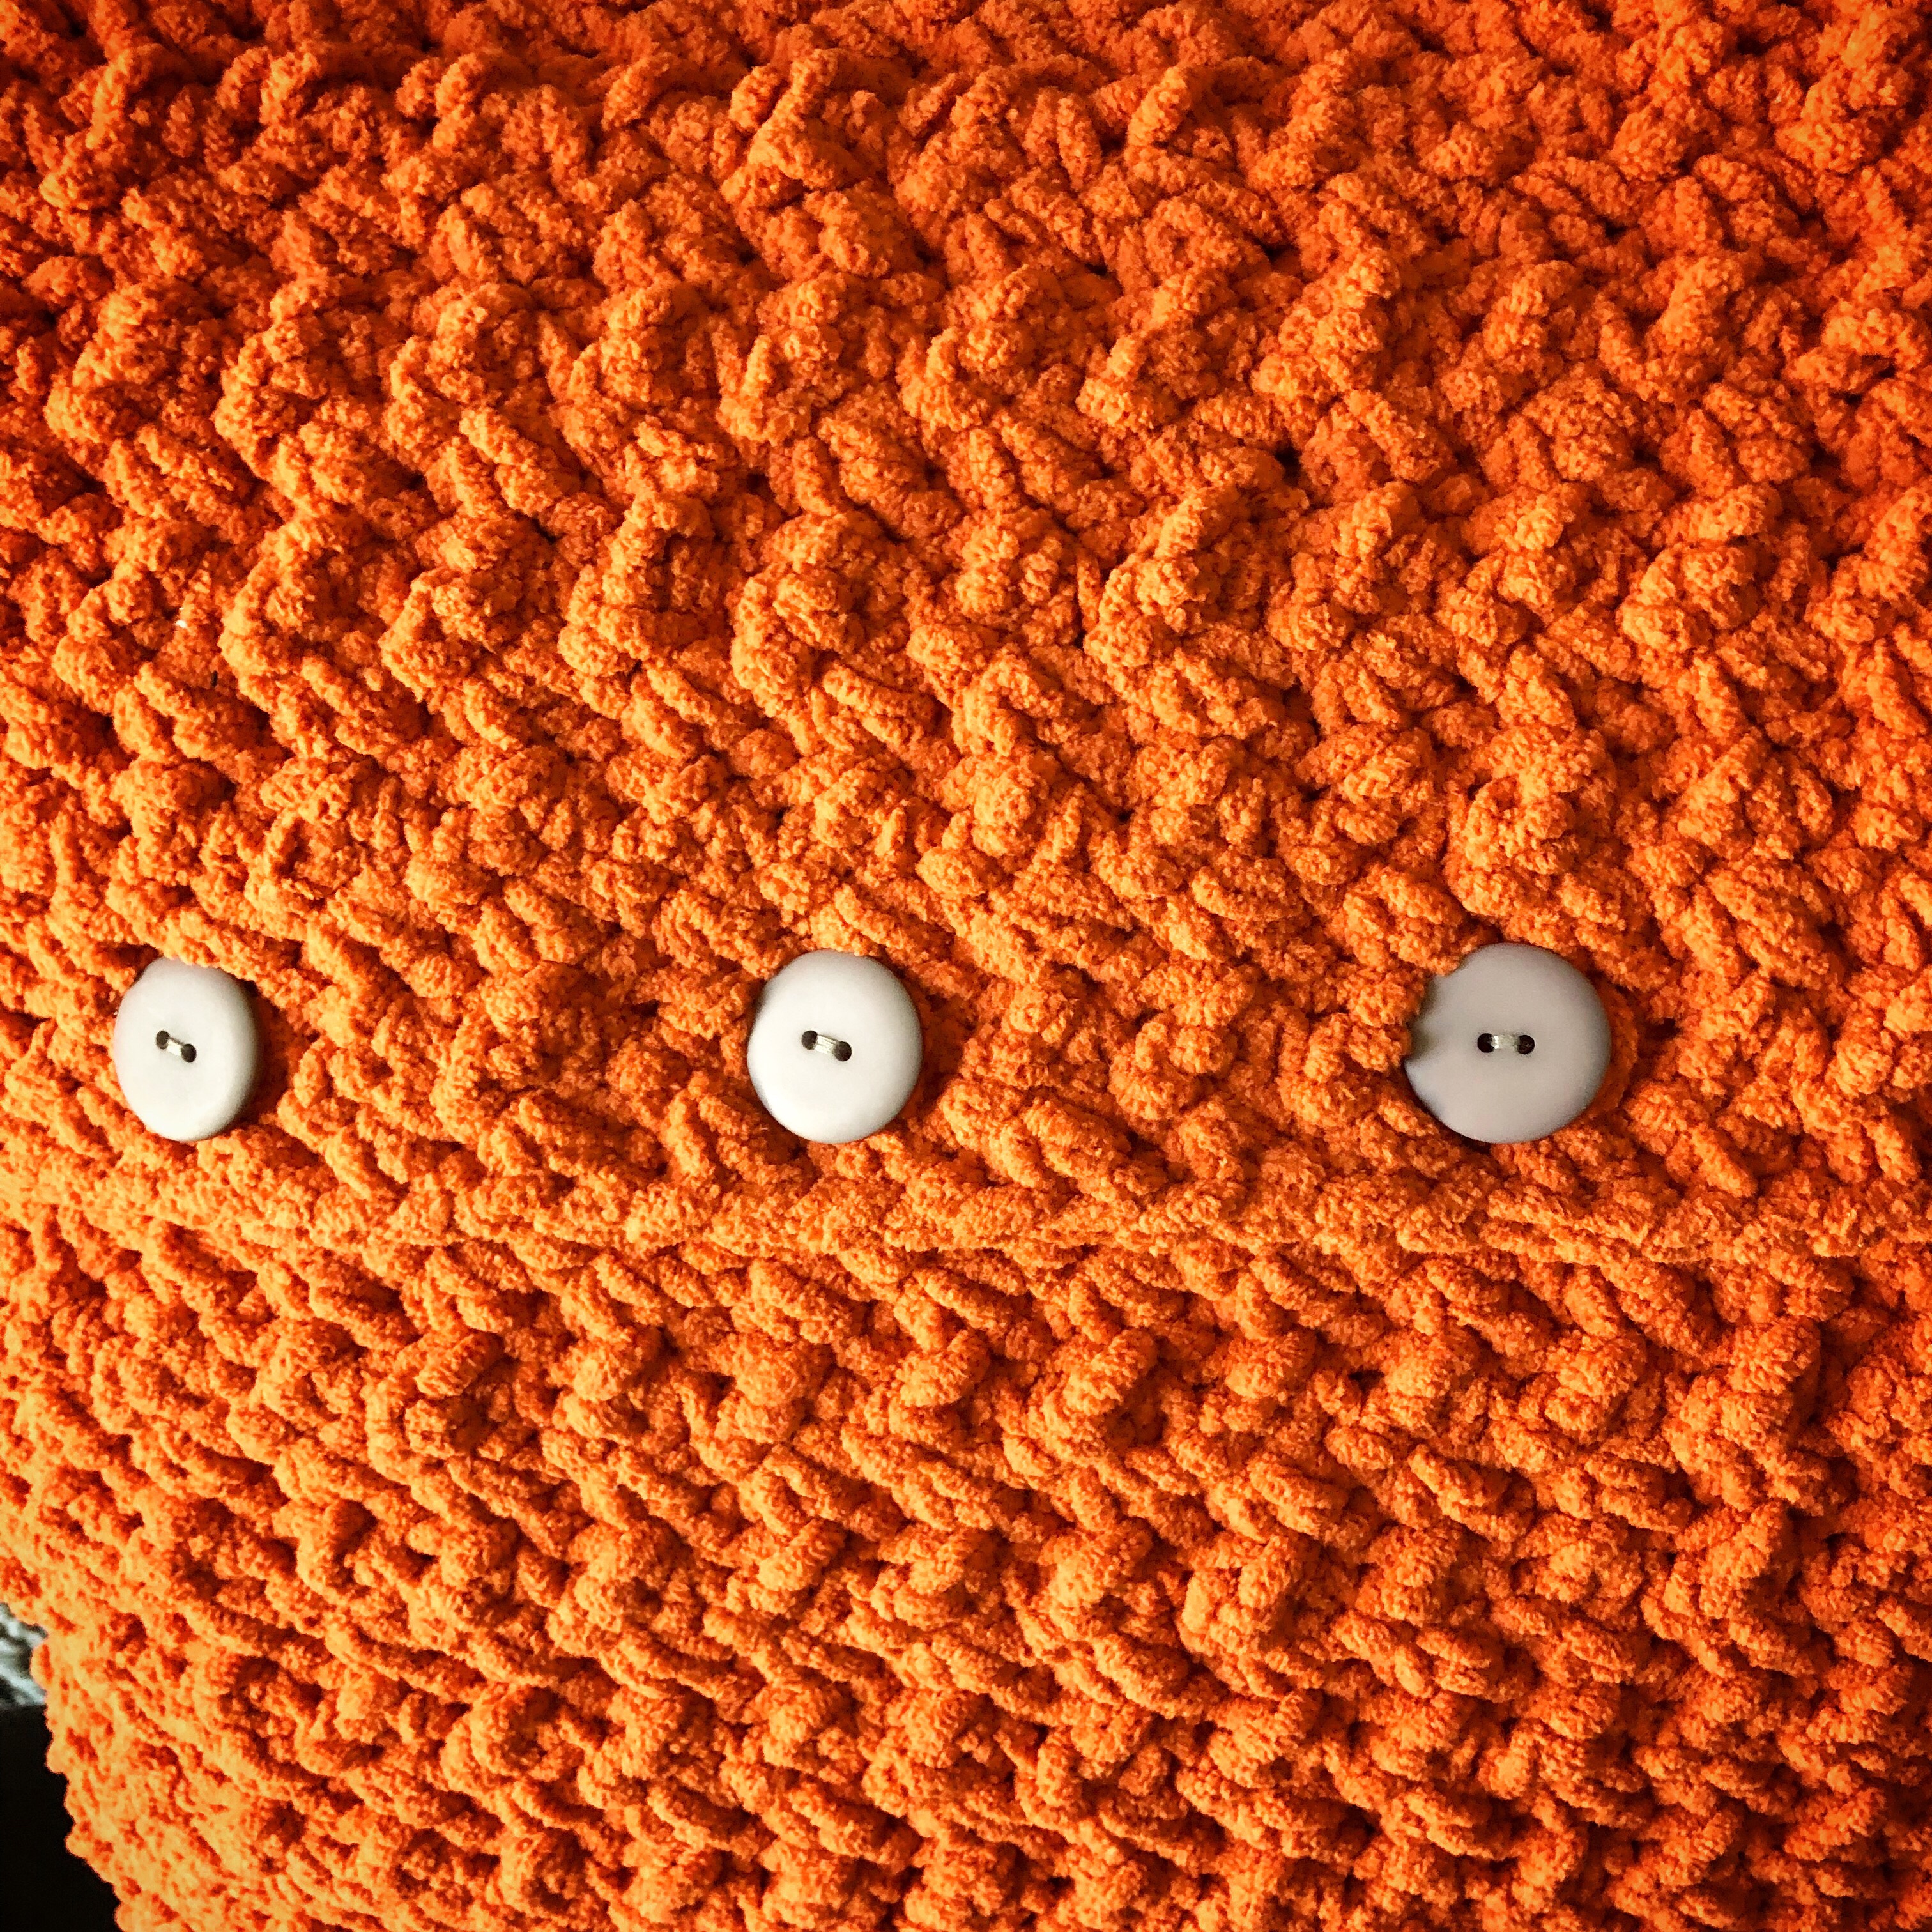
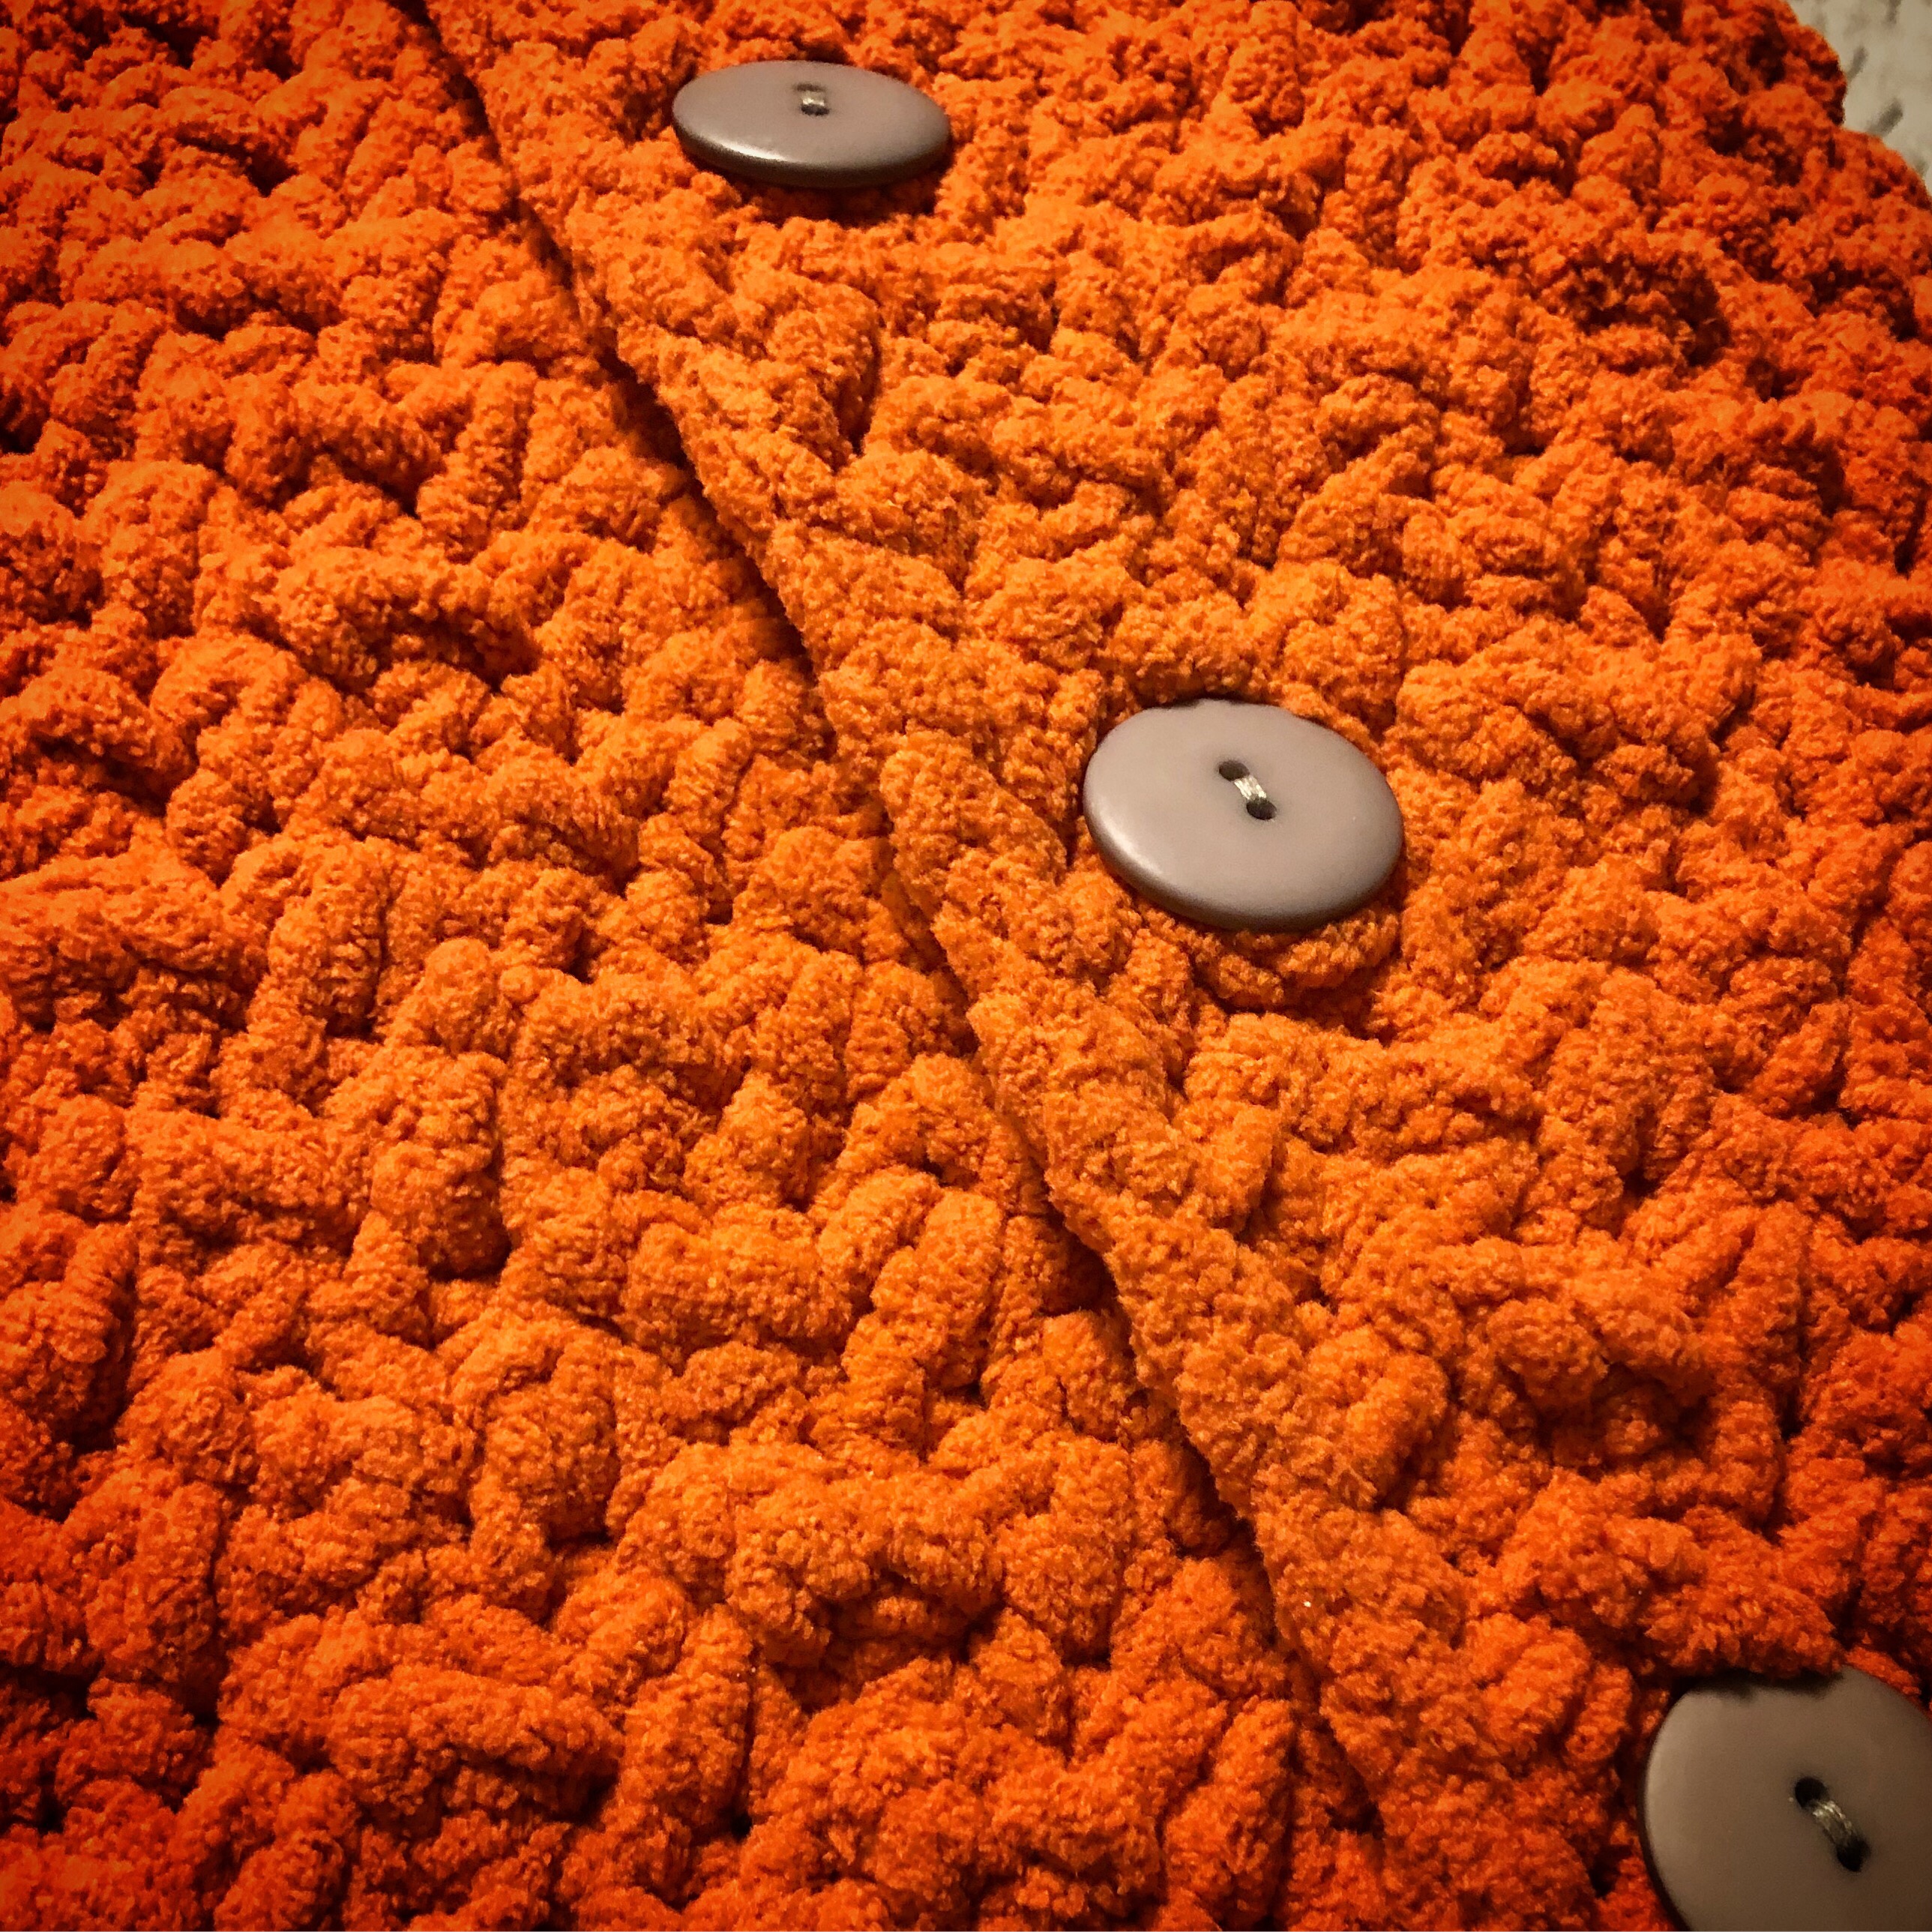
I used Bernat Blanket Yarn in Pumpkin Spice with an N/10mm hook to make my pillow cover. I just followed the directions in the pattern to make the pillow cover large enough to fit my 20-inch insert.
Just look at that texture!!! 😍
I added 6 (1-inch) gray buttons evenly spaced to secure the cover over the insert. The 1-inch size fits perfectly through the openings in the pattern.
I absolutely love how it turned out!! It looks great on our bed and it is so plush and comfy!! And so easy to take off and throw in the washer when needed!
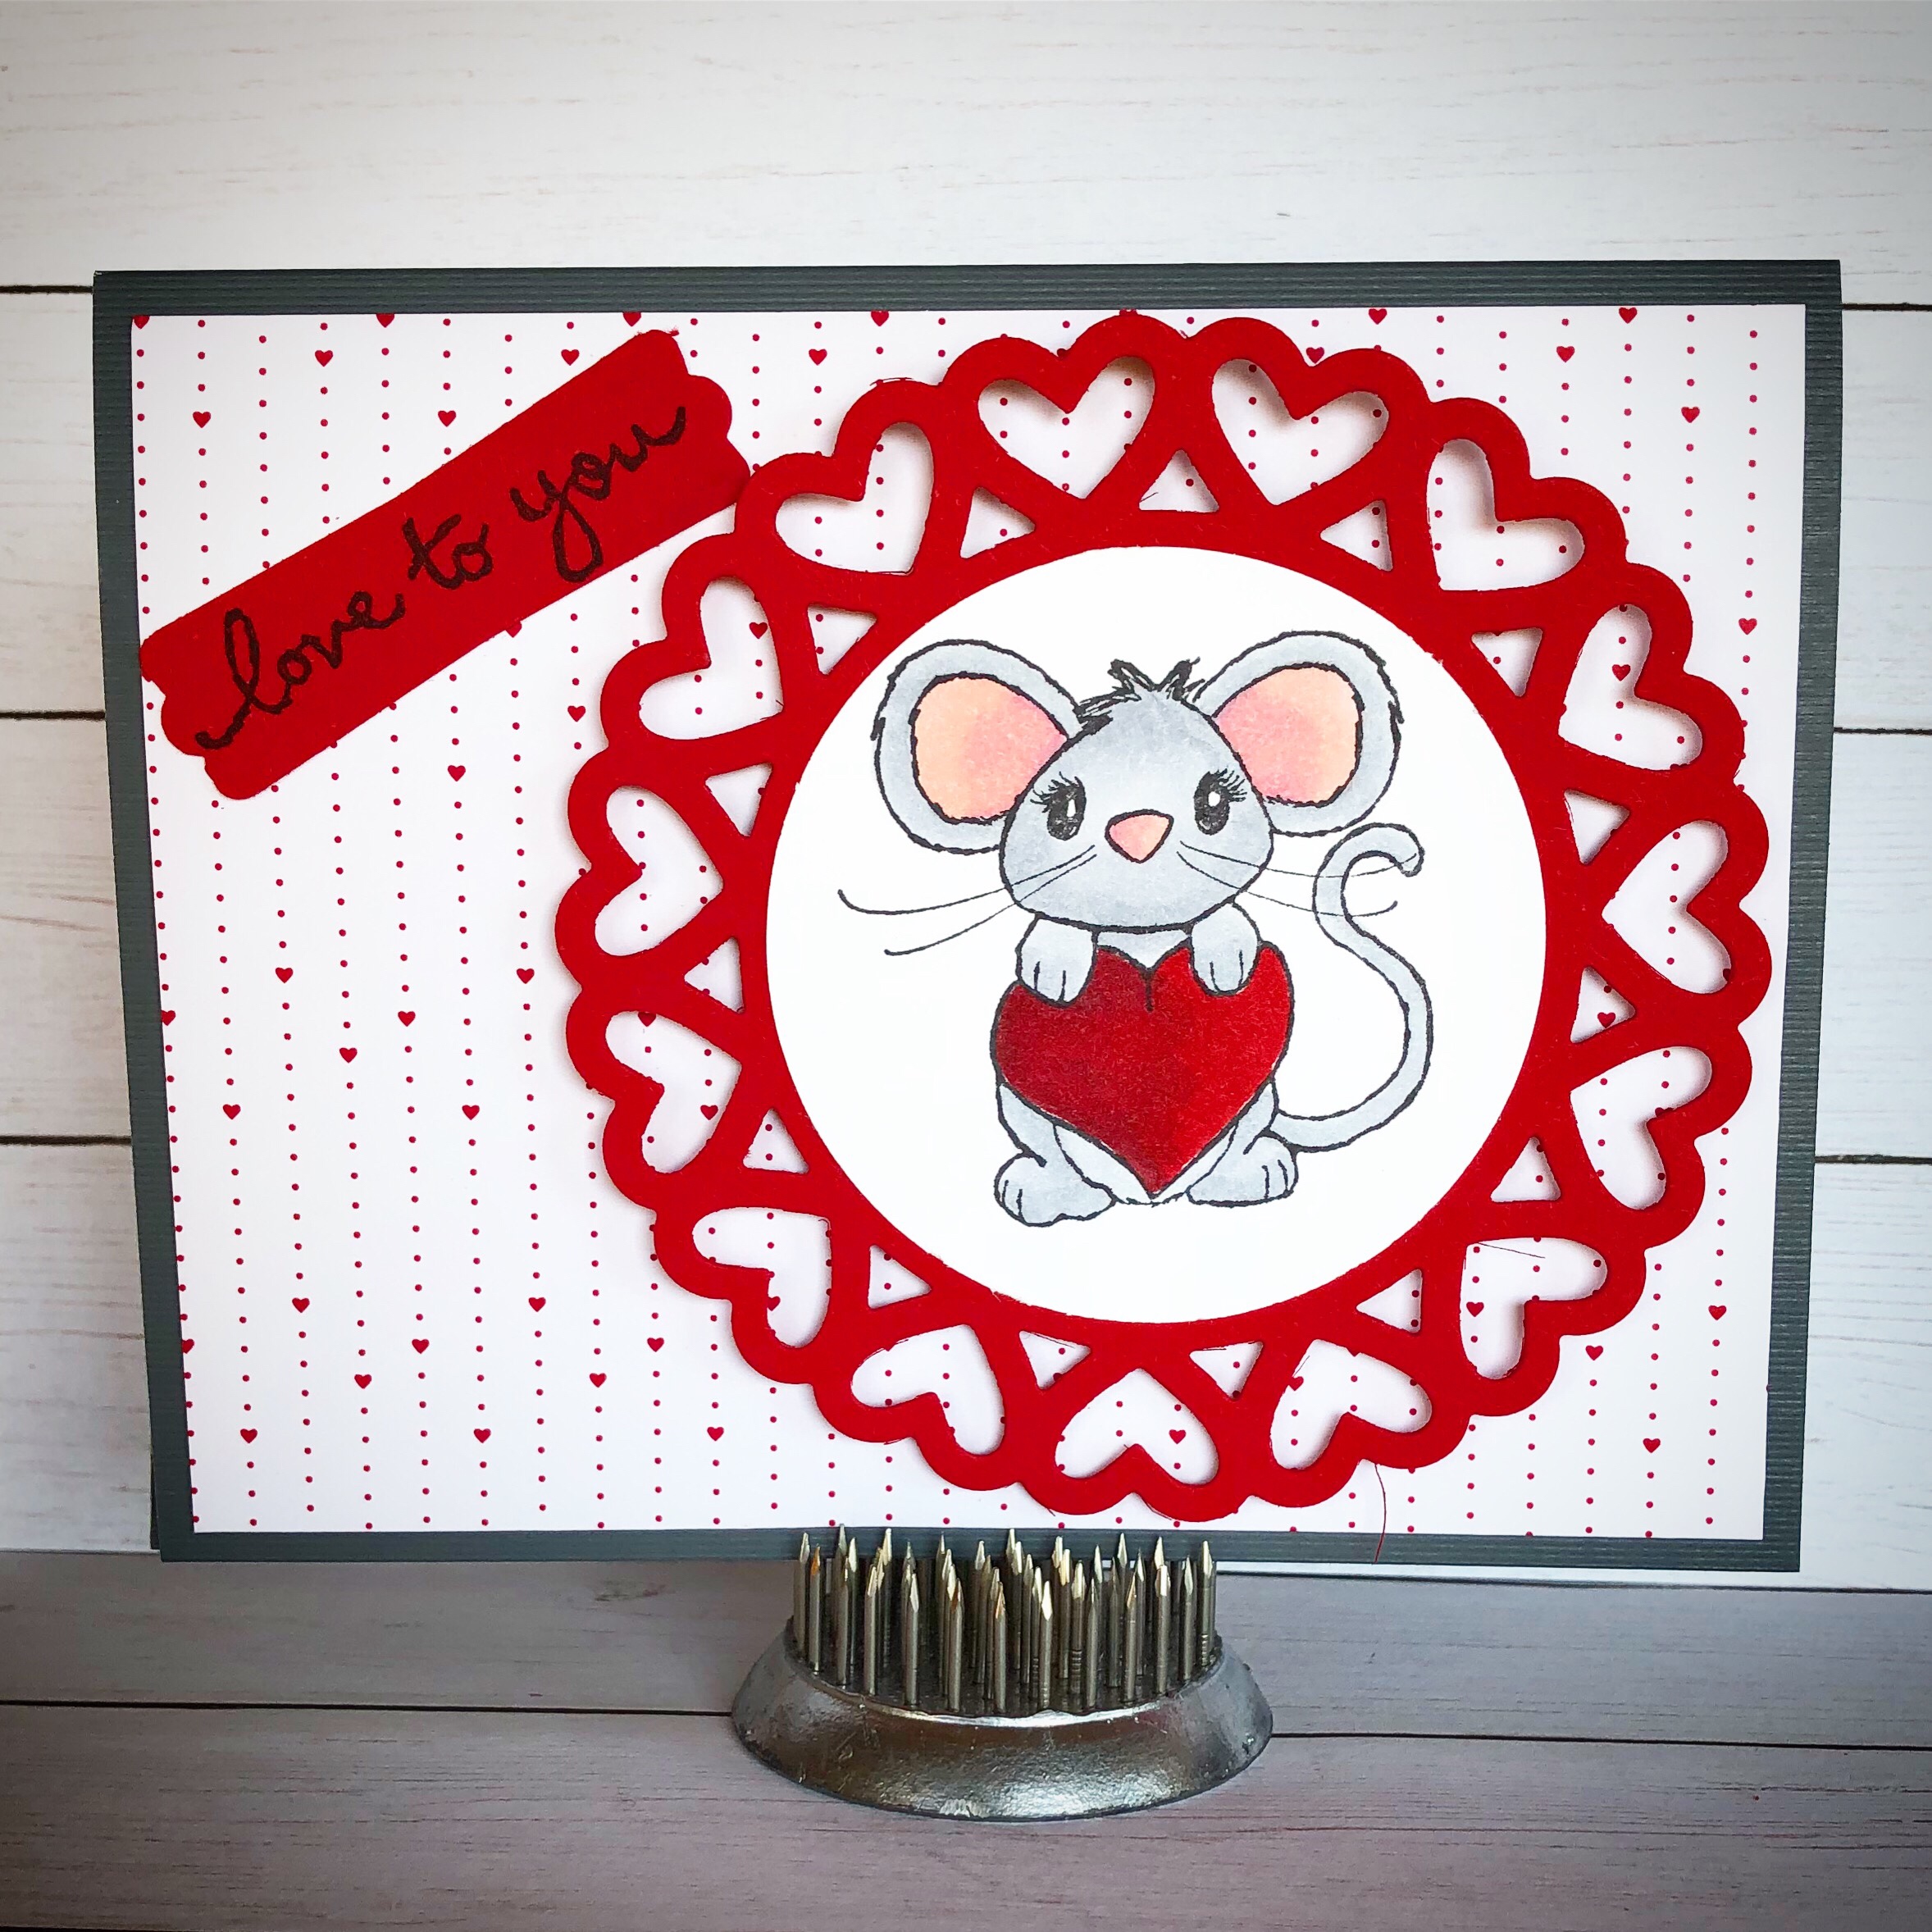
I made this cute card for Valentine’s Day, but I was thinking that with a few tweaks it could be used for so many other occasions.
A different color scheme, maybe a different die cut behind the mouse, a different sentiment…and you have a cute little mouse delivering a heartfelt message for a birthday, to say “thinking of you” or “thank you” or even to welcome a new baby.
I stamped the mouse with black ink on white card stock, colored him with Copic markers, and punched with a circle punch. I die cut the heart doily from red card stock and attached the stamped image to the center. The sentiment is stamped with black ink on red card stock and punched with a label punch.
To put the card together, I added a panel of black card stock to cover the front of a white card. Then I added a panel of patterned paper over the black. The sentiment is attached directly to the card and the doily with the little mouse is attached with foam tape.
He is just the cutest thing! Use your imagination and I’m sure you’ll come up with all kinds of ideas for this little guy.
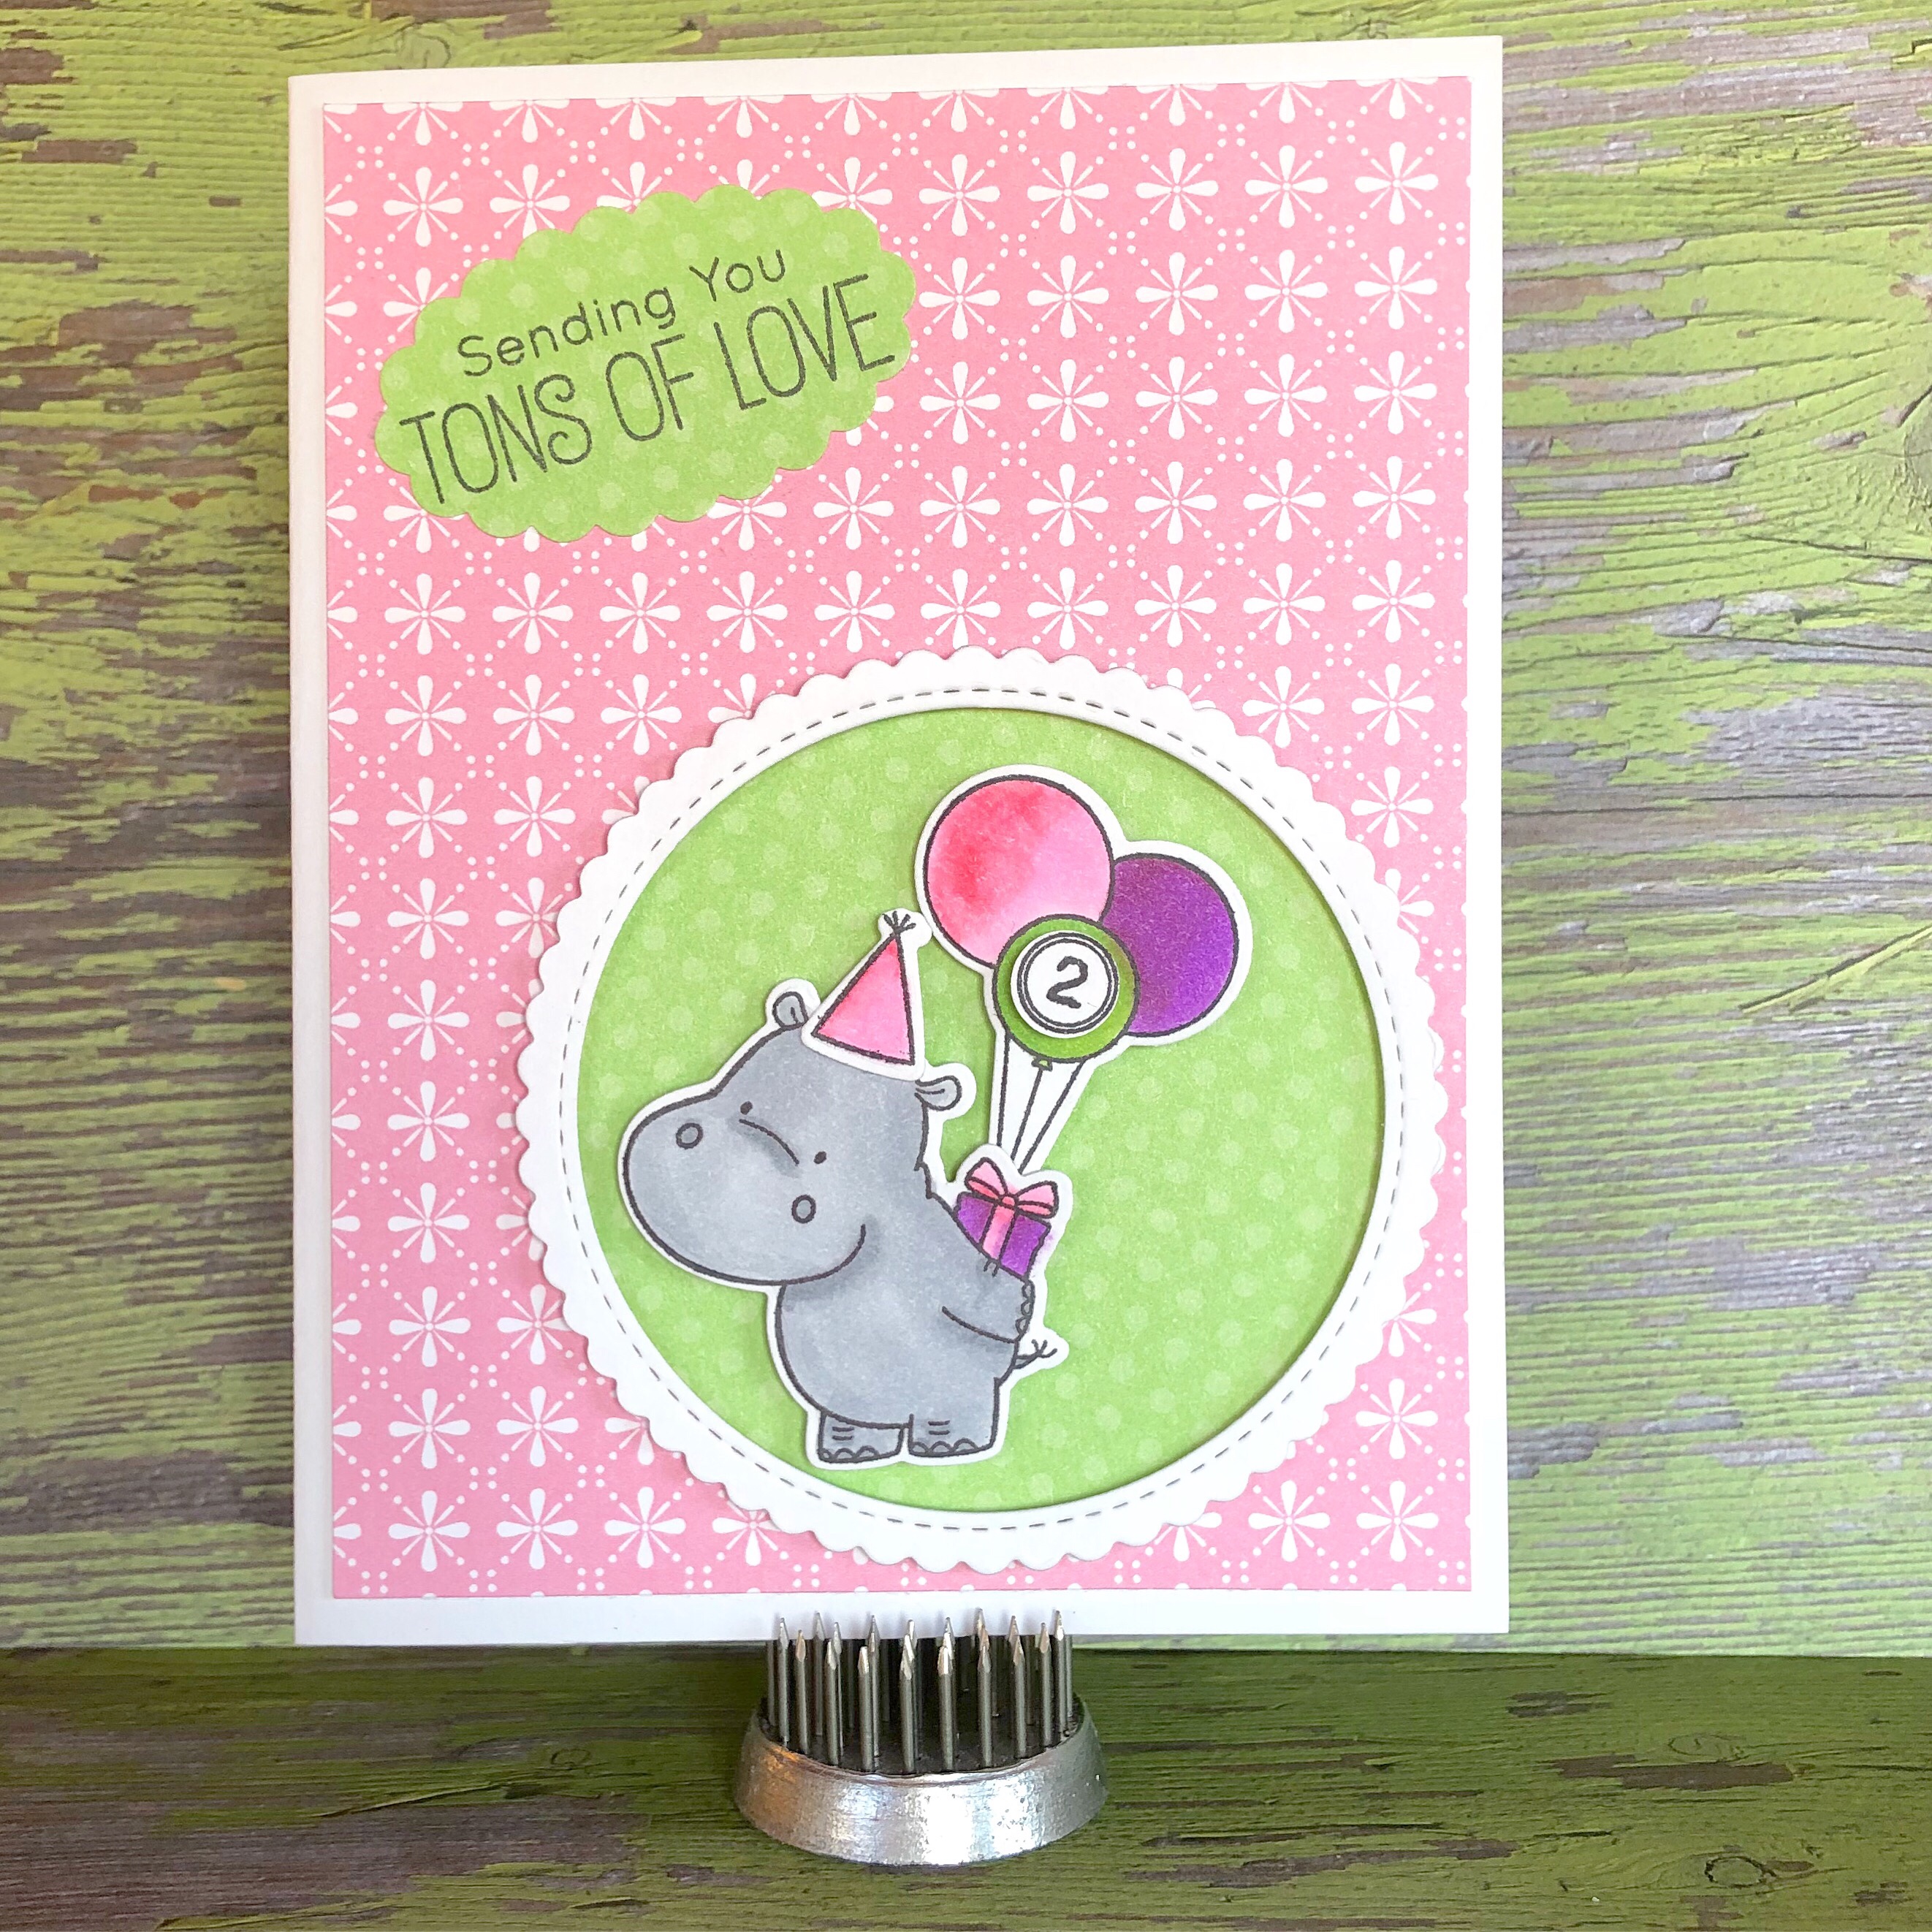
To make the card, stamp the hippo, balloons, and hat with black ink on white card stock. Color the images with Copic markers and die cut the images. Attach a piece of pink patterned paper to a white card. Punch a circle from green patterned paper and attach to the card. Die cut the white frame and attach over the green circle with foam tape. Attach stamped images inside the frame with foam tape. Stamp the sentiment with black ink on green patterned paper and punch with a scalloped oval punch. Attach to the card. The tiny “2” on the green balloon is from an old set by The Paper Studio. I stamped it with black ink on white card stock, punched it with a circle punch, and attached it to the balloon.
You could easily change the color scheme to make this a fun card for a little boy.
This little guy carried “tons of love” across the country to a precious little girl who holds my heart!
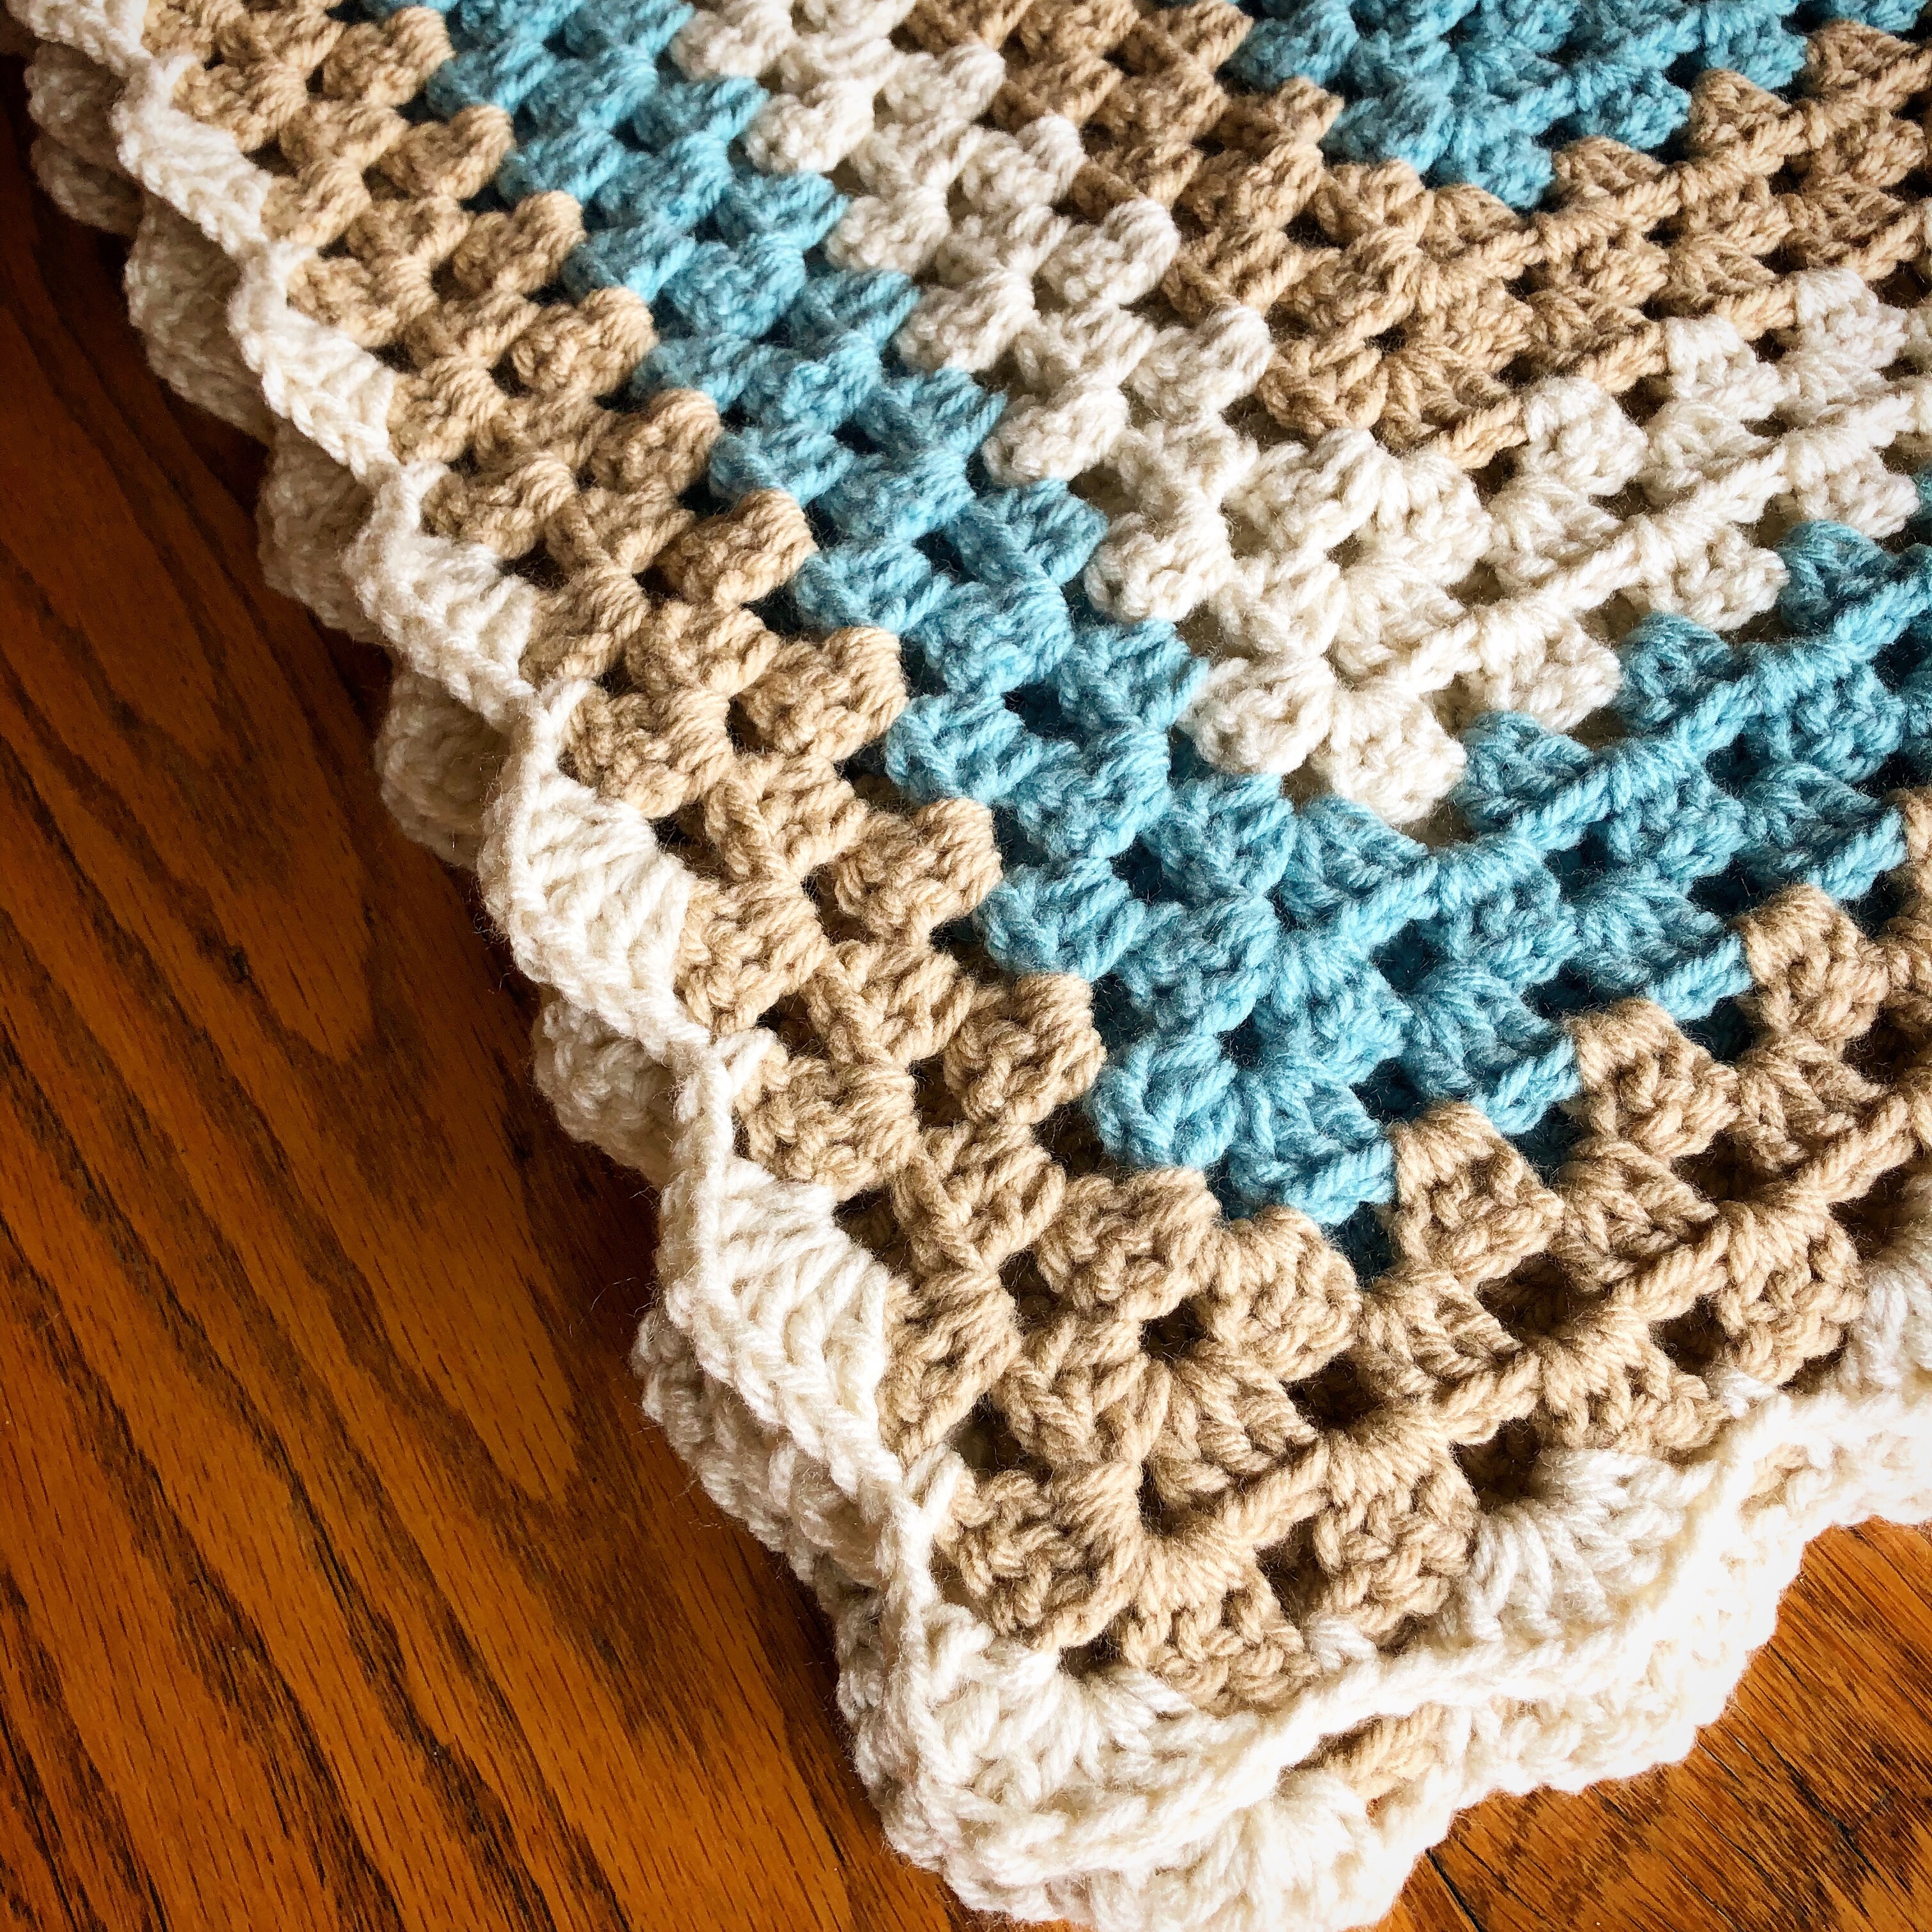
Sometimes it’s fun to get back to basics! That’s just what I did on this baby blanket. It’s a simple granny square pattern made with 3 different colors. If you need a refresher on how to make a simple granny square, click here for great instructions.
I used Caron One Pound Yarn in Off White, Soft Sage (it’s more of a blue than green), and Lace. I started in the center with Off White and crocheted 6 rows. Then I switched to Soft Sage and stitched 3 rows, changed colors to Lace and crocheted 3 rows, and switched back to Off White for 3 rows. I continued the color changes (Off White, Soft Sage, Lace) for 3 rows each until my blanket measured about 32 inches square, ending with the Lace color. I had 3 sections of each color when I finished.
Tip 1: Sometimes when you make a granny square blanket, the finished blanket can end up a little wonky. That’s why I like this pattern. By turning your work after each row, it helps to keep the blanket more square and less wonky. 🙂
Tip 2: Like almost everyone else, I hate weaving in my ends! So one thing I do is to stop every color change or two and weave in the ends. That way I only have to do it a little at a time instead of having to weave them all in at the end.
I made a simple border using Off White. For the border row, chain 1 and work 1 sc in the space between the dc clusters from the previous row. Chain 1, (work 3dc, chain 1, 3dc) in the next space between the dc clusters, chain 1, sc in next space. Continue this pattern around the blanket, making sure that you work the (3dc, chain 1, 3 dc) in each corner.
The finished blanket measures about 33-1/2 inches square.
The Caron One Pound Yarn becomes much softer after a quick wash on the delicate cycle with a little fabric softener added. I put it in the dryer on delicate for about 10 minutes and then laid it flat to dry the rest of the way.
One of the great things about the basic granny square is that you can make it any size and any color combo you want! It’s also such an easy pattern that once you get started, it’s the perfect project to work on while watching your favorite movie or TV show.
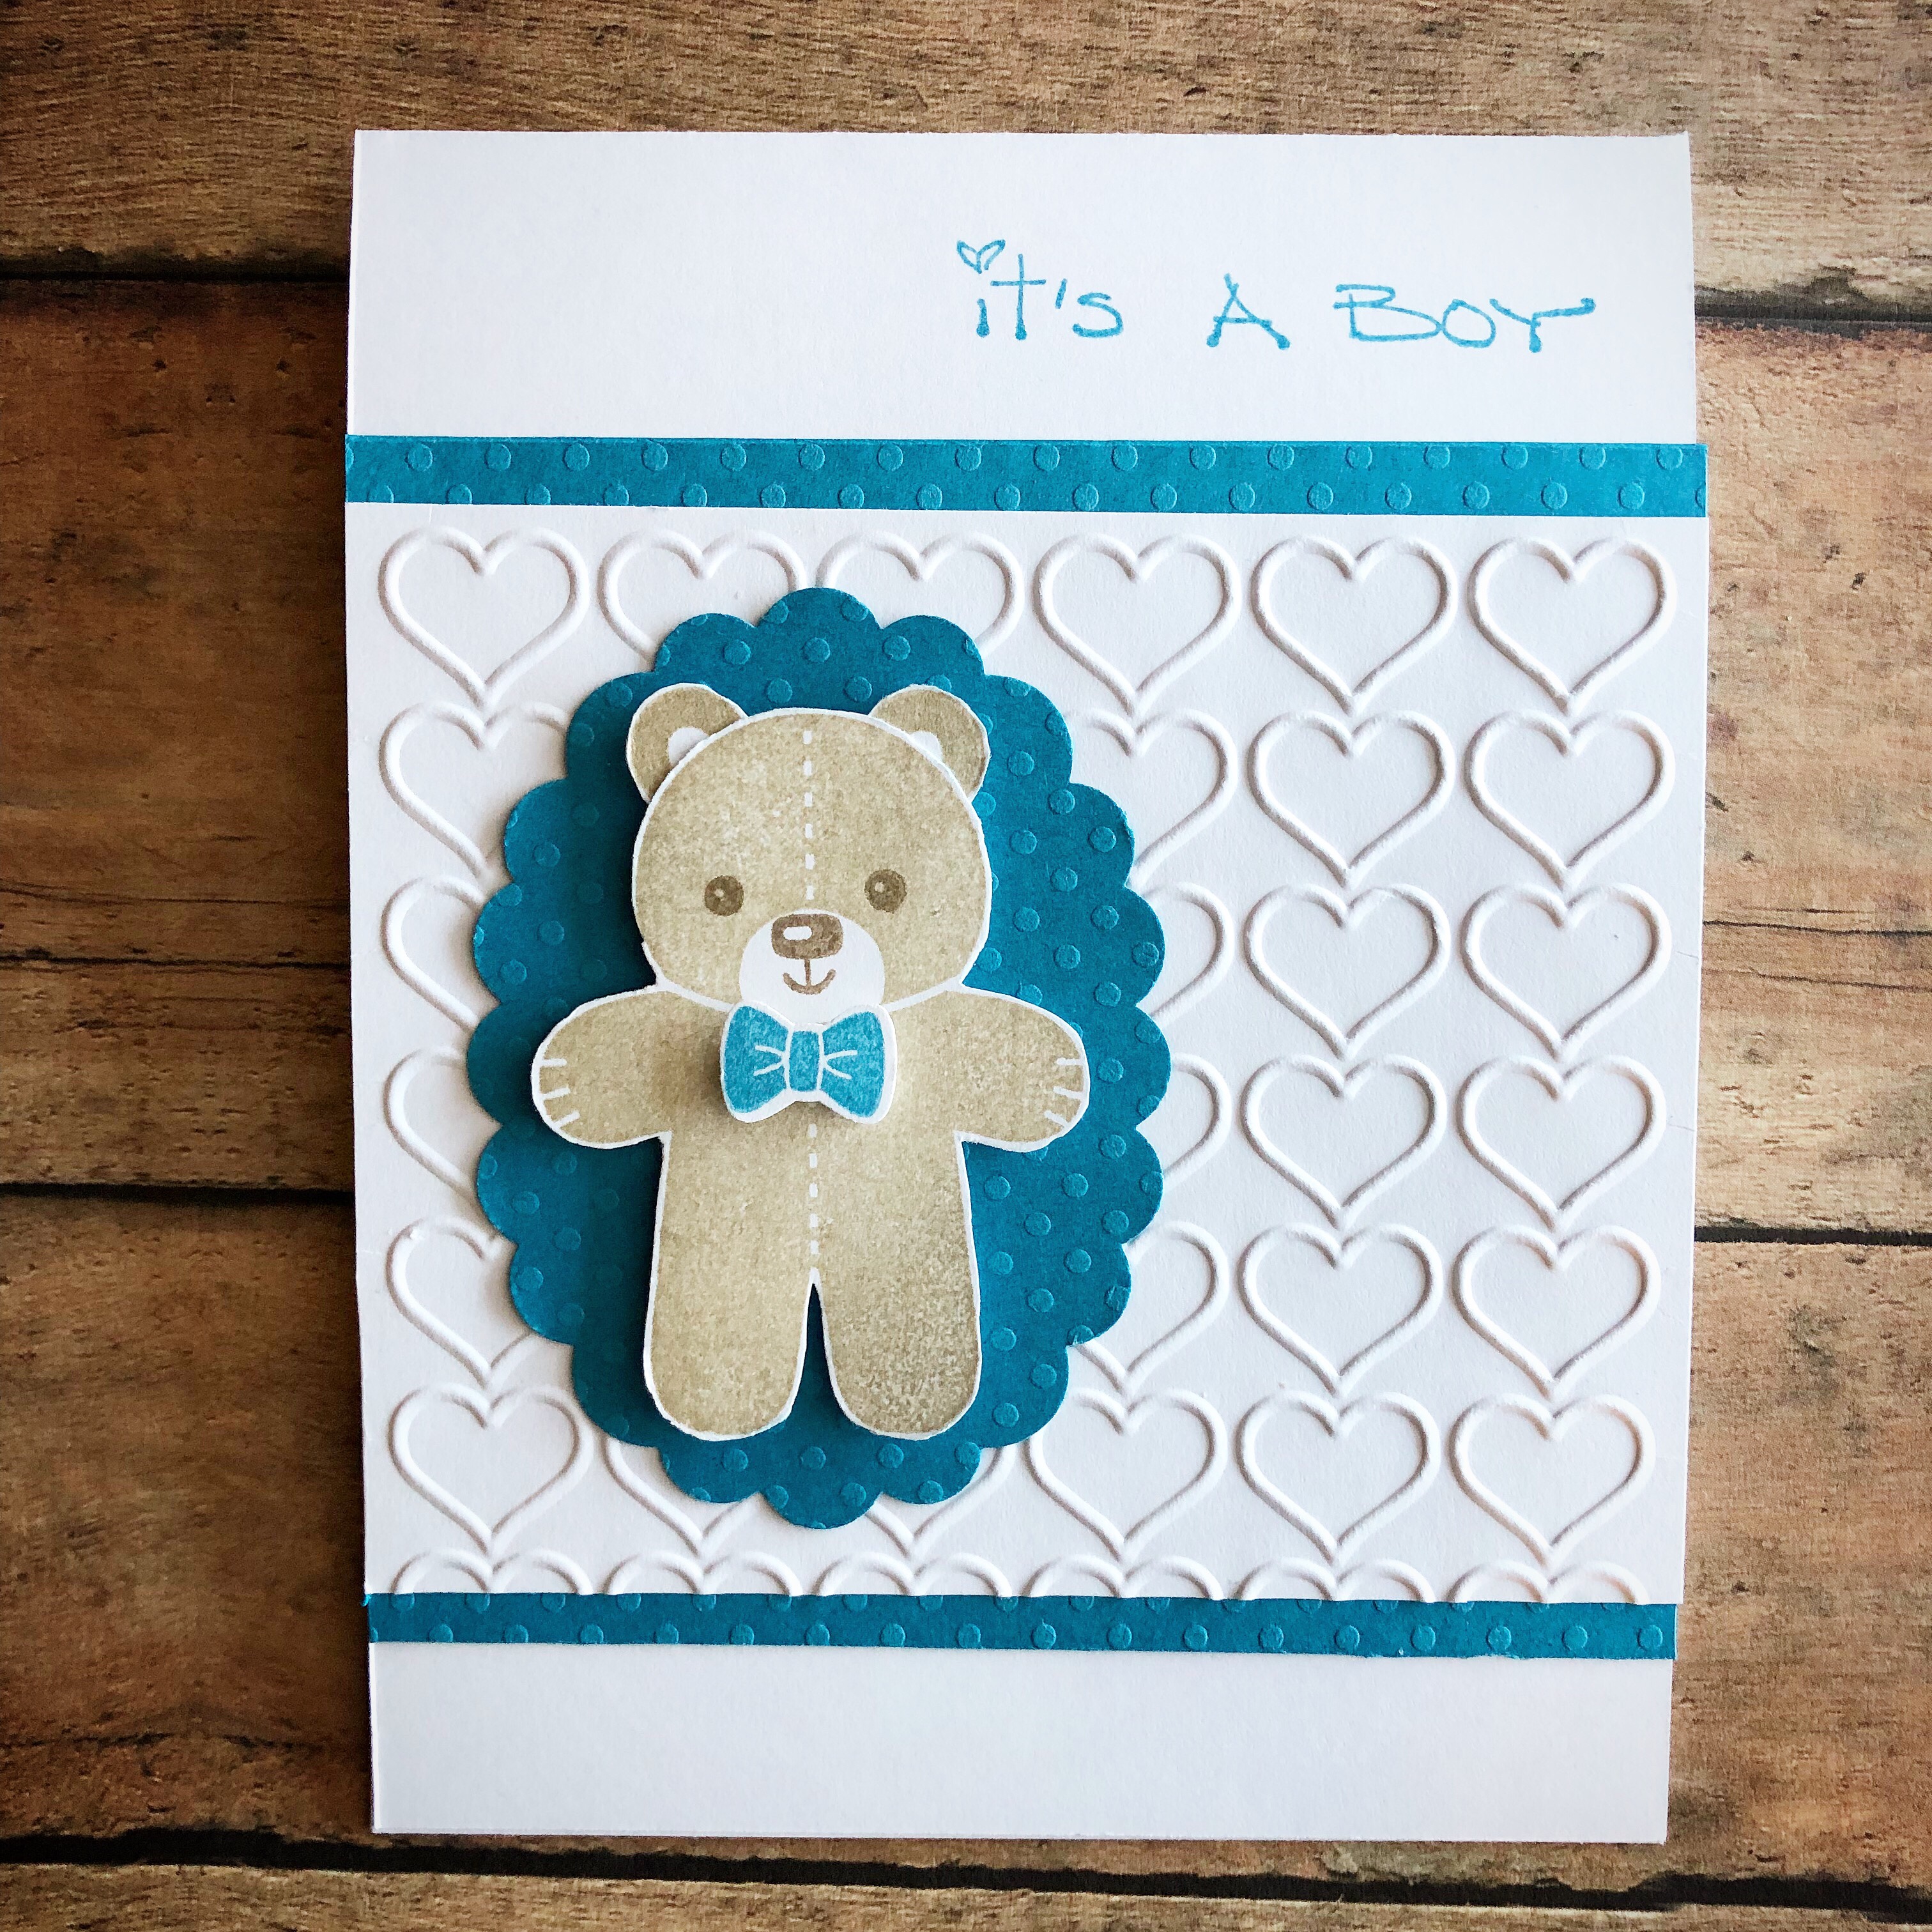
I stamped the bear and his ears with light brown ink on white card stock. Then I stamped his face with dark brown ink. I trimmed the bear and the ears and attached the ears to the back of the bear’s head. The bow is stamped with blue ink and punched out with the Cookie Cutter Builder Punch from Stampin’ Up. I attached the bow with foam tape.
I embossed a piece of white card stock with the heart folder that came fromStampin’ Up. This particular folder is discontinued – just use whatever folder you may have, or even use patterned paper instead. I layered the embossed piece onto a piece of blue dotted swiss card stock and attached it to a white card. I punched a scalloped oval from the same blue dotted swiss card stock and attached it to the card. Then I added the stamped bear with foam tape. To finish the card, I stamped “it’s a Boy” with blue ink at the top of the card.The stamp is from Stamps by Judith & Heather. I’m not sure if it’s still available…again, just use whatever you have in your stash – welcome baby, congratulations, congrats, or nothing at all! 🙂
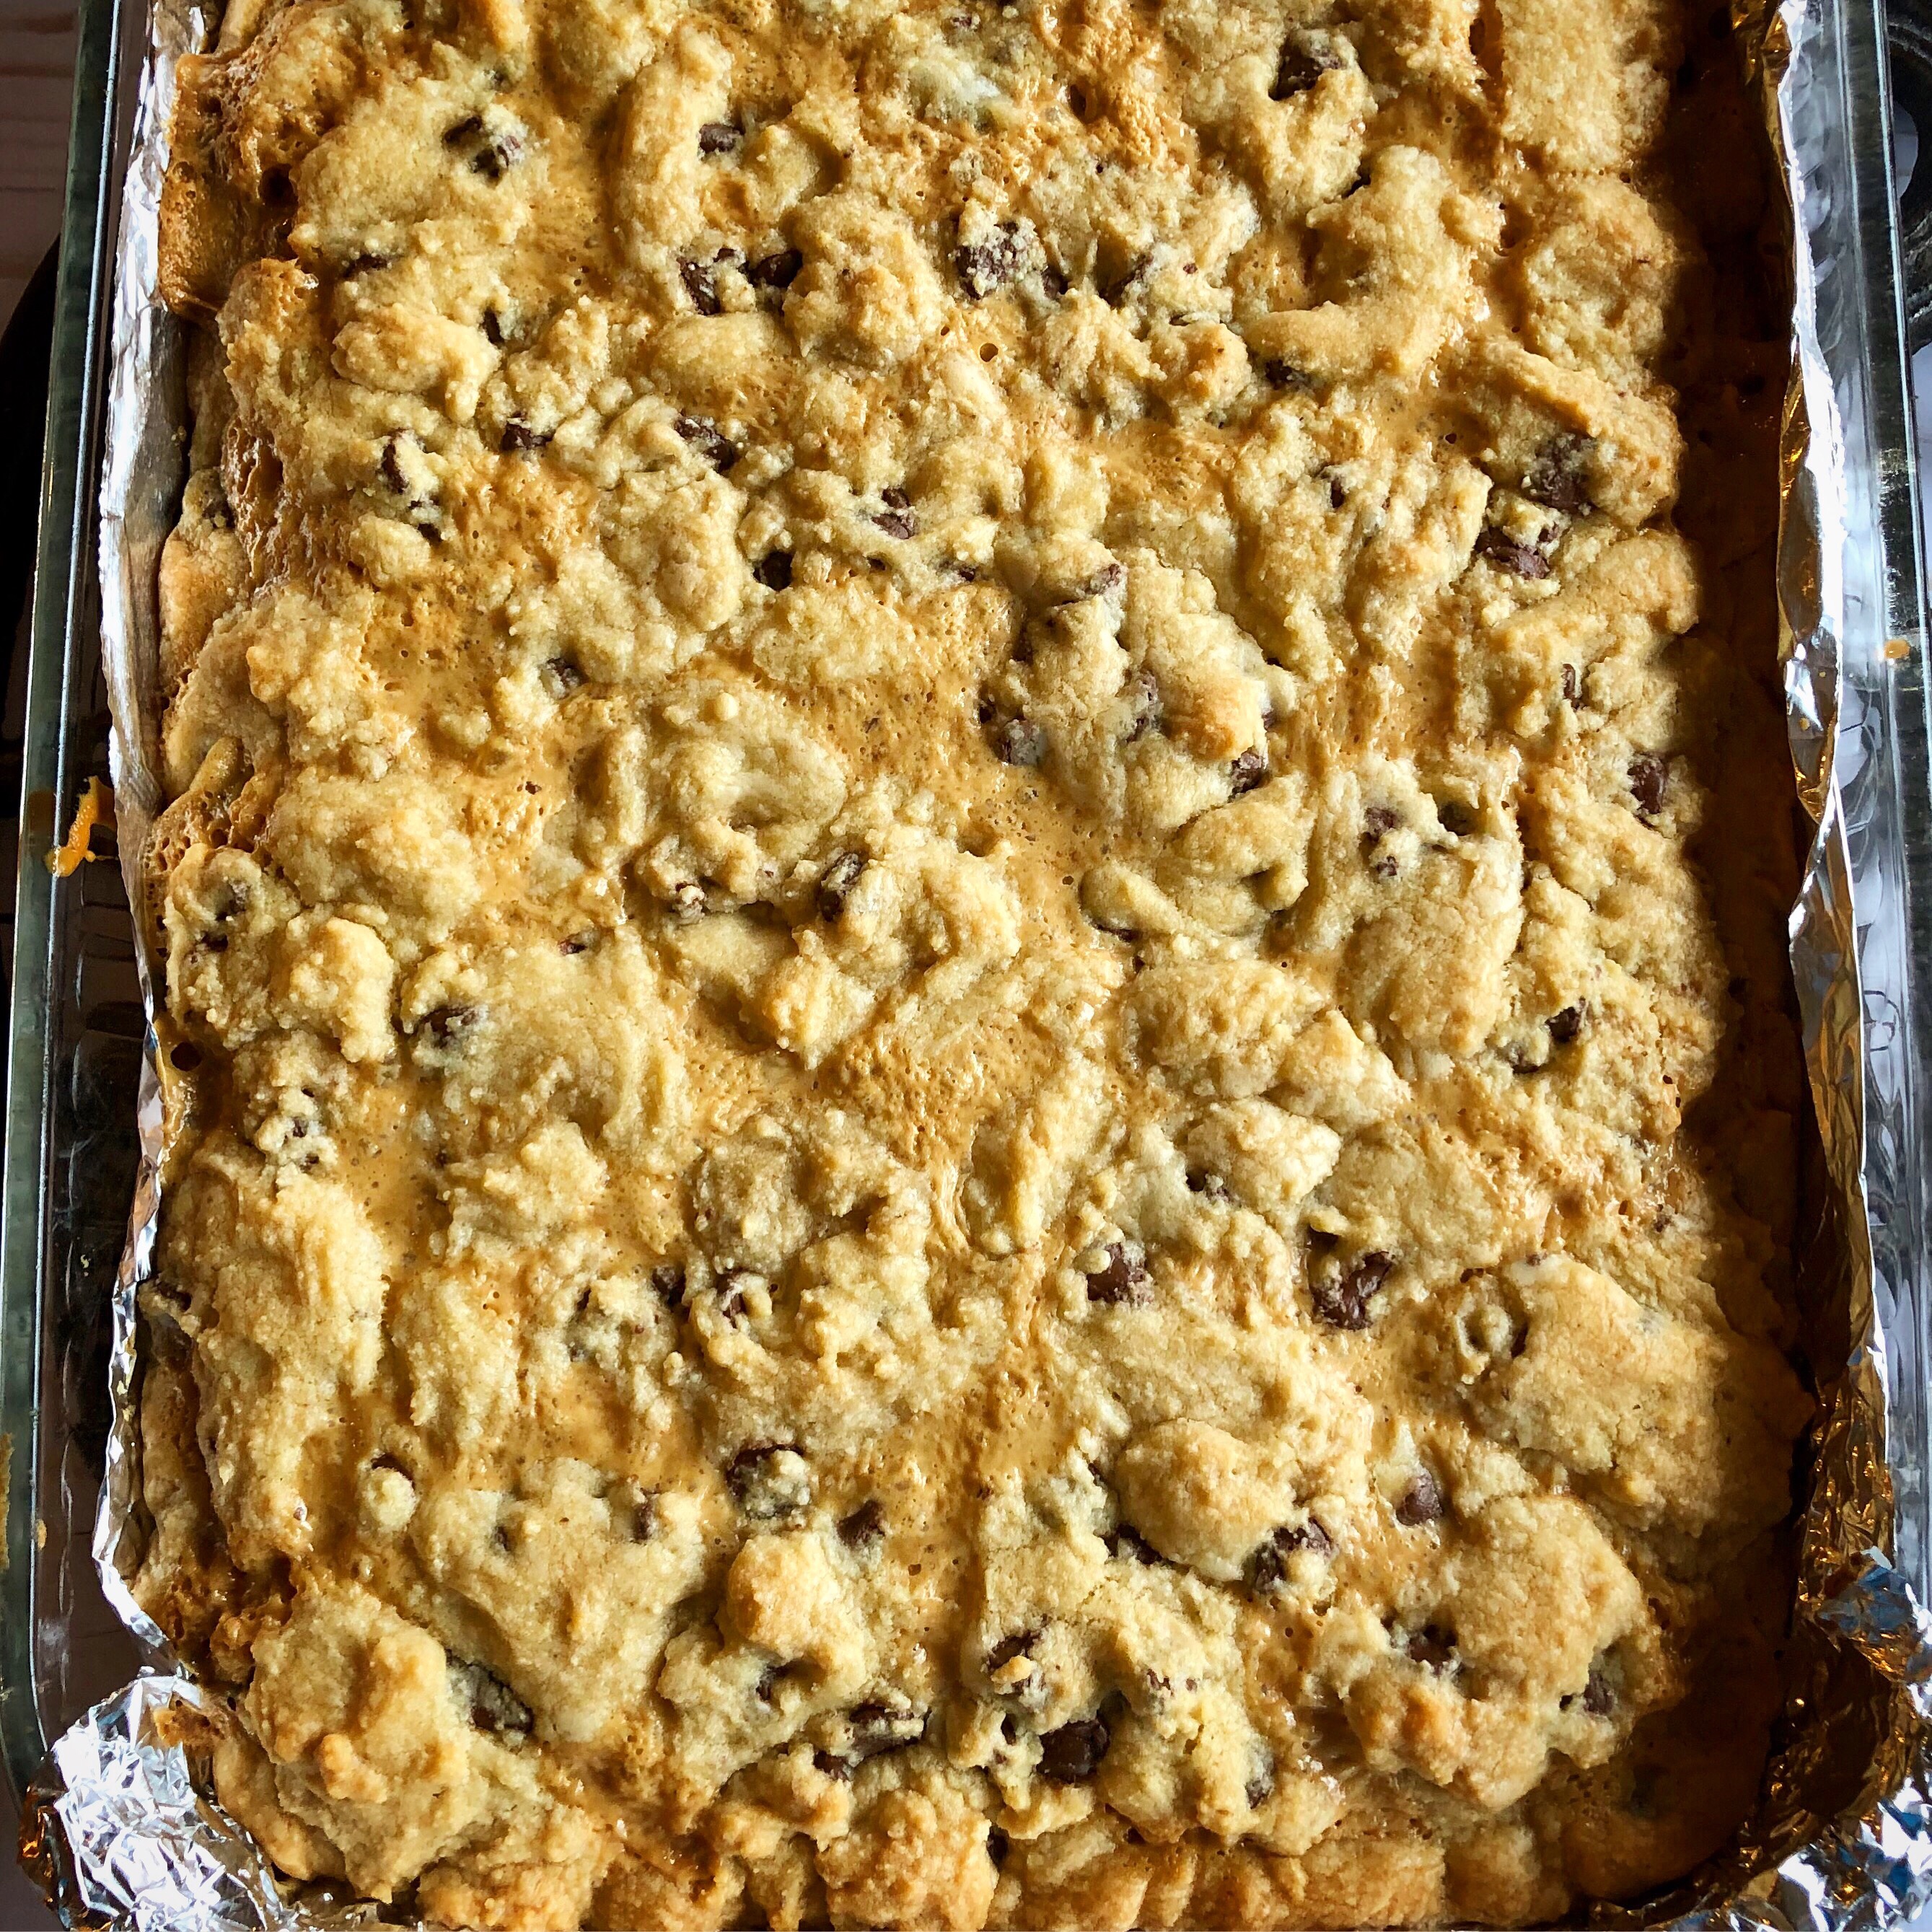
Is there anything in that name that doesn’t sound good?!?!? Chocolate Chip Caramel Butter Bars…when I found this recipe on Pinterest I knew I would have to try it! The recipe is here at Crazy for Crust. These bars are amazing and so simple to make!
Fresh and hot from the oven – they smell so good!! It was hard to wait for them to cool before I cut them. 😉
This cold weather makes me want to have something warm and hearty for dinner! This Slow Cooker Bacon Corn Chowder is just the thing. You can find the recipe here at Spend with Pennies.
I love this recipe – you just add most of the ingredients (except the evaporated milk, corn starch, and butter) to your slow cooker in the morning and let it cook all day. Then 30 minutes before you’re ready to eat, you stir in the last 3 ingredients. That gives you time to bake up some cornbread or dinner rolls to serve alongside this yummy soup.
It not only looks good – it smells amazing!
I cooked my bacon the day before to save some time in the morning. It only took about 10-15 minutes to chop the carrots, onion, and potatoes and add everything to the slow cooker. Perfect if you have a busy day ahead!
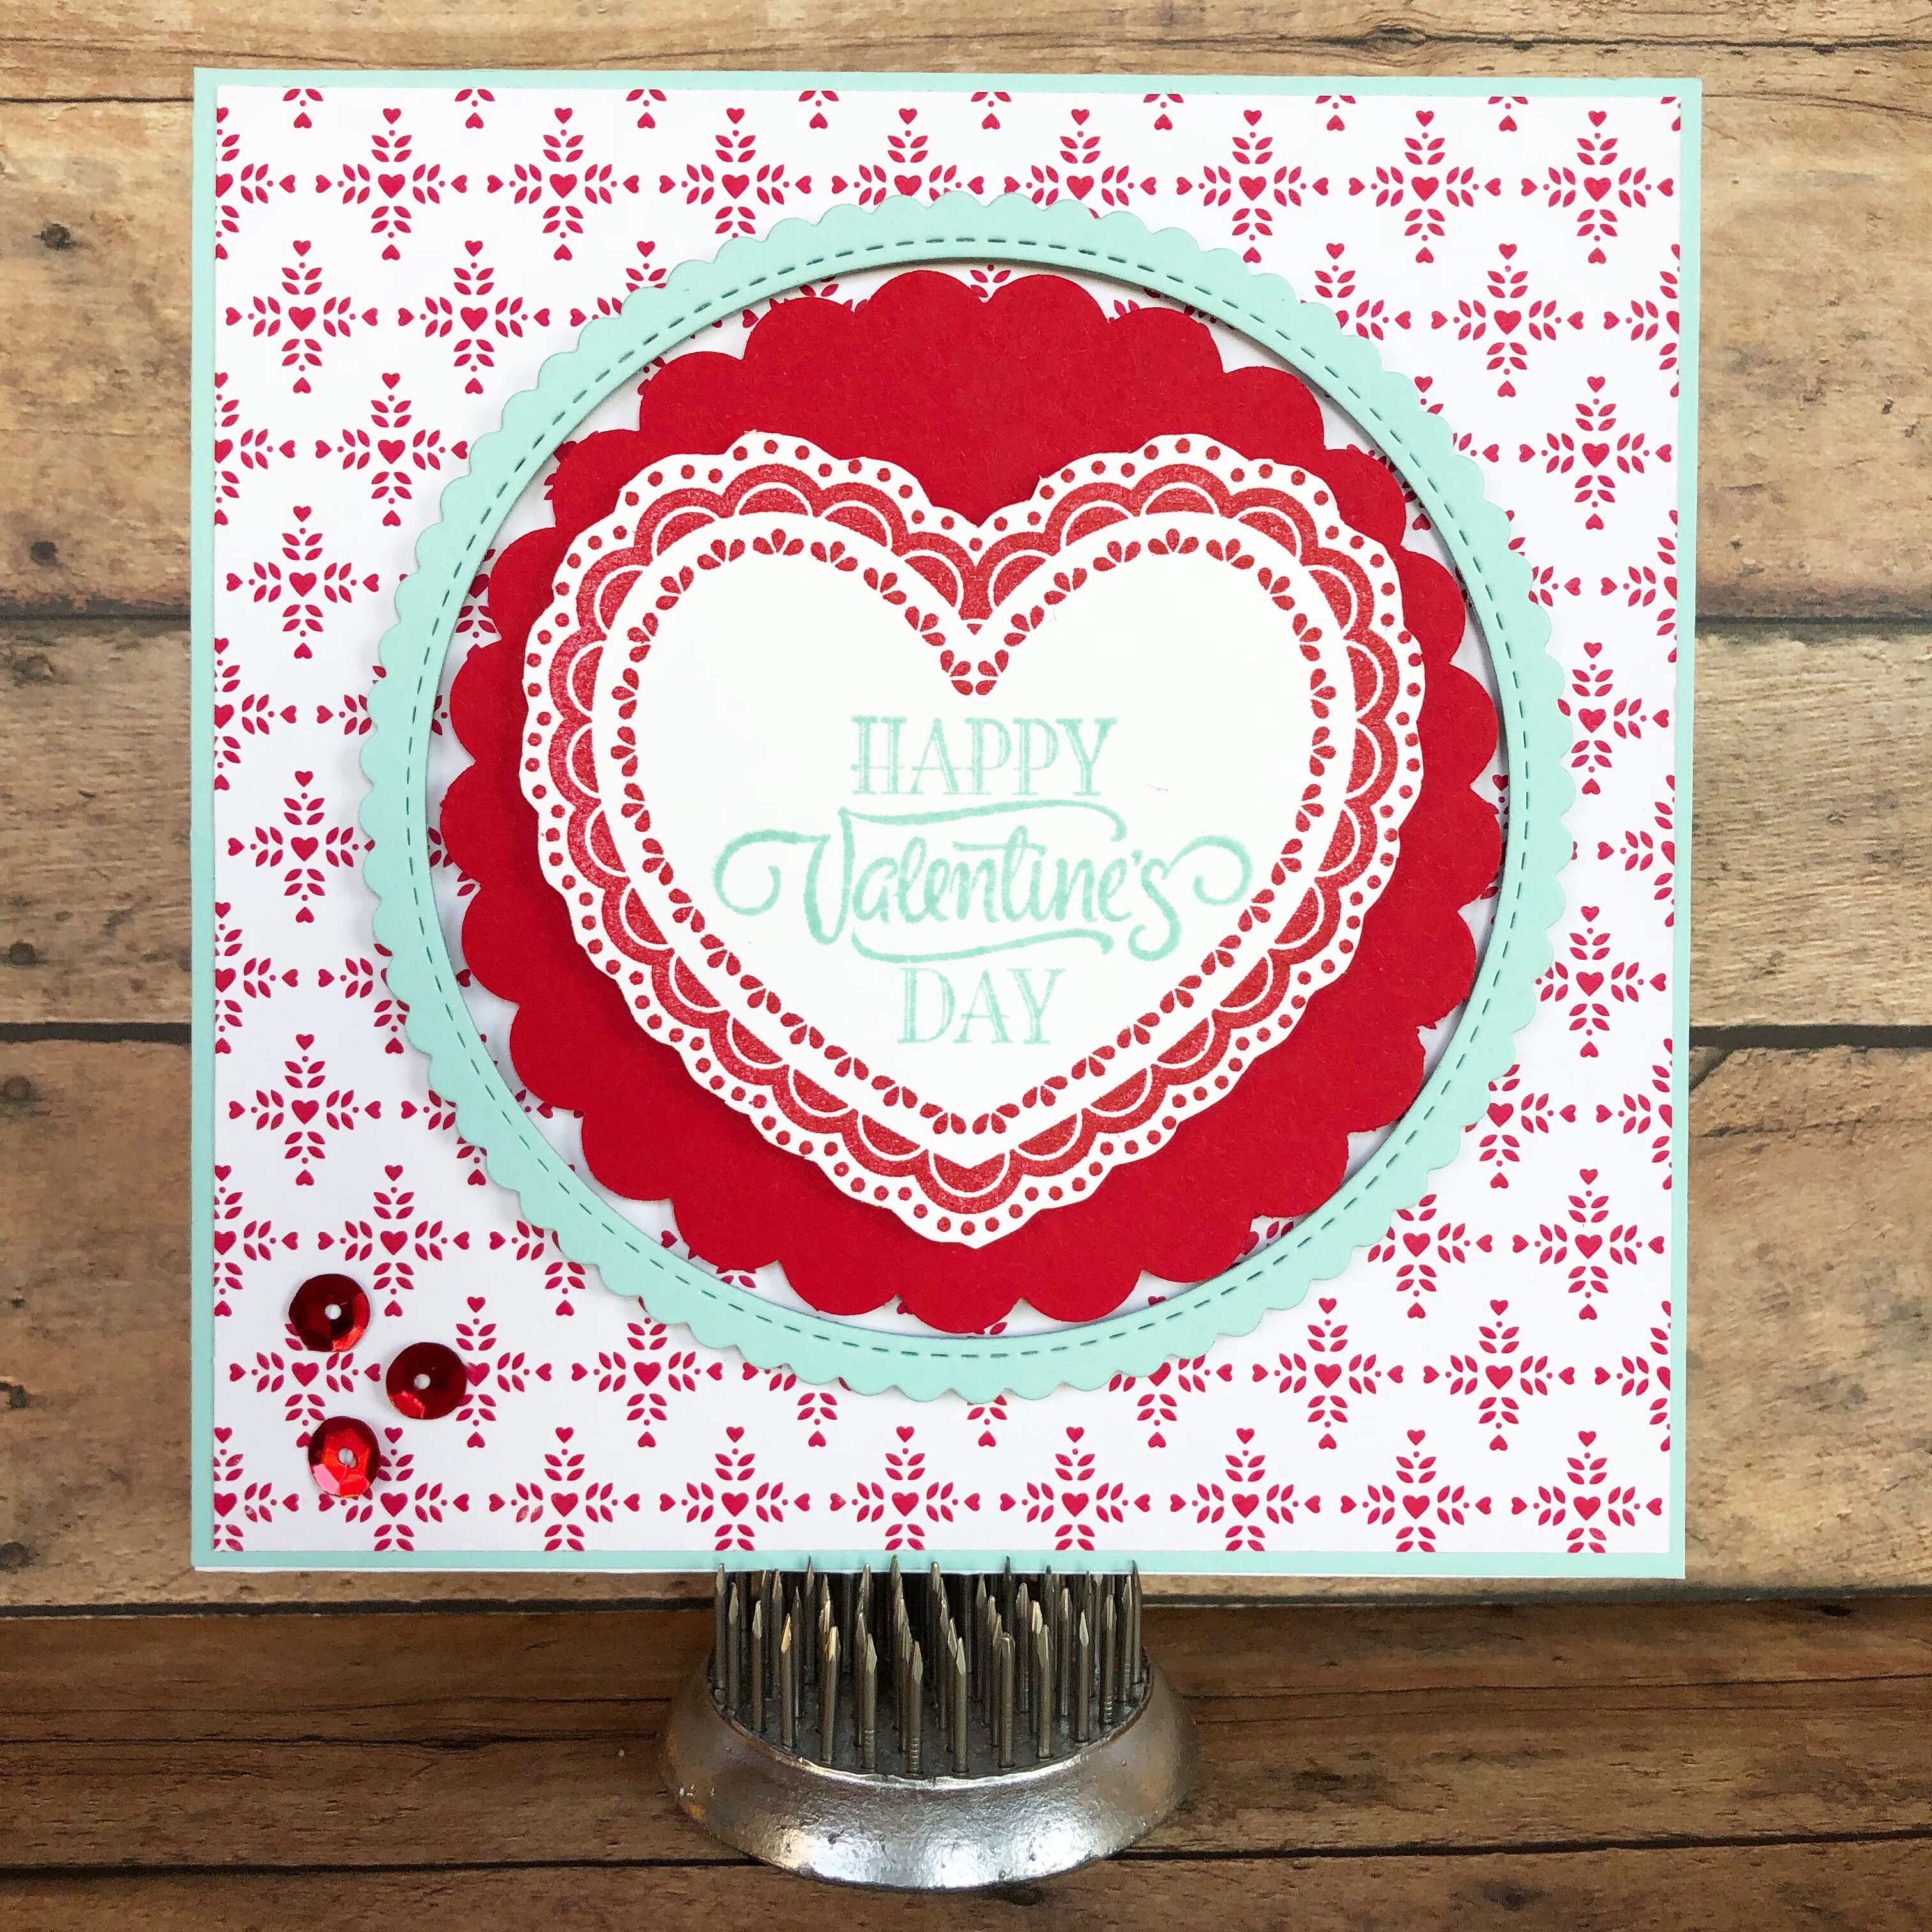
Stamp the heart with red ink on white card stock and trim close. Stamp the sentiment with pool ink in the center of the heart. Attach the heart to a red scalloped circle punched from red card stock with foam tape. Die cut the frame from pool card stock.
To make the card, cut a piece of white card stock to measure 10 inches by 5 inches and fold it in half. Cut a piece of pool card stock to measure 5 by 5 inches and attach to the front of the card. Cut a piece of patterned paper slightly smaller than 5 by 5 inches and attach over pool card stock. Attach the scalloped circle with the heart to the card with foam tape. Attach the frame with foam tape. Finish the card by attaching 3 sequins in the bottom left corner.
A quick and easy card with a vintage feel to send your love on Valentine’s Day!
Disclosure: Some of the links on my site are affiliate links, meaning, at no additional cost to you, I will earn a small commission if you click through and make a purchase. As an Amazon Associate I earn from qualifying purchases.