Christmas Filled With Love – July 2024 Christmas Card

Hi friends,

For July’s Christmas card, I used Sketch Challenge 47 from Build Your Stash Holiday Cardmakers for inspiration. Sketches are such a great starting point for creating cards – not to mention all the great ideas shared by other cardmakers!

Disclosure: Some of the links on my site are affiliate links, meaning, at no additional cost to you, I will earn a small commission if you click through and make a purchase. As an Amazon Associate I earn from qualifying purchases.

You can find the other monthly Christmas cards I’ve created so far this year in these posts: January, February, March, April, May, and June. I make 4-6 of each design every month to add to my stash.

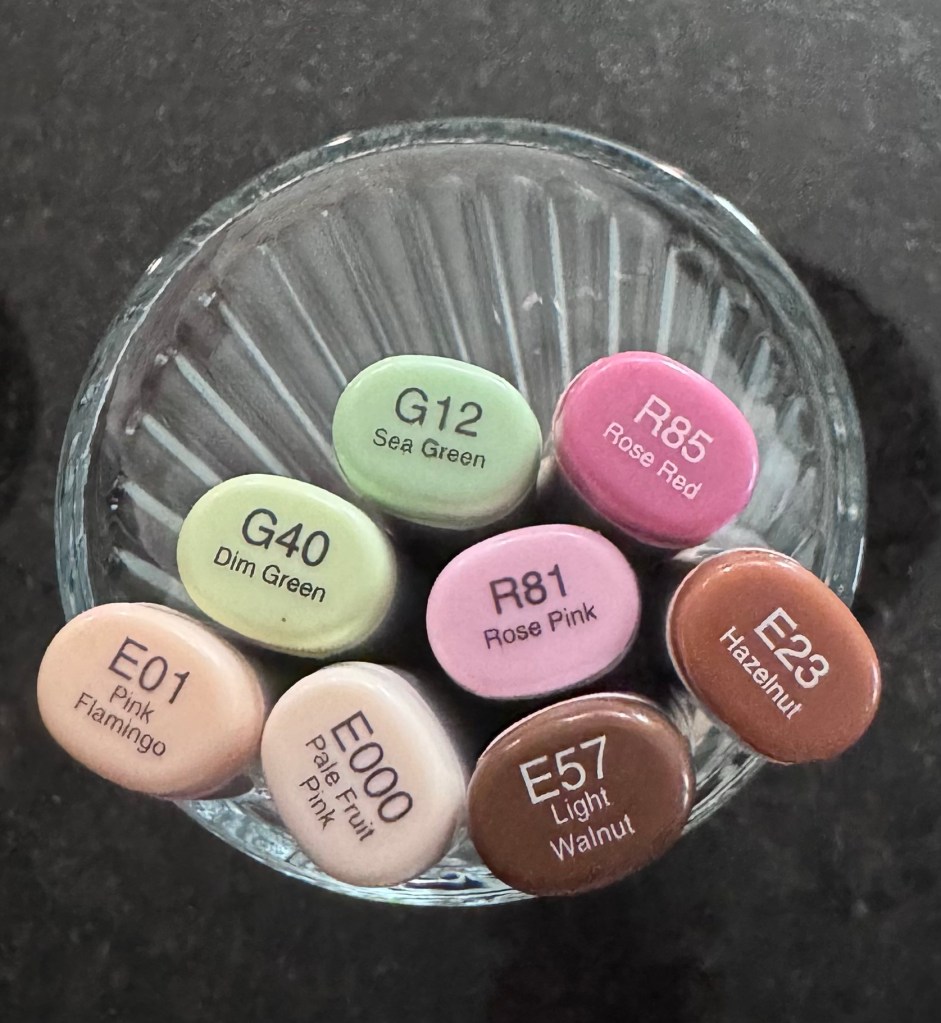
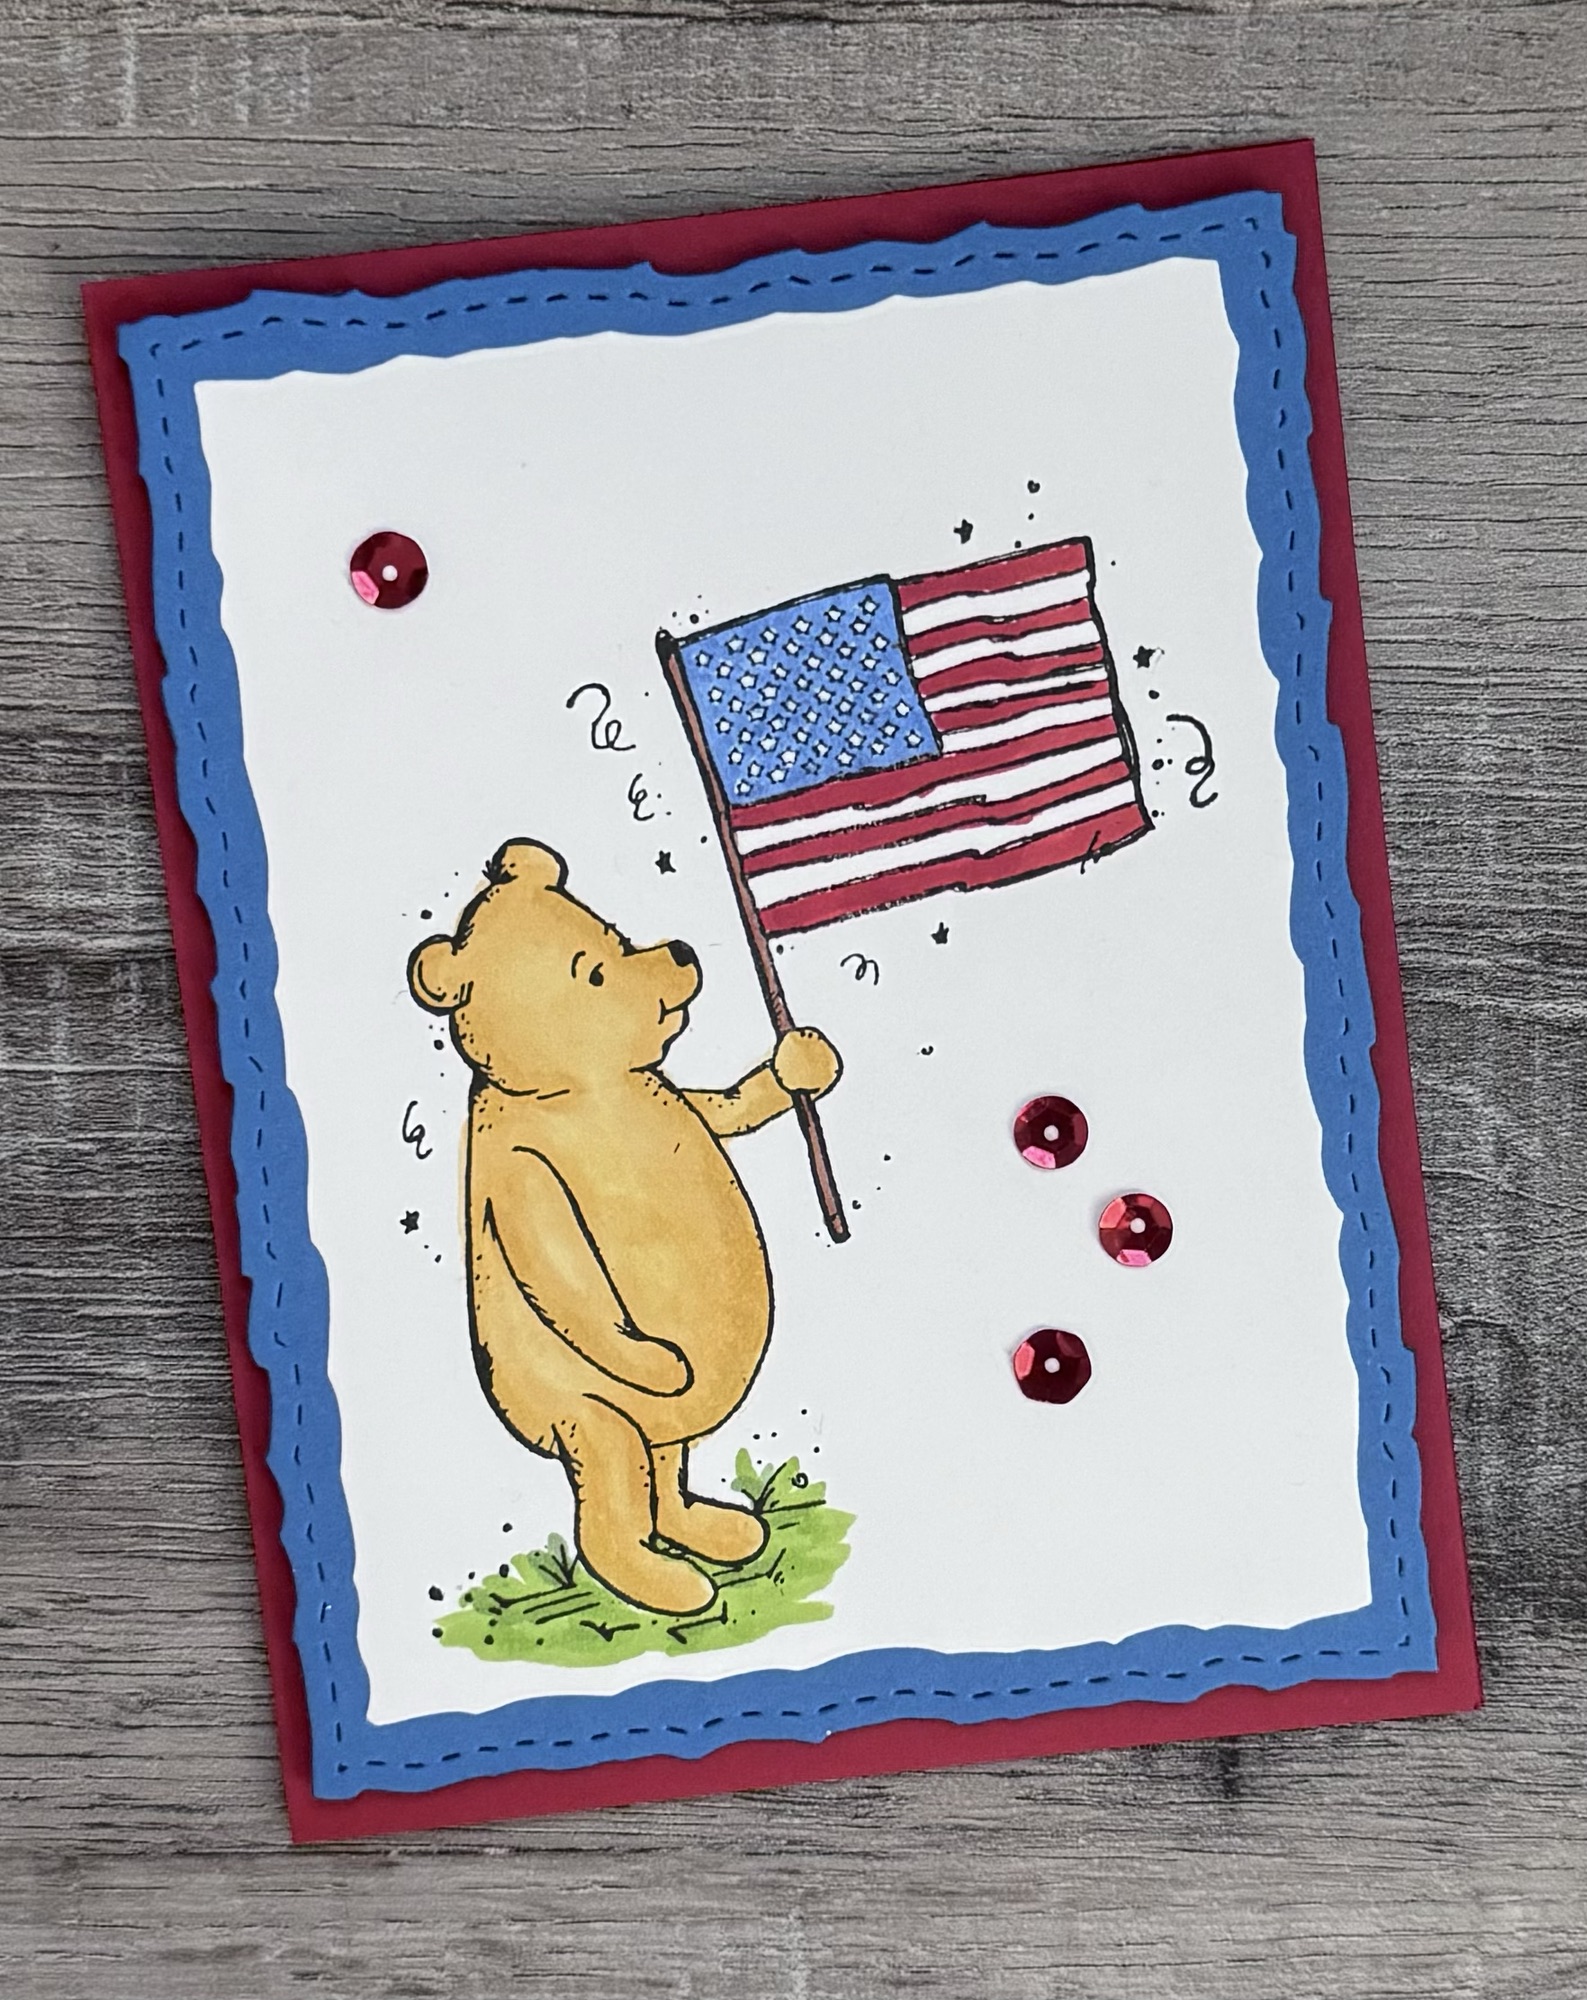
For this month’s card, I used the Planner Gal: Get Your Jingle stamp set from Unity Stamp Company. I stamped her with Memento Tuxedo Black ink on white card stock and colored her with Copic markers. Then I layered the stamped image to red card stock.

To make the card, I embossed a piece of red card stock, layered it to green card stock, and attached it to a white card. This particular embossing folder is discontinued, but here is another one that would be great on the card. I attached a strip of green card stock to the embossed piece and then attached the stamped image using foam tape.

The sentiment is stamped with red ink on white card stock, die cut with the Scalloped & Stitched Sentiment Nesting Dies from Unity and attached to the card. This sentiment stamp is one I’ve had in my collection for a long time and is no longer available ☹️ – use your favorite Christmas sentiment from your collection. 😊

To add a little bling to my card, I finished it off with 3 red sequins.

These are the Copic marker colors that I used to color my stamped image.

My stash of Christmas cards is growing! I love have a bunch made before the holiday season hits. 😊 Join me in adding to your stash – you won’t be sorry! 🎄

Anita

Posted in Cards, Christmas, Stamping | Tagged , , | 6 Comments

Reindeer Face Door Hanger

Hi friends,

I had this Reindeer Face Ornament in my craft stash that I picked up on clearance at Hobby Lobby after Christmas last year. (It did not come with the googly eyes. 👀) I pulled out some of my acrylic paints and got busy turning it into a fun door hanger. 🙂

Disclosure: Some of the links on my site are affiliate links, meaning, at no additional cost to you, I will earn a small commission if you click through and make a purchase. As an Amazon Associate I earn from qualifying purchases.

First I removed the twine hanger so I wouldn’t get paint on it. Then I painted the face dark brown, the antlers tan, and the nose red. I also painted the back of the reindeer head – this is optional, but it gives it a more finished look. Using a small, round, stiff paintbrush, I dry brushed white paint onto the ears and brown paint onto the edges of the antlers. I also dry brushed pink cheeks onto her face. I added white paint to the nose as a little detail to mimic light reflecting off of it.

Here’s a tip: I didn’t have a light tan paint for the antlers so I used a light brown paint and added white until it was the shade I wanted. Look at your stash of paint and see what you can mix together to get the shade you want before running out to buy more. 🙂

I added red and white wood beads (these are similar beads) to the twine I removed from the reindeer earlier and tied it back onto the antlers. I made a bow from 2 different ribbons and glued it to the antler using E6000 clear adhesive. Then I glued on the 1-inch googly eyes. 👀

Here’s another tip: I got my beads on clearance from Hobby Lobby after Christmas. They were actually strung on twine as a garland. I just took them off the twine and now I have beads to use in other projects at a fraction of the cost of what it would have cost me to buy the individual beads. Hobby Lobby will have different colors of beaded garlands for different seasons – wait until they mark them down before you buy them! 😉

What a difference a little paint and creativity can make! Watch Hobby Lobby or even Dollar Tree – I’ll bet similar Reindeer Face Ornaments will be hitting the shelves soon. 🎄

Anita

Posted in Christmas, Decor | Tagged , | Leave a comment

Crochet Little Debbie Christmas Tree Cake Ornament

Hi friends,

Have you seen the cute crochet pattern for the Little Debbie Christmas Tree Cake? It is so fun! 🎄 The pattern I used can be found here at Heather Corinne Crochets. They work up quickly and she also has a video for help if you need it.

Disclosure: Some of the links on my site are affiliate links, meaning, at no additional cost to you, I will earn a small commission if you click through and make a purchase. As an Amazon Associate I earn from qualifying purchases.

I used I Love This Yarn in White, Red, and Jelly Bean with a G/4mm crochet hook to stitch up my Christmas Tree Cake Ornaments.

I decided to add a little red wood bead to the top of my ornaments. I threaded a length of white yarn through the top of the ornament. Then I threaded both ends of the yarn through the bead and tied a knot close to the bead. I tied the 2 ends of the yarn together to create the hanger and trimmed off the excess.

This would be such a great neighbor or friend gift along with a box or two of the Little Debbie Christmas Tree Cakes that are available during the holiday season. Maybe even add some hot cocoa mix to go with the cakes. 🙂

Make a few now to add to your gift closet or add to your crochet board on Pinterest for later. 🎄

Anita

Posted in Christmas, Crochet | Tagged , | Leave a comment

December Girl Birthday Card

Hi friends,

In the midst of creating posts for Christmas in July, I thought it would be fun to make a birthday card for all the girls who have December birthdays. Sometimes the birthdays in December get lost in all of the hustle and bustle of the season. This is a fun card that isn’t too “Christmasy” but still has all the December feels. 🙂

Disclosure: Some of the links on my site are affiliate links, meaning, at no additional cost to you, I will earn a small commission if you click through and make a purchase. As an Amazon Associate I earn from qualifying purchases.

The stamp is called Planner Gal: Cold Outside and is from Unity Stamp Company. The sentiment is from Snow What Fun also from Unity,

I stamped the girl with Memento Tuxedo Black Ink and colored her with Copic markers. Using the Postage Stamp Nesting Dies from Unity, I die cut around her. Then I layered her to a piece of patterned paper die cut with the same die set.

To make the card, I die cut a piece of coordinating patterned paper with the Deckle & Stitches Nesting Dies from Unity and attached it to a white card. I added a strip of pink card stock to the card and then attached the stamped piece to the card using foam tape. I stamped the sentiment with green ink on white card stock, punched it with a scalloped circle punch, and attached it to the card.

Here are the Copic marker colors that I used to color my image.

This card could absolutely be used as a Christmas card! I would probably color it a little differently and use Christmas patterned paper. She is a great stamp for making cards all winter long. 🙂

Anita

Posted in Cards, Stamping | Tagged , | Leave a comment

Sheet Pan Fudgy Brownies With M&Ms

Hi friends,

Last week I shared this cookie bar recipe. Today I’m sharing this great Sheet Pan Fudgy Brownies recipe that I found here at Six Sisters’ Stuff.

Disclosure: Some of the links on my site are affiliate links, meaning, at no additional cost to you, I will earn a small commission if you click through and make a purchase. As an Amazon Associate I earn from qualifying purchases.

I wanted to take a treat to our youth group Sunday school classes and found this great recipe that makes a ton of brownies since you bake them in a jelly roll pan. The only thing I did differently from the recipe was to add M&Ms to the batter – because you can never have too much chocolate!! 😉 You could also add chocolate chips instead of M&Ms if you want to add something extra to your brownies.

Add the Christmas red and green M&Ms for a yummy holiday dessert. Or maybe even the mint M&Ms for a seasonal treat. 🎄😋

You may already have everything you need in your kitchen to bake up this yummy treat!

Here’s the batter spread onto my pan with more M&Ms sprinkled over the top and ready for the oven. I lined my pan with parchment paper and sprayed it with cooking spray just to make it a little easier when cutting the brownies.

And here are the brownies fresh from the oven. My kitchen smelled so good! 😋

It’s hard to see in the picture, but they are fudgy in the middle. I baked mine for 35 minutes, but I think next time I will check them at 30 minutes so the top will be a little less crusty. Time may vary with your oven. But they are so good – the kids gobbled them up! 😊

If you have any left, you can store them in an airtight container on the counter for a few days. A few seconds in the microwave and they will taste like they are fresh from the oven! I didn’t have any leftover to try freezing, but I think they would also freeze well wrapped tightly in foil and put in a zip top freezer bag. Again, pop them in the microwave for a little treat when a chocolate craving hits. 😉

Enjoy!

Anita

Posted in Recipes, Uncategorized | Tagged | Leave a comment

Crochet Granny Hexagon Ornaments

Hi friends,

If you’ve been following me for a minute, you know that I love to start creating Christmas crafts in July! First, I love making all the things for Christmas. Second, if you get started now it will help to make the Christmas season a little less stressful. So I’m planning to give you some ideas this month to get started on your own Christmas crafting.🎄

Disclosure: Some of the links on my site are affiliate links, meaning, at no additional cost to you, I will earn a small commission if you click through and make a purchase. As an Amazon Associate I earn from qualifying purchases.

First up are these beautiful Crochet Granny Hexagon Ornaments from Briana K Designs. There are 2 lovely options for making the ornaments – Puff Granny Hexagon and Traditional Granny Hexagon. You will need to subscribe to her blog to unlock both patterns – but it’s free and the patterns are also free. There is also a lot more exclusive content available to subscribers only so it’s definitely worth it! 🧶

I had some small (2.625 inch) clear glass disc ornaments in my craft stash that I used to make my ornaments. I used Yarn Bee Soft & Sleek yarn in Mustard, Green Apple, Red, and Ivory with a 3.5mm crochet hook to stitch up my ornaments. Since my ornaments were smaller, I stopped after the 3rd round on each pattern. Crocheting all 4 rounds will fit larger size ornaments. You can find 3.15 inch plastic disc ornaments here and 4 inch plastic disc ornaments here.

Depending on the yarn that you use for your ornaments, you may need to adjust the hook size that you use. The pattern calls for a 4mm hook, but with my yarn I needed to go down to a 3.5mm hook. You’ll easily be able to tell after making your first hexagon if you need to make any adjustments.

A little tip when making your first hexagon: If you are changing colors, don’t cut your yarn until you are completely finished and know it is the right size. If you need to remake it, you can just frog it and start over – no wasting any yarn!

Which pattern is your favorite? 🎄

Anita

Posted in Christmas, Crochet, Gifts | Tagged , , | Leave a comment

Happy Birthday USA!

Hi friends,

Disclosure: Some of the links on my site are affiliate links, meaning, at no additional cost to you, I will earn a small commission if you click through and make a purchase. As an Amazon Associate I earn from qualifying purchases.

You can find all the details for the Patriotic Poohbear card in this post.

May God bless the USA! ❤️🤍💙

Anita

Posted in Cards, Stamping, Uncategorized | Tagged , | Leave a comment

Monochromatic Cards

Hi friends,

These Monochromatic Cards work up really quickly! They are fun to make and depending on the colors you use, they are perfect for any occasion from thinking of you and birthday to sympathy and so much more.

Disclosure: Some of the links on my site are affiliate links, meaning, at no additional cost to you, I will earn a small commission if you click through and make a purchase. As an Amazon Associate I earn from qualifying purchases.

I used the Insightful Meadows stamp set from Unity Stamp Company to make my cards. I applied ink to a piece of white card stock using Blender Brushes from Taylored Expressions. Then I stamped the flower images with the same ink color. I also stamped the sentiment with the same ink.

Using the Scallops & Rectangles Nesting Dies from Unity Stamp Company, I die cut the stamped image and layered it to matching card stock die cut with the same die set. The piece is then attached to a white card using foam tape.

My “thinking of you” and “Happy Birthday” stamps have been in my collection for a long time and are discontinued – I’m sure you have great sentiment stamps in your collection, too. 🙂 The “deepest sympathy” stamp is from the Just Wanted To Say stamp set from Unity.

This is such a fun technique for making cards! You can even make several of these cards for your stash and leave off the sentiment until you need to send a card. Then just add the appropriate sentiment and you are good to go! 🙂

Anita

Posted in Cards, Stamping | Tagged , | Leave a comment

Yummy M&M Cookie Bars

Hi friends,

Cookie bars are the perfect Summer treat! They don’t take long to make and since you bake the whole batch of dough at once, your kitchen doesn’t get too hot. And using red, white, and blue M&Ms make them great for the 4th of July! 🇺🇸 😊

Disclosure: Some of the links on my site are affiliate links, meaning, at no additional cost to you, I will earn a small commission if you click through and make a purchase. As an Amazon Associate I earn from qualifying purchases.

There are lots of recipes for M&M cookie bars out there. This Soft and Chewy M&M Cookie Bar recipe is one of my favorites! It has chocolate chips as well as M&Ms because you can never have too much chocolate! 😋 You may even have most everything you need already in your kitchen.

This is a large batch recipe – you’ll make them in an 11 x 17 rimmed baking sheet – so it’s a great recipe to take to BBQs and potlucks. The recipe calls for lining your baking sheet with parchment paper – do not skip this step! It makes everything so much easier! I also got my clean hands a little wet to make it easier as I was spreading the dough.

Here’s the dough ready to go into the oven and after about 22 minutes baking. My kitchen smelled so good!

After the cookies are cool, cut them into bars and enjoy!!

These Soft and Chewy M&M Cookie Bars are really easy to make. And you can make them start to finish – including cooling time – in about an hour! I promise everyone will love them! 😋

Anita

Posted in Recipes, Summer | Tagged | 1 Comment

Crochet Pineapple Dishcloth

Hi friends,

Look at these cute Pineapple Dishcloths! 🍍🍍🍍

If we have to do the dishes, we may as well have fun dishcloths, right? 😉

Disclosure: Some of the links on my site are affiliate links, meaning, at no additional cost to you, I will earn a small commission if you click through and make a purchase. As an Amazon Associate I earn from qualifying purchases.

The free pattern can be found here at Yarnspirations. Just an FYI, the written instructions say to begin with 17 chain stitches, but the diagram shows only 16. I found that the diagram is correct and you’ll need to begin with 16 chain stitches. After that, just follow the pattern as written and diagrammed.

I used I Love This Cotton in Curry and Sage with an H/5mm crochet hook to stitch up my pineapple dishcloths. They work up quickly and the popcorn stitches add such a great texture.

These would make such a fun Summer gift along with a cute pineapple dish, pineapple scented candle, and maybe even some pineapple scented soap.

🍍🍍🍍

Anita

Posted in Crochet, Gifts, Summer | Tagged , , | 2 Comments