Hip Hugger Bars

Hi friends,

This is one of our favorite desserts, but we don’t make it very often because…well, look at all the yummy things in it! I usually make it when I need to take a dish to share since we certainly don’t need to eat a whole 9 by 13 pan ourselves! 😳 I recently made them again and they were just as good as always!

Disclosure: Some of the links on my site are affiliate links, meaning, at no additional cost to you, I will earn a small commission if you click through and make a purchase. As an Amazon Associate I earn from qualifying purchases.

I first shared this recipe several years ago and wanted to share it again for those who might have missed it the first time. 🙂 This is an easy recipe to make and will make your kitchen smell amazing!

Hip Hugger Bars

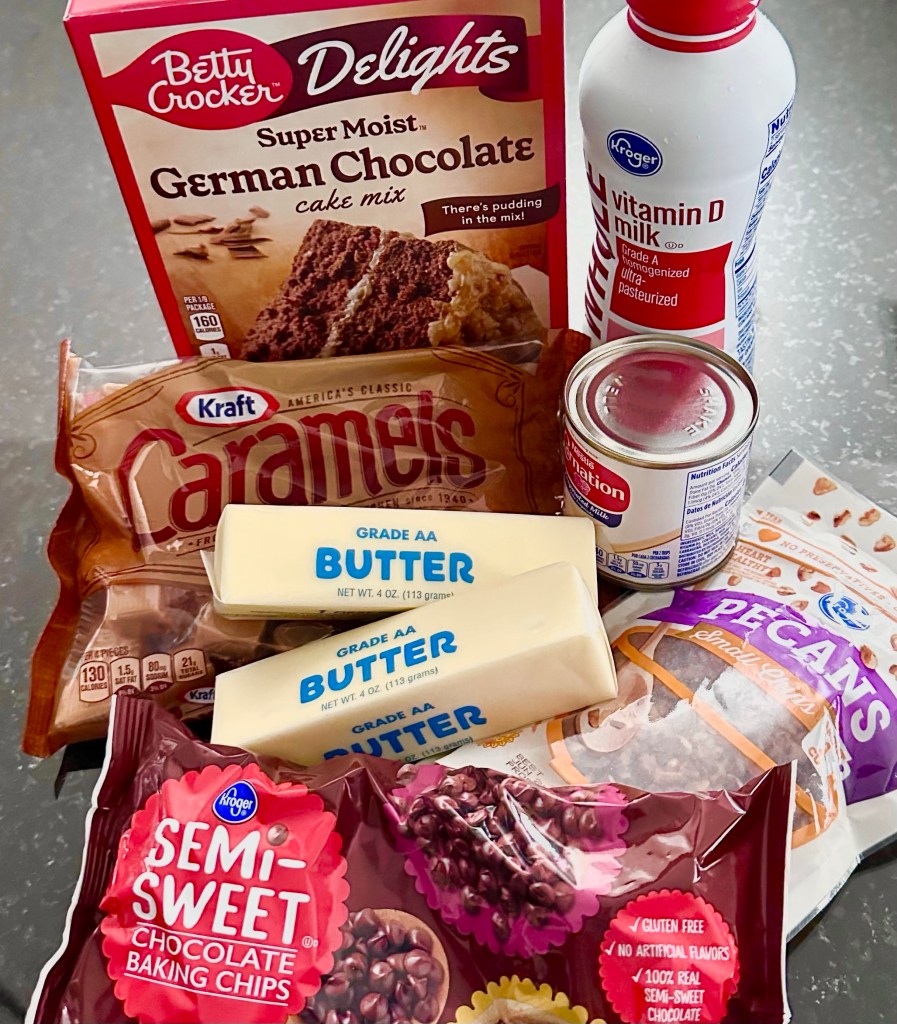
  • 30 light caramels (like Kraft individually wrapped)
  • 1/3 cup evaporated milk
  • 1 pkg Betty Crocker German Chocolate cake mix
  • 1 cup chopped pecans
  • 3/4 cup melted butter
  • 1/3 cup milk
  • 12 ounce bag chocolate chips

Preheat oven to 350°F.

Unwrap caramels. Melt caramels in evaporated milk in a small saucepan over low heat, stirring often. Set aside.

Combine cake mix, milk, and melted butter. Mix well. Add nuts. Pat 2/3 of dough into a greased 9 x 13 pan. Bake 6 minutes. Remove from oven. Cake will have risen but still be quite soft.

Sprinkle chocolate chips over crust, then drizzle caramel mixture over melting chocolate. Drop remaining dough by spoonfuls over the top. Return to oven for 15 minutes or until set. (I usually have to go a little longer – it will depend on your oven.)

Cool completely before cutting.

This is how it looks after baking the first layer for 6 minutes…

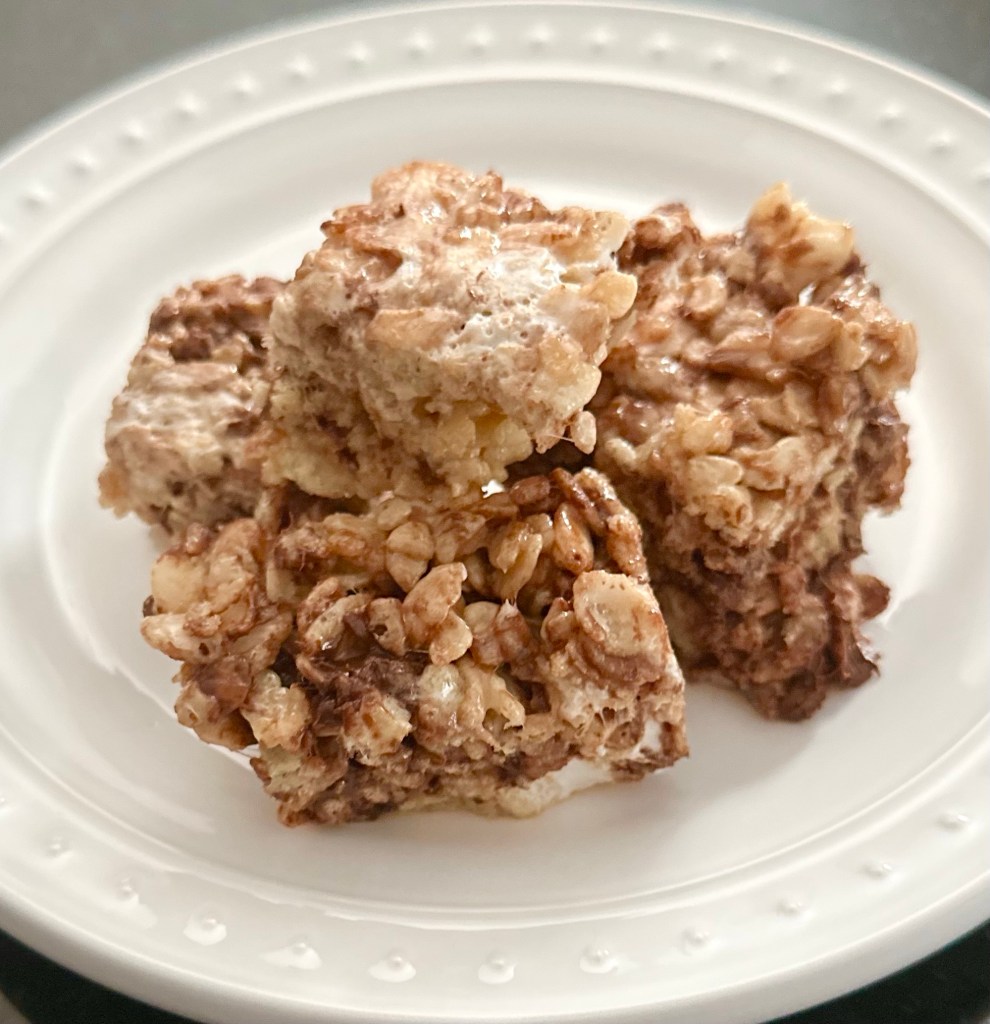
Fresh from the oven…cooled, cut into bars, and ready to eat!!

Hip Hugger Bars are yummy at room temperature, but are also amazing warmed for a few seconds in the microwave with a scoop of vanilla ice cream on top. 😋

If you’re a chocolate lover, try this recipe…I promise you won’t be disappointed!

Anita

Posted in Recipes | Tagged | Leave a comment

Crochet Candy Corn Cup Cozy

Hi friends,

It’s still hot in Alabama, but I’m dreaming of cooler Fall temps! Whether you’re a fan of candy corn or not, when it pops up in the stores it means Fall is on the way. I have a fun, easy Crochet Candy Corn Cup Cozy pattern to hold your Pumpkin Spice Latte. 🙂

Disclosure: Some of the links on my site are affiliate links, meaning, at no additional cost to you, I will earn a small commission if you click through and make a purchase. As an Amazon Associate I earn from qualifying purchases.

I used I Love This Cotton yarn in Curry, Glowing, and White with an H/5mm crochet hook to stitch up my cup cozy. I used Glowing yarn to stitch on a white and yellow button for an added touch. This is totally optional, but I love the way it looks.

You can find the pattern below along with a link to a free PDF if you’d like to easily print it.

Crochet Candy Corn Cup Cozy

Worsted weight cotton yarn (size 4) – I used I Love This Cotton in Curry, Glowing, and White

H/5mm hook

Optional buttons 

Stitches used in US terms:

Chain – ch

Slip Stitch – ss

Single Crochet – sc

Double Crochet – dc

Note: chains at beginning of rounds do not count as stitches. 

With Curry, chain 30 and join to first chain with ss to form a ring.

Round 1: ch 1. sc in back bump of each ch around. Join with ss to first sc. (30 stitches)

Rounds 2-3: ch 1. sc in each stitch around. Join with ss to first sc. (30 stitches)

Change to Glowing.

Round 4: ch 2. Work 2 dc in same stitch as ss. *skip next stitch, 2 dc in next stitch* Repeat from * to * around. Skip last stitch. Join with ss to first dc. (15 v-stitches)

Rounds 5-9: ch 2. Work 2 dc in each v-stitch of the row below (in the space between the 2 dc) Join with ss to first dc. (15 v-stitches)

Change to White

Rounds 10-12: ch 1. sc in each stitch around. Join with ss to first sc. (30 stitches)

Fasten off and weave in ends. 

Sew on buttons if using. 

Here’s the link to the free PDF…

The Crochet Candy Corn Cup Cozy will also fit on 12 ounce cans and 16.9 ounce bottles. And you don’t have to like candy corn to like this cute cozy. 😉

Anita

Posted in Crochet, Fall, Gifts | Tagged , , | 6 Comments

Born to be Loved – New Baby Girl Card

Hi friends,

When I saw this sweet little bunny, I thought she would make the cutest New Baby Girl Card. She’s from the Born to be Loved set from Unity Stamp Company and includes the sentiment along with the bunny image.

Disclosure: Some of the links on my site are affiliate links, meaning, at no additional cost to you, I will earn a small commission if you click through and make a purchase. As an Amazon Associate I earn from qualifying purchases.

I stamped the bunny image with Memento Tuxedo Black ink on white card stock and colored it with Copic markers. I used the Scallops & Circles Nesting Dies from Unity Stamp Company to die cut around the image and layered it to pink card stock die cut with the same set.

I embossed white card stock with a heart embossing folder (this is a similar one) and attached it to a pink card. I stamped the sentiment with pink ink and die cut it with the Scalloped & Stitched Sentiment Nesting Dies from Unity Stamp Company. Both the bunny image and the sentiment are attached to the card with foam tape.

This sweet little bunny would be so cute on a birthday card, thinking of you card, or a just because card. You can color her dress and bow in any color. 🙂

Anita

Posted in Baby, Cards, Stamping | Tagged , , | 2 Comments

Chocolate Chip Rice Crispy Treats

Hi friends,

Rice Crispy Treats are such a classic sweet snack. I found this simple recipe at Caramel & Cashews that adds a little more to this tasty treat with mini chocolate chips. What could be better? 😋

Disclosure: Some of the links on my site are affiliate links, meaning, at no additional cost to you, I will earn a small commission if you click through and make a purchase. As an Amazon Associate I earn from qualifying purchases.

You only need 5 ingredients and a few minutes to whip up these yummy Chocolate Chip Rice Crispy Treats. And you can make them gluten free by using gluten free cereal – just FYI, Kroger Crispy Rice is NOT gluten free – be sure to check your brand of crispy rice if you need it to be gluten free. Here’s the full recipe.

I made up 2 batches of these tasty treats to take to our youth group and was surprised they didn’t eat them all! 😉 So I wrapped the extra in parchment paper and aluminum foil and put them in the freezer. They froze really well and thawed out quickly. The youth group finished them off the next week. 🙂

My chocolate chips melted a little more than the picture in the recipe shows, but they were still so good! I had someone mention that they were the best Rice Crispy Treats they ever had. 🙂

Try this simple recipe for Chocolate Chip Rice Crispy Treats for a fun after school treat for the kids – I don’t think they will be disappointed!

Anita

Posted in Recipes | Tagged | Leave a comment

Snowy Gift – August 2023 Christmas Card

Hi friends,

It’s time for the monthly Christmas card. 🎄 If you’re new to my blog, Welcome! I’m glad you’re here! Each month I create a new Christmas card and make 4 to 6 cards of the design. It makes it so much easier when the holidays roll around to have a stash ready to send out. You can find the cards I’ve created so far this year in these posts – January, February, March, April, May, June, and July.

Disclosure: Some of the links on my site are affiliate links, meaning, at no additional cost to you, I will earn a small commission if you click through and make a purchase. As an Amazon Associate I earn from qualifying purchases.

I called this month’s card Snowy Gift. ⛄️🎁 This cute little snowman is from the Love Into Giving set from Unity Stamp Company. The set also includes another snowman and a sweet sentiment.

My inspiration came from the Build Your Stash Holiday Cardmakers Sketch Challenge #36. Check out their Facebook page – you’ll find tons of inspiration!

I stamped the snowman with Memento Tuxedo Black ink on white card stock and colored it with Copic makers. I die cut around the image with the Scalloped & Rectangles Nesting Dies from Unity Stamp Company. I embossed a piece of green card stock with a snowflake embossing folder. This particular folder is discontinued, but this Snowfall Embossing Folder would be so cute with this snowman. I attached the embossed piece to a white card. Then I attached the stamped image to the card and added 2 strips of coordinating patterned paper. To finish the card, I added 3 dots of Peppermint Candy Nuvo Drops.

I know I’ve said it before, but I really love having a stash of Christmas cards made ahead of time! 🎄

Anita

Posted in Cards, Christmas, Stamping | Tagged , , | 5 Comments

You’re the Flippin’ Best! (Handmade Card)

Hi friends,

Unity Stamp Company has the cutest gnome stamps! This little guy is called BBQ Gnome and includes 2 sentiments – the perfect set for making masculine cards, especially for those grillmasters. 🙂

Disclosure: Some of the links on my site are affiliate links, meaning, at no additional cost to you, I will earn a small commission if you click through and make a purchase. As an Amazon Associate I earn from qualifying purchases.T

This is a super easy card to make and I love the way it turned out. I stamped the image with Memento Tuxedo Black ink on white card stock and colored it with Copic markers. By adding the green under his feet, it grounds him so he doesn’t look like he’s just floating. 😉 I stamped the sentiment with black ink, layered the piece to green card stock, and attached it to a white card.

Sometimes a stamped image is all you need to make a great card – I think this is one of those times. 🙂

Anita

Posted in Cards, Stamping | Tagged , | Leave a comment

Giant Christmas Clothespins

Hi friends,

Have you ever seen these giant wood clothespins? They measure about 6 inches tall by about 1.25 inches wide. I was looking through my craft room and stumbled across them…I forgot I had them! Maybe I need to do some cleaning and organizing?? 🤷🏼‍♀️ Anyway, these clothespins are similar to what I discovered in my craft room.

Disclosure: Some of the links on my site are affiliate links, meaning, at no additional cost to you, I will earn a small commission if you click through and make a purchase. As an Amazon Associate I earn from qualifying purchases.

They are the perfect size to hold a recipe card or your to do list and look cute on your counter. I thought they would be fun to decorate for Christmas to hold those recipe cards while baking up all the goodies for the season. I pulled some 6 by 6 inch Christmas patterned papers from my stash and got to work! 😊

I trimmed my papers into 2 pieces to fit onto the clothespins without covering the metal piece. That way I was also able to use 2 different coordinating papers. Using Mod Podge with a foam brush, I applied a thin coat to the clothespins and adhered the papers. Once that was dry (it only takes a few minutes), I applied another thin coat over the top.

I went ahead and added the paper to both sides of the clothespin so it would be cute no matter which side you see. You can leave it just like that or add embellishments to dress it up. Ribbons, buttons, charms, gems, or anything else you can think of to make these giant clothespins even more fun!

These are also cute decorated to match your kitchen, office, or craft room! You can paint them to match your patterned paper, too. Add your favorite recipe on a cute card or a fun notepad and they make a cute little gift!

Not quite ready to do any Christmas crafting? Pin it to your Christmas board for later!

Anita

Posted in Christmas, Decor, Gifts | Tagged , , | 1 Comment

Chicken and Rice Casserole

Hi friends,

This is a simple great weeknight recipe that has just 4 ingredients plus a couple of spices. It only takes 15-20 minutes to bake once you throw it all together. Add a salad or some steamed veggies and you’ll have a tasty dinner! You can find the full recipe at The Diary of a Real Housewife.

Disclosure: Some of the links on my site are affiliate links, meaning, at no additional cost to you, I will earn a small commission if you click through and make a purchase. As an Amazon Associate I earn from qualifying purchases.

The recipe calls for 3 cups cooked chicken. To make it easier, I cooked my chicken the day before. A little tip on cooking chicken breasts to use in recipes that I’ve found to help keep the chicken tender is to pound it with a meat mallet before cooking. You don’t have to pound it flat, just pound it a few times. Then I simply add the chicken to a pot and cover it with water. Bring it to a boil and boil for 20 minutes or so until done. Let it cool and shred.

Tip: cook up some chicken breasts, shred, and freeze in freezer bags in 1 or 2 cup quantities. You’ll always have cooked chicken on hand for recipes.

Ready for the oven…

I separated the recipe into 2 square pans. I was taking a meal to some friends and it’s just the 2 of them so I wrapped up the other pan in foil to put in the freezer for another meal later. I also left the spices out due to health reasons, but I took a little taste and it was still yummy! 😋

Fresh from the oven…warm and creamy!

You can add whatever spices your family enjoys and also use a rotisserie chicken for extra flavor and convenience. Brown rice or long grain white rice can also be used – just cook it first.

Chicken and Rice Casserole is a kid friendly recipe that the whole family will enjoy!

Anita

Posted in Recipes | Tagged | Leave a comment

For Your Shower Card

Hi friends,

I was invited to 2 bridal showers for 2 special couples this Summer. I wanted to make a special card for them and liked the way this card turned out so much that I made it for both showers. 🙂

Disclosure: Some of the links on my site are affiliate links, meaning, at no additional cost to you, I will earn a small commission if you click through and make a purchase. As an Amazon Associate I earn from qualifying purchases.

The umbrella filled with tulips stamp is from a set called When It Rains from Unity Stamp Company. The sentiment is from a retired set called Teeny Tiny Wishes from Stampin’ Up – use your favorite sentiment stamp from your stash. A simple “for you” stamp would work great. Or you could leave the sentiment off and still have a beautiful card.

I stamped the image with Memento Tuxedo Black ink on white card stock and colored it with Copic markers. I die cut around the image using the Scallops & Rectangles Nesting Dies from Unity Stamp Company. I embossed a piece of white card stock with a swirl embossing folder (similar to this) and attached it to a white card. The stamped image is attached to the card with foam tape. I stamped the sentiment with pink ink on white card stock and punched it with a label punch. (This particular punch is discontinued, but this is a great die set to use with sentiment stamps.) I attached the sentiment at an angle to the stamped piece.

This card could be used for more than just a bridal shower. It would make a great birthday, thank you, or thinking of you card, too.

Anita

Posted in Cards, Stamping | Tagged , | Leave a comment

Summer’s End Faux Flower Arrangement

Hi friends,

Do you have an empty quart mason jar hiding in your cabinet? They can be used for so much more than canning! I added a few touches to one of mine to make a cute little Summer’s End Faux Flower Arrangement. 🌻

I know it’s not quite the end of summer yet, but the kids have started back to school already here in Alabama so it kind of feels like it. 🤷🏼‍♀️

Disclosure: Some of the links on my site are affiliate links, meaning, at no additional cost to you, I will earn a small commission if you click through and make a purchase. As an Amazon Associate I earn from qualifying purchases.

I picked up a bunch of small sunflowers at Hobby Lobby and pulled out some ribbons and twine from my stash. I also added a spider mum and some little white flowers I had that aren’t in the picture below.

I attached the buffalo print ribbon around the jar by overlapping the edges and securing it with a little E6000 clear adhesive. Then I attached the sunflower ribbon the same way. I wrapped the natural twine around the top of the jar several times and tied it into a bow. It seemed to need something else, so I tied a large button with twine and glued it to the front of the jar.

I cut my sunflowers into several stems to make them easier to arrange. I added some pale green flat glass decorative marbles to the jar. I added my flowers, beginning with the spider mum and then adding the sunflowers and the little white flowers, pushing the stems down into the marbles to secure them. I’m by no means a great flower arranger, I just kind of play with it until I like the way it looks. 😉

I don’t think it turned out too bad! 😊 If you’re interested in the little riser that my arrangement is sitting on, you can find it in this post.

This is a cute arrangement that will go from summer right into fall. 🌻 Pull out some of those empty mason jars and see what you can create with them!

Anita

Posted in Decor, Summer | Tagged , | 2 Comments