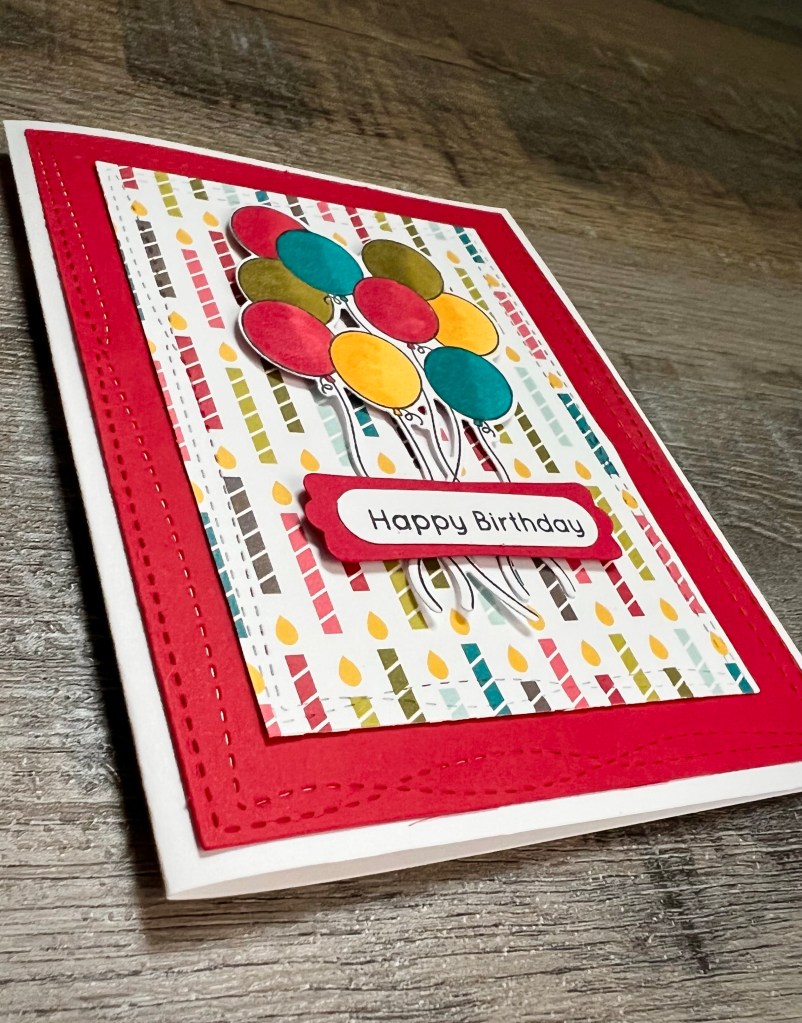
What says “Happy Birthday” more than a fun bunch of balloons? 🎈🎈🎈
I made a couple of cards in slightly different color combos using the Balloon Bundle stamp set along with the matching Balloon Bundle Die-namics die (both from My Favorite Things) that will work for anyone’s special day. The balloons are so fun to color and the die makes it super easy to cut them out.
Disclosure: Some of the links on my site are affiliate links, meaning, at no additional cost to you, I will earn a small commission if you click through and make a purchase. As an Amazon Associate I earn from qualifying purchases.
I stamped the sentiment with black ink on white card stock, punched it with a label punch, and layered it to another label punched from red card stock. My label punches are discontinued, but Stampin’ Up has a great set of Message Dies that has some similar shapes.
I added the balloons to the card using foam tape and then added the sentiment over the balloon strings using foam tape.
The Balloon Bundle stamp set also comes with 2 more sentiments that make this set perfect for any celebration. And of course your color options are endless…this is such a fun set! What will you celebrate?
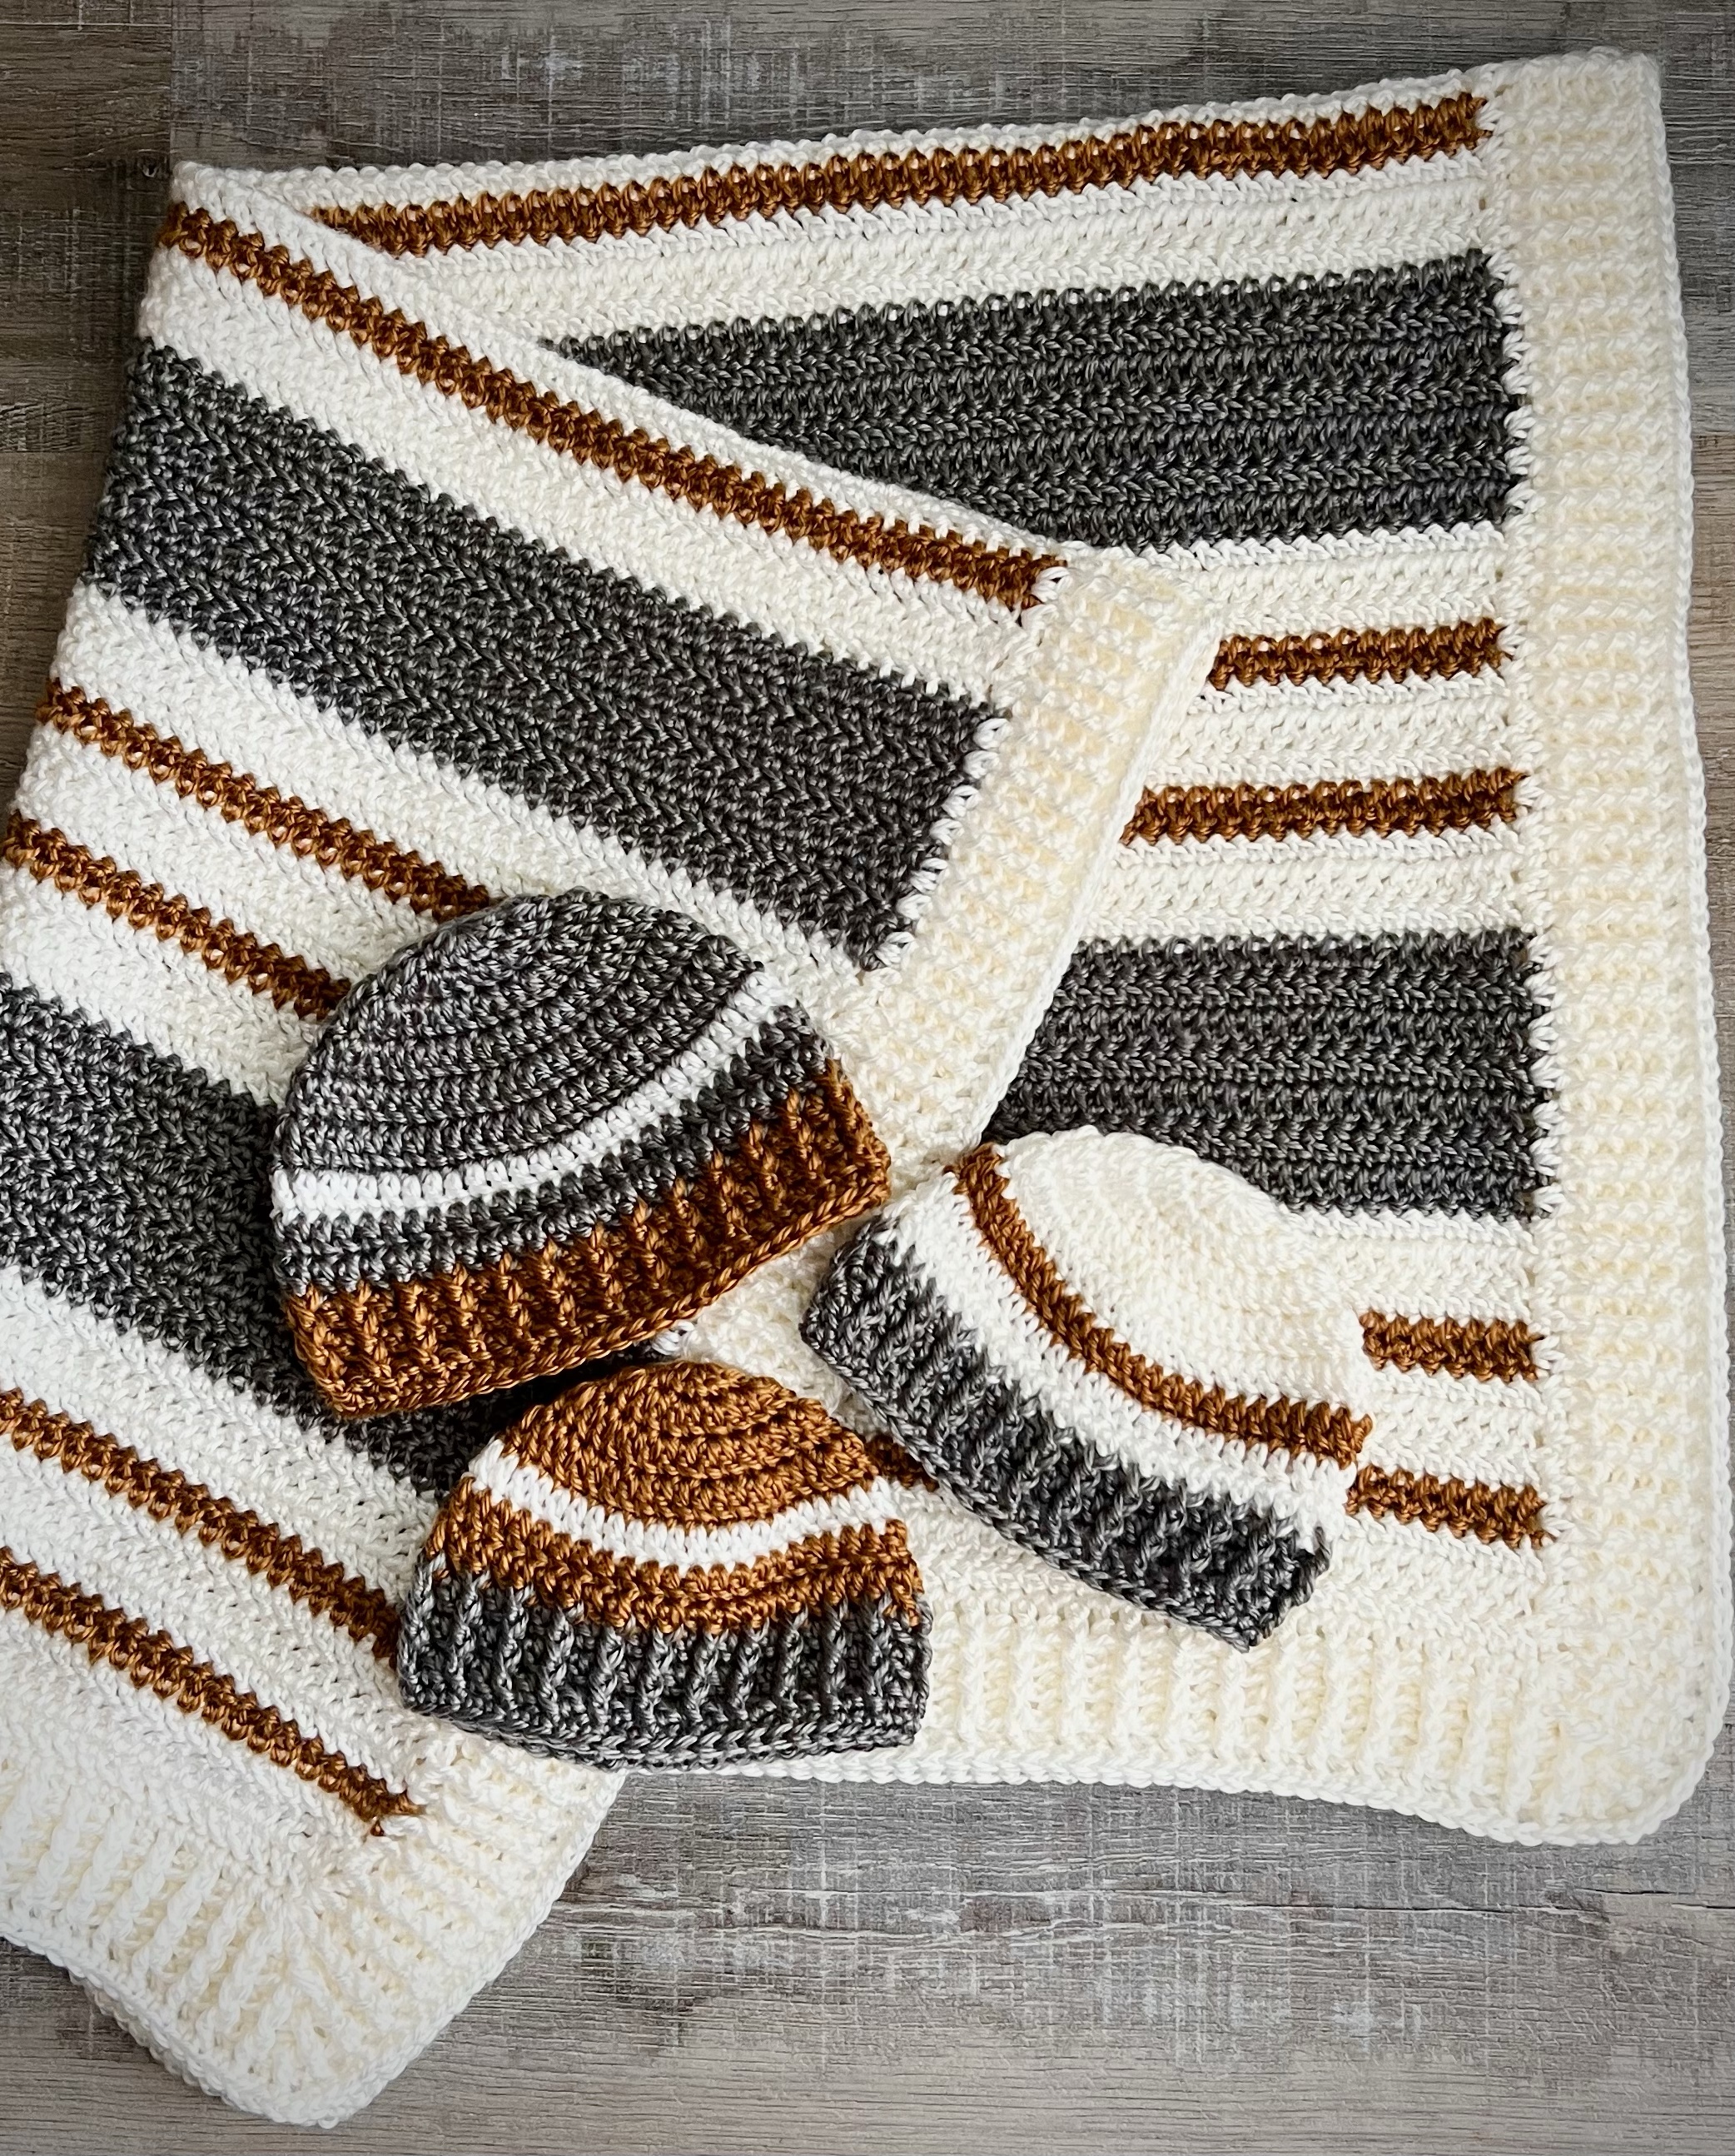
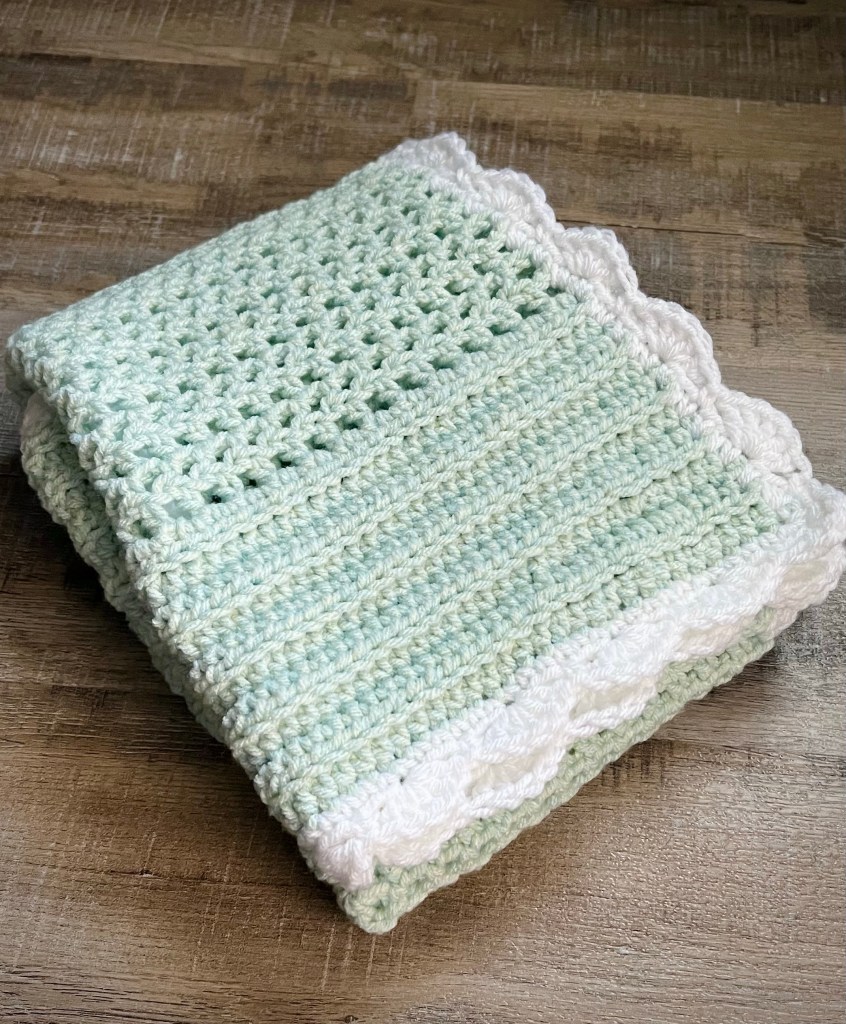
If you’ve followed me for a minute, you know that I love to crochet baby blankets. 🙂 So when my godson and his beautiful wife were expecting their first baby I knew I had to make one for him. He was born on February 14th and is just the sweetest little guy! 💙
Disclosure: Some of the links on my site are affiliate links, meaning, at no additional cost to you, I will earn a small commission if you click through and make a purchase. As an Amazon Associate I earn from qualifying purchases.
I also made Porter 3 little beanies of different sizes so he can grow into them for next Fall and Winter. The free Parker Crochet Baby Hat from Sewrella is one of my favorite patterns and she has 6 different sizes starting from 0-3 months and going through Child size.
I hope Porter will enjoy snuggling in this blanket as much as I loved making it for him!
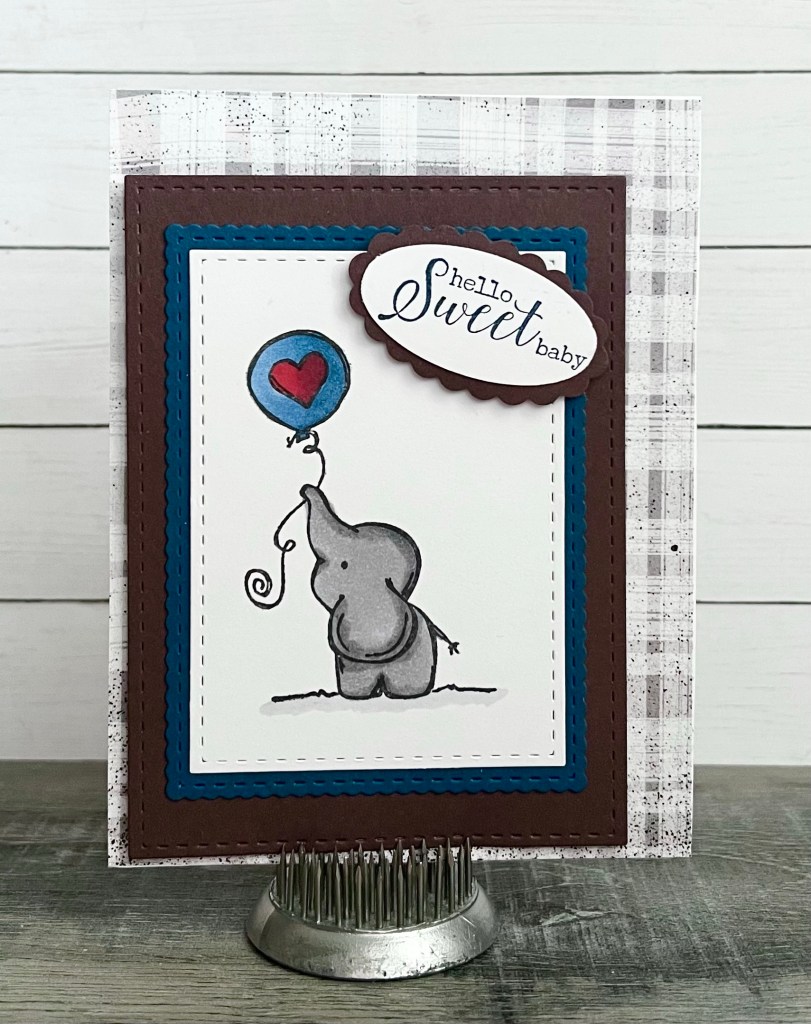
Sweet Elle from Unity Stamp Company is one of my favorite stamps to use for making baby cards. I love the way this card turned out and even though her name is Elle, she made a fantastic baby boy card. 💙 This card was for my godson and his beautiful wife for their first baby – he was born on February 14th and I can’t wait to meet him!!
Disclosure: Some of the links on my site are affiliate links, meaning, at no additional cost to you, I will earn a small commission if you click through and make a purchase. As an Amazon Associate I earn from qualifying purchases.
To assemble the card, I attached a piece of patterned paper to a white card and attached the stamped piece with foam tape. The sentiment is also attached with foam tape.
With a change of color, Sweet Elle makes a sweet baby girl card. And with a change of sentiment, she makes a perfect birthday card!
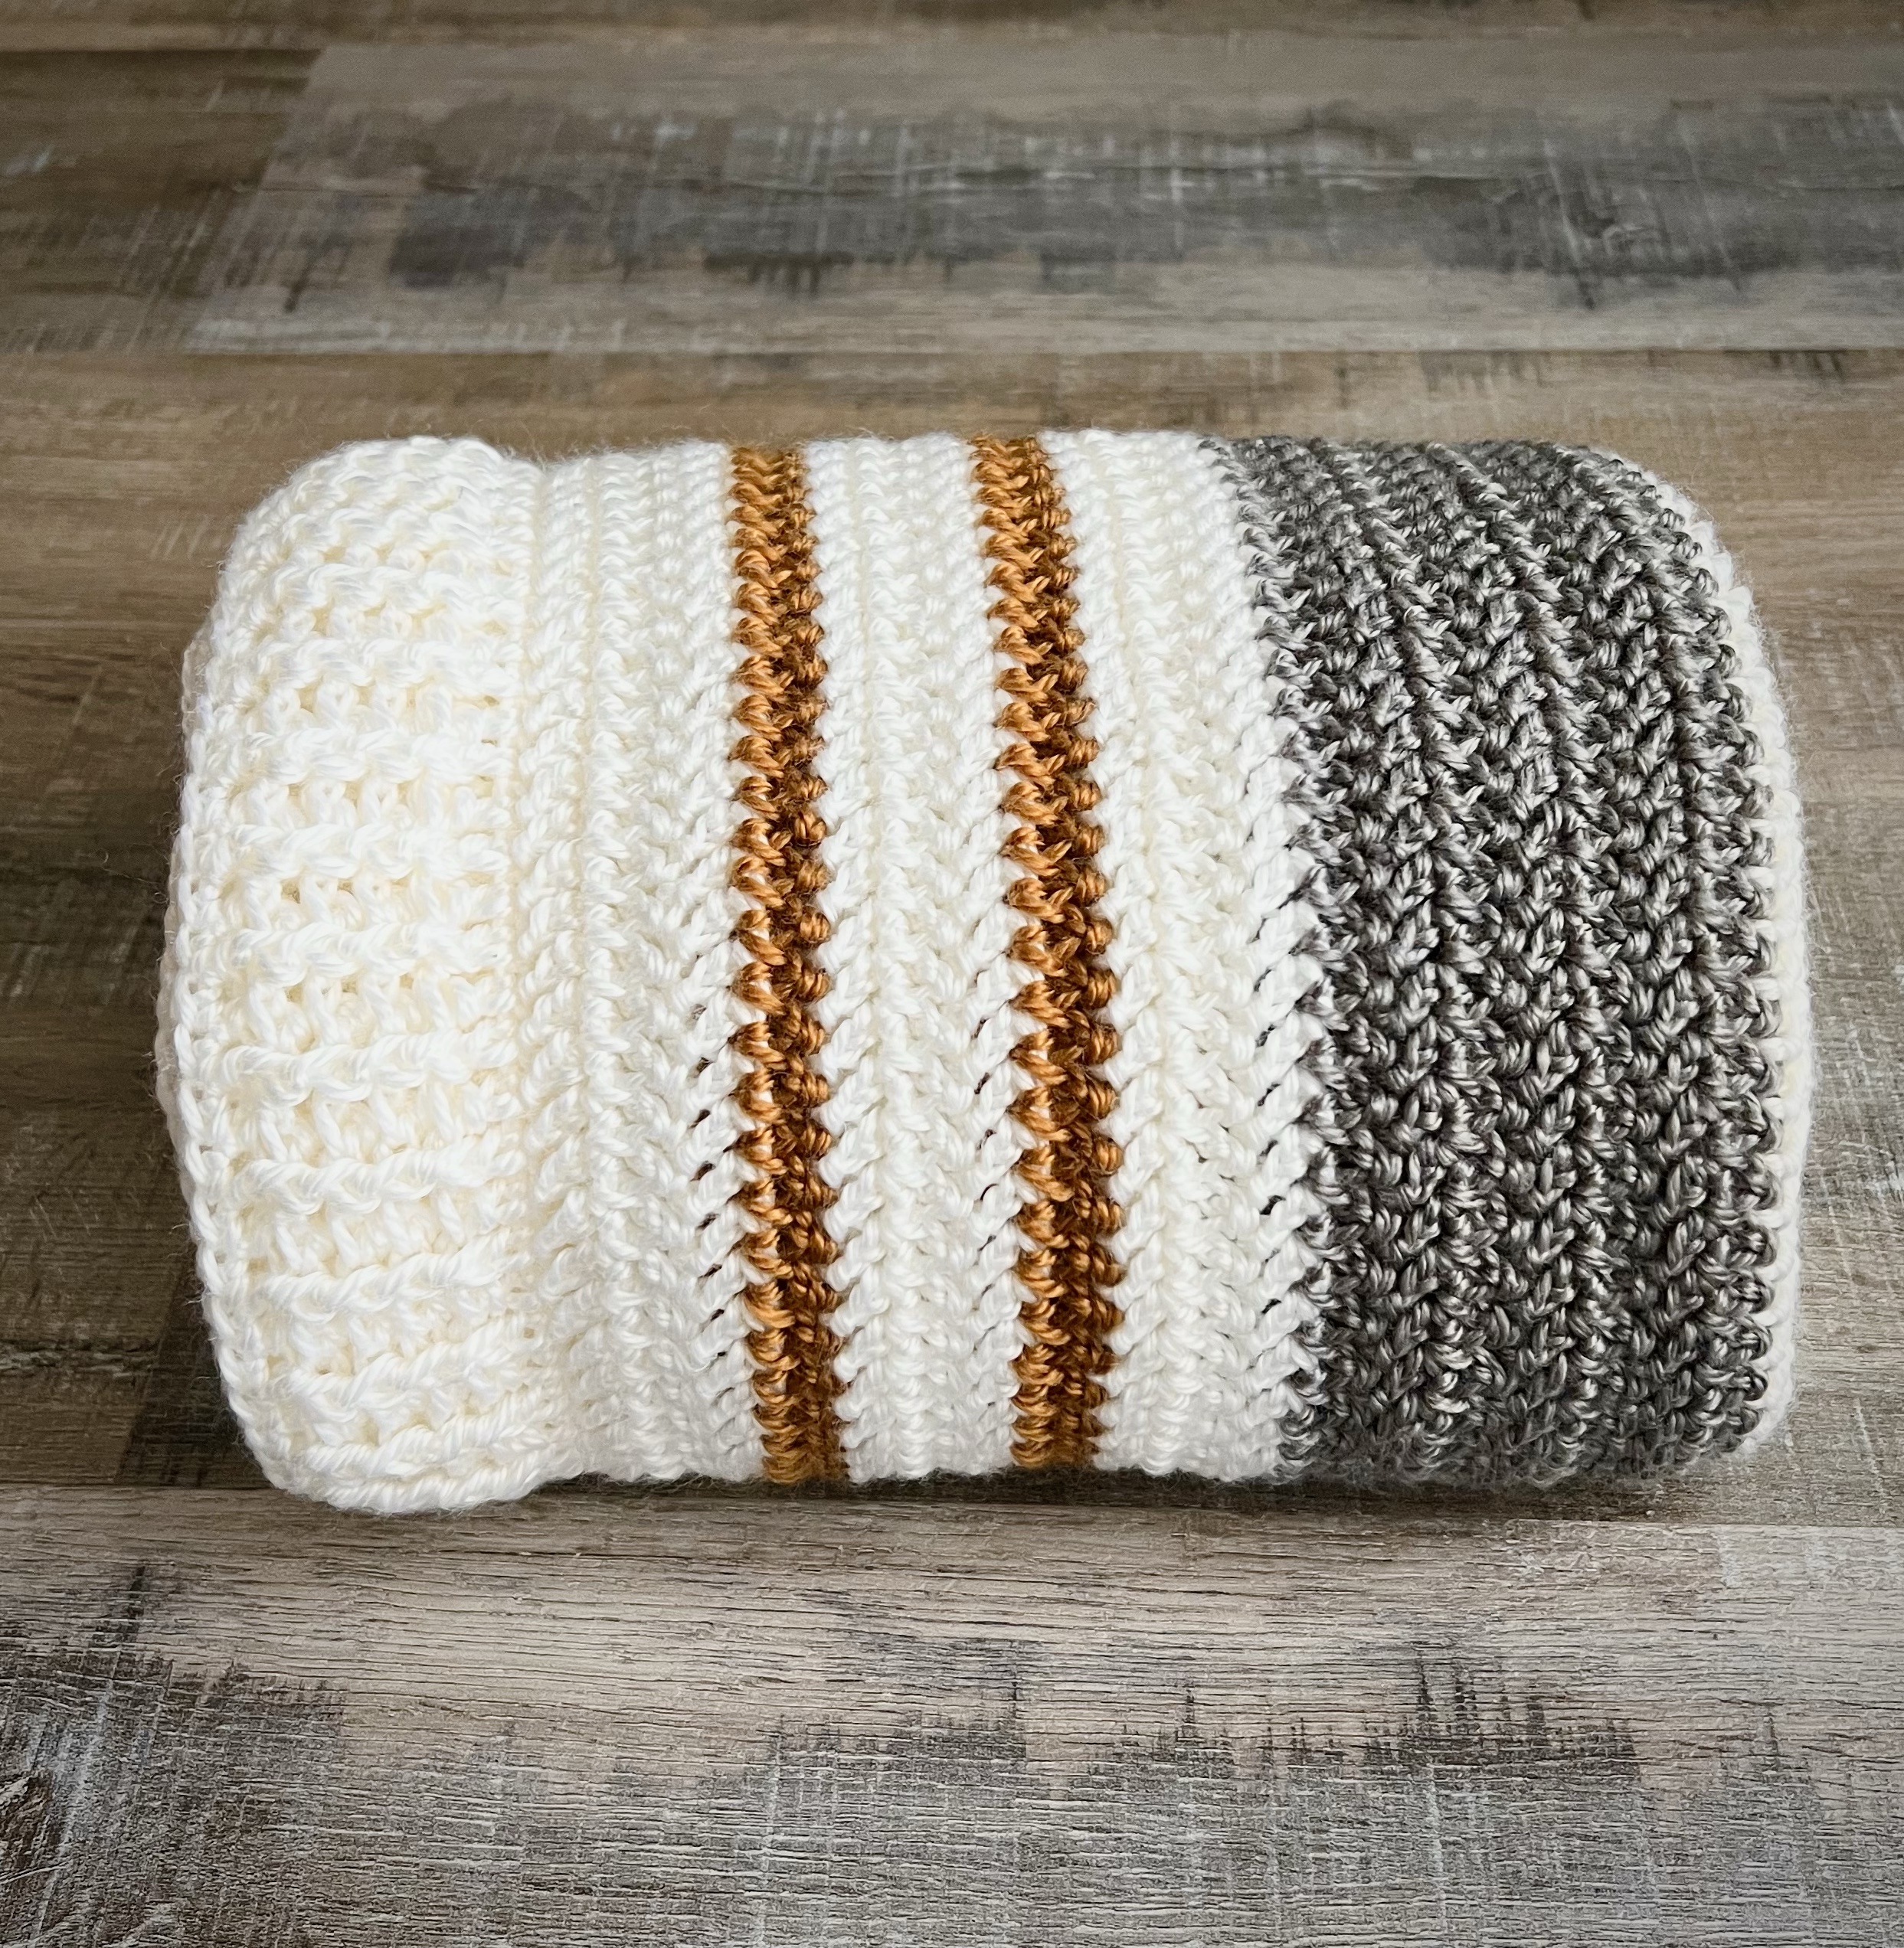
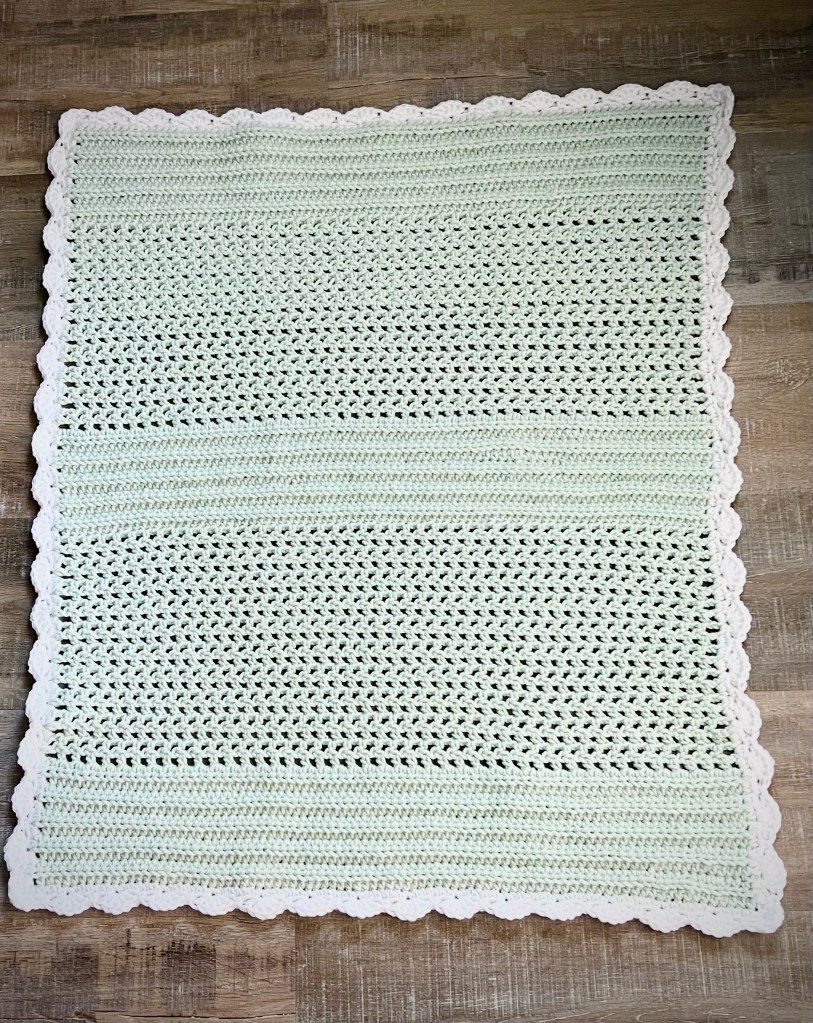
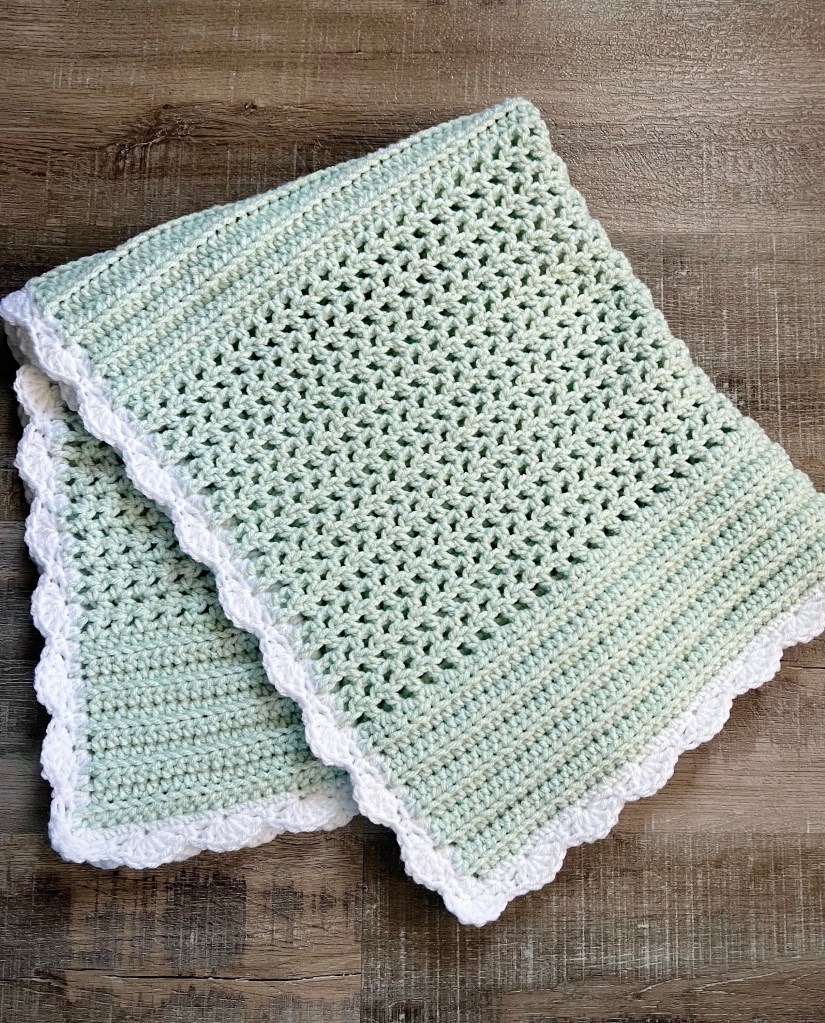
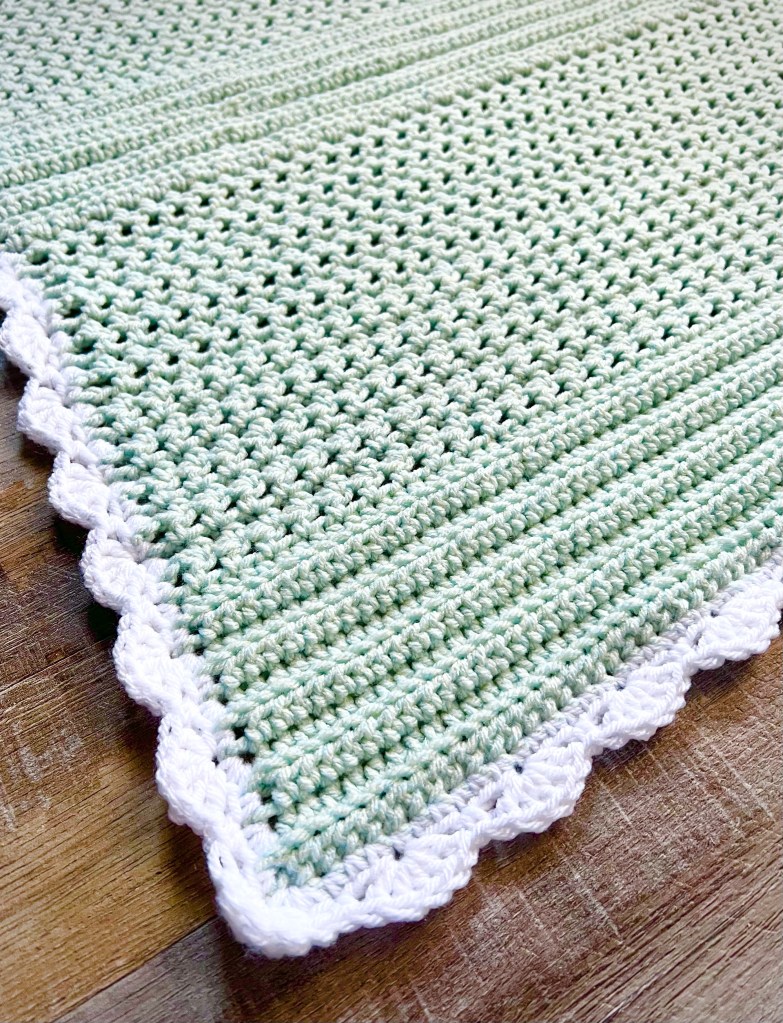
I have a new Sweet and Simple Crochet Baby Blanket pattern to share with you today. It works up quickly and is made with basic crochet stitches, so I think it would be a beginner friendly pattern. The finished size of the blanket is about 25 by 30 inches including the border.
Disclosure: Some of the links on my site are affiliate links, meaning, at no additional cost to you, I will earn a small commission if you click through and make a purchase. As an Amazon Associate I earn from qualifying purchases.
I used I Love This Yarn from Hobby Lobby with an I/5.5mm hook to stitch up my blanket. I started my blanket with the foundation half double crochet stitch. If you need a tutorial for this stitch, you can find a great video here. I love starting my projects this way – it gives such a clean beginning edge to my project which is great when adding a border.
If you find it difficult to crochet evenly around your project when adding the first row of your border, I found this post that has some great tips on how to do it and keep your work from puckering.
The free pattern for the Sweet and Simple Crochet Baby Blanket is below and I’ve also included a link to free PDF if you’d like to easily print it.
Crochet Sweet and Simple Baby Blanket
I Love This Yarn (4 weight) – You’ll Be Mist (about 11 ounces – 2 (5 ounce) skeins plus a little from a third skein) and White (about 1.5 ounces)
The color You’ll Be Mist has been discontinued, but the color Spa appears to be similar.
I/5.5mm hook
Stitches used in US terms:
Foundation half double crochet – fhdc
Chain – ch
Half Double Crochet – hdc
Back Loop Only – blo
Single Crochet – sc
Slip Stitch – ss
Double Crochet – dc
Notes:
(1) chain 2 at beginning of row counts as a hdc stitch
(2) chain 3 at beginning of row counts as 1 hdc stitch and 1 chain
Begin with You’ll Be Mist.
Row 1: work 88 fhdc. Turn. (88 stitches)
Rows 2-10: ch 2 (counts as 1st hdc)
Skip 1st stitch. hdc in blo of next stitch and each stitch across. Turn. (88 stitches)
Row 11: ch 3 (counts as 1 hdc and 1 ch). Skip 1st stitch. hdc in next stitch. *ch 1, skip 1 stitch, hdc in next stitch.* Repeat from * to * across. Turn. (45 hdc and 44 ch 1 spaces)
Rows 12-30: ch 3 (counts as 1 hdc and 1 ch). Skip 1st stitch and 1st ch 1 space. hdc in next hdc. *ch 1, skip ch1 space , hdc in next hdc* Repeat from * to * across, ending with hdc in 2nd ch of ch 3 from previous row. Turn. (45 hdc and 44 ch 1 spaces)
Row 31: ch 2. Skip 1st hdc. *Hdc in next ch 1 space , hdc in next hdc* Repeat from * to * across, ending with hdc in 2nd ch of ch 3 from previous row. Turn. (88 stitches)
Rows 32-40: ch 2 (counts as 1st hdc) Skip 1st stitch. hdc in blo of next stitch and each stitch across. Turn. (88 stitches)
Row 41: ch 3 (counts as 1 hdc and 1 ch). Skip 1st stitch. hdc in next stitch. *ch 1, skip 1 stitch, hdc in next stitch.* Repeat from * to * across. Turn. (45 hdc and 44 ch 1 spaces)
Rows 42-60: ch 3 (counts as 1 hdc and 1 ch). Skip 1st stitch and 1st ch 1 space. hdc in next hdc. *ch 1, skip ch 1 space, hdc in next hdc* Repeat from * to * across, ending with hdc in 2nd ch of ch 3 from previous row. Turn. (45 hdc and 44 ch 1 spaces)
Row 61: ch 2. Skip 1st hdc. *Hdc in next ch 1 space , hdc in next hdc* Repeat from * to * across, ending with hdc in 2nd ch of ch 3 from previous row. Turn. (88 stitches)
Rows 62-70: ch 2 (counts as 1st hdc) Skip 1st stitch. hdc in blo of next stitch and each stitch across. Turn. (88 stitches)
Change to White.
Begin working in rounds.
Rnd 1: ch 1 (does not count as stitch) sc evenly around blanket, working 3 sc in each corner. Join with ss to 1st sc. Do not turn.
Rnd 2: ch 1. sc in same stitch as ss. *Skip 2 stitches, 5 dc in next stitch. Skip 2 stitches, sc in next stitch.* Repeat from * to * around. Join with ss to first sc.
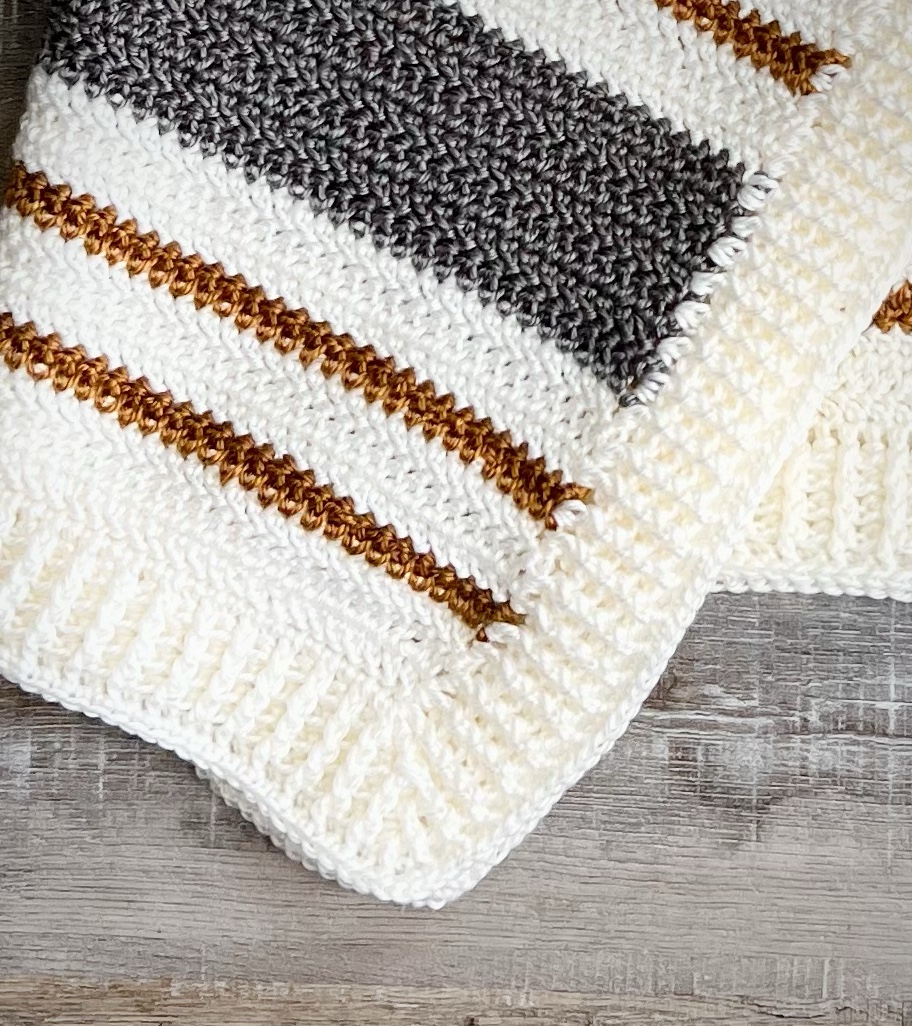
This is such a versatile pattern. You can make it with a contrasting border like I did, or make it completely one color. You can make the sections of the blanket in different colors, maybe the solid rows of hdc in one color with the other sections in another color. Or make the solid sections with stripes of 2 different colors. Lots of options! 🙂
What color will you make your Sweet and Simple Crochet Baby Blanket?
Did you see this Christmas card post in January? I’m hoping to create a new Christmas card each month this year – and make several of each to build my stash. I’m sharing February’s card today – Woo Hoo!! – 2 months in a row! 😉
Disclosure: Some of the links on my site are affiliate links, meaning, at no additional cost to you, I will earn a small commission if you click through and make a purchase. As an Amazon Associate I earn from qualifying purchases.
This cute little bear is from the Birthday Bears stamp set from My Favorite Things. He makes me think of a polar bear and I thought with the stack of packages he would make a cute Christmas card.
I stamped the Christmas Greetings Background, also from My Favorite Things, on a white card with blue ink. I stamped “Merry Christmas” (this is an older stamp, but here is a similar one or a larger one if you want a larger sentiment) with blue ink on white card stock and die cut it with a label die. There is similar die in this set or you can trim the sentiment strip to the size you want.
The bear image is attached to the card with foam tape and the sentiment is also attached with foam tape.
The Birthday Bears stamp set is just so cute! There are 5 bears and several sentiments along with other birthday images. There is also a set of Birthday Bears Die-Namics available to easily die cut the stamped images. And as you can tell from my card, it can be used for more than just birthdays! 😊
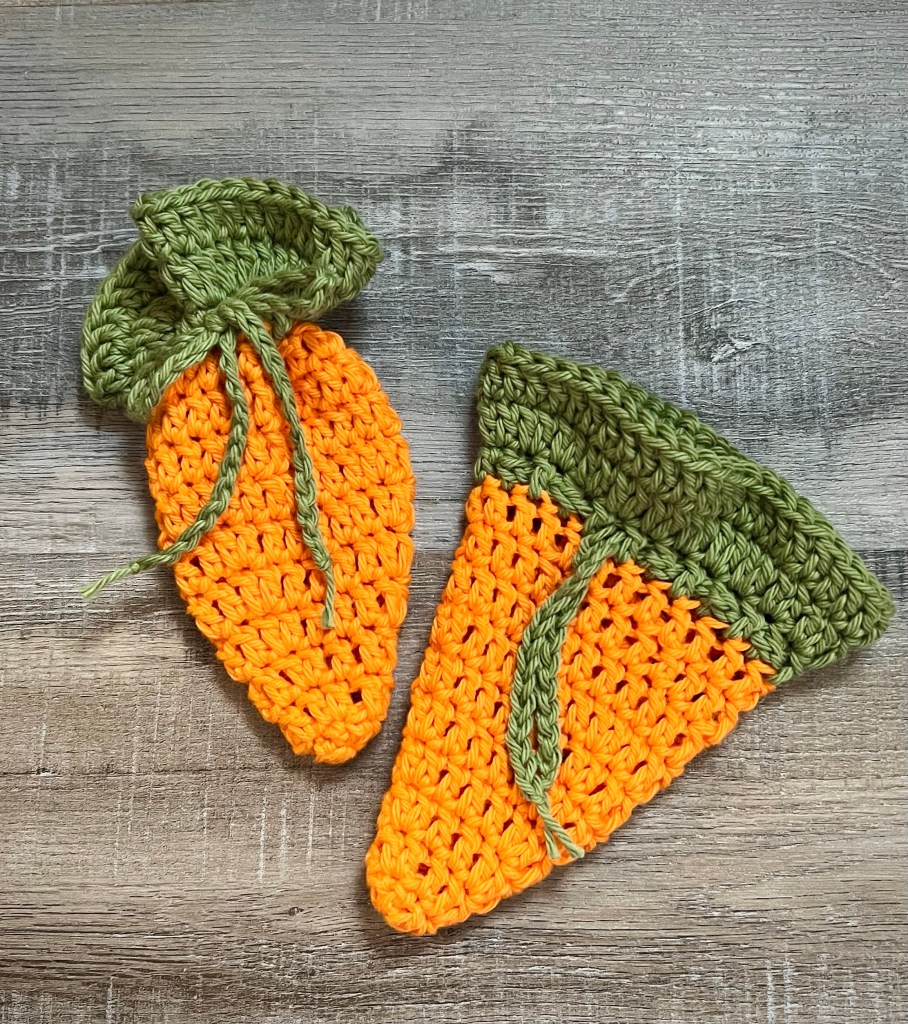
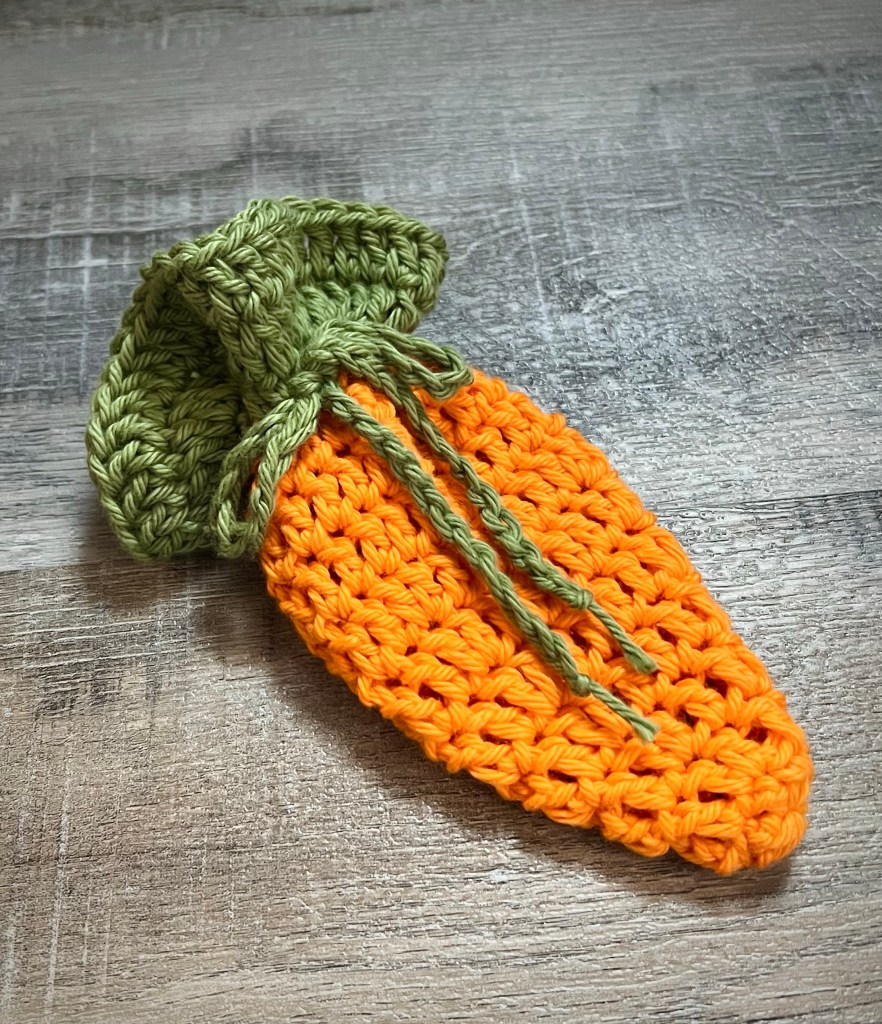
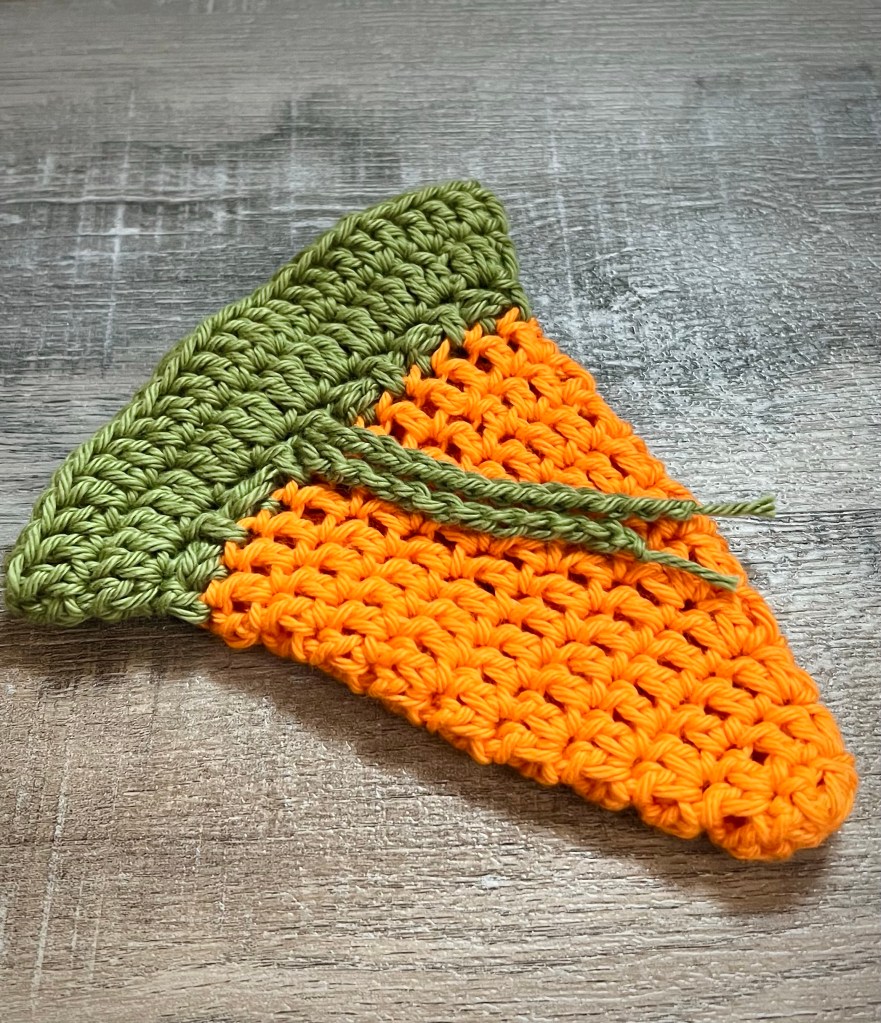
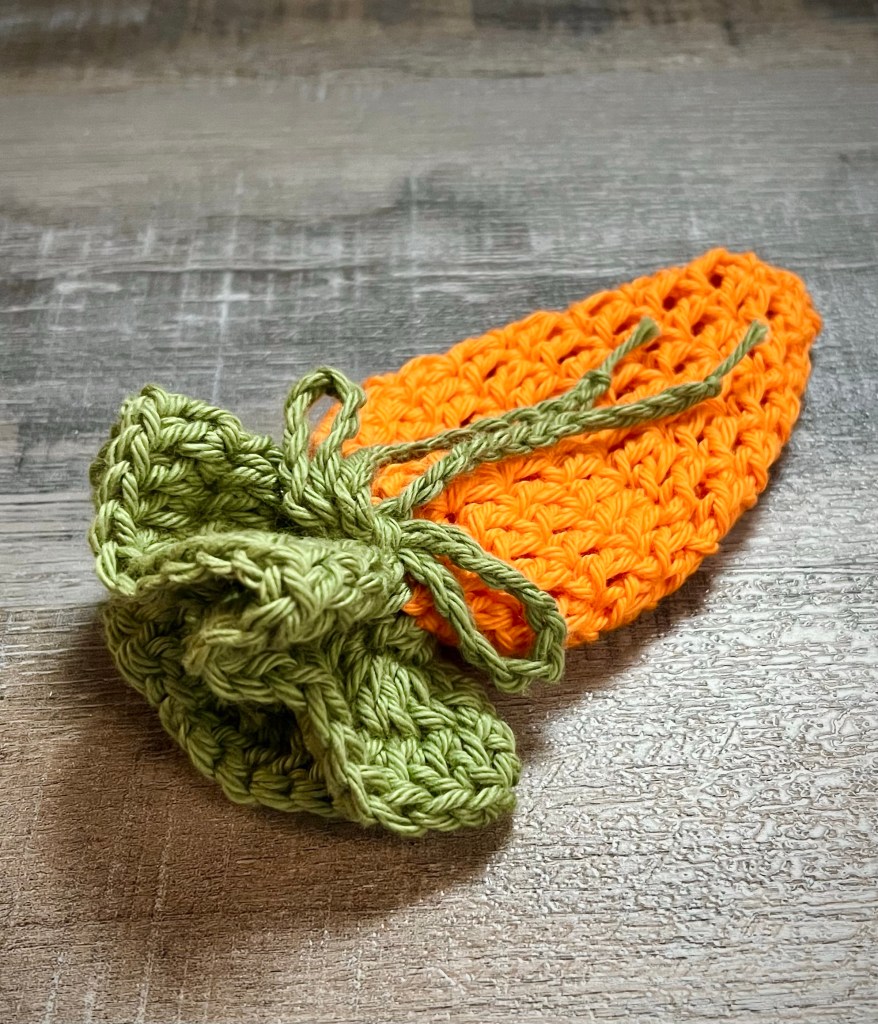
Are you thinking about Easter makes yet? 🐰🥕 This year Easter falls on April 17th – still a few weeks away, but now is a great time to start making all the Easter things.
I’m sharing my free pattern for this cute Crochet Drawstring Carrot Treat Bag below. 🥕 It’s super quick to stitch up and is so fun for sharing Easter treats! Fill it with your favorite wrapped candies and it’s sure to bring a smile.
I used I Love This Cotton Yarn in Glowing and Sage and an H/5mm hook to stitch up my Carrot Treat Bags. You will be able to get about 7 treat bags from one skein of each color – super inexpensive to make!
Disclosure: Some of the links on my site are affiliate links, meaning, at no additional cost to you, I will earn a small commission if you click through and make a purchase. As an Amazon Associate I earn from qualifying purchases.
Here’s the pattern and you’ll find a free PDF below if you want to easily print it.
Crochet Drawstring Carrot Treat Bag
I Love This Cotton yarn in Glowing and Sage – or your favorite 4 weight yarn
H/5mm hook
Stitches used – (US terms):
Magic Ring
Chain – ch
Single crochet – sc
Double crochet – dc
Slip stitch – ss
Note: chain 2 at beginning of rounds does not count as a stitch
Rnd 1: Using Glowing, begin with a magic ring. Ch 2, dc 6 times in ring. Join with a ss to first dc. Pull magic ring closed. (6 stitches)
Rnd 2: ss into next dc, ch 2. Work 2 dc in same stitch, dc in next stitch. (2 dc in next stitch, 1 dc in next stitch) twice and join with ss to first dc of rnd. (9 stitches)
Rnd 3: ss into next dc, ch 2. Work 2 dc in same stitch, dc in next 2 stitches. (2 dc in next stitch, dc in next 2 stitches) twice and join with ss to first dc of rnd. (12 stitches)
Rnd 4: ss into next dc, ch 2. Work 2 dc in same stitch, dc in next 3 stitches. (2 dc in next stitch, dc in next 3 stitches) twice and join with ss to first dc of rnd. (15 stitches)
Rnd 5: ss into next dc, ch 2. Work 2 dc in same stitch, dc in next 4 stitches. (2 dc in next stitch, dc in next 4 stitches) twice and join with ss to first dc of rnd. (18 stitches)
Rnd 6: ss into next dc, ch 2. Work 2 dc in same stitch, dc in next 5 stitches. (2 dc in next stitch, dc in next 5 stitches) twice and join with ss to first dc of rnd. (21 stitches)
Rnd 7: ss into next dc, ch 2. Work 2 dc in same stitch, dc in next 6 stitches. (2 dc in next stitch, dc in next 6 stitches) twice and join with ss to first dc of rnd. (24 stitches)
Rnds 8-10: ss into next dc, ch2. dc in same stitch and in each stitch around and join with ss to first dc of rnd. (24 stitches)
Change to Sage
Rnd 11: ss into next dc, ch2. dc in same stitch and each stitch around and join with ss to first dc of rnd. (24 stitches)
Rnd 12: ss into next dc, ch 2. Work 2 dc in same stitch. Work 2 dc in each stitch around and join with ss to first dc of rnd. (48 stitches)
Rnd 13: ss into next dc, ch2. dc in same stitch and in each stitch around. Join with ss to first dc of rnd. (48 stitches)
Fasten off and weave in ends.
For drawstring, ch 60 with Sage. Fasten off. Weave drawstring between the stitches of rnd 11. Draw the carrot bag closed and tie in a bow.
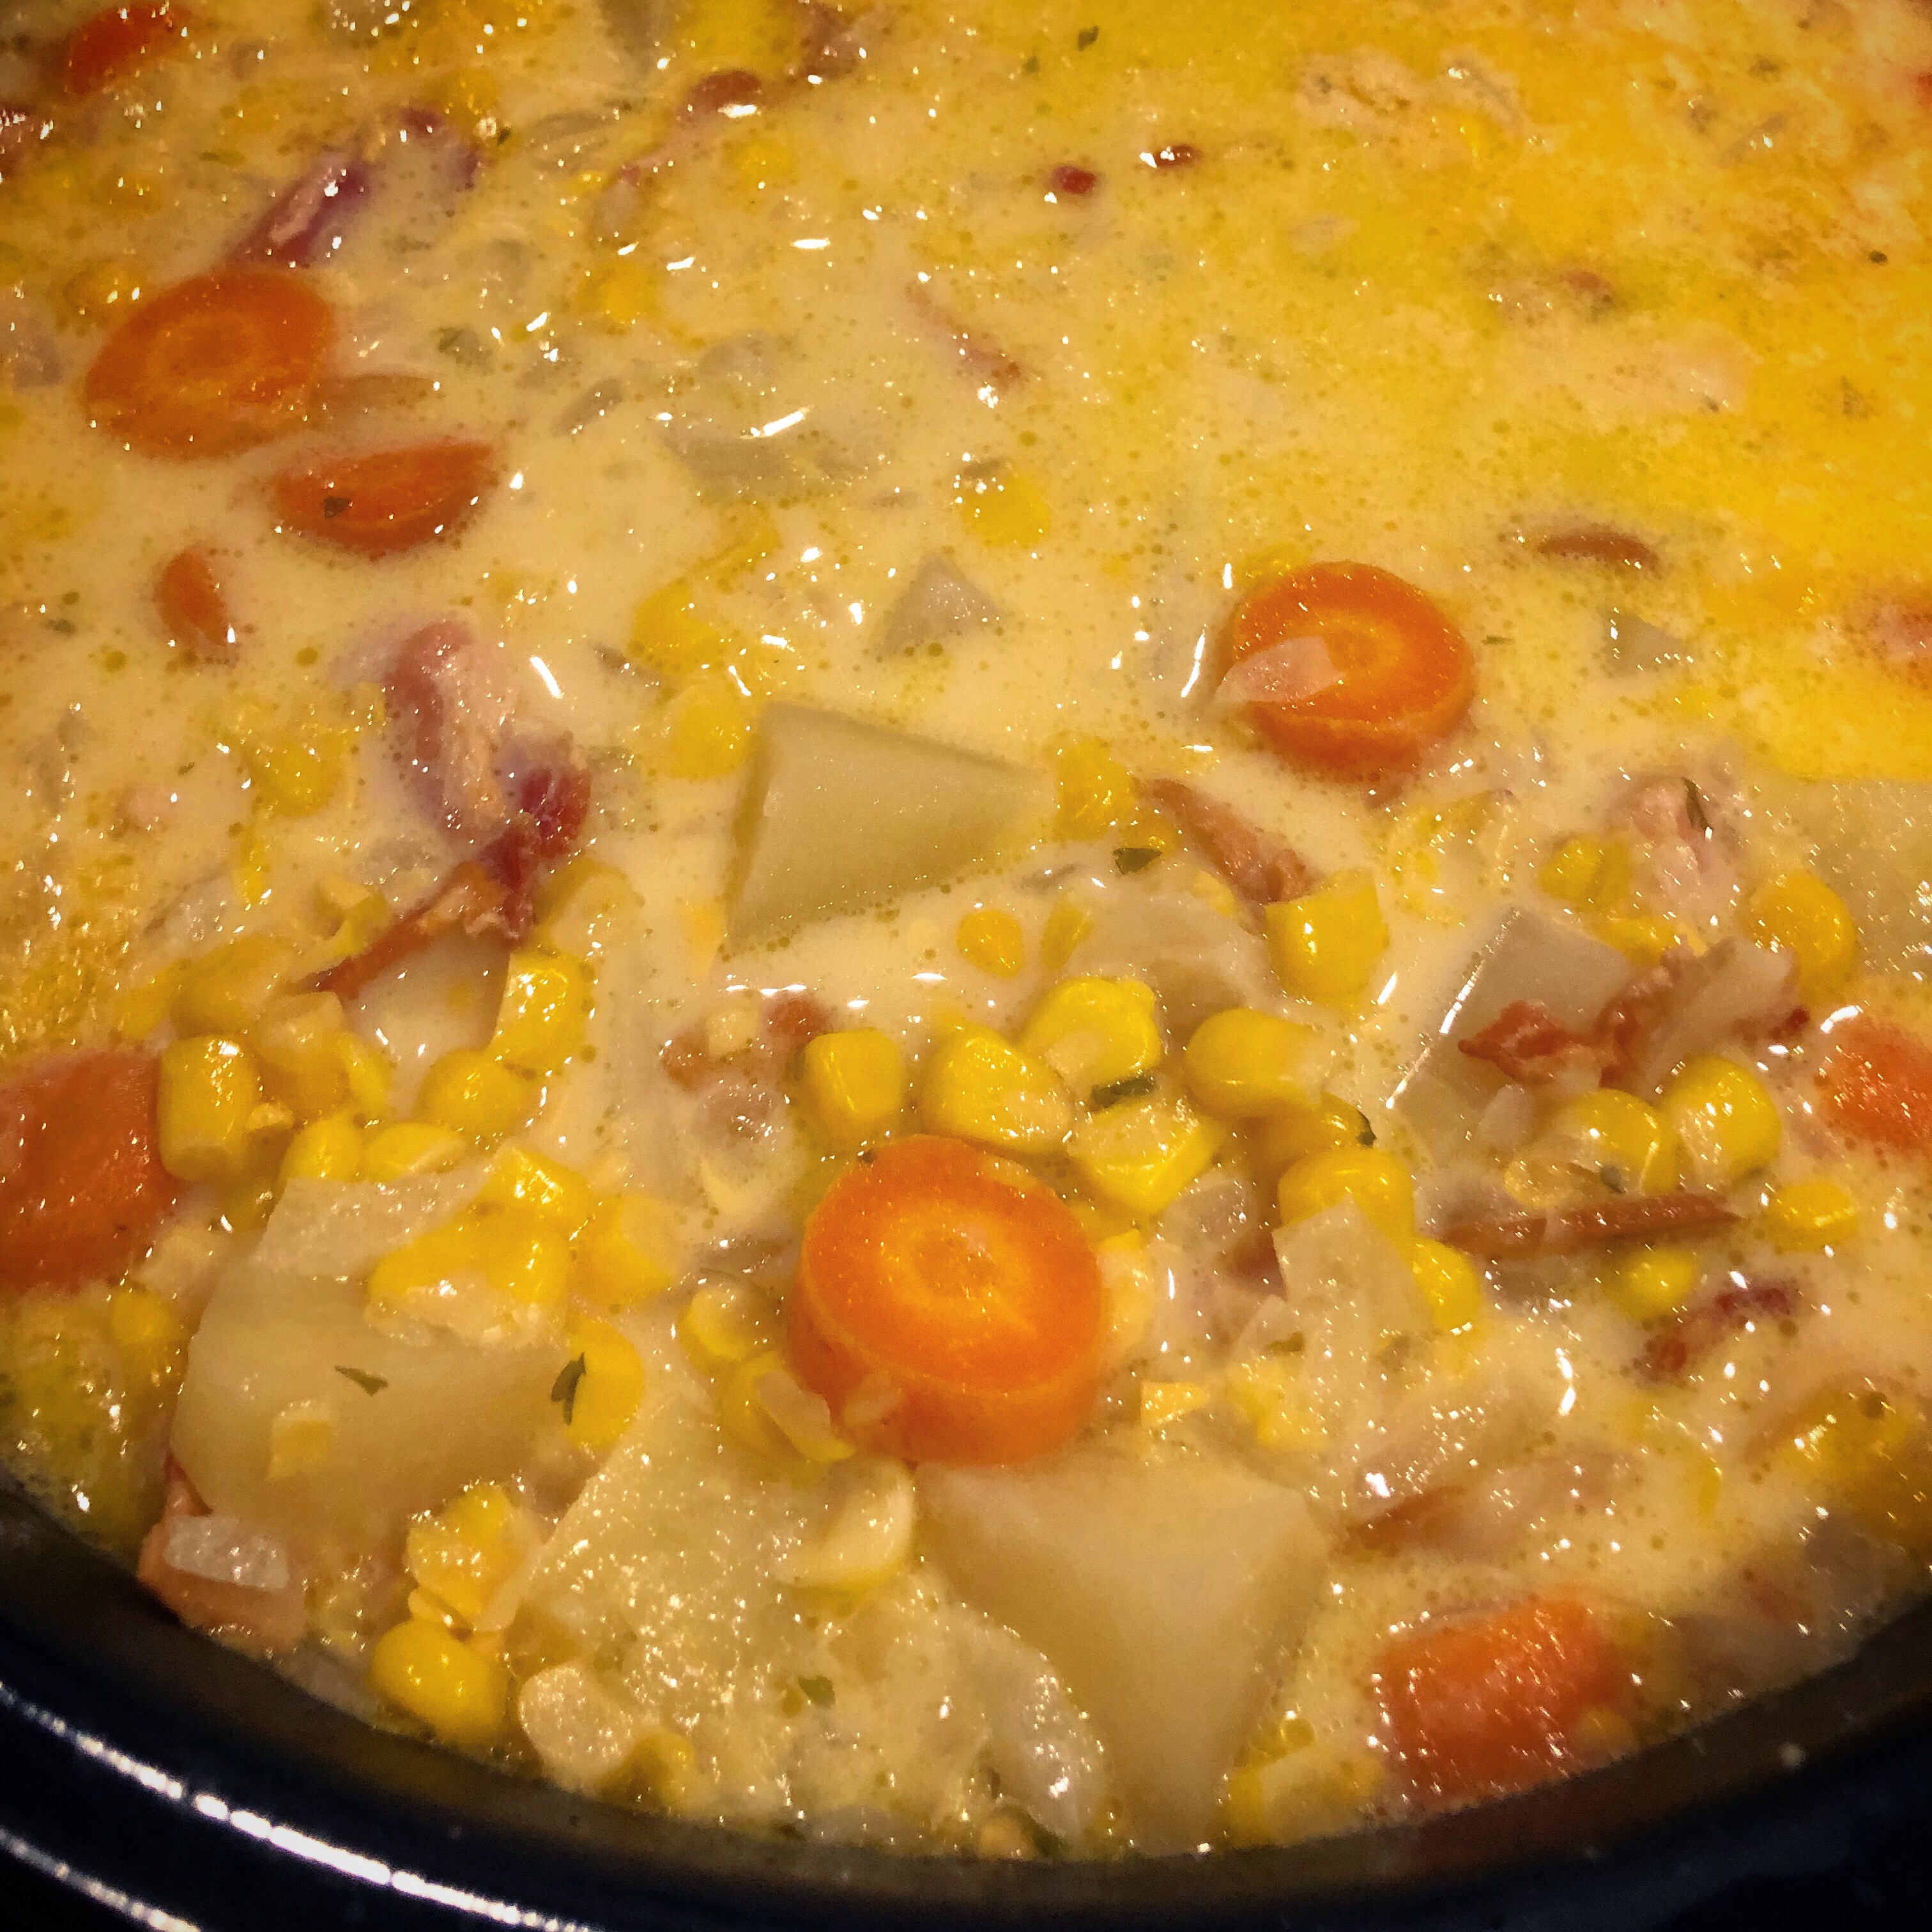
I shared this post for yummy Slow Cooker Bacon Corn Chowder a few years ago and just had to share it again in case you missed it! 😊
It is so tasty and such a great comfort food on a cold winter day – I hope you enjoy it as much as we do! 😋
This cold weather makes me want to have something warm and hearty for dinner! This Slow Cooker Bacon Corn Chowder is just the thing. You can find the recipe here at Spend with Pennies.
I love this recipe – you just add most of the ingredients (except the evaporated milk, corn starch, and butter) to your slow cooker in the morning and let it cook all day. Then 30 minutes before you’re ready to eat, you stir in the last 3 ingredients. That gives you time to bake up some cornbread or dinner rolls to serve alongside this yummy soup.
It not only looks good – it smells amazing!
I cooked my bacon the day before to save some time in the morning. It only took about 10-15 minutes to chop the carrots, onion, and potatoes and add everything to the slow cooker. Perfect if you have a busy day ahead!
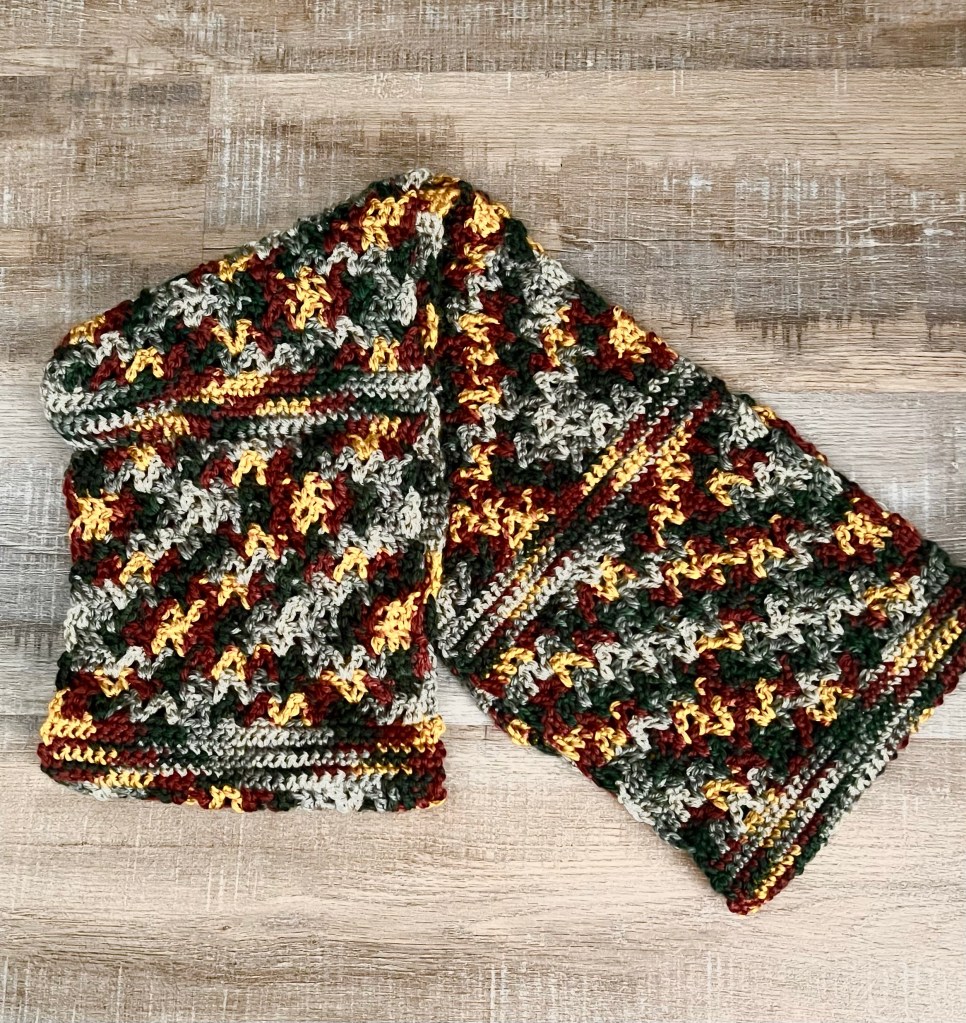
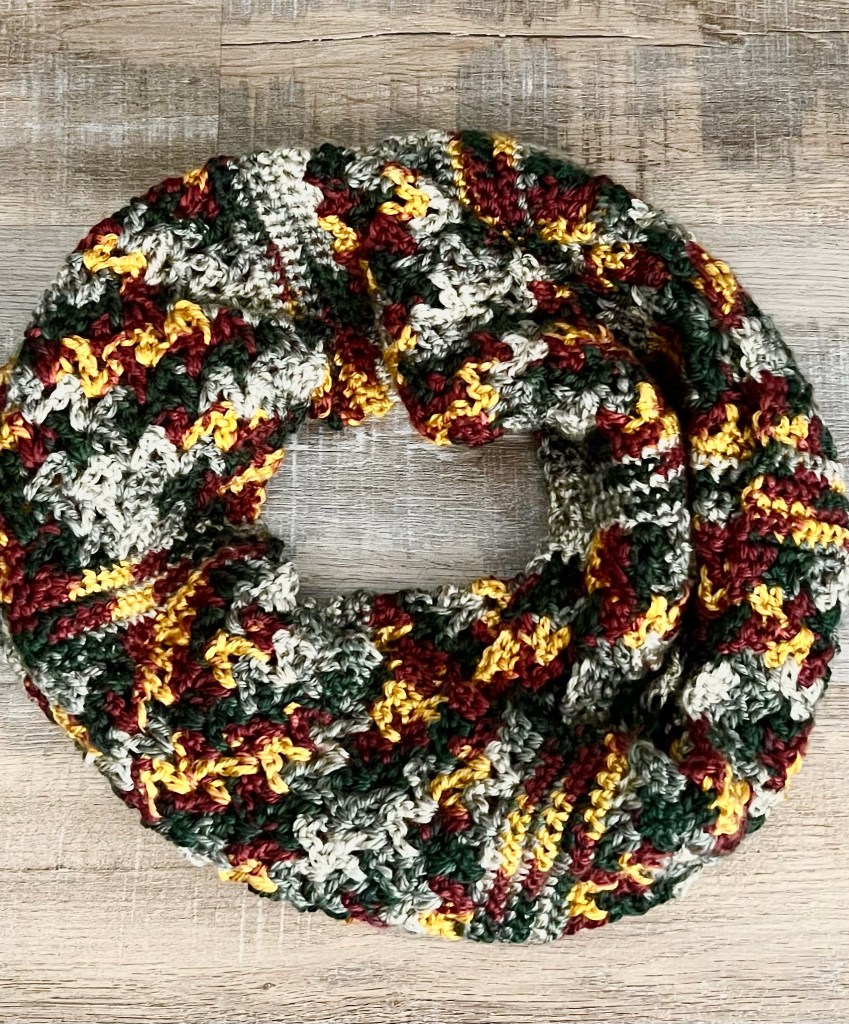
A couple of years ago I shared my pattern for the Crochet Lillian Infinity Scarf with you. The pattern was named after my Grandmother who taught me how to crochet. I thought it only fitting to create another scarf in memory of my other Grandmother who also crocheted and helped me to hone my skills. So today I’m sharing my pattern for the Crochet Irene Infinity Scarf in honor of Grandma Irene. ❤️
Disclosure: Some of the links on my site are affiliate links, meaning, at no additional cost to you, I will earn a small commission if you click through and make a purchase. As an Amazon Associate I earn from qualifying purchases.
I’ve included the pattern below and also a link to a free PDF if you’d like to easily print it. I used Yarn Bee Ombre Soft Secret yarn in Gold Dust and an H/5mm hook to stitch up my scarf. I think this color way has been discontinued – I picked it up during a Hobby Lobby yarn clearance – but you can make this scarf in any solid or variegated yarn. This yarn is listed as a 4 weight, but I think it’s on the thinner side of 4 weight. It is so soft and drapes beautifully!
This is a 4 weight yarn, but think it’s on the thinner side of 4 weight.
H/5mm hook
Stitches used in US terms:
Foundation Single Crochet – fsc
Single Crochet – sc
Double Crochet – dc
Chain – ch
Special Stitch – v-stitch (dc, ch 1, dc) in same stitch
Notes:
(1) ch 1 at beginning of rows does not count as a stitch.
(2) ch 2 at beginning of rows does count as a stitch.
Row 1: work 33 fsc. Turn. (33 stitches)
Rows 2-6: ch 1 (does not count as a stitch). sc in each stitch across. Turn. (33 stitches)
Row 7: ch 2 (counts as first stitch). Skip first stitch, dc in next 2 stitches. Skip next stitch, (dc, ch 1, dc) in next stitch (v-stitch made), *skip next 2 stitches, v-stitch in next stitch* Repeat from * to * across to last 4 stitches. Skip next stitch, dc in last 3 stitches. Turn. (9 v-stitches and 3 dc at beginning and end of row.)
Rows 8-18: ch 2 (counts as first stitch) Skip 1st stitch, dc in next 2 stitches. Work v-stitch in next ch 1 space. Repeat v-stitch in each ch space across to last 4 dc. Skip next dc, dc in last 3 stitches. Turn. (9 v-stitches and 3 dc at beginning and end of row)
Row 19: ch 1 (does not count as a stitch). sc in each stitch and ch 1 space across. Turn. (33 stitches)
Rows 20-24: ch 1 (does not count as a stitch). sc in each stitch across. Turn. (33 stitches)
Repeat Rows 7 through 24 until scarf measures about 60 inches, making sure to end with row 18.
I stitched 8 sections of single crochet and 8 sections of v-stitch on my scarf.
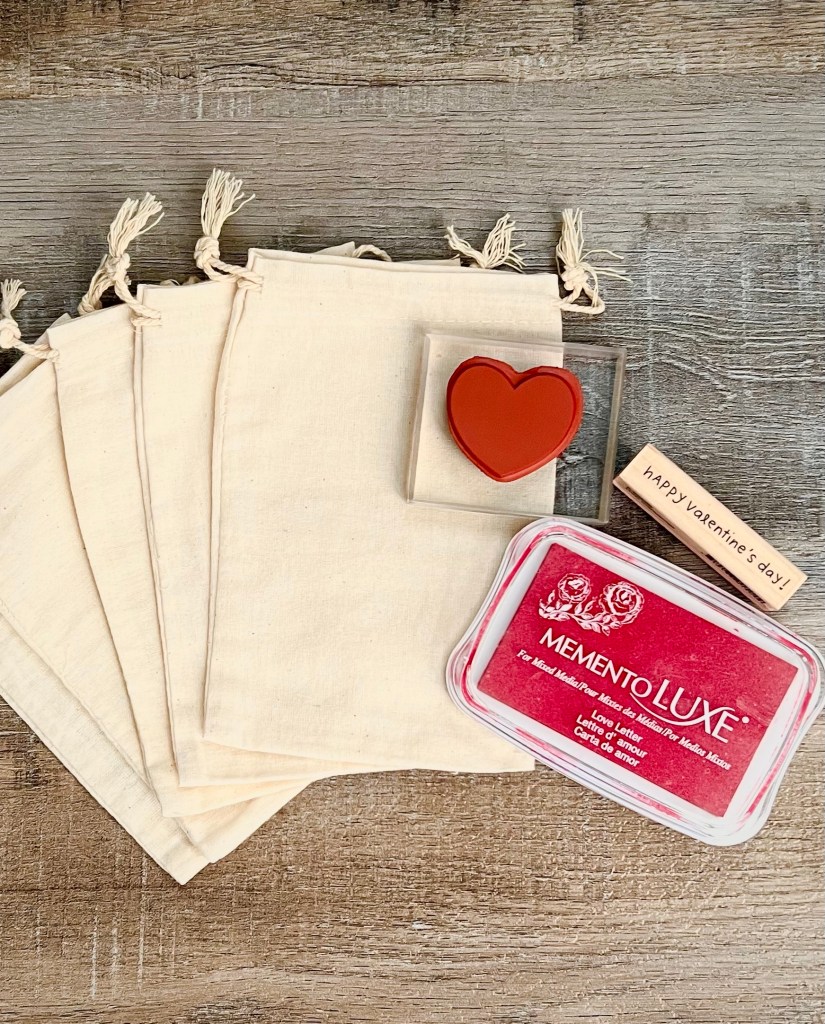
Treat bags are always fun to give on Valentine’s Day and you can stamp these little muslin bags in seconds! Fill them with your favorite Valentine chocolates for a sweet treat. ❤️
Disclosure: Some of the links on my site are affiliate links, meaning, at no additional cost to you, I will earn a small commission if you click through and make a purchase. As an Amazon Associate I earn from qualifying purchases.
I found my muslin bags here. They come in a pack of 50, measure about 4 by 6 inches, and close with a drawstring.
I slipped a piece of scrap card stock into the bags before I stamped them just to be sure the ink didn’t bleed through to the back of the bag.
Stamp the heart in the middle of the bag with the sentiment stamped underneath. Then fill the bags with sweet treats for all of your favorite Valentines! ❤️
These Hand-Stamped Muslin Valentine Treat Bags are super cute and super easy to make! They would be great for the kids to give to their classmates. 🥰
Disclosure: Some of the links on my site are affiliate links, meaning, at no additional cost to you, I will earn a small commission if you click through and make a purchase. As an Amazon Associate I earn from qualifying purchases.