Layered Spring Wreath

Hi friends,

Are you looking for a pretty Spring wreath to brighten up your front door? I have super easy Layered Spring Wreath to share with you. You will be surprised at how quickly and easily this wreath comes together with just a few supplies.

Disclosure: Some of the links on my site are affiliate links, meaning, at no additional cost to you, I will earn a small commission if you click through and make a purchase. As an Amazon Associate I earn from qualifying purchases.

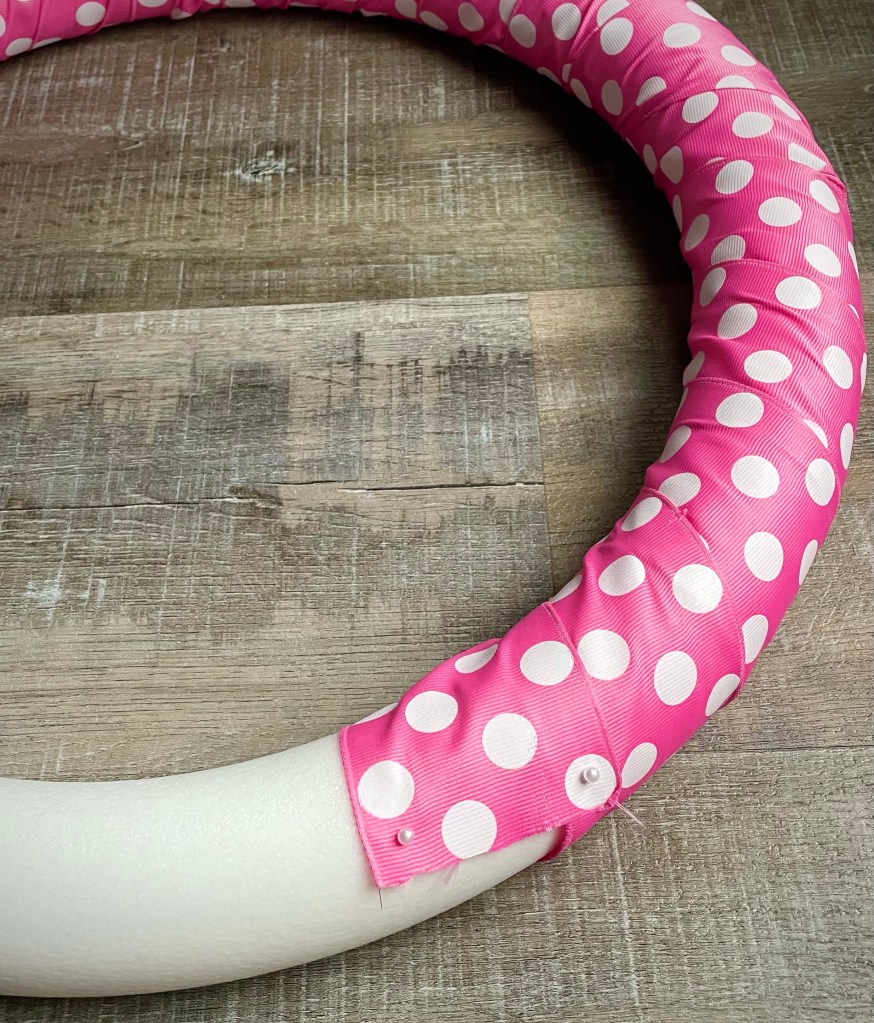
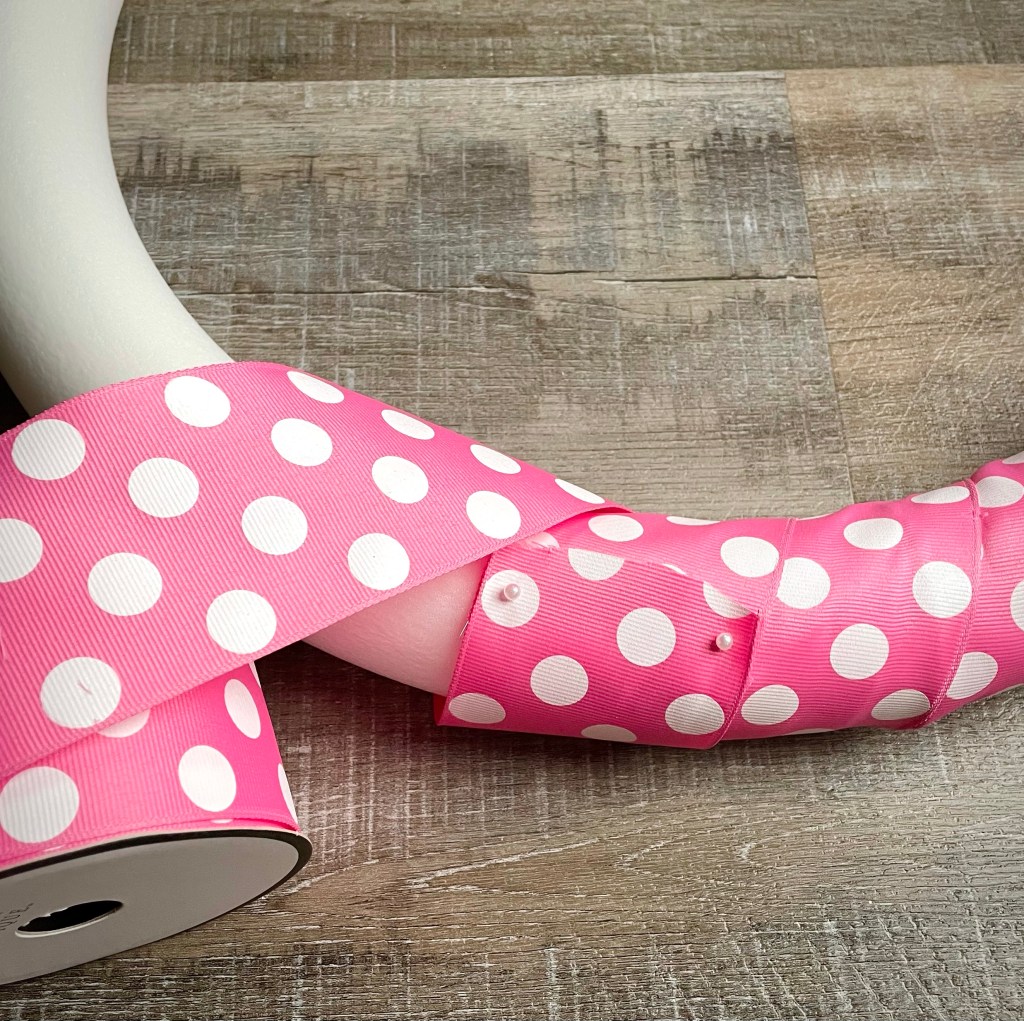
You’ll need 2 foam wreaths – I used 14-inch and 18-inch wreaths, 2 different ribbons (6 yards each) to wrap your wreaths – I used a 2.5-inch pink polka dot and a 1.5-inch blue stripe. You’ll also need 1.5-inch floral pins and any embellishments you want to add to your wreath. I layered some flowers I had in my craft stash, securing them with hot glue, and added a button to the center.

Starting with the larger wreath, pin the end of the wider ribbon to the form with a couple of the pins. Then simply wrap the ribbon tightly around the wreath, slightly overlapping the edges as you go. Secure the end of the ribbon with a couple more pins, making sure it is on the back of the wreath. I started the 2nd spool of ribbon by overlapping the end of the first ribbon and pinning them both together onto the back of the wreath.

Do the same with the smaller wreath and the other ribbon.

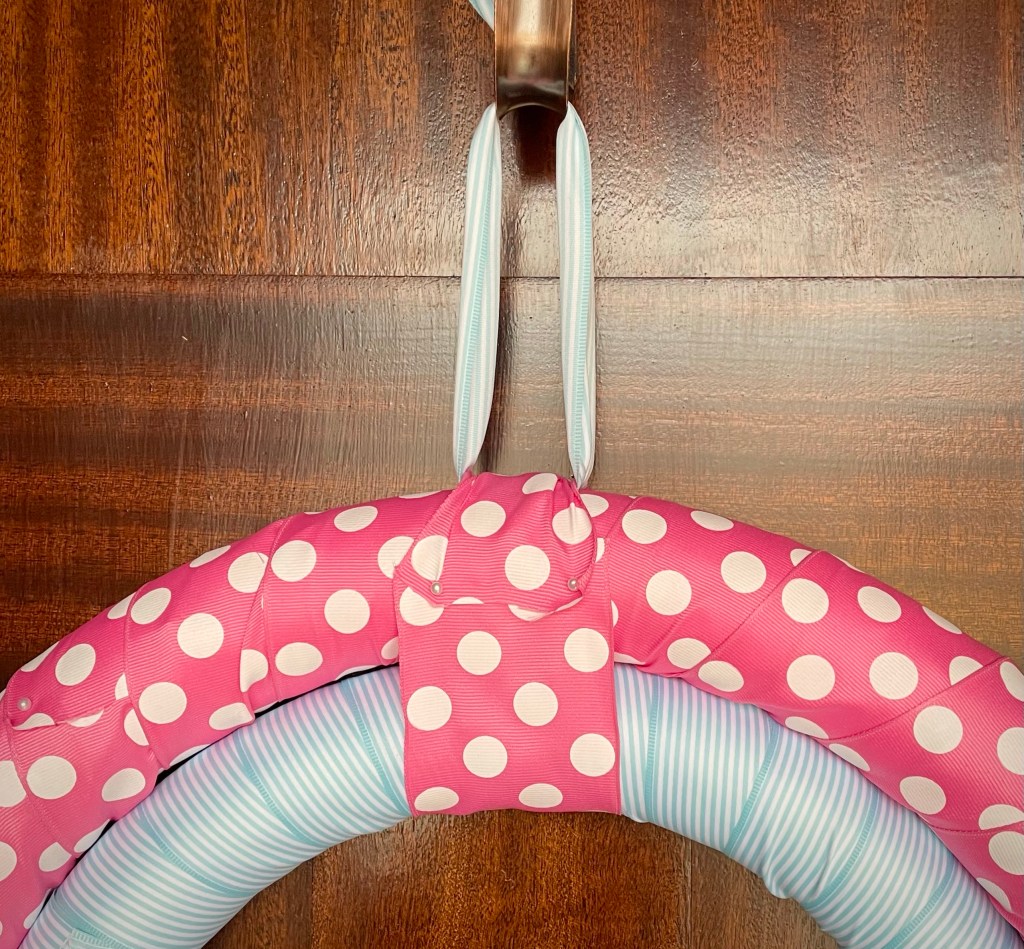
Set the smaller wreath on top of the larger wreath. Take a piece of the wider ribbon and wrap it tightly around both wreaths, securing it on the back with pins. Thread a piece of the thinner ribbon under the wider ribbon on top of the larger wreath and tie a knot to make a hanger for your wreath.

Add any embellishments you’d like (I used hot glue to attach my flowers) and your wreath is ready for the front door.

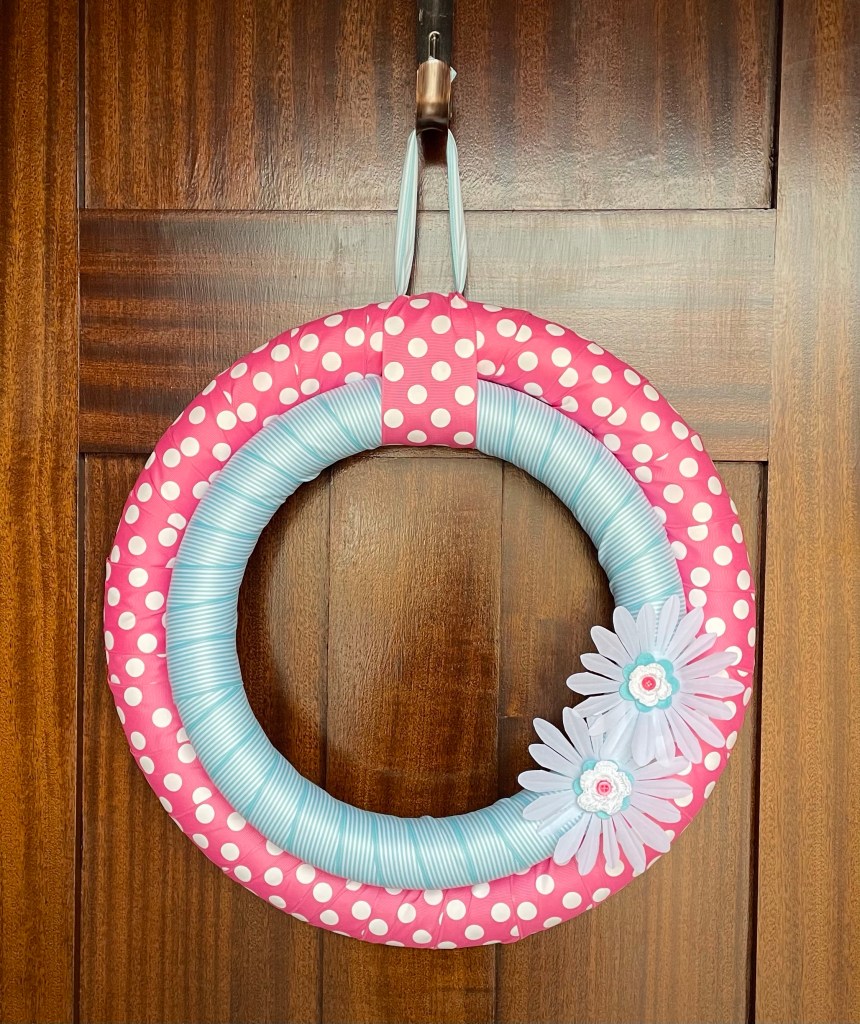
This is such a fun easy way to make a wreath – the color options are truly endless! What will you choose?

Happy Crafting!

Anita

Posted in Decor, Easter | Tagged | 2 Comments

Crochet Ridged Can Cozy

Hi friends,

I had this pretty Bright Green I Love This Cotton yarn in my stash and thought with St. Patrick’s Day coming up this would be the perfect time to use it. ☘️

I made this fun Crochet Ridged Can Cozy using an H/5mm hook. You’ll find the free pattern below along with a link to a free PDF if you’d like to easily print it.

Disclosure: Some of the links on my site are affiliate links, meaning, at no additional cost to you, I will earn a small commission if you click through and make a purchase. As an Amazon Associate I earn from qualifying purchases.

I have a little tip to share with you on joining when you are crocheting in the round. Instead of joining with a normal slip stitch, I used the Invisible Slip Stitch. You can find great instructions on how to do this here at A Plush Pineapple. The blog post at A Plush Pineapple has instructions on how to do a chainless starting stitch after using the Invisible Slip Stitch, but I didn’t make my cozy that way. I joined my rounds using the Invisible Slip Stitch and then just continued as normal chaining at the beginning of the round.

The left picture below shows the wrong side (inside of the cozy) of my work. The right picture shows the right side (outside of the cozy) with the seam in the center. Using the Invisible Slip Stitch gives you a straight seam when crocheting in the round, making it less obvious in your project.

Here’s the pattern and you’ll find the free PDF below…

Crochet Ridged Can Cozy

I Love This Cotton Yarn

H/5mm hook

Stitches used US terms:

Magic Ring

Chain – ch

Single Crochet – sc

Half Double Crochet – hdc

Double Crochet – dc

Front Post Double Crochet – fpdc

Back Loop Only – blo

Invisible Slip Stitch – iss

Link for Invisible Slip Stitch instructions

Note: chains at the beginning of rounds do not count as stitches. 

Make Magic Ring, ch 1.

Round 1: Work 9 hdc in ring. Join with iss to first hdc. Pull ring closed. (9 stitches)

Round 2: ch 1. 2 hdc in same stitch as iss and in each stitch around. Join with iss to first hdc. (18 stitches)

Round 3: ch 1. 2 hdc in same stitch as iss. *hdc in next stitch, 2 hdc in next stitch* Repeat from * to * around to last stitch. hdc in last stitch. Join with iss to first hdc. (27 stitches)

Round 4: ch 1. Working in blo, sc in same stitch as iss and in each stitch around. Join with iss to first sc. (27 stitches)

Rounds 5-7: ch 1. Working in both loops, sc in same stitch as iss and in each stitch around. Join with iss to first sc. (27 stitches) 

Round 8: ch 2. dc in same stitch as iss and in each stitch around. Join with iss to first dc. (27 stitches)

Rounds 9-14: ch 2. dc in same stitch as iss. fpdc in next stitch. *dc in next 3 stitches, fpdc in next stitch* Repeat from * to * around to last stitch. dc in last stitch. Join with iss to first dc. (27 stitches)

Round 15: ch 1. sc in same stitch as iss and in each stitch around. Join with iss to first sc. (27 stitches)

Round 16: ch 1. sc in blo in same stitch as iss and in each stitch around. Join with iss to first sc. (27 stitches)

Fasten off and weave in ends.

Here’s the link to the free PDF…

What color will you use to make your Crochet Ridged Can Cozy?

Happy Stitching!

Anita

Posted in Crochet | Tagged | 1 Comment

I’m So Lucky To Gnome You

Hi friends,

I am just a little obsessed with all the cute Gnome stamps at Unity Stamp Company! I used the Shenanigans Gnome set to create this fun St. Patrick’s Day card. I don’t usually do much crafting for St. Patrick’s Day, but he was just so cute that I couldn’t pass him up! ☘️☘️☘️

Disclosure: Some of the links on my site are affiliate links, meaning, at no additional cost to you, I will earn a small commission if you click through and make a purchase. As an Amazon Associate I earn from qualifying purchases.

He’s a great size and I love the way he made this simple card come together so quickly.

I stamped the gnome with Memento Tuxedo Black ink on white card stock and colored him with Copic markers. I die cut around the image with a scalloped rectangle frame and stamped the sentiment with the black ink. (These particular dies are no longer available, but here are some similar dies) I attached a piece of patterned paper to a white card, then attached the stamped image to the card with foam tape. To finish the card, I added 3 green gems (similar to these).

He’s super cute and a fun way to wish the lads and lassies a Happy St. Patrick’s Day!☘️

Happy Stamping!

Anita

Posted in Cards, Stamping | Tagged , | 1 Comment

Bunny Door Hanging

Hi friends,

I have a simple but very sweet Bunny Door Hanging to share with you today! She won’t take long to make and will add a little touch of Spring wherever you hang her.

Disclosure: Some of the links on my site are affiliate links, meaning, at no additional cost to you, I will earn a small commission if you click through and make a purchase. As an Amazon Associate I earn from qualifying purchases.

I picked up this cute unfinished wood bunny at Hobby Lobby in their seasonal department (she measures about 18-inches tall). Then I popped over to the fabric department and got a yard of pink cotton gingham. You won’t use anywhere close to a yard of fabric, but since it was on sale I went ahead and got the whole yard – you never know when you might need pink gingham! 😉

First, pop off the bunny tail and set it aside to glue back on later. Don’t worry if there is a blob of glue that won’t come off. The bump will be covered up when you glue the tail back on. Flip the bunny over and trace the bunny onto the back of the fabric. I used a pencil to trace my bunny. Be careful to keep your fabric from slipping as you are tracing. Then cut out the bunny shape.

Spread a thin layer of Mod Podge over the front of the wood bunny shape. I used a foam brush to apply the Mod Podge. Carefully smooth your cut fabric onto the bunny shape, smoothing out any air bubbles or wrinkles. Let it dry. You may have to trim any excess fabric around the bunny shape a little, then add a thin layer of Mod Podge over the top of the fabric.

Reattach the pom pom tail using your hot glue gun. I used the Re-Fabbed method to make my bow and hot glued it to my bunny. I tied a small piece of white ribbon to a pink button and attached it to the center of the bow with mini glue dots. You can also use a dot of hot glue to attach the button.

And here she is!

She looks sweet on my front door.

And here she is propped up on my mantel next to my DIY Farmhouse Candlesticks. I’m not sure where she will end up when I get all my Easter decorations out! 🐰

Not a fan of pink? She would be so cute in yellow, green, or blue too!

Happy Easter Crafting! 🐰

Anita

Posted in Decor, Easter | Tagged | 4 Comments

Clothespin Carrots

Hi friends,

Is it too soon to be thinking of Easter? It’s April 4th this year, so I’m thinking it’s time to start Easter crafting before time gets away from us. 😉

This is a super fun and inexpensive way to make some cute carrots to put with your bunnies and baskets as you decorate. 🥕🐰

Disclosure: Some of the links on my site are affiliate links, meaning, at no additional cost to you, I will earn a small commission if you click through and make a purchase. As an Amazon Associate I earn from qualifying purchases.

All you need are some spring-type clothespins, orange paint, (this is a great set of paints if you need to resupply your craft room) and green yarn. You’ll also need a hot glue gun to attach the yarn. I used E6000 clear adhesive to glue my clothespins together, but hot glue would work, too.

The first thing you’ll do is to take the clothespins apart like in the picture below. If you sort of twist the 2 wood pieces, it comes apart easily.

Then paint the clothespins with orange chalky finish or acrylic paint – both kinds of paint will work. I had chalky finish paint on hand so that’s what I used. I painted 2 coats, letting it dry between coats. I didn’t paint the flat sides of the clothespins since they are glued together.

After the paint is dry, glue the flat sides together using hot glue or E6000 clear adhesive.

Cut 4 pieces of yarn about 5-inches long. Fold them in half and hot glue them to the top of the carrot. Then glue the end of another long piece of yarn to the carrot about where the first notch is and begin wrapping the top of the carrot, using a little hot glue to secure it along the way. Wrap all the way to the top where you glued on the 4 pieces of yarn and secure the end with a dot of hot glue. Your carrots will look like the picture below on the right.

To finish the carrots, separate the strands of the yarn at the top. Just untwist each piece of yarn and pull the individual strands apart. This will give the carrots the cute curly tops.

So adorable! They are so cute with my Rustic Farmhouse Easter Bunny. I found the sweet little basket in the Easter section at Hobby Lobby. It’s a cute way to display a basketful of these fun carrots.

Happy Crafting! 🥕🥕🥕

Anita

Posted in Decor, Easter, Uncategorized | Tagged , | 4 Comments

Happy Birthday Gnome

Hi friends,

Remember in this post when I said I had more Gnome stamps in my collection? This Happy Birthday Gnome set from Unity Stamps is one of them.

I love his cute party hat and the single balloon he is holding. 🎈Such a fun way to wish Happy Birthday!

Disclosure: Some of the links on my site are affiliate links, meaning, at no additional cost to you, I will earn a small commission if you click through and make a purchase. As an Amazon Associate I earn from qualifying purchases.

I stamped the Gnome with Memento Tuxedo Black ink and colored him with Copic markers. I trimmed the image and layered it to turquoise card stock. I stamped the “Happy Birthday” with light turquoise ink and trimmed the words close.

To make the card, I attached a piece of red striped patterned paper to a white card. Then I attached the stamped image over the striped paper. I attached “Happy Birthday” with foam tape and stamped the little cupcake with light turquoise ink in the bottom right corner.

You can make this cute little guy in any color combination. He’s sure to brighten someone’s special day!

Happy Stamping!

Anita

Posted in Uncategorized | 2 Comments

Crochet Spring Hand Sanitizer Holder

Hi friends,

I am so ready for Spring! Even though it still feels very much like Winter in a lot of places, we can still dream of flowers and bright colors!

That’s what I was dreaming of when I designed this cute Crochet Spring Hand Sanitizer Holder. We are still keeping the hand sanitizer close, so a cute little holder makes it easy! I used I Love This Cotton yarn and an H/5mm hook to stitch up my sanitizer holders. A 1-ounce bottle of hand sanitizer fits in the holder perfectly.

Disclosure: Some of the links on my site are affiliate links, meaning, at no additional cost to you, I will earn a small commission if you click through and make a purchase. As an Amazon Associate I earn from qualifying purchases.

You can find this super quick and easy pattern below. I’ve also included a link to a free PDF if you’d like to print it. 😊

Crochet Spring Hand Sanitizer Holder

Materials:

I Love This Cotton yarn – 2 colors (I used White and Aqua)

H/5mm hook

1/2 inch button and small button for center of flower

Stitches used in US terms:

Chain – ch

Slip Stitch – ss

Single Crochet- sc

Magic Ring

Half Double Crochet – hdc

Double Crochet – dc

Chain 12 with main color. Join with ss to first ch to form a ring.

Round 1: ch 1. sc in same stitch as ss and in each ch around. Join with ss to first sc. (12 stitches)

Round 2: ch 1. sc in same stitch as ss. *2 sc in next stitch, sc in next stitch.* Repeat from * to * 4 times. 2 sc in last stitch. Join with ss to first sc. (18 stitches)

Rounds 3-12: ch 1. sc in same stitch as ss and in each stitch around. Join with ss to first sc. (18 stitches)

Handle:

Ch 20. sc in 6th ch from hook. sc in next 14 ch. Join with ss to top of Round 12.

Fasten off and weave in ends.

Sew 1/2 inch button to opposite side of holder.

Flower:

Round 1: Using accent color, make magic ring, ch 1. Work 5 sc in magic ring. Join with ss to first sc. Pull ring tight. (6 stitches)

Round 2: (hdc, dc, hdc, ss) in same stitch as ss. (ss, hdc, dc, hdc, ss) in each of next 4 stitches. Join with ss to bottom of first petal. (5 petals)

Fasten off and weave in ends.

Place small button in center of flower and sew onto Hand Sanitizer Holder. 

Insert hand sanitizer and button handle around purse or backpack strap. 

Here’s the link to the free PDF…

These would be cute for a little extra something in an Easter basket or for Mother’s Day. What colors will you make yours?

Happy Stitching!

Anita

Posted in Crochet | Tagged | 6 Comments

Sending Valentine Love

Hi friends,

Happy Valentine’s Day! ❤️ I’m sending you all some love today…Thank you for taking time to look at my little corner of the blogging world. 🙂

Disclosure: Some of the links on my site are affiliate links, meaning, at no additional cost to you, I will earn a small commission if you click through and make a purchase. As an Amazon Associate I earn from qualifying purchases.

Here are the details for the card above if you are interested…

The image is from the Easy to Love stamp set by Unity Stamp Company. I stamped it with Memento Tuxedo Black ink on white card stock and colored it with Copic markers. I attached a panel of red card stock to a white card and added strips of 2 different patterned papers. Then I added the bunny image to the card with foam tape. It’s hard to see, but I added Diamond Glaze to the 3 hearts to add a little glossy accent.

Happy ❤️ Day!

Anita

Posted in Cards, Stamping, Valentine | Tagged , | Leave a comment

Valentine Treat Mix

Hi friends,

This is a super easy, last minute treat to mix up for your Valentines. ❤️ It will take just a couple of minutes and it has raisins and cashews so that makes it healthy, right? 😉

Disclosure: Some of the links on my site are affiliate links, meaning, at no additional cost to you, I will earn a small commission if you click through and make a purchase. As an Amazon Associate I earn from qualifying purchases.

You’ll need cashews (I used halves and pieces in sea salt), raisins, white chocolate chips, and Valentine m&m’s. Not a fan of cashews? Make this tasty treat with your favorite nuts – I would recommend using salted nuts to get the salty/sweet taste that is so yummy.

Then just mix them all together in a big bowl and your Valentine Treat Mix is ready to eat!

I used a 16 ounce can of cashews, an 11.5 ounce bag of white chocolate chips, a 10 ounce bag of m&m’s, and just added raisins until I thought I had enough – maybe 1.5 cups.

You can fill up a clear treat bag, tie it with some red and white twine, and gift it to your family and friends for a sweet Valentine treat.

But…you may need to make a double batch so you’ll have plenty to keep at home, too! I have this fun extra large mason jar that I like to store my Valentine Treat Mix in – it looks so cute on my counter. 😍

Happy ❤️ Day!

Anita

Posted in Recipes, Valentine | Tagged | Leave a comment

Crochet Textured Square Spa Cloth

Hi friends,

I’ve got a quick and easy Crochet Textured Square Spa Cloth pattern to share with you that you can stitch up in no time at all! I crocheted them using 100% cotton with an H/5mm hook.

The yarn I used is I Love This Cotton from Hobby Lobby, The colors I chose were White, Aqua, and Antique Cream.

Disclosure: Some of the links on my site are affiliate links, meaning, at no additional cost to you, I will earn a small commission if you click through and make a purchase. As an Amazon Associate I earn from qualifying purchases.

Here’s the pattern and you’ll find a free PDF below for easy printing if you’d like.

Crochet Textured Square Spa Cloth

I Love This Cotton yarn

H/5mm hook

Stitches used US terms:

Foundation Double Crochet – fdc

Front Post Double Crochet – fpdc

Back Post Double Crochet – bpdc

Chain – ch

Single Crochet – sc

Slip Stitch – ss

Back Loop Only – blo

Row 1: work 15 fdc. Turn. (15 stitches)

Row 2: Ch 2 (counts as first stitch). Skip first stitch, dc in next 2 stitches. *fpdc in next stitch, dc in next 3 stitches* Repeat from * to * 2 times. Turn. (15 stitches)

Row 3: Ch 2 (counts as first stitch). Skip first stitch, dc in next 2 stitches. *bpdc in next stitch, dc in next 3 stitches* Repeat from * to * 2 times. Turn. (15 stitches)

Rows 4-9: Repeat Rows 2 and 3 three times. Turn. (15 stitches)

Begin working in Rounds.

Round 1: Ch 1. Sc evenly around, working 3 sc in each corner. Join with ss to first sc.

Round 2: Ch 1. Sc in each stitch around, working 3 sc in each corner. Join with ss to first sc.

Rounds 3-6: Ch 1. Sc in blo in each stitch around, working 3 sc in each corner. Join with ss to first sc.

Fasten off and weave in ends.

Finished Spa Cloth measures about 7-inches square.

Here’s the free PDF…

These would make a great gift along with some pretty soaps, lotions, and bath bombs. Think birthdays, Mother’s Day, or the new mom who needs a little pampering. 🙂

Happy Stitching!

Anita

Posted in Crochet, Gifts, Uncategorized | Tagged , | 10 Comments