Incredible Baked Oatmeal

Hi friends,

This Incredible Baked Oatmeal is such a yummy recipe! It is perfect for just about any time of the day – breakfast, lunch, dinner, or snack time! 😋

It’s very easy to make. You can find the recipe here at Passionate Penny Pincher. It’s part of their Freezer Menu Recipe Plan which includes 60 (yes, 60!) recipes that are freezer friendly along with 12 yummy dessert recipes. It also includes a grocery list for each week so you’ll have everything you need to make all 5 meals for that week. You can find all the info here in their shop.

Disclosure: Some of the links on my site are affiliate links, meaning, at no additional cost to you, I will earn a small commission if you click through and make a purchase. As an Amazon Associate I earn from qualifying purchases.

Passionate Penny Pincher is way more than a menu planning site. Lots of info on saving money, finding great deals, crafting, and much more. I’m not receiving any compensation for this – I just wanted to share this great site with you. 😊

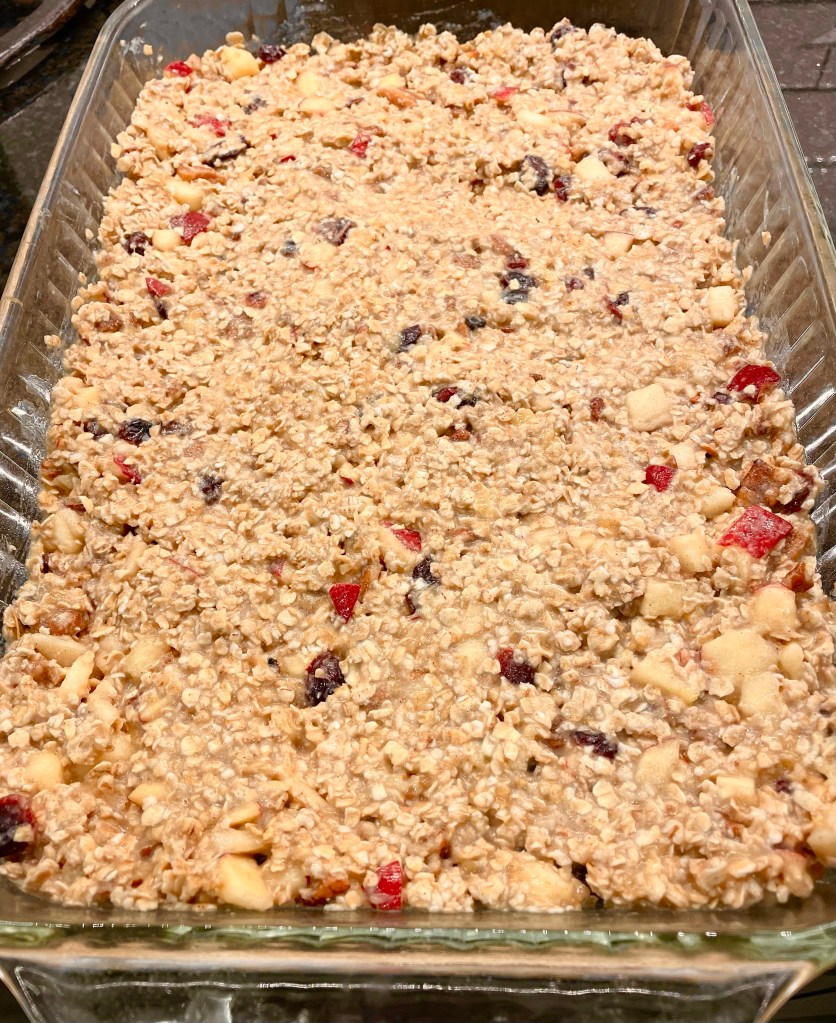
I made the Incredible Baked Oatmeal following the recipe except I put it in a 9×13 pan (instead of an 8×8 pan) and baked it for about 25 minutes. Here it is ready for the oven.

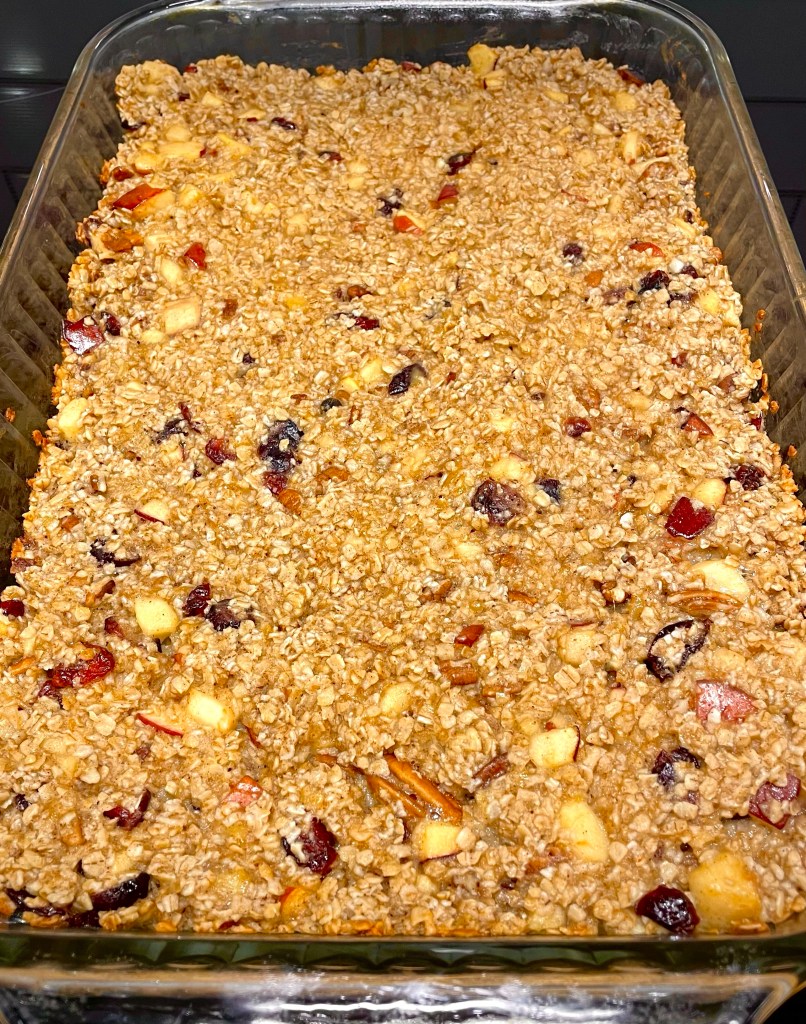
Fresh from the oven. It smells amazing!!

It’s so good while it is still warm. 😋 You’ll want to store it covered in the fridge. But I would pop it in the microwave for a bit – maybe 20 seconds or so – to warm it up before eating.

This is such a versatile recipe. You can use applesauce or canola oil instead of coconut oil. Add raisins or blueberries or peaches. Leave out the craisins or pecans. I even read where someone left out the apples and craisins, but added peanut butter and chocolate chips! There are so many options!

Since it’s part of the Freezer Menu Plan, you can mix it together (don’t bake it yet), wrap it up, and put it in the freezer to save for a lazy Saturday morning. Just thaw it overnight the night before and bake as directed.

Oh, and it’s really good with a little maple syrup drizzled over it!! 😋

Happy Eating!

Anita

Posted in Recipes | Tagged | Leave a comment

Pink Gingham Bunny

Hi friends,

Have you picked up any of these cute unfinished wood bunnies from the craft stores this Spring? I found mine in the seasonal section of Hobby Lobby. She is so fun to dress up for Easter!

Disclosure: Some of the links on my site are affiliate links, meaning, at no additional cost to you, I will earn a small commission if you click through and make a purchase. As an Amazon Associate I earn from qualifying purchases.

I had lots of pink gingham fabric left over from my Bunny Door Hanging that was perfect for this little bunny. 🐰

First I traced the bunny on the back of the fabric using a pencil. Decide which way you want your bunny to face, then turn her over before you trace her onto the fabric. It doesn’t matter which way she’s looking.

Then carefully cut out the bunny shape and set it aside.

I painted the back and sides of my bunny with white acrylic paint, but you could also paint her pink to match the fabric. I used a foam brush to apply 2 coats of paint, letting it dry between coats. I also decided to paint one coat of white on the front of the bunny just in case my fabric didn’t line up perfectly.

Then I applied a thin coat of Mod Podge to the front of my bunny with a foam brush and carefully placed my cut fabric onto the wood, smoothing out any wrinkles and bubbles.

After the Mod Podge dried, I attached a bow using my hot glue gun (I used the super easy Re-fabbed way to make my bow) and added a pink button tied with natural twine to the center. I finished her off with a white pom pom for her tail.

Isn’t she sweet?!?!?

She’s perfect to add to your Easter decor, but I can also see her in a sweet little girl’s room. Of course you don’t have to make her pink or even gingham! There are tons of fabrics out there to choose from – find the perfect one for you. 😊

Happy Crafting!

Anita

Posted in Decor, Easter, Uncategorized | Tagged | 1 Comment

Happy Easter Gnome Cards

Hi friends,

Did you see my cute Mini Easter Gnome Canvases in my last post? Well…I took those same little guys and made them into Easter cards!

The Sweet Easter Gnome stamp set is from Unity Stamp Company. It is one of several Gnome sets they have that are just adorable!

Disclosure: Some of the links on my site are affiliate links, meaning, at no additional cost to you, I will earn a small commission if you click through and make a purchase. As an Amazon Associate I earn from qualifying purchases.

To make the cards, I stamped the gnome images with Memento Tuxedo Black ink on white card stock, colored them with Copic markers, and cut the images out. I stamped the sentiments on white card stock and punched them out with scalloped circle (this is a similar punch) and oval punches. (The oval punch I used is no longer available, but this is a great set of scalloped oval dies.) Then I layered the scalloped circle to a slightly larger circle punched from matching card stock.

I layered patterned paper to card stock, added a strip of a different patterned paper, and then attached it to a white card for the top card. For the bottom card, I embossed a piece of green card stock with a Swiss Dot embossing folder, added a strip of patterned paper and a ribbon, then attached it to a white card. I added the Gnomes and sentiments to the cards with foam tape. I added 3 pink sequins to the bottom card.

I love these little guys and can’t wait to see if Unity Stamp Company will add more!

Happy Stamping!

Anita

Posted in Cards, Easter, Stamping | Tagged , | Leave a comment

Mini Easter Gnome Canvas

Hi friends,

I was in Target the other day and looking at the endcaps where they put all their clearance items. They had 4-packs of 4×4-inch stretched canvases marked down to $3.49, so I picked up a couple packs. I didn’t really have an idea in mind, but knew eventually I’d come up with something. 😉

Disclosure: Some of the links on my site are affiliate links, meaning, at no additional cost to you, I will earn a small commission if you click through and make a purchase. As an Amazon Associate I earn from qualifying purchases.

You probably know by now that I love all the cute Gnome stamps from Unity Stamp Company and their Sweet Easter Gnome stamp set did not disappoint! I mean, look at those bunny slippers!!! 🐰 I decided to stamp them up and use them on my canvases for a cute little addition to my Easter decor.

I stamped the gnome images with Memento Tuxedo Black ink on white card stock, colored them with Copic markers, and cut the images out. I stamped the sentiments on white card stock and punched them out with scalloped circle (this is a similar punch) and oval punches. (The oval punch I used is no longer available, but this is a great set of scalloped oval dies.) Then I layered the sentiments to a slightly larger circle and oval (here is a set of oval dies) punched from matching card stock.

I trimmed pieces of patterned paper to 4×4-inches. Using a foam brush, I applied a thin layer of Mod Podge to the canvas and then attached the patterned paper. I attached my Gnomes and sentiments using foam tape.

They turned out so cute! 🙂

They are the perfect size for tiered trays or anywhere you need to add a little cuteness.

You can find all the info on my Mini Easter Rolling Pins in this post and those cute Clothespin Carrots here.

Happy Crafting! 🐰🥕

Anita

Posted in Decor, Easter, Stamping, Uncategorized | Tagged | 3 Comments

Happy St. Patrick’s Day! ☘️

Hi friends,

Happy St. Patrick’s Day to all you Lads and Lassies! ☘️☘️☘️

We all have a wee bit o’ Irish in us today! ☘️🎩☘️😉

Disclosure: Some of the links on my site are affiliate links, meaning, at no additional cost to you, I will earn a small commission if you click through and make a purchase. As an Amazon Associate I earn from qualifying purchases.

(You can find the info on this card in this post.)

May the luck of the Irish be with you today and always! ☘️☘️💚

Anita

Posted in Cards, Stamping, Uncategorized | Tagged , | Leave a comment

Mini Easter Rolling Pins

Hi friends,

Have you seen these cute Mini Rolling Pins? They are so fun to add to tiered trays, coffee bars, and other kitchen decor.

I ordered my unfinished wood mini rolling pins from Woodpeckers on Amazon. They are 7-inches long and I got the pack of 12 so I can make some for different seasons. The quality of these is wonderful!

Disclosure: Some of the links on my site are affiliate links, meaning, at no additional cost to you, I will earn a small commission if you click through and make a purchase. As an Amazon Associate I earn from qualifying purchases.

I pulled out some paint and scrapbook paper to embellish my mini rolling pins. You can use either acrylic (this is a great set of acrylic paints if you need to resupply your craft room) or chalk paint on your rolling pins. You can find small bottles of chalky finish paint at most craft stores.

I painted the handles of the rolling pins with 2 coats of paint, letting it dry between coats. I trimmed my scrapbook paper to 3-1/4 inches by 3-7/8 inches. You’ll want your paper to overlap about 1/4-inch when wrapped around the rolling pin. I used this great stamp set from Unity Stamp Company called Gotta Love Sentiments to stamp “Happy Easter” and “Celebrate” before I attached the paper to my rolling pins using Tombow Dot Adhesive – be sure to cover the entire edge with adhesive where the paper overlaps. I tied some ribbon around the rolling pins and here’s how they turned out. 🙂

These mini rolling pins are just so fun! You can decorate them any way your imagination takes you. 😊

So fun with my other Easter decor! 🐰 You can see how I made the cute Clothespin Carrots in this post.🥕

Happy Crafting!

Anita

Posted in Decor, Easter | Tagged | 7 Comments

Treat-Size Crochet Easter Basket

Hi friends,

Do you have any little bunnies that you would like to give a sweet Easter treat? This Treat-Size Crochet Easter Basket is just perfect for giving some chocolate or jelly beans. It measures about 2.75 inches tall before adding the handle and will hold about 18-20 Hershey’s Kisses or a handful of Jelly Beans in a small cellophane treat bag.

Disclosure: Some of the links on my site are affiliate links, meaning, at no additional cost to you, I will earn a small commission if you click through and make a purchase. As an Amazon Associate I earn from qualifying purchases.

The quick and easy pattern is below and I’ve also included a link to a free PDF so you can easily print it if you’d like.

Treat-Size Crochet Easter Basket

Finished basket measures about 2.75 inches tall before adding the handle.

Worsted Weight Yarn – I used I Love This Yarn in Light Taupe

G/4.5mm hook

Stitches used US terms:

Magic Ring

Chain – ch

Single Crochet – sc

Half Double Crochet – hdc

Double Crochet – dc

Front Post Double Crochet – fpdc

Back Loop Only – blo

Slip Stitch – ss

Note: chains at the beginning of rounds do not count as stitches.

Make Magic Ring, ch 1.

Round 1: Work 9 hdc in ring. Join with ss to first hdc. Pull ring closed. (9 stitches)

Round 2: ch 1. 2 hdc in same stitch as ss and in each stitch around. Join with ss to first hdc. (18 stitches)

Round 3: ch 1. 2 hdc in same stitch as ss. *hdc in next stitch, 2 hdc in next stitch* Repeat from * to * around to last stitch. hdc in last stitch. Join with ss to first hdc. (27 stitches)

Round 4: ch 1. Working in blo, sc in same stitch as ss and in each stitch around. Join with ss to first sc. (27 stitches)

Rounds 5-6: ch 1. Working in both loops, sc in same stitch as ss and in each stitch around. Join with ss to first sc. (27 stitches)

Round 7: ch 2. dc in same stitch as ss and in each stitch around. Join with ss to first dc. (27 stitches)

Rounds 8-10: ch 2. dc in same stitch as ss. fpdc in next stitch. *dc in next stitch, fpdc in next stitch* Repeat from * to * around to last stitch. dc in last stitch. Join with ss to first dc. (27 stitches)

Round 11: ch 1. (sc, dc, sc) in same stitch as ss. *skip next stitch, (sc, dc, sc) in next stitch* Repeat from * to * around. Join with ss to first sc. (14 shells)

Do not fasten off. 

To make the handle:

Ch 25. sc in second ch from hook and each ch across. ss to basket edge. Fasten off. (24 stitches)

Sew the end of the handle to the opposite side of the basket with a short length of yarn.

Weave in ends.

Here’s the link to the free PDF…

I added cute “Happy Easter” tags tied with colored baker’s twine to my Treat-Size Crochet Easter Baskets. The stamps and tag die are from Taylored Expressions. There is a set of 3 Tag Team dies so you can cut 3 tags at a time. The Tag Team Easter stamp set includes several sentiments and images including the adorable tiny bunny peep I used on my tags. 🐰

These sweet little baskets work up very quickly and you can make them up in any color – they are a great stash buster!

Happy Stitching!

Anita

Posted in Crochet, Easter, Gifts | Tagged , | 2 Comments

Layered Spring Wreath

Hi friends,

Are you looking for a pretty Spring wreath to brighten up your front door? I have super easy Layered Spring Wreath to share with you. You will be surprised at how quickly and easily this wreath comes together with just a few supplies.

Disclosure: Some of the links on my site are affiliate links, meaning, at no additional cost to you, I will earn a small commission if you click through and make a purchase. As an Amazon Associate I earn from qualifying purchases.

You’ll need 2 foam wreaths – I used 14-inch and 18-inch wreaths, 2 different ribbons (6 yards each) to wrap your wreaths – I used a 2.5-inch pink polka dot and a 1.5-inch blue stripe. You’ll also need 1.5-inch floral pins and any embellishments you want to add to your wreath. I layered some flowers I had in my craft stash, securing them with hot glue, and added a button to the center.

Starting with the larger wreath, pin the end of the wider ribbon to the form with a couple of the pins. Then simply wrap the ribbon tightly around the wreath, slightly overlapping the edges as you go. Secure the end of the ribbon with a couple more pins, making sure it is on the back of the wreath. I started the 2nd spool of ribbon by overlapping the end of the first ribbon and pinning them both together onto the back of the wreath.

Do the same with the smaller wreath and the other ribbon.

Set the smaller wreath on top of the larger wreath. Take a piece of the wider ribbon and wrap it tightly around both wreaths, securing it on the back with pins. Thread a piece of the thinner ribbon under the wider ribbon on top of the larger wreath and tie a knot to make a hanger for your wreath.

Add any embellishments you’d like (I used hot glue to attach my flowers) and your wreath is ready for the front door.

This is such a fun easy way to make a wreath – the color options are truly endless! What will you choose?

Happy Crafting!

Anita

Posted in Decor, Easter | Tagged | 2 Comments

Crochet Ridged Can Cozy

Hi friends,

I had this pretty Bright Green I Love This Cotton yarn in my stash and thought with St. Patrick’s Day coming up this would be the perfect time to use it. ☘️

I made this fun Crochet Ridged Can Cozy using an H/5mm hook. You’ll find the free pattern below along with a link to a free PDF if you’d like to easily print it.

Disclosure: Some of the links on my site are affiliate links, meaning, at no additional cost to you, I will earn a small commission if you click through and make a purchase. As an Amazon Associate I earn from qualifying purchases.

I have a little tip to share with you on joining when you are crocheting in the round. Instead of joining with a normal slip stitch, I used the Invisible Slip Stitch. You can find great instructions on how to do this here at A Plush Pineapple. The blog post at A Plush Pineapple has instructions on how to do a chainless starting stitch after using the Invisible Slip Stitch, but I didn’t make my cozy that way. I joined my rounds using the Invisible Slip Stitch and then just continued as normal chaining at the beginning of the round.

The left picture below shows the wrong side (inside of the cozy) of my work. The right picture shows the right side (outside of the cozy) with the seam in the center. Using the Invisible Slip Stitch gives you a straight seam when crocheting in the round, making it less obvious in your project.

Here’s the pattern and you’ll find the free PDF below…

Crochet Ridged Can Cozy

I Love This Cotton Yarn

H/5mm hook

Stitches used US terms:

Magic Ring

Chain – ch

Single Crochet – sc

Half Double Crochet – hdc

Double Crochet – dc

Front Post Double Crochet – fpdc

Back Loop Only – blo

Invisible Slip Stitch – iss

Link for Invisible Slip Stitch instructions

Note: chains at the beginning of rounds do not count as stitches. 

Make Magic Ring, ch 1.

Round 1: Work 9 hdc in ring. Join with iss to first hdc. Pull ring closed. (9 stitches)

Round 2: ch 1. 2 hdc in same stitch as iss and in each stitch around. Join with iss to first hdc. (18 stitches)

Round 3: ch 1. 2 hdc in same stitch as iss. *hdc in next stitch, 2 hdc in next stitch* Repeat from * to * around to last stitch. hdc in last stitch. Join with iss to first hdc. (27 stitches)

Round 4: ch 1. Working in blo, sc in same stitch as iss and in each stitch around. Join with iss to first sc. (27 stitches)

Rounds 5-7: ch 1. Working in both loops, sc in same stitch as iss and in each stitch around. Join with iss to first sc. (27 stitches) 

Round 8: ch 2. dc in same stitch as iss and in each stitch around. Join with iss to first dc. (27 stitches)

Rounds 9-14: ch 2. dc in same stitch as iss. fpdc in next stitch. *dc in next 3 stitches, fpdc in next stitch* Repeat from * to * around to last stitch. dc in last stitch. Join with iss to first dc. (27 stitches)

Round 15: ch 1. sc in same stitch as iss and in each stitch around. Join with iss to first sc. (27 stitches)

Round 16: ch 1. sc in blo in same stitch as iss and in each stitch around. Join with iss to first sc. (27 stitches)

Fasten off and weave in ends.

Here’s the link to the free PDF…

What color will you use to make your Crochet Ridged Can Cozy?

Happy Stitching!

Anita

Posted in Crochet | Tagged | 1 Comment

I’m So Lucky To Gnome You

Hi friends,

I am just a little obsessed with all the cute Gnome stamps at Unity Stamp Company! I used the Shenanigans Gnome set to create this fun St. Patrick’s Day card. I don’t usually do much crafting for St. Patrick’s Day, but he was just so cute that I couldn’t pass him up! ☘️☘️☘️

Disclosure: Some of the links on my site are affiliate links, meaning, at no additional cost to you, I will earn a small commission if you click through and make a purchase. As an Amazon Associate I earn from qualifying purchases.

He’s a great size and I love the way he made this simple card come together so quickly.

I stamped the gnome with Memento Tuxedo Black ink on white card stock and colored him with Copic markers. I die cut around the image with a scalloped rectangle frame and stamped the sentiment with the black ink. (These particular dies are no longer available, but here are some similar dies) I attached a piece of patterned paper to a white card, then attached the stamped image to the card with foam tape. To finish the card, I added 3 green gems (similar to these).

He’s super cute and a fun way to wish the lads and lassies a Happy St. Patrick’s Day!☘️

Happy Stamping!

Anita

Posted in Cards, Stamping | Tagged , | 1 Comment