Beach Gnome – Enjoy Your Day

Hi friends,

Are you ready for the sea and sand? This little guy certainly is! 🙂

This is another one of the adorable gnome stamps from Unity Stamp Company. He’s part of the Beach Happy Gnome set that includes 2 more gnomes – one ready to go snorkeling and one with the cutest frog swim ring – and several sentiments to go with them.

Disclosure: Some of the links on my site are affiliate links, meaning, at no additional cost to you, I will earn a small commission if you click through and make a purchase. As an Amazon Associate I earn from qualifying purchases.

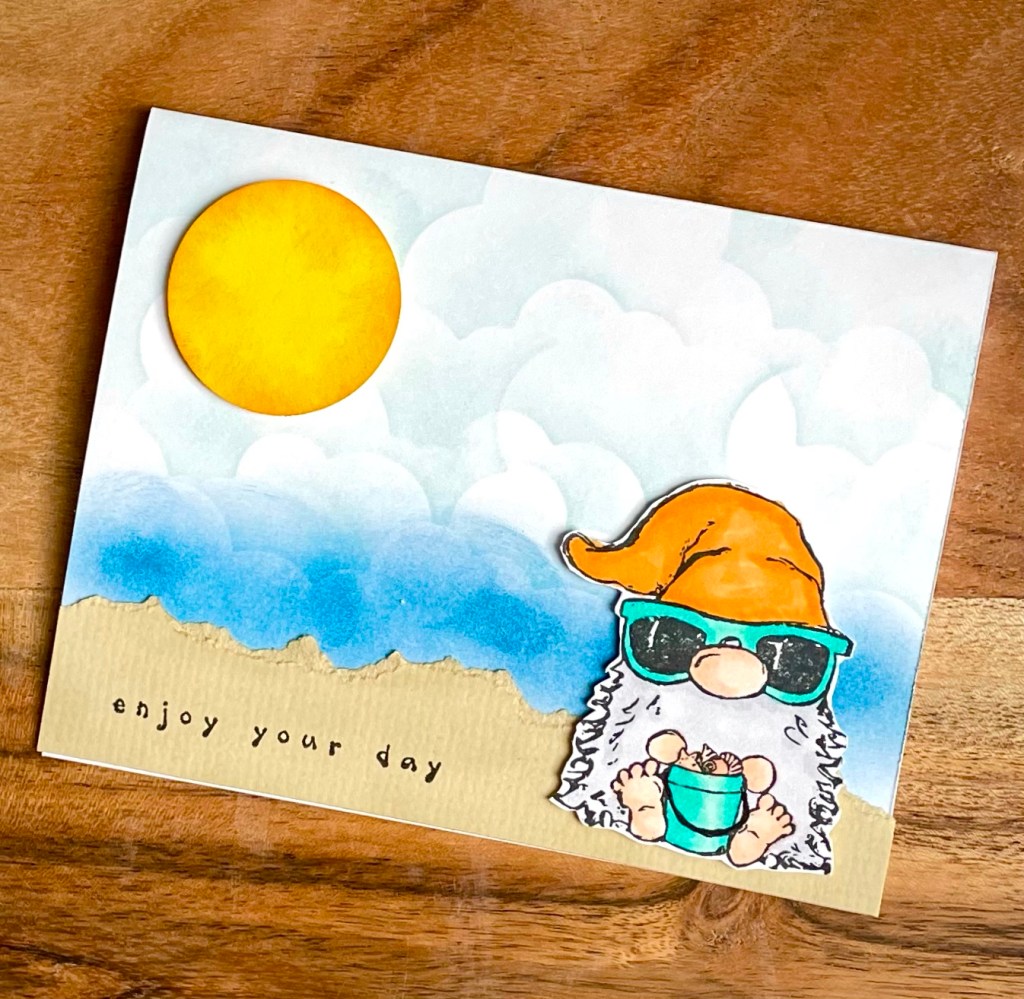
I stamped the gnome with Memento Tuxedo Black ink, colored him with Copic markers, and cut him out. To make the card, I used a cloud stencil (similar to this one) and applied light blue and a darker blue ink with these Blender Brushes from Taylored Expressions to mimic the sky and water. I tore a piece of tan card stock and, although it’s hard to see in the picture, I brushed the edges with a slightly darker tan ink. I attached the tan strip to the card to mimic sand.

Using 1.5 circle punch, I punched a circle from yellow card stock and brushed orange ink on the edges using a blender brush. I attached both the gnome and the sun to the card with foam tape. I stamped the sentiment with black ink on the “sand”. The sentiment is one from Hero Arts that I’ve had forever – it’s no longer available ☹️, but you can use one of the sentiments from the Beach Happy Gnome set or your favorite stamp from your collection.

He sure looks like he’s enjoying his day – although I think that beard would be awfully warm at the beach. 😉

Just an FYI – if you are looking for blender brushes but are limited on funds, Taylored Expressions just released these cute Bitty Blender Brushes. The brush heads are 1-inch as opposed to 1.5-inches on the regular Blender Brushes. It’s a set of 6 for just $18.00. I think they are so adorable! I’m pretty sure I need these! 😉

Happy Stamping!

Anita

Posted in Cards, Stamping | Tagged , | 1 Comment

Beach Cardi Coverup

Hi friends,

It’s getting close to beach and pool time! ☀️ That means it’s time to make a new swimsuit coverup. 🙂

This is a fun pattern from Wilmade.com for the Beach Cardi Coverup. It’s a great beginner pattern and she includes sizes S-5XL! The coverup is made from 3 rectangles that are sewn together. She includes instructions for an optional belt. My belt is a bit different – I’ve included instructions on what I did below.

Disclosure: Some of the links on my site are affiliate links, meaning, at no additional cost to you, I will earn a small commission if you click through and make a purchase. As an Amazon Associate I earn from qualifying purchases.

I used Lion Brand 24/7 Cotton yarn in Aqua with a J/6mm hook to stitch up my Beach Cardi. I love this color because it reminds me of Summer and the blue waters of the ocean. But if this isn’t your color, no worries – the yarn comes in lots of other colors! You can order a Crochet Kit here in your choice of size and color of yarn and it includes the free digital download of the pattern.

It’s perfect to wrap yourself in on those windy beach days or when you head in to your favorite beachside restaurant for lunch. It’s also great while you’re lounging at the pool sipping your favorite cold drink.🥤

To make my belt, I held 3 strands of yarn together and made a chain according to the pattern. Then I worked a single crochet in the 2nd chain from the hook and in each chain across. At the end of the row, I turned, chained 1, and worked a single crochet in each stitch across. Then I fastened off and wove in the ends.

I added fringe to both ends of my belt – using 2 sets of 3 strands of yarn folded in half on each end.

You can find other photos along with a video and links to a printable PDF over on Wilmade.com. She also has patterns for beautiful shawls, hats, and other wearables – you should check out her site. 🙂

This was a fun and easy pattern to make. Looking forward to wearing it on our beach trip to Destin, FL. ☀️

Happy Stitching!

Anita

Posted in Crochet | Tagged | 1 Comment

Fruity Chicken Salad

Hi friends,

Are you looking for a yummy, summery, fruity chicken salad recipe? Well…Passionate Penny Pincher has you covered with their Fruity Chicken Salad recipe!

You start with a store bought rotisserie chicken, then chop up your vegetables and fruit, add mayo and sour cream, and mix it all together. It couldn’t be easier! 🙂 Of course, you can roast your own chicken instead of buying one. 😉 Or cook and shred some chicken breasts.

Disclosure: Some of the links on my site are affiliate links, meaning, at no additional cost to you, I will earn a small commission if you click through and make a purchase. As an Amazon Associate I earn from qualifying purchases.

This Fruity Chicken Salad is great in a sandwich or on a bed of lettuce with your favorite crackers on the side. You can easily change up the recipe by adding your favorite fruits and nuts. And if you are feeding a crowd – just double it!

Passionate Penny Pincher has an entire Summer Menu Plan that include 12 weeks of recipes to get you through the lazy days of Summer. Right now it’s only available in PDF form but the recipe card set will be available later this Summer.

Happy Eating!

Anita

Posted in Recipes | Tagged | 1 Comment

Mickey Inspired Slimline Birthday Card

Hi friends,

Slimline cards are so fun to make! Have you been making them? The finished size is 8.5 by 3.5 inches and you get to be creative with something other than the usual A2 size card.

Disclosure: Some of the links on my site are affiliate links, meaning, at no additional cost to you, I will earn a small commission if you click through and make a purchase. As an Amazon Associate I earn from qualifying purchases.

I made this fun Mickey inspired card using the slimline size and I love how it turned out!

I made the Mickey heads using a 1.5-inch punch and a 7/8-inch punch for the ears. Simply attach the smaller circles to the back of the larger circle and you have a cute Mickey head. 😊

I cut a piece of white card stock to 8.5 by 7 inches and folded it in half lengthwise to make my card base – finished size of 8.5 by 3.5 inches. I used the Pinkfresh Studio Diagonal Stitched Rectangles dies to cut my 3 mats for the card. The black mat has the diagonal stitches and the red and white are plain rectangles. The dies are perfectly sized for layering onto the slimline card base.

I used black embroidery floss to make the strings for my balloons. The balloons are popped up using foam tape, so I put a piece of the foam tape over the end of the embroidery floss on the back the balloon to attach it. After attaching the balloons to the card, I tied all 3 balloon strings together. Then I glued a small red ribbon bow over the knot to attach it to the card.

I punched smaller 3/8-inch circles from the same card stock I used to make the balloons and scattered them onto the card.

I stamped “happy birthday” with black ink on white card stock. (Use your favorite sentiment stamp.) I punched it out with a label punch, layered it another label punched from red card stock, and attached it to the card with foam tape. (The label punches I used are discontinued, but this is a fun set of dies if you are looking for some.)

My favorite adhesive for making cards is Tombow Mono Dots Adhesive and you can find refills here. To attach the ribbon bow and the small scattered circles, I used Art Glitter Glue Designer Dries Clear Adhesive. Even though it’s called glitter glue (because it works great for adding larger areas of glitter to your projects), it also works great for adding small embellishments or smaller card stock pieces.

This was a really fun card to make! It would be so cute in pink and white with little bows on the balloons for a Minnie inspired card.

Happy Card Making! 😊

Anita

Posted in Cards, Stamping | Tagged , | Leave a comment

Laundry Sign

Hi friends,

I’ve had this idea to make a laundry sign in the back of my mind for a long time and I finally made it! It was super easy to make and adds a little fun to my laundry room. 🧺

Disclosure: Some of the links on my site are affiliate links, meaning, at no additional cost to you, I will earn a small commission if you click through and make a purchase. As an Amazon Associate I earn from qualifying purchases.

We had this leftover piece of wood from remodeling our house that was the perfect size. It measures about 32-inches long by 7-inches wide. I found my letters at Walmart and they are 5-inches high.

First I had to remove the hang tags from my letters by carefully prying off the staples they were attached with. I’m not sure who decided that was the best way to attach them! 🤷🏼‍♀️

The board was already white, but it needed some sprucing up. I painted it with 2 coats of Deco Art Americana Décor Acrylic Chalky Finish Paint in Everlasting White, making sure to let it dry between coats.

I painted my letters with 2 coats of acrylic craft paint in turquoise. (This is a great set of acrylic paints.) I used sponge brushes to apply my paints.

Once everything was dry, I attached my letters to the board using E6000 clear adhesive. If you don’t have any of this in your craft room, you need to get some! It is so strong and works great to bond materials together – it will even work on glass! A little goes a long way so a tube will last you a long time.

Here’s my finished sign. I love how it turned out!

It was hard to get a good picture of it in my laundry room, but you get the idea. 😊

There are lots of different fonts and sizes of wood letters available at the craft stores. And the word on your sign can be absolutely anything! A child’s name would be so fun, or your family’s last name, or anything else you can think of. 🙂

Happy Crafting!

Anita

Posted in Decor | Tagged | Leave a comment

Chunky Crochet Oval Baskets

Hi friends,

I found the free pattern for these Chunky Oval Baskets over on Malloo Knits while I was perusing Pinterest. I find a lot of inspiration on Pinterest – more things than I can ever make – but it is so fun to look for new crafty ideas and recipes. You can find my Pinterest account here if you’d like to follow me or check out some of the (1000’s ???) pins I’ve saved. 😊

Disclosure: Some of the links on my site are affiliate links, meaning, at no additional cost to you, I will earn a small commission if you click through and make a purchase. As an Amazon Associate I earn from qualifying purchases.

The baskets are stitched up using super bulky (6) yarn with L/8mm and M/9mm hooks. I used Bernat Blanket Twist yarn in Cream to make my baskets. Mine came up a little smaller than the dimensions listed in the pattern – probably due to using a different yarn and my tension is different – but they are still a great size. My smaller basket is about 6 x 4 x 3 inches. My larger basket is about 7.5 x 5 x 4 inches.

I was able to get 3 smaller and 2 larger baskets from one 10.5 oz skein of Bernat Blanket Twist yarn. You may or may not get as many depending on the difference in your tension.

The smaller basket is the perfect size for some hand soap, lotion, and a small candle tin. I’m thinking the larger basket would be fun filled with some of my handmade cards, envelopes, and a pretty pen.

These baskets work up super quickly! They would make a great Mother’s Day gift filled with all of mom’s favorite things (chocolate? 😊). Or a fun pampering gift for your girlfriends filled with toiletries in their favorite scents. Tie them up in some cellophane with a pretty ribbon. What will you fill your baskets with?

Happy Stitching!

Anita

Posted in Crochet, Gifts, Organization | Tagged , | 3 Comments

M&M Cookie Bars

Hi friends,

I took these M&M Cookie Bars to an Easter gathering last week and they were so amazing I just had to share them with you! 😋

I found the recipe here at here at Passion for Savings. They are super easy to make and are full of chocolate and butterscotch along with sweetened condensed milk and graham cracker crumbs – and some quick cooking oats to make them a little healthy. 😉 And Oh My Goodness! They are so yummy!

Disclosure: Some of the links on my site are affiliate links, meaning, at no additional cost to you, I will earn a small commission if you click through and make a purchase. As an Amazon Associate I earn from qualifying purchases.

The recipe fills a 9 by 13 inch baking dish so there are plenty of cookie bars for everyone. Here they are ready to put in the oven. Be sure to line your baking dish with parchment paper – it makes it so easy to lift the entire thing out of the dish before you cut them. (I just had a roll of parchment paper, but I am getting these parchment paper sheets when my roll runs out. So much easier to work with!)

Fresh from the oven – and they smell amazing!

There is so much chocolatey goodness! And the butterscotch chips add another layer of flavor that blends so well. There are also some suggestions over on the recipe page for changing up the recipe by adding different things.

They were a big hit at our Easter gathering! I think they would also be fun with Red, White, and Blue m&m’s for the Summer holidays, Fall colored m&m’s for the Fall season, and Red and Green m&m’s for Christmastime. Of course, there’s no reason to wait for a special occasion – just use the everyday m&m’s for an anytime treat!

Happy Baking!

Anita

Posted in Recipes | Tagged | Leave a comment

Fun and Easy Birthday Cards

Hi friends,

Just popping in with a few super quick and easy birthday cards!

The stamps I used are all from Unity Stamp Company. The little chick is from the Birthday Wishes Peep set. The sweet Otter is from the Otter Love This Much set. And the cupcake is from the Birthday Treat set. The “birthday wishes” sentiment is part of the Birthday Wishes Peep set and “happy birthday” sentiment is one I received in a grab bag from Unity.

Disclosure: Some of the links on my site are affiliate links, meaning, at no additional cost to you, I will earn a small commission if you click through and make a purchase. As an Amazon Associate I earn from qualifying purchases.

To make the cards, I stamped the images with Memento Tuxedo Black ink on white card stock and colored them with Copic markers.

For the Birthday Peep card, I trimmed the stamped image and then layered it to a green card stock square die cut using Pink Fresh Studio Essentials Diagonal Stitches Square die set. I embossed a panel of blue card stock with a dot embossing folder (similar to this) and attached it to a white card. I stamped the sentiment with green ink on white card stock, punched it with a label punch, and layered it to a larger label punched from green card stock. (The punches I used are no longer available, but this is a great set of label dies if you are looking for some.) The peep image and sentiment are attached to the card with foam tape.

For the sweet Otter card, I die cut him using the Pink Fresh Studio Essentials Diagonal Stitches Square die set and layered the image to red card stock. I embossed a piece of turquoise card stock that had a white core using a birthday embossing folder. (I don’t think the one I used is available anymore, but I love this one!) Then I lightly sanded the raised areas to bring out the white core and attached it to a white card. The otter is attached the the card with foam tape.

For the Cupcake card, I die cut the image with a circle die and layered it to a larger blue card stock circle. (This is a great set of circle dies.) I attached a strip of patterned paper to a white card and stamped the sentiment with green ink. I attached the stamped image to the card with foam tape.

These cards really come together quickly! I think it took me longer to write this post than it did to make the cards! 😉

I hope these will inspire you to pull out your favorite stamps and make some fun cards. 🙂

Happy Stamping!

Anita

Posted in Cards, Stamping | Tagged , | Leave a comment

Crochet Summer Sunnies Pouch

Hi friends,

It’s almost time for beach days, picnics, and fun in the sun! So you’ll want to keep your sunnies handy. 😎

I have a colorful quick and easy Crochet Summer Sunnies Pouch so you can keep your sunglasses close by. It’s perfect to throw in your purse or beach bag and the button closure will keep your sunnies from sliding out.

Disclosure: Some of the links on my site are affiliate links, meaning, at no additional cost to you, I will earn a small commission if you click through and make a purchase. As an Amazon Associate I earn from qualifying purchases.

I made my Sunnies Pouch with I Love This Cotton yarn and an H/5mm hook. I chose the color called Eastern Nova because it’s just so bright and fun!

If you are looking for some new small scissors to add to your crochet tools, I love this Vintage Gold Embroidery Scissors Set. It is a set of 2 scissors, stork scissors and tiny shears, with leather covers. They are the perfect size to snip your yarn as you are working. I received them as a Christmas gift from my mom and I just love them!

You can find the pattern for the Sunnies Pouch below. I’ve also included a free PDF in case you’d like to easily print the pattern.

Crochet Summer Sunnies Pouch

Worsted weight cotton yarn (4) – I used I Love This Cotton in Eastern Nova

H/5mm hook

3/4-inch button

Stitches used US terms:

Chain – ch

Foundation Double Crochet – fdc

Double Crochet – dc

Front Post Double Crochet – fpdc

Back Post Double Crochet -bpdc

Single Crochet – sc 

Slip Stitch – ss

Note: chain 2 at beginning of row counts as a stitch.

Row 1: work 11 fdc. Turn. (11 stitches)

Row 2: ch 2 (counts as 1st stitch). Skip 1st stitch. dc in next stitch and in each stitch across. Turn. (11 stitches)

Row 3: ch 2 (counts as 1st stitch). Skip 1st stitch, dc in next stitch. *fpdc in next stitch, dc in next 2 stitches* Repeat from *to* 1 time. fpdc in next stitch. dc in last 2 stitches. Turn. (11 stitches)

Row 4: ch 2 (counts as 1st stitch). Skip 1st stitch, dc in next stitch. *bpdc in next stitch, dc in next 2 stitches* Repeat from *to* 1 time. bpdc in next stitch. dc in last 2 stitches. Turn. (11 stitches)

Repeat Rows 3 and 4 until your piece measures about 15 inches, ending with Row 4. Turn. (11 stitches)

At this point, I have 32 rows total. Your total rows may be different depending on tension and yarn used.

Last Row: ch 2 (counts as 1st stitch). Skip 1st stitch, dc in next stitch and in each stitch across. (11 stitches)

Do not turn.

Border:

ch 1 (does not count as a stitch). sc evenly around piece, working 3 sc in each corner. Join with ss to 1st sc. 

Fold the bottom up, with right sides together, to about 2 to 3 inches from the top. This will make your flap to close the pouch.

Sew the sides of your pouch together. I used the invisible seam method. This is a great tutorial from BHooked crochet.

Weave in ends. 

Turn your pouch right side out, sew on the button, and slip in your sunnies. 

Here’s the link to the free PDF…

This pattern works up super fast! It would be great for those readers that so many of us need, too. 👓

What color will you make your Crochet Summer Sunnies Pouch? 😎

Happy Stitching!

Anita

Posted in Crochet, Gifts | Tagged | Leave a comment

Mother’s Day Gift Ideas 2021

Hi friends,

Mother’s Day is May 9th in the United States this year. There is still plenty of time to make a handmade gift for your special mom. I’ve put together a post with a few ideas to spark your creativity. Just click on the link below each picture for all the details on each gift.

Disclosure: Some of the links on my site are affiliate links, meaning, at no additional cost to you, I will earn a small commission if you click through and make a purchase. As an Amazon Associate I earn from qualifying purchases.

The Simple Summer Wrap would be beautiful in her favorite color!

Crochet Simple Summer Wrap

Make her a wardrobe of earrings to match all her Summer outfits.

Summer Faux Leather Earrings

Crochet her a basketful of Crochet Spa Cloths and add her favorite soap.

Crochet Spa Cloth

The Crochet Ridged Can Cozy along with her favorite drink would make a fun gift – make it in any color!

Crochet Ridged Can Cozy

I decorated these Chalk Painted Bud Vases for Christmas, but they would be so pretty with a greenery sprig or spring flower and filled with mom’s favorite fresh flowers.

Chalk Painted Christmas Bud Vase

Does mom have a sweet tooth? These Almond Meltaway Cookies are so yummy!

Almond Meltaway Cookies

Or maybe some tasty Cinnamon Swirled Banana Bread…

Cinnamon Swirled Banana Bread

And of course you’ll want to make a card. This one would be so nice, just change the sentiment.

Hello Friend

Or this one with a Happy Mother’s Day sentiment…

Flower Thank You Card

I hope this post gives you some ideas to create something special for your mom!

Happy Mother’s Day!

Anita

Posted in Uncategorized | Leave a comment