Quick Valentine Treat Bag Tags

Hi friends,

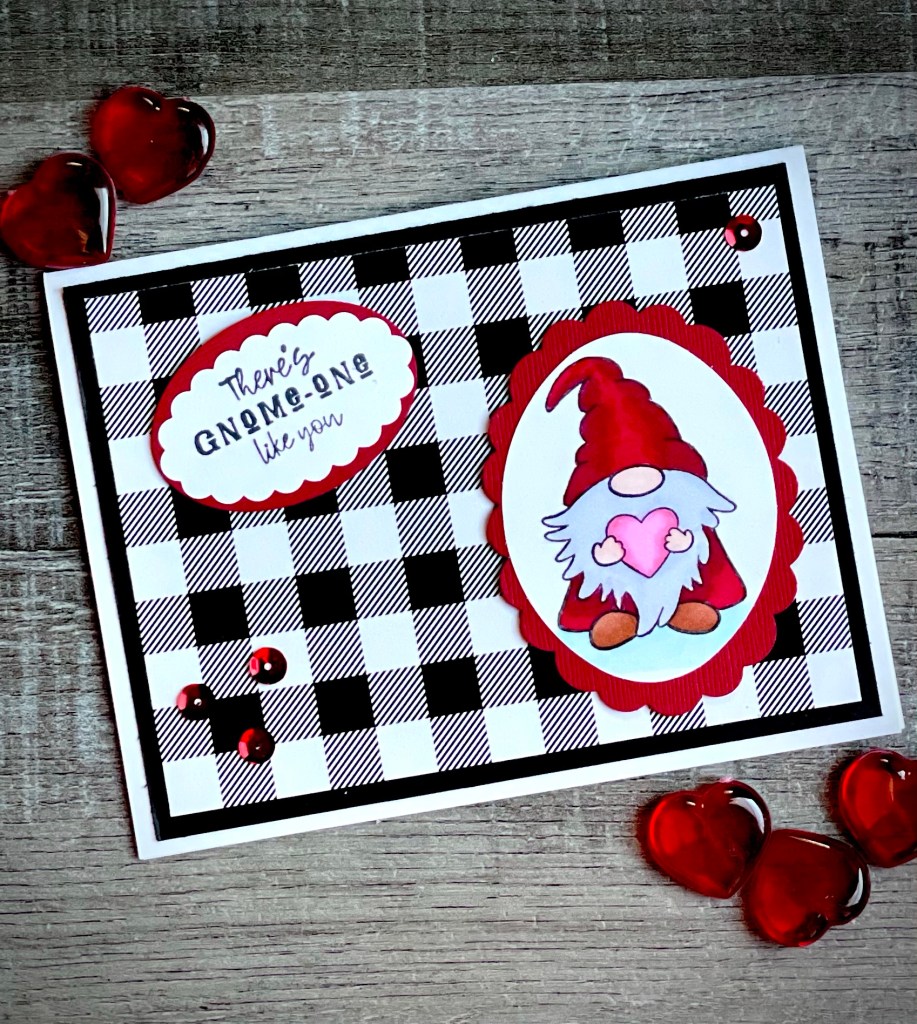
I love giving out little treat bags for different holidays. Taylored Expressions has made it so easy to make cute tags to attach to the bags. I used their Tag Team Dies along with the Tag Team Valentine stamp set to make these adorable little tags.

Disclosure: Some of the links on my site are affiliate links, meaning, at no additional cost to you, I will earn a small commission if you click through and make a purchase. As an Amazon Associate I earn from qualifying purchases.

I die cut the tag shape from white card stock and stamped several different sentiments from the Tag Team Valentine set with black ink onto the tags. Then I stamped the tiny hearts with red and pink ink.

I stamped the little patterned squares with red and pink inks onto white card stock and cut them out. Then I attached them to the end of the tags and trimmed off the excess.

Using a 1/8-inch hole punch, I punched a tiny hole through the patterned paper, using the hole on the tag as my guide. I used red and white baker’s twine to tie the tags to Valentine treat bags filled with chocolate kisses. I used the hole punch to punch a hole in the treat bag to thread the twine through.

Taylored Expressions has several different Tag Team stamp sets including Teacher, Birthday, Easter, Christmas, and Thanksgiving. These sets are also great to use in card making or scrapbooking – let your creativity run wild! 😊

Happy ❤️ Day!

Anita

Posted in Gifts, Stamping, Valentine | Tagged , | Leave a comment

Gnome-One Like You

Hi friends,

This cute little gnome is just perfect for making a Valentine! He’s holding a sweet heart to show his love. ❤️ The stamp set is from Unity Stamp Company and is called Gnome-One Like You.

Disclosure: Some of the links on my site are affiliate links, meaning, at no additional cost to you, I will earn a small commission if you click through and make a purchase. As an Amazon Associate I earn from qualifying purchases.

I stamped the gnome with Memento Tuxedo Black ink on white card stock and colored him with Copic markers. I die cut the image with an oval die and layered it to a scalloped oval die cut from red card stock.

I stamped the sentiment with the same black ink, die cut it with a scalloped oval die, and layered it to an oval die cut from red card stock.

To assemble my card, I layered a piece of small buffalo check patterned paper to black card stock and attached the piece to a white card. I attached both the gnome and the sentiment to the card with foam tape. I finished the card by adding 4 red sequins.

This is my favorite adhesive (and refills) for card making and this glue is great for adding small embellishments to your cards.

This little guy isn’t just great for a Valentine card… I used him to make Christmas thank you cards in this post. He would also make a super cute birthday card colored up in the recipient’s favorite colors. 😊

Happy Stamping! ❤️

Anita

Posted in Cards, Stamping, Valentine | Tagged , | 2 Comments

Crochet Men’s Color Block Scarf

Hi friends,

What do you do when your husband asks you to stitch up a scarf for him? Of course you say yes! 😊 He helped me design what he had in mind and we are both happy with the way it turned out.

I used I Love This Yarn (worsted weight) and an I/5.5mm hook to make my scarf. Once you get started, this is one of those repeat patterns you can work on while watching your favorite movie or Netflix show.

Disclosure: Some of the links on my site are affiliate links, meaning, at no additional cost to you, I will earn a small commission if you click through and make a purchase. As an Amazon Associate I earn from qualifying purchases.

I’ve included the pattern below along with a free PDF if you are interested in printing it.

Crochet Men’s Color Block Scarf

I Love This Yarn in Red and Coffee (7 ounce skeins) – approximately 11 ounces Red and 2-3 ounces Coffee

I/5.5mm hook

Stitches used US terms

Chain – ch

Foundation Double Crochet – fdc

Double Crochet – dc

Front Post Double Crochet – fpdc

Back Post Double Crochet – bpdc

Slip Stitch – ss

Note: ch 2 at beginning of row counts as 1st dc stitch.

Begin with Coffee.

Row 1: Work 29 fdc. Turn. (29 stitches)

Row 2: ch 2 (counts as 1st stitch). Skip 1st dc, dc in each stitch across. Turn. (29 stitches)

Row 3: ch 2 (counts as 1st stitch). Skip 1st dc, dc in next 3 stitches. fpdc in next stitch. *dc in next 4 stitches, fpdc in next stitch* Repeat from * to * 3 times. dc in last 4 stitches. Turn. (29 stitches)

Change to Red.

Row 4: ch 2 (counts as 1st stitch). Skip 1st dc, dc in next 3 stitches. bpdc in next stitch. *dc in next 4 stitches, bpdc in next stitch* Repeat from * to * 3 times. dc in last 4 stitches. Turn. (29 stitches)

Change to Coffee.

Rows 5-12: Repeat Rows 3 and 4 four times.

Change to Red.

Repeat Rows 3 and 4 to desired length, ending with a repeat of Row 3. The center Red part of my scarf measures about 78 inches. The scarf measures about 84 inches before changing to Coffee for the color block at the end of the scarf.

Change to Coffee.

Repeat Rows 4 and 3 four times (8 rows).

Change to Red.

Repeat Row 4 once.

Change to Coffee.

Repeat Rows 3 and 4 once.

Last Row: ch 2 (counts as 1st stitch). Skip 1st dc, dc in each stitch across. Turn. (29 stitches)

Fasten off and weave in ends. 

Your finished scarf will have 12 rows at each end consisting of 3 rows Coffee, 1 row Red, and 8 rows Coffee with the long center part of the scarf all in Red.

Finished scarf measures approximately 90 inches long by 9 inches wide. My husband is tall and wanted to have plenty of length to wrap the scarf. You can easily adjust the length of the scarf by subtracting or adding rows to the center red part of the scarf.  

Here’s the free PDF…

This is a quick and easy pattern to work up in your favorite worsted weight yarn. What colors will you choose?

Happy Stitching!

Anita

Posted in Crochet, Gifts | Tagged , | 2 Comments

Peanut Butter Fudge

Hi friends,

Fudge isn’t just for the Christmas holidays. 😉 It’s good anytime and this Peanut Butter Fudge is so yummy!! It’s super easy to make. The recipe is here on the Re-Fabbed blog – which is one of my favorite blogs to follow! (It’s a post with several yummy Christmas recipes that you can make all year!)

Disclosure: Some of the links on my site are affiliate links, meaning, at no additional cost to you, I will earn a small commission if you click through and make a purchase. As an Amazon Associate I earn from qualifying purchases.

The recipe makes a 9 by 13 inch pan so there is plenty of fudge to satisfy your sweet tooth. 😋

This would be a fun treat to give to family and friends for Valentine’s Day. Cut your fudge into squares and slip them into a Valentine treat bag. Or use a small heart shaped cookie cutter to cut the fudge – the kids would love that for an afternoon treat. ❤️

Yum!

Anita

Posted in Recipes, Uncategorized | Tagged | Leave a comment

Feb 14 Canvas

Hi friends,

This a quick, easy, and fun way to add a little Valentine love to to your home. ❤️ It would be great to add to your Valentine mantel along with these cute mason jars that I made last year. You can find all the info on the Vintage-Look Valentine Treat Jars in this post.

Disclosure: Some of the links on my site are affiliate links, meaning, at no additional cost to you, I will earn a small commission if you click through and make a purchase. As an Amazon Associate I earn from qualifying purchases.

To make your own Feb 14 Canvas, here’s what you’ll need…

First paint your numbers (and small letters if you are using them) with red paint using a foam brush. I painted 2 coats, letting it dry between coats – no need to paint the backs since you will be glueing them down.

Trim your patterned paper to 8 by 10 inches. Using a foam brush, spread a thin coat of mod podge over the entire surface of the canvas. Place your trimmed scrapbook paper onto the canvas, smoothing out any air bubbles and making sure that the edges are glued down well.

Stamp “feb” with red ink onto your solid color paper – I used kraft card stock. I die cut my card stock with a label die (this is a similar set) and inked the edges with red ink. These finger sponge daubers are great for inking the edges. I attached the piece to the canvas using foam tape.

Glue “14” onto the canvas using E6000 adhesive – I love this adhesive for attaching heavier items when I’m crafting. If you are using wood letters to spell out “feb”, attach them to your solid card stock (after you have die cut it and inked the edges) using the E6000 adhesive. Then attach the piece to the canvas using foam tape.

I love the way this turned out! It’s so easy to make and the “14” just pops off the canvas.

You can also make this in pale pinks and white – I think that would be so pretty! Embossed scrapbook paper would be great to add even more texture to your canvas. What will you do when you make your Feb 14 canvas?

Happy Crafting! ❤️❤️❤️

Anita

Posted in Decor, Valentine | Tagged | Leave a comment

Crochet Spa Cloth

Hi friends,

I think January is the longest month of the year! The weather can be cold and dreary, it gets dark early, and I’m always ready for Spring right after Christmas. 😉

January is a good month for a little pampering, though. These quick and easy Crochet Spa Cloths are a little treat you can make for yourself or a friend as we get through the winter.

Disclosure: Some of the links on my site are affiliate links, meaning, at no additional cost to you, I will earn a small commission if you click through and make a purchase. As an Amazon Associate I earn from qualifying purchases.

I stitched them up using I Love This Cotton yarn in White and Antique Cream with an H/5mm hook. The pattern is below and I’ve also included a link to a free PDF for easy printing.

Crochet Spa Cloth

I Love This Cotton in White and Antique Cream

H/5mm hook

Stitches used US terms:

Chain – ch

Foundation Double Crochet – fdc

Double Crochet – dc

Front Post Double Crochet – fpdc

Back Post Double Crochet – bpdc

Slip Stitch – ss

Note: ch 2 at beginning of row counts as 1st dc stitch.

Row 1: Work 24 fdc. Turn. (24 stitches)

Row 2: ch 2 (counts as 1st stitch). Skip 1st dc, dc in each stitch across. Turn. (24 stitches)

Row 3: ch 2 (counts as 1st stitch). Skip 1st dc, dc in next 3 stitches. fpdc in next stitch. *dc in next 4 stitches, fpdc in next stitch* Repeat from * to * 2 times. dc in last 4 stitches. Turn. (24 stitches)

Row 4: ch 2 (counts as 1st stitch). Skip 1st dc, dc in next 3 stitches. bpdc in next stitch. *dc in next 4 stitches, bpdc in next stitch* Repeat from * to * 2 times. dc in last 4 stitches. Turn. (24 stitches)

Repeat Rows 3 and 4 five times. (24 stitches and 14 rows)

Last Row (Row 15): ch 2 (counts as 1st stitch). Skip 1st dc, dc in each stitch across. Turn. (24 stitches)

Fasten off and weave in ends. 

Finished size of spa cloth is approximately 7 by 7 inches. 

Here’s the link to the free PDF…

These would make such a fun gift! Package them up in a cute berry basket with some handmade soap.

Happy Stitching!

Anita

Posted in Crochet, Gifts | Tagged , | 3 Comments

L❤️VE Blocks

Hi friends,

Are you thinking of Valentine’s Day yet? Do you do any decorating? I have a fun little project to share if you want to add a little love to your home. ❤️

Disclosure: Some of the links on my site are affiliate links, meaning, at no additional cost to you, I will earn a small commission if you click through and make a purchase. As an Amazon Associate I earn from qualifying purchases.

You’ll need some 2-inch unfinished wood blocks (I found mine here), some white paint (I used this paint), 1.5 inch letter stencils (these are similar), and a 1.5 to 1.75 inch heart stamp or stencil. My heart stamp is no longer available, but this set has some images that would be cute. I have black paint in the picture but I ended up not using it – I used Memento Tuxedo Black ink instead.

Paint your blocks with 2 coats of white paint using a foam brush, letting them dry between coats. Using the Memento Tuxedo Black ink and a small sponge dauber, stencil “L”,”V”, and “E” onto 3 of the blocks. I taped the edges of the stencil to the block to help hold it steady while I dabbed the ink on.

I used red ink similar to this to stamp my heart on the last block. The red ink turned out more pink than red, but I like the softness of it. Of course you can stamp with pink or any other color ink. 🙂

Then using a stiff bristle brush, lightly dry brush the edges of the blocks with black ink. I like to take a chip brush and trim the bristles down so the brush is stiff, then use that to dry brush.

You can stack them like the picture below…

Or spell the word LOVE like this…

There are lots of different stencil fonts to choose from – or if you’re more talented than me, you can paint everything freehand. 😉

Happy Crafting!

Anita

Posted in Decor, Valentine | Tagged , | 2 Comments

Reflections on 2020

Hi friends,

We all know 2020 was a difficult year. Covid 19 hit us fast and hard. There have been lockdowns, jobs lost, loss of contact with family and friends, terrible illness, and loss of loved ones.

Our family was one of the many to lose a loved one to this awful virus. My brother Keith passed away on November 22, 2020. He left us quickly and unexpectedly and my heart hurts that he’s no longer here. I miss his random texts. I miss his teasing me about my “southern” accent he thought I had acquired. I miss his checking to see if we were ok after bad weather hit our area – and this past year checking to see if we were still covid free. I miss his asking when we would be in Indiana – and his making sure we got back to Alabama safely.

One of my best memories of him is one I don’t think many know. We were in my Dad’s hospital room moments after Dad passed in 2015. I was in a chair with Keith standing next to me. As I was crying, he reached over and put his arm around me. I leaned my head against his hip and we just stayed that way for a while. I felt so close to him in those moments of shared pain. He was feisty, loved his wife fiercely, was a strong supporter of our Veterans, and did things his own way. No matter how old I get, he was always my big brother and I miss him!

When I look back at 2020, the loss of my brother is, of course, the first thing I think of. But when I look over the rest of the year, I remember that despite the pandemic…

We were able to get away to the beach and the mountains.

We were able to see our oldest godson marry the love of his life.

And we were blessed by family and friends in countless little ways all year long … an impromptu concert in our driveway, little gifts and flowers left at our front door, cards, texts, phone calls, zoom get togethers, prayers.

This bible verse has been in my heart much of 2020. John 16:33 from the Message translation…

33 I’ve told you all this so that trusting me, you will be unshakable and assured, deeply at peace. In this godless world you will continue to experience difficulties. But take heart! I’ve conquered the world.”

It’s been a rough year. But it hasn’t all been hard. There has been a lot of good, too. I’m moving into 2021 still hurting, but with hope! Because Jesus has conquered the world and He is walking this journey with me! ❤️

My prayer for 2021 is that you will find the grace and peace that Jesus offers and let him go along on your journey, too.

Much love,

Anita

Posted in Uncategorized | Leave a comment

Crochet Ridged Cowl

Hi friends,

Happy New Year! Praying this year will be much better than 2020!

I decided to start off 2021 with a free crochet pattern. 🙂 This is a fun and easy pattern that works up in just a couple of hours in your choice of worsted weight yarn. I used I Love This Yarn in the beautiful Painted Canyon color way with an I/5.5mm hook to stitch up my cowl.

Disclosure: Some of the links on my site are affiliate links, meaning, at no additional cost to you, I will earn a small commission if you click through and make a purchase. As an Amazon Associate I earn from qualifying purchases.

You can find the free pattern below. I’ve also included a free PDF for easy printing.

Crochet Ridged Cowl

I Love This Yarn in Painted Canyon – one 5 ounce (252 yards) skein

I/5.5mm hook

Stitches used US terms

Chain – ch

Foundation Double Crochet – fdc

Double Crochet – dc

Front Post Double Crochet – fpdc

Back Post Double Crochet – bpdc

Slip Stitch – ss

Note: ch 2 at beginning of row counts as 1st dc stitch.

Row 1: Work 29 fdc. Turn. (29 stitches)

Row 2: ch 2 (counts as 1st stitch). Skip 1st dc, dc in each stitch across. Turn. (29 stitches)

Row 3: ch 2 (counts as 1st stitch). Skip 1st dc, dc in next 3 stitches. fpdc in next stitch. *dc in next 4 stitches, fpdc in next stitch* Repeat from * to * 3 times. dc in last 4 stitches. Turn. (29 stitches)

Row 4: ch 2 (counts as 1st stitch). Skip 1st dc, dc in next 3 stitches. bpdc in next stitch. *dc in next 4 stitches, bpdc in next stitch* Repeat from * to * 3 times. dc in last 4 stitches. Turn. (29 stitches)

Repeat Rows 3 and 4 to desired length. My cowl measured about 31 inches before adding the last row.

Last Row: ch 2 (counts as 1st stitch). Skip 1st dc, dc in each stitch across. Turn. (29 stitches)

Fold scarf in half and ss ends together. Fasten off and weave in ends.

If you would like to make this an infinity scarf that you can wrap around twice, you’ll need about 10 ounces of yarn. Crochet until the scarf measures about 60 inches before adding the last row, then join the ends together.

Here’s a link to the free PDF…

What color Crochet Ridged Cowl will you make?

Happy Stitching!

Anita

Posted in Crochet, Gifts | Tagged , | 6 Comments

Thanks Gnome Much

Hi friends,

Do you love gnomes? They are so cute, are everywhere, and just so fun! Unity Stamp Company has several new gnome stamp sets including this adorable Gnome-One Like You set.

I thought it would be fun to color this cute gnome in Christmas colors and make him into a thank you card. He’s perfect for saying “thank you” for those special Christmas gifts.

Disclosure: Some of the links on my site are affiliate links, meaning, at no additional cost to you, I will earn a small commission if you click through and make a purchase. As an Amazon Associate I earn from qualifying purchases.

I stamped the gnome with Memento Tuxedo Black ink on white card stock and colored the image with Copic markers. I die cut the image with a scalloped oval die and layered it to a larger scalloped oval die cut from red card stock. (This is a good set of scalloped oval dies.) I then added dots of clear glitter glue to his hat.

I added a strip of green patterned paper to a white card and attached the stamped image to the card with foam tape. I stamped “thanks” with red ink (this is a nice red) in the bottom right corner of the card. (My “thanks” stamp has been in my collection forever and is no longer available, but this set has some great sentiments!)

I think this little guy is just so adorable…my head is already spinning with ideas for Valentine’s Day, birthdays, and thinking of you cards. Stayed tuned – I’m sure I will be sharing more fun cards with you!

Thanks Gnome Much for stopping by!

Anita

Posted in Cards, Christmas, Stamping, Uncategorized | Tagged , , | 3 Comments