Need one more sweet treat for Christmas? I’ll bet you have everything you need in your kitchen to whip up a batch of these yummy Snickerdoodle Cookies. 😋
Disclosure: Some of the links on my site are affiliate links, meaning, at no additional cost to you, I will earn a small commission if you click through and make a purchase. As an Amazon Associate I earn from qualifying purchases.
Important tip: Be sure to use margarine NOT butter! This will keep your cookies soft and chewy.
Here they are ready for the oven! I like to use silicone mats on my baking sheets. The cookies won’t stick and you can use them over and over. You can also use parchment paper.
Hot and fresh from the from the oven…they smell amazing!!
Here’s the recipe:
1 cup margarine at room temperature
1 and 1/2 cups sugar
2 eggs
2 and 3/4 cups flour
2 teaspoons cream of tartar
1 teaspoon baking soda
1/4 teaspoon salt
3 tablespoons sugar
3 teaspoons cinnamon
Preheat oven to 400°.
Cream together margarine, sugar, and eggs thoroughly. Sift together flour, cream of tartar, baking soda, and salt. Add to the first mixture and blend thoroughly. Form dough into balls the size of walnuts.
If dough is too sticky, just put it in the refrigerator for a few minutes or sprinkle your hands with water before rolling into balls.
In a small bowl, combine 3 tablespoons sugar and 3 teaspoons cinnamon. Roll each ball in this mixture and place on an ungreased cookie sheet, allowing at least 2 inches between each ball. Bake 8 to 10 minutes.
This recipe makes about 5 dozen cookies so there are plenty for everyone. So good with a cold glass of milk or a hot cup of tea or coffee! And if there are any left, they freeze well.
This is a fun recipe to make with the kids. They will love rolling the dough into little balls and then into the cinnamon/sugar mixture. 😊
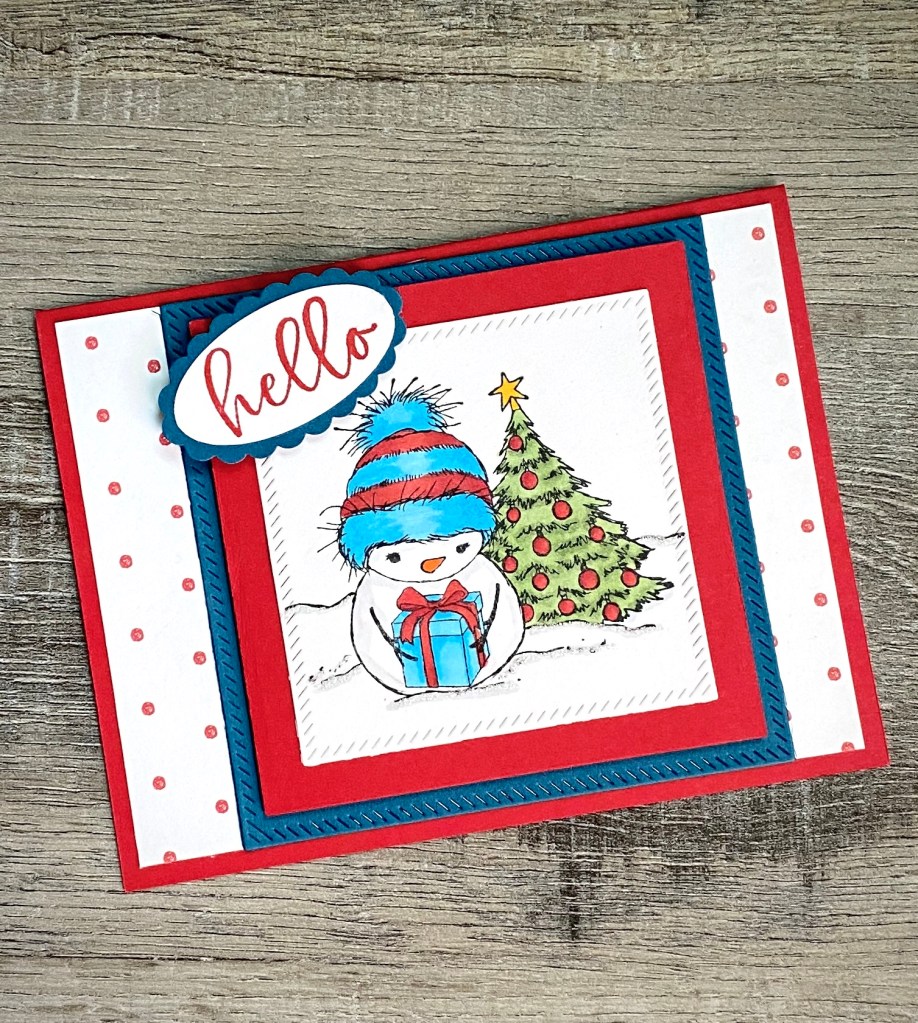
Do you need a last minute Christmas gift? This simple Red Crochet V-Stitch Scarf works up quickly – you still have time. 🙂 It’s an easy repeat pattern, so you can make it any length you want.
I used Red Heart Soft Yarn in Really Red with an H/5mm hook to stitch up my scarf. I used a little more than one skein (each skein has 5 ounces/256 yards). The finished scarf measures about 6.5 inches wide by 60 inches long.
Disclosure: Some of the links on my site are affiliate links, meaning, at no additional cost to you, I will earn a small commission if you click through and make a purchase. As an Amazon Associate I earn from qualifying purchases.
Here’s the pattern…
Chain 35 loosely.
Row 1 – Double crochet in 4th chain from hook. (3 skipped chains count as a double crochet). *Skip 2 chains. Double crochet, chain one, double crochet (V-stitch) in next chain.* Repeat from * to* across until last 4 chains. Skip 2 chains. Double crochet in final 2 chains. Turn. (9 V-stitches and 2 double crochet at each end)
Row 2 – Chain 3 (counts as double crochet). Skip first double crochet. Double crochet in next double crochet. Work V-stitch in chain-one space. Repeat V-stitch across to last 2 double crochet. Double crochet in last 2 double crochet. Turn.
Repeat Row 2 to desired length. Fasten off and weave in ends.
Of course you can make this simple scarf in any color and any worsted weight yarn will work – I would suggest using a soft yarn so it will drape nicely.
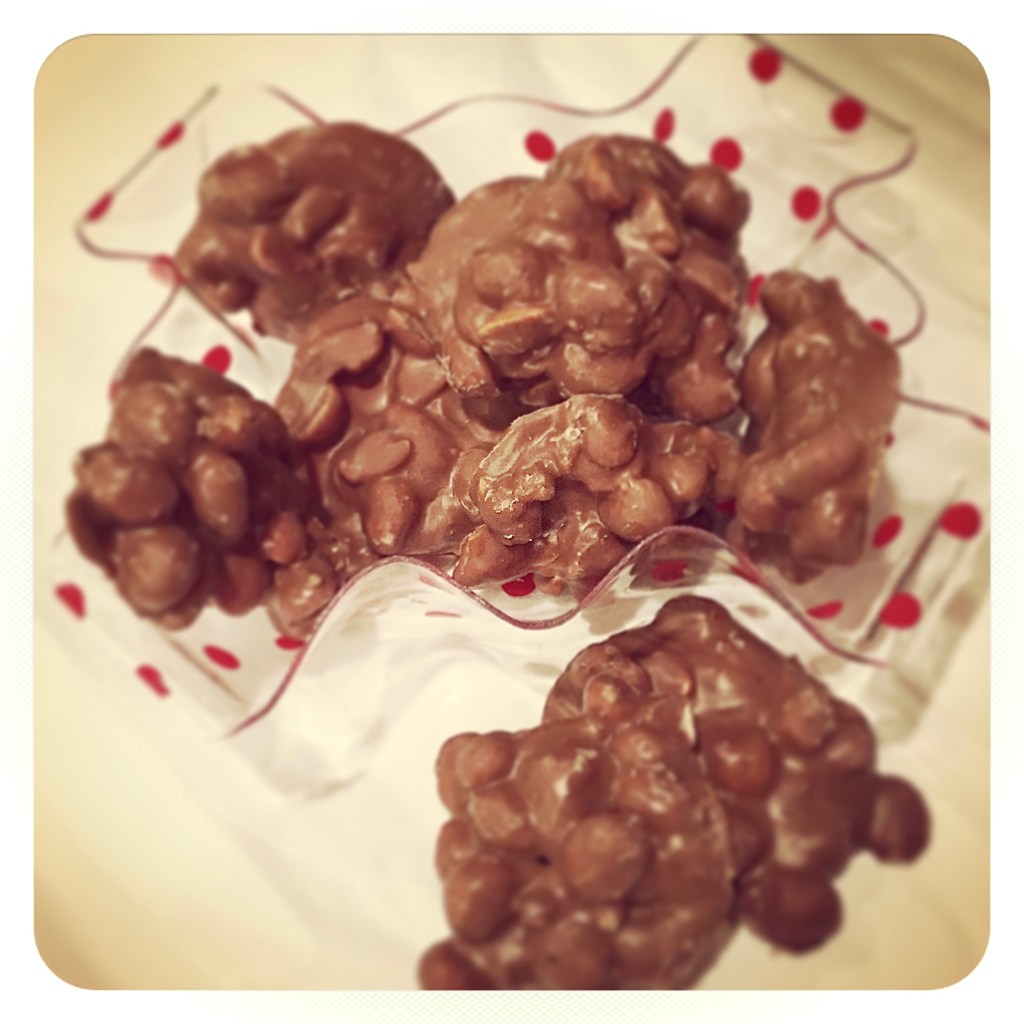
Looking for a super easy sweet treat for the holidays? These Yummy Peanut Clusters are made in your slow cooker! All you do is dump everything in your slow cooker for a couple of hours and scoop them onto wax paper to cool.
Disclosure: Some of the links on my site are affiliate links, meaning, at no additional cost to you, I will earn a small commission if you click through and make a purchase. As an Amazon Associate I earn from qualifying purchases.
Yummy Slow Cooker Peanut Clusters
16 oz jar salted peanuts
16 oz jar honey roasted peanuts
16 oz package chocolate bark
16 oz package white chocolate bark
11 oz bag butterscotch chips
Put all ingredients in your slow cooker, breaking up the chocolate and white chocolate bark into squares. Cover and cook on low 2-1/2 to 3 hours. When melted, stir well. Drop by spoonfuls onto wax paper and let cool.
Note: Don’t put the honey roasted peanuts in first – they may burn if they are directly on the surface of the slow cooker.
Another note: as this is melting, the chocolate bark squares may keep their shape even though they have become very soft. So check to see if they are melted and don’t just go by looks.
This makes a lot of candy! Perfect for putting in cellophane treat bags and tying with red and white bakers twine for gifting. And it also freezes well if you want to save some for later. 🙂
I hope you enjoy this candy – it’s kind of addicting 😉
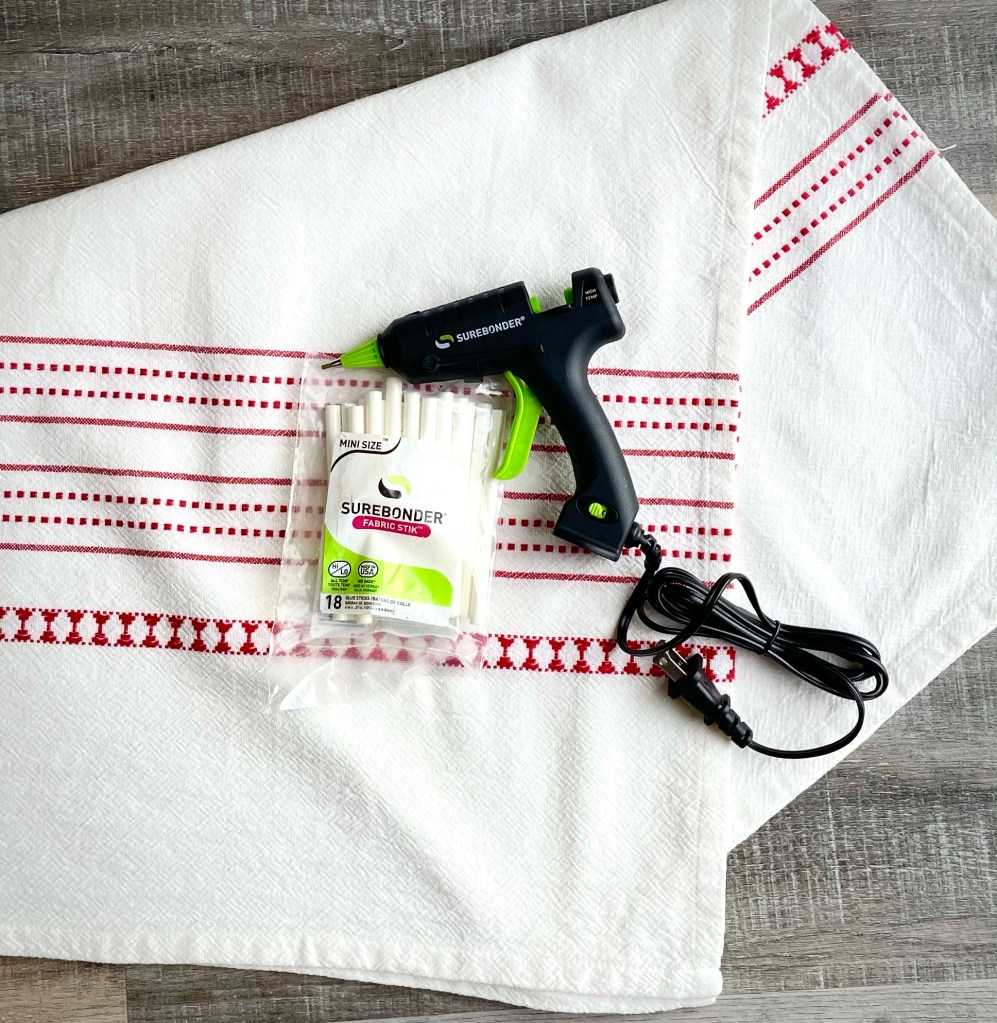
Sewing is not one of my talents – but I can use a glue gun! 🙂 This is a super easy way to make a No Sew Christmas Pillow to add to your seasonal decor.
Disclosure: Some of the links on my site are affiliate links, meaning, at no additional cost to you, I will earn a small commission if you click through and make a purchase. As an Amazon Associate I earn from qualifying purchases.
You’ll need a tea towel, the cotton/linen type fabric not terry cloth. I found my towel at Target, it is 30-inches square. You’ll also need a glue gun with glue sticks made for fabric. I like this Surebonder Glue Gun it has a very fine tip along with an on/off switch. (I decided to keep this glue gun specifically for the fabric glue so I don’t mix glue types.) The glue sticks I used are also from Surebonder. They are specially made for glueing fabric, although they are white not clear so make sure you don’t get glue in the wrong place! 😉 You’ll also need Polyfil to stuff your pillow.
I washed, dried, and ironed my towel. I folded it in half so my finished pillow measured 30 by 15 inches. Then I simply ran a line of glue along the edge securing a few inches at a time, leaving one end open to add the Polyfil. After I had the pillow stuffed the way I wanted, I glued the open end closed.
Here’s how 3 of the edges of the pillow look where they have been glued together. The bottom of the pillow is where my towel is folded in half.
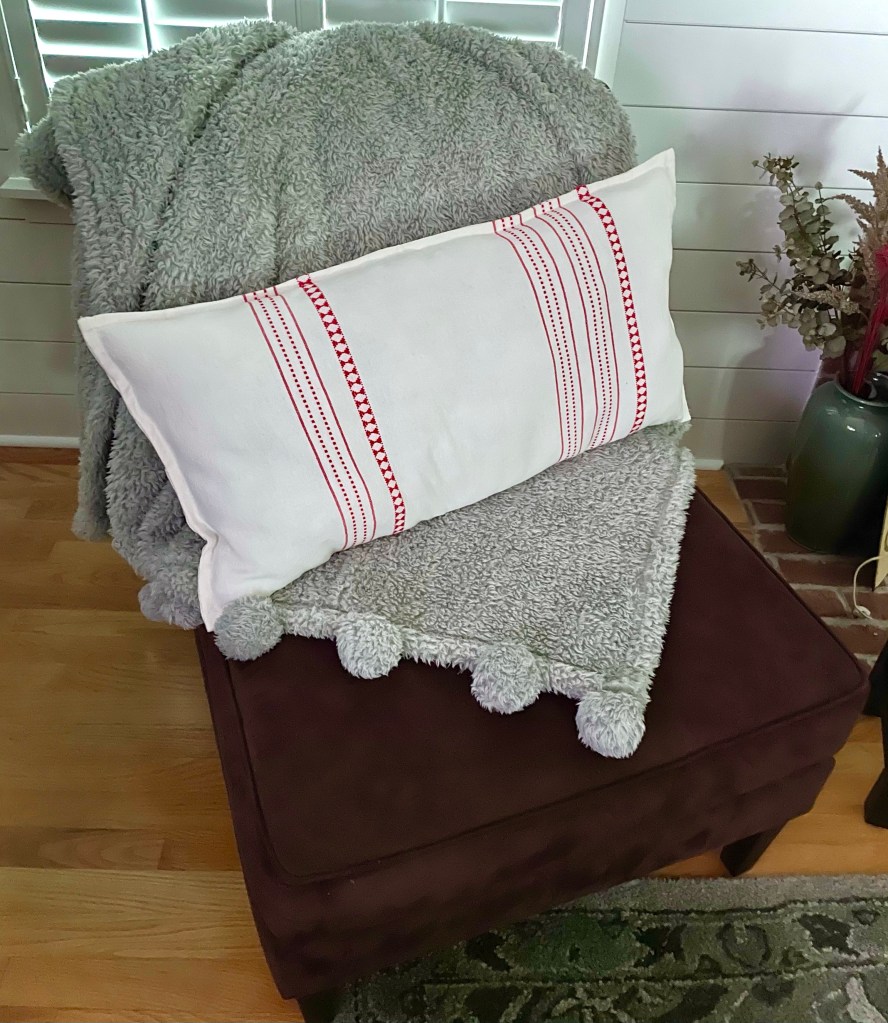
This is my completed pillow – even though I found my towel in the Christmas section it could easily be used year round.
This easy pillow adds a little extra Christmas cheer to my decor. 🎄
There are lots of different, fun Christmas towels available. Some of them measure about 15 by 30 inches so folded in half would make a pillow about 15 inch square instead of a rectangle like mine.
No sew pillows are so quick and easy to make. They are a great thrifty gift idea, too! 🎁
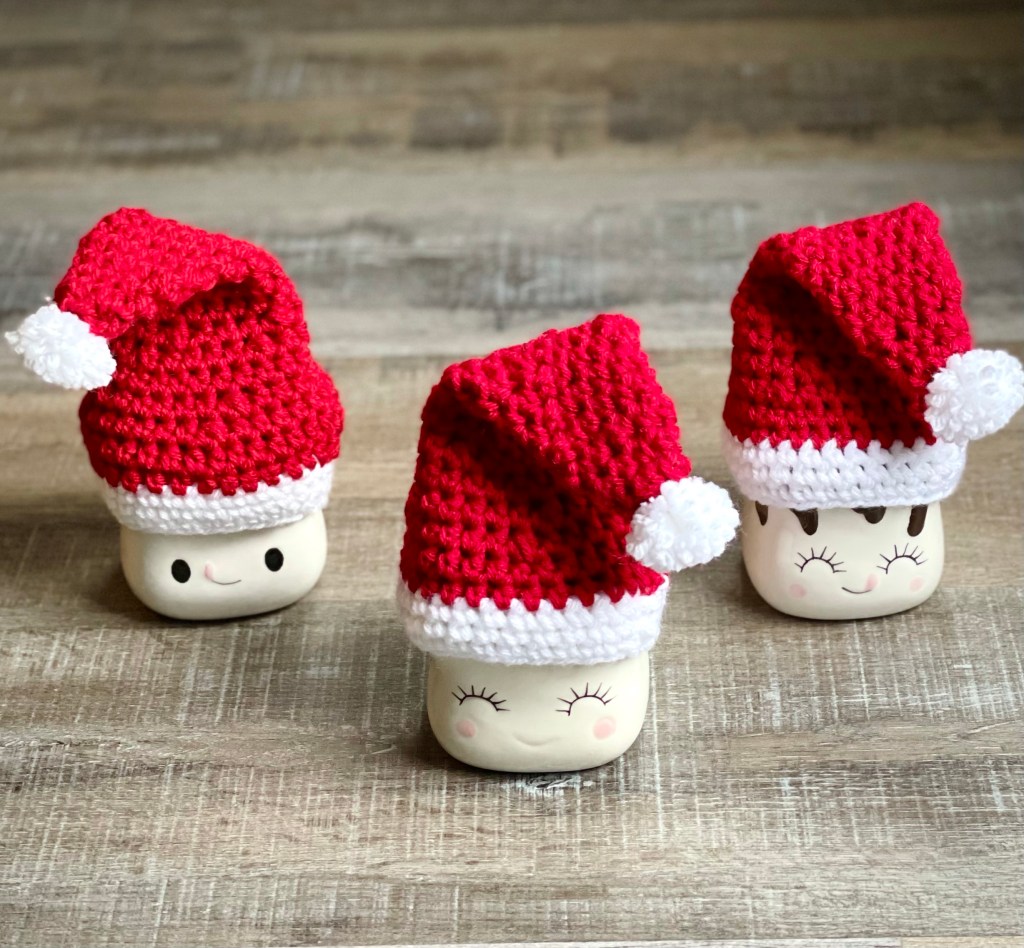
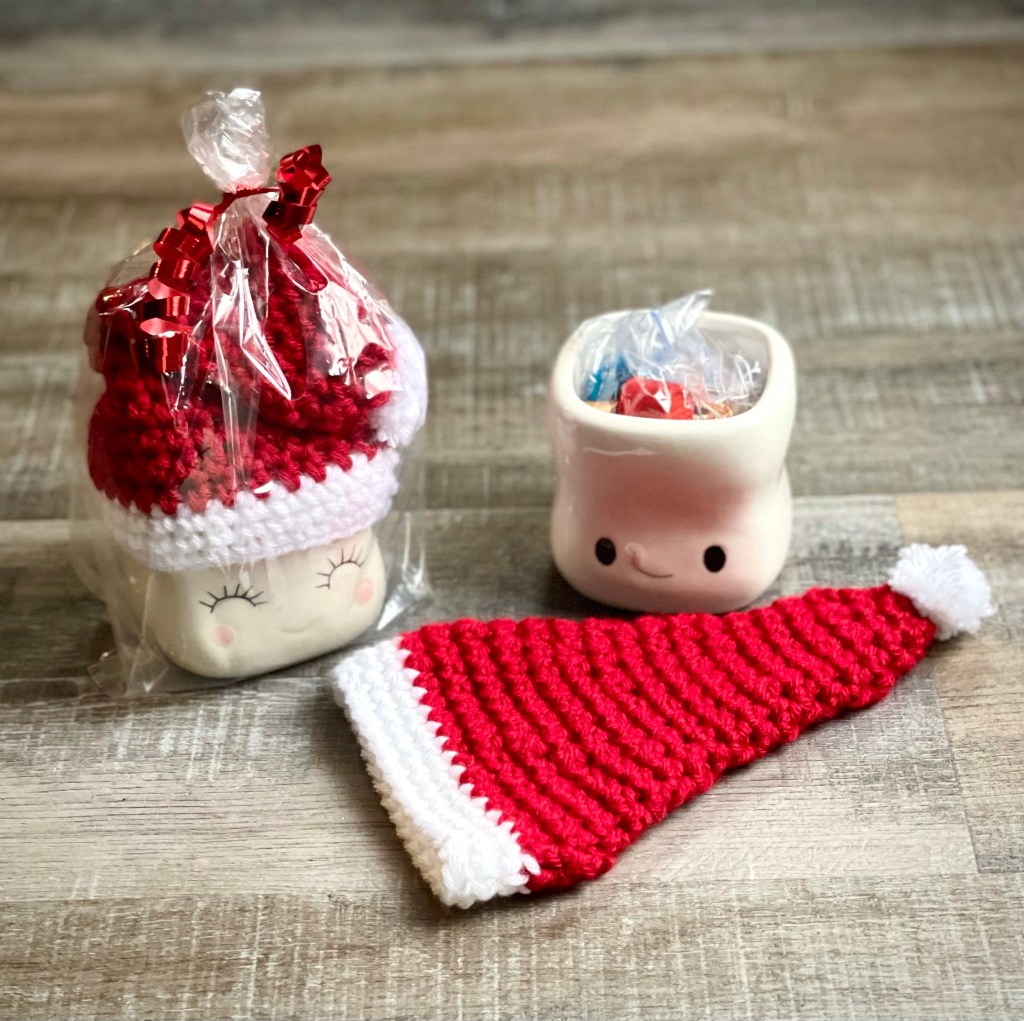
Have you seen these cute little Marshmallow Mugs? I’ve seen them used on tiered trays and cocoa bars. They don’t hold a lot, but they are so adorable!
Disclosure: Some of the links on my site are affiliate links, meaning, at no additional cost to you, I will earn a small commission if you click through and make a purchase. As an Amazon Associate I earn from qualifying purchases.
I used Yarn Bee Soft & Sleek yarn in White and Red to stitch up my hats. The pattern calls for a G/4.25mm hook, but I needed to use an H/5mm hook to get the right size – just check your gauge to see what will work for you. I used the 1-inch Clover Pom Pom Maker to make the pom pom on the top of the hat.
I added some chocolates in a snack size ziptop bag, put them inside the mug, and slipped on the Santa hat. Then I put the mug in a 4 by 9 inch cellophane bag and tied it with red curling ribbon for a super cute gift. 🎁
These make great teacher, neighbor, or friend gifts. The Santa hats work up super quick and everyone loves a little chocolate! 🎅🏼 🎁
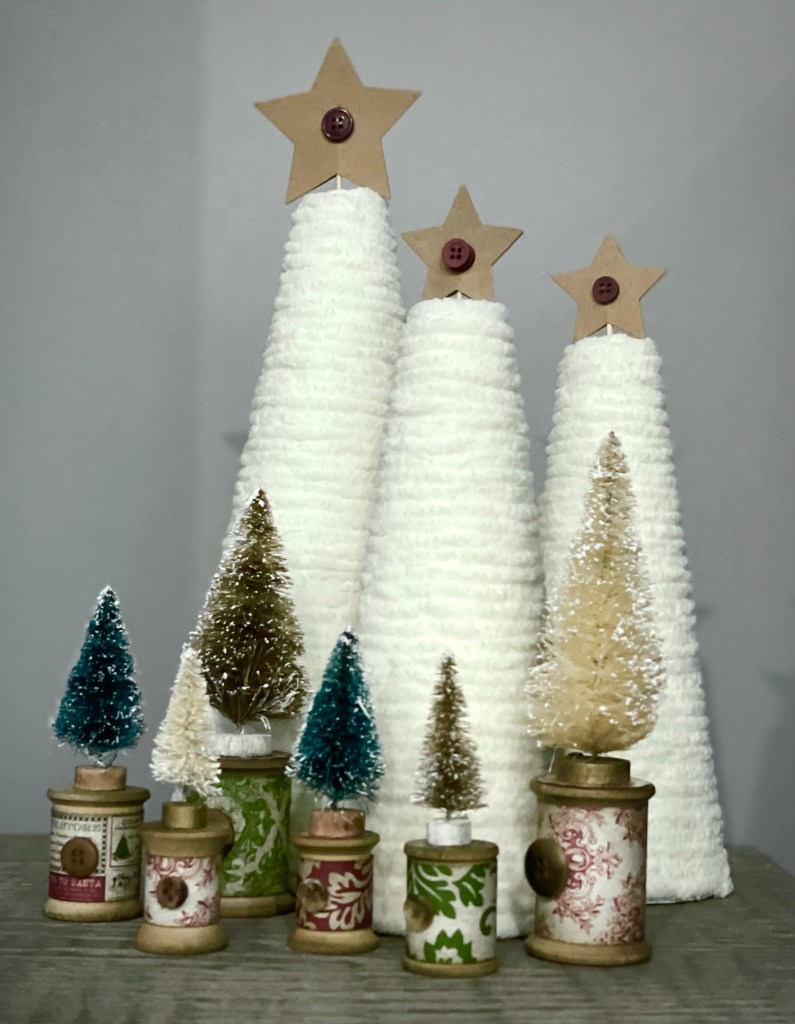
I love farmhouse/vintage decor! The Christmas season is a perfect time to craft a little something farmhouse-y. 😉
These sweet little trees are so easy to make and will add the perfect touch to your table or shelf. All you need are some styrofoam cones (I got my little ones at Dollar Tree and the larger one at Hobby Lobby), some chunky yarn (I used Bernat Blanket Yarn in Vintage White), craft glue (I love this glue), and something for the tree topper. I used kraft card stock to make stars to top my trees.
Disclosure: Some of the links on my site are affiliate links, meaning, at no additional cost to you, I will earn a small commission if you click through and make a purchase. As an Amazon Associate I earn from qualifying purchases.
To make the trees, begin by putting a thin layer of glue on the top of the cone. Attach the end of the yarn in the center of the top and make a little coil until the top is covered. Add a little more glue on the sides and continue wrapping the yarn around the cone until you get near the bottom, no need to add glue to the entire cone. I added more glue before I wrapped the last couple of rows. Then just cut the yarn making sure to glue the end securely.
To make my stars, I used my star dies and cut 2 stars from kraft card stock for each tree. I glued them together with a toothpick sandwiched between them. Then I added a button to the center of each star. Once they were dry, I pushed the toothpick into the top of the tree.
And here are my completed Farmhouse Yarn Wrapped Christmas Trees! I love how they turned out!
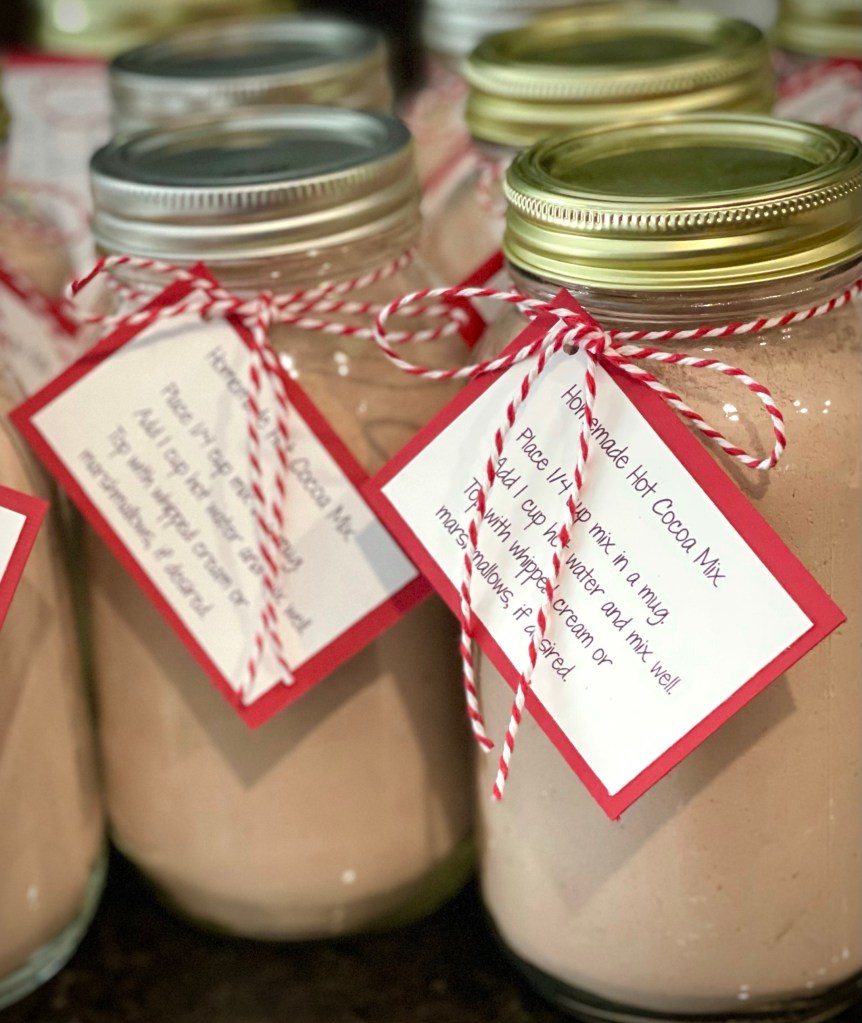
There is something so comforting in a mug of hot cocoa! It warms you up on a cold winter night – even just wrapping your hands around the warm mug feels so good. 😉
I used a simple recipe to mix up some Homemade Hot Cocoa Mix to gift to friends for Christmas this year. Simply fill some quart mason jars with the mix and tie on a tag with instructions for a sweet treat.
Disclosure: Some of the links on my site are affiliate links, meaning, at no additional cost to you, I will earn a small commission if you click through and make a purchase. As an Amazon Associate I earn from qualifying purchases.
Homemade Hot Cocoa Mix
10 cups powdered milk
4-1/2 cups powdered sugar
1-1/2 cups dry coffee creamer (I used French vanilla)
2 cups unsweetened cocoa powder
1 teaspoon salt
Mix all ingredients together in a large bowl. Place in airtight containers of your choice.
To prepare Hot Cocoa:
Place 1/4 cup mix in a mug. Add 1 cup hot water and mix well.
Top with whipped cream or marshmallows, if desired.
You can add some mini chocolate chips to the mix for extra chocolate flavor. Like peppermint hot cocoa? Crush some peppermint candies and mix them in.
I was able to fill 4 quart mason jars with this recipe. Of course, you could stretch it farther by using smaller containers. I printed a label with instructions on white card stock, trimmed and layered it to red card stock, punched a hole in the corner, and tied it around the jar with red baker’s twine.
If you are interested in a free PDF of the labels I printed I’ve attached a link below.
A jar of this mix alone would make a great gift. But you could also put it in a basket with a couple of cute mugs (these red polka dot mugs are cute!), a bag of mini marshmallows, and some peppermint sticks for a fun gift.
We all love our hot beverages in the winter, but we still drink lots of cold ones, too! My Crochet Candy Cane Can Cozy is just the thing to make those cold drinks a little festive and to help keep them nice and frosty. 🙂
It works up quickly using cotton yarn and I added a cute little wooden tree button just for fun. 🌲 I had the tree buttons in my stash, but these buttons are cute and you could sew them on with either side showing. I love this Clover Soft Touch crochet hook, too!
Disclosure: Some of the links on my site are affiliate links, meaning, at no additional cost to you, I will earn a small commission if you click through and make a purchase. As an Amazon Associate I earn from qualifying purchases.
Here’s the pattern…
Crochet Candy Cane Can Cozy
I Love This Cotton – White and Red
H/5mm hook
Optional: Decorative button
Stitches used US terms:
Magic Ring
Single crochet – sc
Half double crochet – hdc
Slip stitch – ss
Back loop only – blo
Note: DO NOT cut yarn when changing colors. Carry the yarn on the inside of your work. This saves you from weaving in a lot of ends when you are finished.
Using Red, make Magic Ring, ch 1.
Round 1: Work 9 hdc in ring. Join with ss to first hdc. Pull ring closed. (9 stitches)
Round 2: ch 1. 2 hdc in same stitch as ss and in each stitch around. Join with ss to first hdc. (18 stitches)
Round 3: ch 1. 2 hdc in same stitch as ss. *hdc in next stitch, 2 hdc in next stitch * Repeat from * to * around to last stitch. hdc in last stitch. Join with ss to first hdc. (27 stitches)
Round 4: ch 1. Working in blo, sc in same stitch as ss and in each stitch around. Join with ss to first sc. (27 stitches)
Rounds 5-7: ch 1. Working in both loops, sc in same stitch as ss and in each stitch around. Join with ss to first sc. (27 stitches)
Change to White.
Rounds 8-9: ch 1. hdc in same stitch as ss and in each stitch around. Join with ss to first hdc. (27 stitches)
Change to Red.
Rounds 10-11: ch 1. hdc in same stitch as ss and in each stitch around. Join with ss to first hdc. (27 stitches)
Change to White.
Rounds 12-13: ch 1. hdc in same stitch as ss and in each stitch around. Join with ss to first hdc. (27 stitches)
Change to Red.
Rounds 14-15: ch 1. hdc in same stitch as ss and in each stitch around. Join with ss to first hdc. (27 stitches)
Change to White
Round 16: ch 1. sc in same stitch as ss and in each stitch around. Join with ss to first sc. (27 stitches)
Change to Red.
Round 17: ch 1. sc in same stitch as ss and in each stitch around. Join with ss to first sc. (27 stitches)
Change to White.
Round 18: ch 1. sc in same stitch as ss and in each stitch around. Join with ss to first sc. (27 stitches)
Change to Red.
Round 19: ch 1. sc in same stitch as ss and in each stitch around. Join with ss to first sc. (27 stitches)
Happy Thanksgiving to all those in the United States! I hope your day is filled with love and gratitude even though this year has been much different than usual. ❤️
Disclosure: Some of the links on my site are affiliate links, meaning, at no additional cost to you, I will earn a small commission if you click through and make a purchase. As an Amazon Associate I earn from qualifying purchases.
Disclosure: Some of the links on my site are affiliate links, meaning, at no additional cost to you, I will earn a small commission if you click through and make a purchase. As an Amazon Associate I earn from qualifying purchases.