Bunnies in a Balloon

Hi friends,

It’s my birthday! 🎉 So I thought it would be fun to share a new birthday card in today’s post. 😊

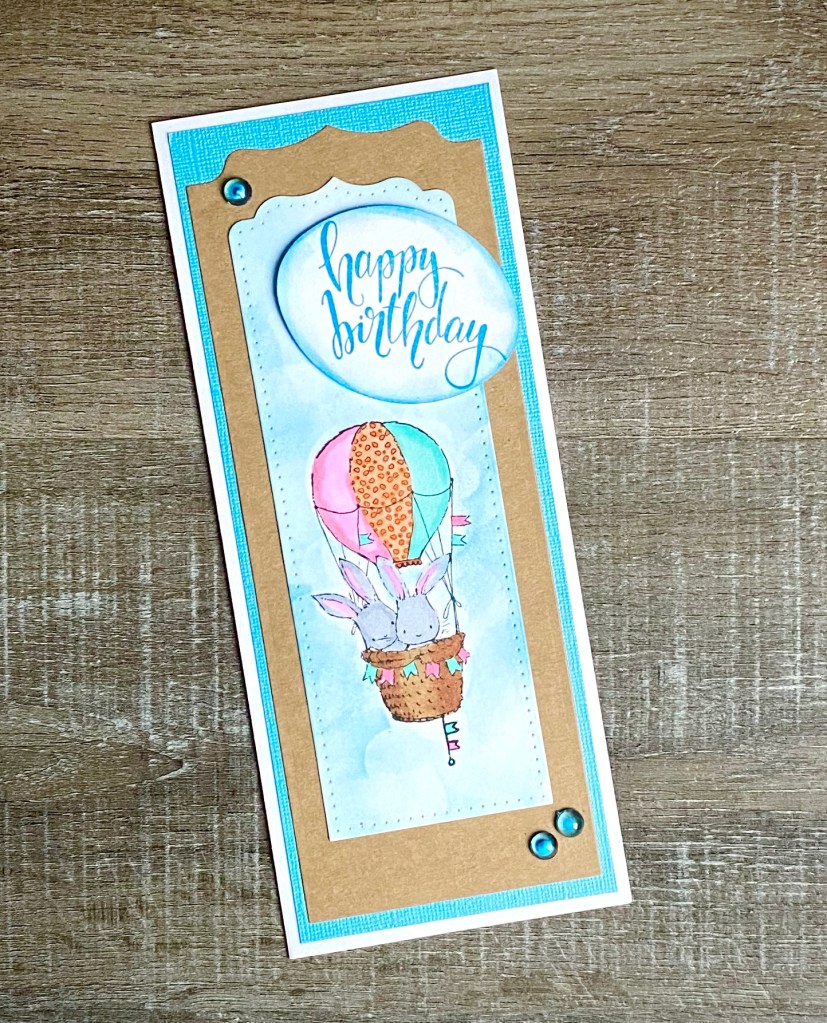
Have you noticed all the slimline cards popping up everywhere? They measure 3.5 by 8.5 inches and easily fit into a business size envelope. It’s a fun and different size card to make.

The stamp set I used is called Bunnies in a Balloon and it’s from Unity Stamp Company.

Disclosure: Some of the links on my site are affiliate links, meaning, at no additional cost to you, I will earn a small commission if you click through and make a purchase. As an Amazon Associate I earn from qualifying purchases.

I stamped the Bunnies in a Balloon with Memento Tuxedo Black ink on white card stock and colored it with Copic markers. I die cut the image using the Pinkfresh Studio Slim Ornate Banner Die Set. Then using a cloud template, I sponged a cloud background around the image with turquoise ink. I attached the image to kraft card stock die cut using the same die set.

I stamped “happy birthday” from the Bunnies in a Balloon stamp set with turquoise ink on white card stock, punched it with an oval punch, and sponged the edges with the same ink.

I cut my card base to 7 by 8.5 inches from white card stock and folded it in half lengthwise for a finished size of 3.5 by 8.5 inches. I cut a panel of turquoise card stock and layered it to the front of the card. I then attached the stamped image to the card. The sentiment is attached with foam tape. I finished the card by adding 3 turquoise Dew Drops.

My favorite adhesive for card making is this tape runner by Tombow – you can get refills for it, too. I like this Art Institute Glitter Glue for attaching small embellishments to my cards.

These cute little bunnies are sure to bring a smile!

Happy Stamping!

Anita

Posted in Cards, Stamping | Tagged , | 6 Comments

Repurposed Picture Frame

Hi friends,

I’ve had this frame in my garage for I don’t even know how long! 🙃 I picked it up at a thrift store thinking it would be a great project with all the detail it has. I just wasn’t sure what I wanted to do with it until now. 🙂

I love using chalk paint on my craft projects because it will adhere to just about any surface and comes in so many great colors. I wanted my frame to have a farmhouse feel so I used my go to Americana Décor Acrylic Chalky Finish Paint in Everlasting White to paint my frame. It’s my favorite white chalk paint to use on smaller craft projects.

Disclosure: Some of the links on my site are affiliate links, meaning, at no additional cost to you, I will earn a small commission if you click through and make a purchase. As an Amazon Associate I earn from qualifying purchases.

Here’s what my frame looked like before I started. Lots of detail, but it didn’t really go with my decor. The first thing I did was to remove the wire hanger from the back – it was rusted and unusable. Then I cleaned the frame with warm soapy water and let it dry thoroughly.

I painted the entire frame – front and back – with 2 coats of Americana Décor Acrylic Chalky Finish Paint in Everlasting White. Make sure to let the paint completely dry between coats. I used a chip brush to apply the paint which worked great getting into all the nooks and crannies on the front of the frame.

Once the paint was dry, I brought out the detail on the frame by dry brushing gray acrylic paint over the entire frame. (This is a great set if you need to add acrylic paint to your craft supplies.)

I had a 6-inch grapevine wreath that I wanted to hang in my frame. I put a 1.5-inch wide ribbon through the wreath, tied a knot at the top, and hot glued the knot to the top of the frame. Because of the thickness of my frame, the knot didn’t show. If you use a thinner frame, you can glue the ribbon to the back of the frame.

And here is my finished frame. I love the way it turned out! I think I may hang it in my bathroom – I haven’t completely decided yet. I have gray walls and think it will look really pretty against the darker hue. 🙂

Keep your eyes open as you are thrifting or shopping garage sales. It’s amazing what a couple coats of paint can do!

Happy Crafting!

Anita

Posted in Decor | Tagged , | 2 Comments

Crochet Candy Corn Hand Sanitizer Holder

Hi friends,

We are all keeping hand sanitizer close by these days so why not make it a little fun? I whipped up this cute Crochet Candy Corn Hand Sanitizer Holder that you can use all Fall. It attaches easily to your purse, backpack or even your belt loop. 😁

It works up super fast using I Love This Cotton yarn with an H/5mm hook. You can literally stitch this up in just a few minutes – and it’s a great stash buster! As of writing this post, Amazon has a 4 pack of Purell Travel Hand Sanitizer available if you are having trouble finding small bottles near you. (Just remember that prices and availability often change on Amazon.)

Disclosure: Some of the links on my site are affiliate links, meaning, at no additional cost to you, I will earn a small commission if you click through and make a purchase. As an Amazon Associate I earn from qualifying purchases.

You can find the pattern below along with a link to a free PDF if you’d like to easily print it out.

Crochet Candy Corn Hand Sanitizer Holder

I Love This Cotton yarn – White, Glowing, Curry

H/5mm hook

1/2 inch yellow button

Stitches used in US terms:

Chain – ch

Slip Stitch – ss

Single Crochet- sc

Chain 12 with White. Join with ss to first ch to form a ring.

Round 1: ch 1. sc same stitch as ss and in each ch around. Join with ss to first sc. (12 stitches)

Round 2: ch 1. sc in same stitch as ss. *2 sc in next stitch, sc in next stitch.* Repeat from * to * 4 times. 2 sc in last stitch. Join with ss to first sc. (18 stitches)

Round 3: ch 1. sc in same stitch as ss and in each stitch around. Join with ss to first sc. (18 stitches)

Change to Glowing.

Rounds 4-9: ch 1. sc in same stitch as ss and in each stitch around. Join with ss to first sc. (18 stitches)

Change to Curry.

Rounds 10-12: ch 1. sc in same stitch as ss and in each stitch around. Join with ss to first sc. (18 stitches)

Do not fasten off.

Handle:

Ch 20. sc in 6th ch from hook. sc in next 14 ch. Join with ss to top of Round 12.

Fasten off and weave in ends.

Sew button to opposite side of holder from handle. Insert hand sanitizer and button handle around purse or backpack strap.

Here’s the link to the PDF…

I hope you enjoy this fun little pattern. Stay well, friends!!

Anita

Posted in Crochet, Fall | Tagged , | 15 Comments

Chalk Painted Pumpkin Jar

Hi friends,

I love the Fall season and all the fun decor that comes along with it. I especially love when I can make new and inexpensive things to add to my Fall decorating. I found this cute little jar at Dollar Tree and I thought it would make a great pumpkin!

Disclosure: Some of the links on my site are affiliate links, meaning, at no additional cost to you, I will earn a small commission if you click through and make a purchase. As an Amazon Associate I earn from qualifying purchases.

To make your own pumpkin, you’ll need chalk paint (I found mine at Michael’s) in orange and green along with some antique wax.

Apply 2-3 coats of orange paint to the jar and 2-3 coats of green paint to the lid of the jar, being sure to let the paint dry thoroughly between coats. I like to apply the paint with a chip brush. Once the last coat is completely dry, apply the wax with a chip brush and immediately wipe off the excess with a paper towel. I finished my pumpkin by spraying it with matte sealing spray.

I had raffia in the supply picture above, but decided I liked tying the stem of my pumpkin with natural jute twine better. But of course you can use raffia, ribbon, or even baker’s twine.

And here’s my finished pumpkin! Such a fun addition to my Fall decor. 🍁

Have fun making your own pumpkin – or a whole pumpkin patch! 😉

Happy Crafting!

Anita

Posted in Decor, Fall | Tagged , , | 4 Comments

Crochet Candy Corn Can Cozy

Hi friends,

Candy Corn – I think you either love it or hate it! Me? I love it! 😋 You can find my 5 Minute Snack Mix using candy corn in this post.

Not a fan of the sweet treat? You can still enjoy the fun colors of candy corn in this cute Crochet Candy Corn Can Cozy. It stitches up quickly using cotton yarn and is great for the whole Fall season. 🍁

Disclosure: Some of the links on my site are affiliate links, meaning, at no additional cost to you, I will earn a small commission if you click through and make a purchase. As an Amazon Associate I earn from qualifying purchases.

I used I Love This Cotton yarn in Curry, Glowing, and White with an H/5mm hook to stitch up my cozy.

You’ll find the pattern below and I’ve included a link to a free PDF below.

Crochet Candy Corn Can Cozy

I Love This Cotton yarn – Curry, Glowing, White

H/5mm hook

Yellow, Orange, and White buttons (optional)

Stitches used US terms:

Magic Ring

Single crochet – sc

Half double crochet – hdc

Slip stitch – ss

Back loop only – blo

Using Curry, make Magic Ring, ch 1.

Round 1: Work 9 hdc in ring. Join with ss to first hdc. Pull ring closed. (9 stitches)

Round 2: ch 1. 2 hdc in same stitch as ss and in each stitch around. Join with ss to first hdc. (18 stitches)

Round 3: ch 1. 2 hdc in same stitch as ss. *hdc in next stitch, 2 hdc in next stitch* Repeat from * to * around to last stitch. hdc in last stitch. Join with ss to first hdc. (27 stitches)

Round 4: ch 1. Working in blo, sc in same stitch as ss and in each stitch around. Join with ss to first sc. (27 stitches)

Rounds 5-7: ch 1. Working in both loops, sc in same stitch as ss and in each stitch around. Join with ss to first sc. (27 stitches)

Change to Glowing.

Rounds 8-14: ch 1. hdc in same stitch as ss and in each stitch around. Join with ss to first hdc. (27 stitches)

Change to White.

Rounds 15-19: ch 1. sc in same stitch as ss and in each stitch around. Join with ss to first sc. (27 stitches)

Fasten off and weave in ends.

Layer and sew on buttons if desired.

Here’s the free PDF link…

I hope you enjoy this pattern!

Happy Stitching!

Anita

Posted in Crochet, Fall, Gifts | Tagged , , | 3 Comments

Boo!

Hi friends,

Are you ready for Fall yet? I’m looking forward to some cooler temps! August in Alabama is HOT!!

I thought it might be fun to get started on some Fall crafting projects as I wait for the cooler weather to come our way… 🎃

Disclosure: Some of the links on my site are affiliate links, meaning, at no additional cost to you, I will earn a small commission if you click through and make a purchase. As an Amazon Associate I earn from qualifying purchases.

I found this “BOO!” mdf word at Dollar Tree for, yes, $1.00! It measures about 12-inches long, about 4-inches wide, and about 1/2-inch thick. It also has a twine hanger at the top, which I cut off because I wasn’t going to hang it that way.

The rectangle slatted wood panel came from Hobby Lobby. It measures about 6.25-inches wide, about 15.75-inches long, and about 1.25-inches thick. It also came with a twine hanger that I cut off because it was on the long side and I wanted my project to hang lengthwise.

You’ll need a 1.75-inch sponge dabber (I found a package of 3 different sizes at Dollar Tree), black, white, and orange acrylic paint, various ribbons, and a button for the bow. (Here’s a great set of acrylic paints you can add to your craft room so you’re always ready to create.)

I painted the front and sides of the rectangle slatted wood panel with black paint. I used a chip brush to apply the paint. I only painted one coat and didn’t worry about getting it perfectly covered since you can see the staples that were used to put it together. It gives it a bit of a weathered look.

I painted the front and sides of the “BOO!” with 2 coats of orange paint, letting it dry between coats. When the 2nd coat was dry, I used the sponge dabber to add random dots with white paint. Make sure to let the dots dry completely!

I glued the “BOO!” to the wood panel using E6000 clear adhesive. Then I made a super easy bow using the Re-Fabbed bow method and glued it to the wood panel. I tied a black button with orange and white baker’s twine and glued it to the center of the bow.

And here’s how it turned out! I just love it! It’s so fun and cute!

If you can’t find the “BOO!” sign, you can use individual letters instead and it would be just as cute.

This was a super inexpensive project to make. I used my 40% off coupon at Hobby Lobby for the wood panel, so I got it for $3.00. The “BOO!” was, of course, $1.00, the sponge dabbers were $1.00, and I had all the other supplies on hand. So $5.00 out of pocket for this fun Halloween project!! I love when that happens! 🙂

Happy Fall Crafting! 🎃

Anita

Posted in Decor, Fall | Tagged , | 5 Comments

Hello Friend

Hi friends,

I am loving this Succulent Greetings stamp set from Unity Stamp Company! The succulents in the vase stamp measures about 3 by 3.5 inches and the set also includes 4 sentiment stamps. (The sentiment I used on the card is not part of the set – it is from Impress Cards & Crafts.) The image is the perfect size to fill the front of a card, making it easy to make a quick card when you need one!

Disclosure: Some of the links on my site are affiliate links, meaning, at no additional cost to you, I will earn a small commission if you click through and make a purchase. As an Amazon Associate I earn from qualifying purchases.

This card is a little bigger than the normal A2 (5.5 by 4.25) size. The measurements for my card are 5 by 6 inches – so just a little bit larger.

I stamped the image with Memento Tuxedo Black ink and colored it with Copic Markers. (The colors I used are RV11, RV34, W2, W4, W5, G12, G24, G40, G82, and G94.) I die cut the image using the 4 inch square from the Diagonal Stitched Squares Die Set from Pinkfresh Studio. I layered the image to green card stock.

I stamped the sentiment with pink ink on white card stock, punched it with a 1.5 inch circle punch, and layered it to a green card stock circle punched with a 2 inch punch. (If you would rather use dies to cut your circles, this is a great set.)

I attached a panel of pink patterned paper to a white card. I adhered the succulent vase to the card using my favorite Tombow Mono Dots Adhesive. Then I attached the sentiment to the card using foam tape. I finished the card by adding 3 Dew Drops.

By changing the sentiment, this card will be perfect for just about any occasion. It’s fun to color, too! 🙂

Happy Stamping!

Anita

Posted in Cards, Stamping | Tagged , | 3 Comments

Crochet Snowman Tote Bag

Hi friends,

Oh my goodness! Have you seen this adorable Snowman Tote Bag by Repeat Crafter Me?!?! It is so cute and fun to make. It works up quickly using 2 strands of worsted weight yarn. And she has several other tote bag patterns including a Santa, Gingerbread, and 3(!!) Halloween patterns.

You can find the Snowman Tote Bag (as well as the Santa) pattern link here. The Gingerbread pattern link is here and the Halloween pattern link here.

Disclosure: Some of the links on my site are affiliate links, meaning, at no additional cost to you, I will earn a small commission if you click through and make a purchase. As an Amazon Associate I earn from qualifying purchases.

I used Yarn Bee Soft & Sleek yarn in White and Light Blue to stitch up my bag. I used a J/6mm hook (the pattern calls for an I/5.5mm). I had some Red Heart Super Saver yarn in Carrot that I used for his nose. The eyes are 1/2-inch buttons and the other 3 buttons are 1-inch. I stitched the buttons on using black yarn so they are very secure.

My finished bag measures about 10.5 inches wide by 14 inches tall including the handle – which is just a little smaller than the pattern measurements. It’s probably due to my using a different yarn and a difference in crochet tension. But it is still a great size!

These would make great Christmas gifts just as they are or filled with goodies for someone special! The Gingerbread tote is next on my list to make…which one will you make first?

Happy Stitching!

Anita

Posted in Christmas, Crochet, Gifts | Tagged , , | 8 Comments

Repurposed Glass Candle Jar

Hi friends,

You know those great candles that come in the glass jars that are about 4-inches in diameter? They come from places like Bath and Body works and always smell so good! Once they have burned down, you are left with a great jar that can be repurposed. 🙂

There will be a little wax left in the bottom of the jar that you’ll want to remove. The easiest way I’ve found is to put the jar in the freezer for a few hours. Then carefully use a knife to break up the frozen wax. It should just pop out. Wash the jar in warm soapy water and dry thoroughly.

Disclosure: Some of the links on my site are affiliate links, meaning, at no additional cost to you, I will earn a small commission if you click through and make a purchase. As an Amazon Associate I earn from qualifying purchases.

To repurpose my jar, I painted the lid with Americana Décor Acrylic Chalky Finish Paint in Everlasting. I applied 3 thin coats using a chip brush, letting it dry completely between coats. I dry brushed a little FolkArt Home Décor Chalk Furniture & Craft Paint in Maui Sand to soften the white. Then I took it outside and sprayed it with some matte sealing spray.

I used E6000 clear adhesive to attach the blue knob to the center of the lid. I found the knob here and also used them for my DIY Jewelry Organizer in this post. (The blue isn’t available right now, but they do come in other colors.) Whatever knob you use, just make sure the bottom is flat so you’ll be able to glue it to the lid.

I wrapped the jar with some cream burlap ribbon and attached it using my hot glue gun. I wrapped some natural jute twine several times around the jar and tied a wood button to the front.

And now you have a great storage jar for your bath, bedroom, or craft room! I think I will use this one for the seashells I am always collecting when we go to the beach. 🏖

Happy Crafting!

Anita

Posted in Decor, Organization | Tagged , , | 5 Comments

Roasted Broccoli and Carrots

Hi friends,

I have a super easy but very tasty side dish to share today!

I love roasted vegetables – they just taste so much better to me than any other way to prepare them. This is a really easy way to roast up some broccoli and carrots – or any other vegetables that you like, cauliflower, bell peppers, etc.

Disclosure: Some of the links on my site are affiliate links, meaning, at no additional cost to you, I will earn a small commission if you click through and make a purchase. As an Amazon Associate I earn from qualifying purchases.

I cut my broccoli into bite-size florets and used baby carrots. (Of course you can use full size carrots, just cut them into bite-size pieces.) Put your vegetables into a bowl and drizzle with olive oil. Sprinkle with garlic powder and fresh ground pepper. Toss well, adding more oil and spices as desired.

Preheat the oven to 420 degrees. Line a baking pan with foil and spray with olive oil cooking spray. Spread the prepared vegetables onto the pan. Place in the preheated oven and roast for 15 to 20 minutes. That’s it! So easy! 🙂

Here are my vegetables just before I put them in the oven.

And this is how they look after 15 minutes in the oven. Roasting brings out such wonderful flavor in the veggies! At this point, you could also sprinkle them with some grated Parmesan cheese – so yummy!

I have a Breville Convection/Toaster oven that I love using in the Summer. It’s perfect for baking or roasting and produces much less heat in the kitchen than turning on the big oven! This is a newer model of the one I have. It has a slow cook setting that mine doesn’t- how fun is that?!?! If you have ever thought about treating yourself to a small countertop convection oven, I highly recommend this one. I use mine all the time!

You can season your vegetables with any of your favorite spices or herbs before popping them in the oven. You can also use vegetable oil instead of olive oil. Which vegetables will you roast?

Happy Roasting!

Anita

Posted in Recipes | Tagged | Leave a comment