I used the stamp set to make a birthday bookmark. It measures 2 by 7 inches – the perfect size to mark your place in a favorite book.
To make the bookmark, I cut a piece of white card stock to 2 by 7 inches. I stamped the cake, balloons, and sentiment with Memento Tuxedo Black ink onto the bookmark. I colored the images with Copic Markers and sponged turquoise ink onto the background. I cut a second piece of white card stock and glued it to the back to cover up the bleed through from the Copic markers. You can also laminate the bookmark to protect it.
Such a fun, cute way to say Happy Birthday to You!
I had this fun Dew Drops Baby Bee Lots of Dots yarn that I picked up on clearance from Hobby Lobby. This particular color way is discontinued, but there are still several others available. It is a bulky (5) weight yarn.
The size of the blanket can be adjusted by changing the length of the beginning chain. The pattern calls for the chain to be in multiples of 3 + 3 more chains. My blanket starting chain was 99 stitches (96 + 3 more), then I followed the pattern as written.
Here’s a close up of the blanket. It’s a little hard to see the pattern due to the type of yarn I used. If you click over to the free pattern here, you can really see how pretty it is in the stripes with blanket yarn.
I crocheted my blanket using an N/10mm hook. I used about 6 skeins (3.5 ounce/110 yards) of Dew Drops Baby Bee Lots of Dots yarn. The finished size of my blanket is about 33-inches by 32-inches.
This is a great pattern if you need a gift in a hurry – or if you want a quick and easy pattern to make blankets for donating.
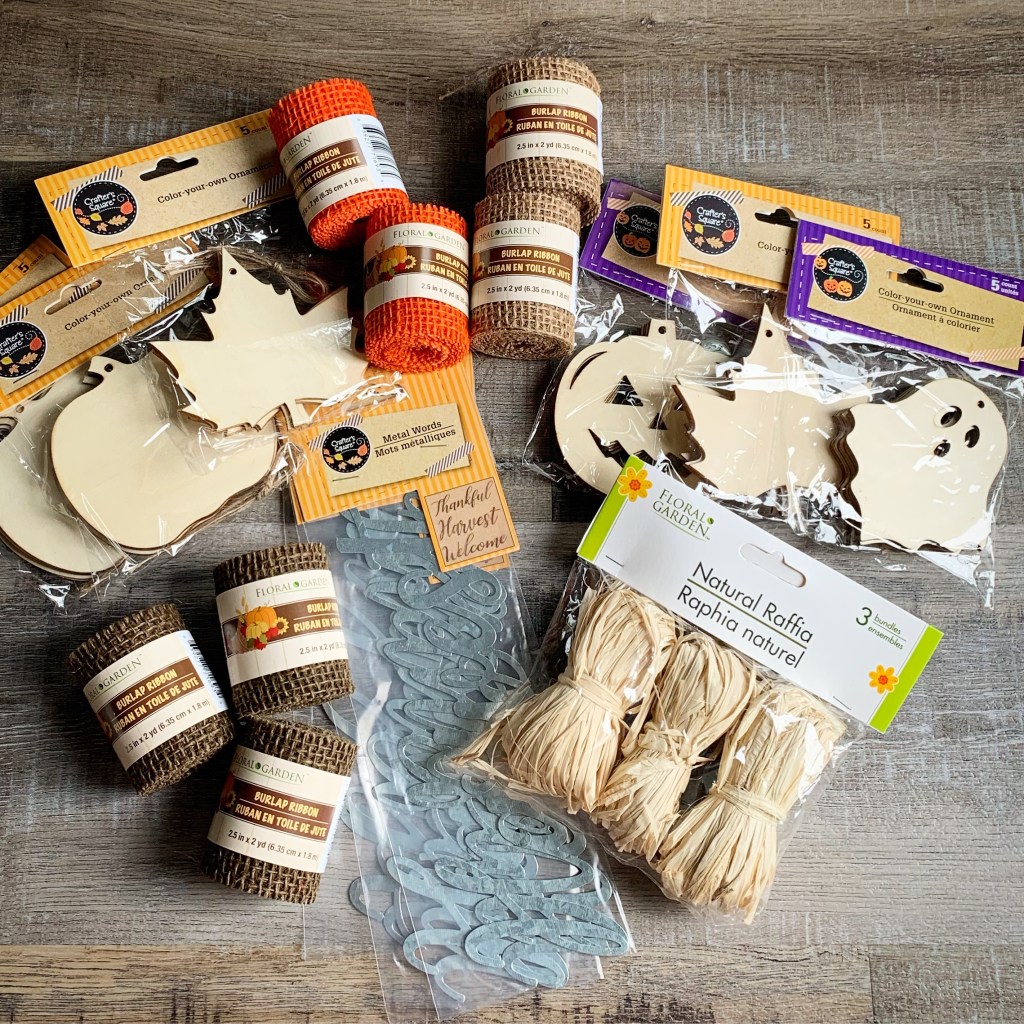
Just popping in quickly to let you know that Dollar Tree has their Fall and Halloween craft supplies and decor on the shelves! And they have some GREAT stuff this year…
I found all of this at my local Dollar Tree store!! 🎃🍁
Each pack of wooden shapes has 3 pieces. And the galvanized words thankful, harvest, and welcome – all 3 in one package for a dollar!!
I happened to be in my store last week the day they were putting all their Fall goodness on the shelves. I need to go back!! 🙂
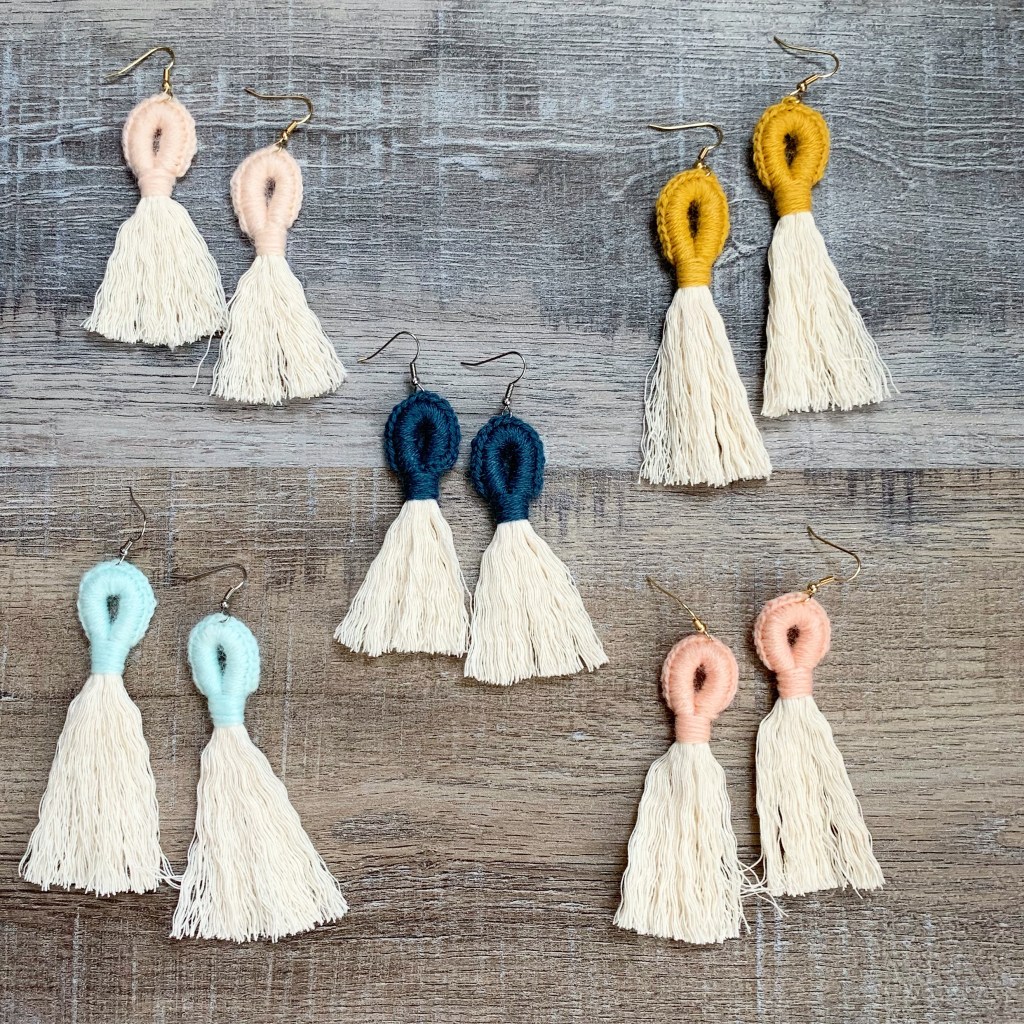
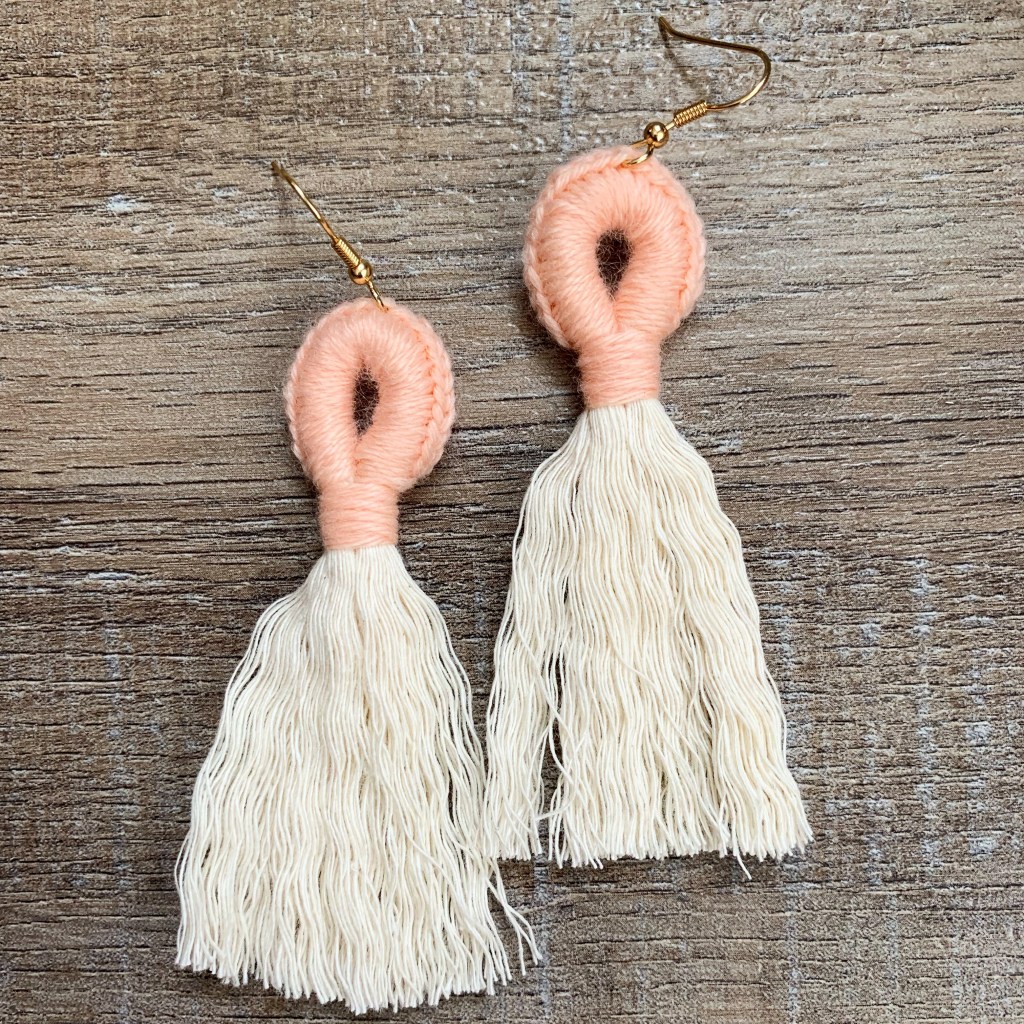
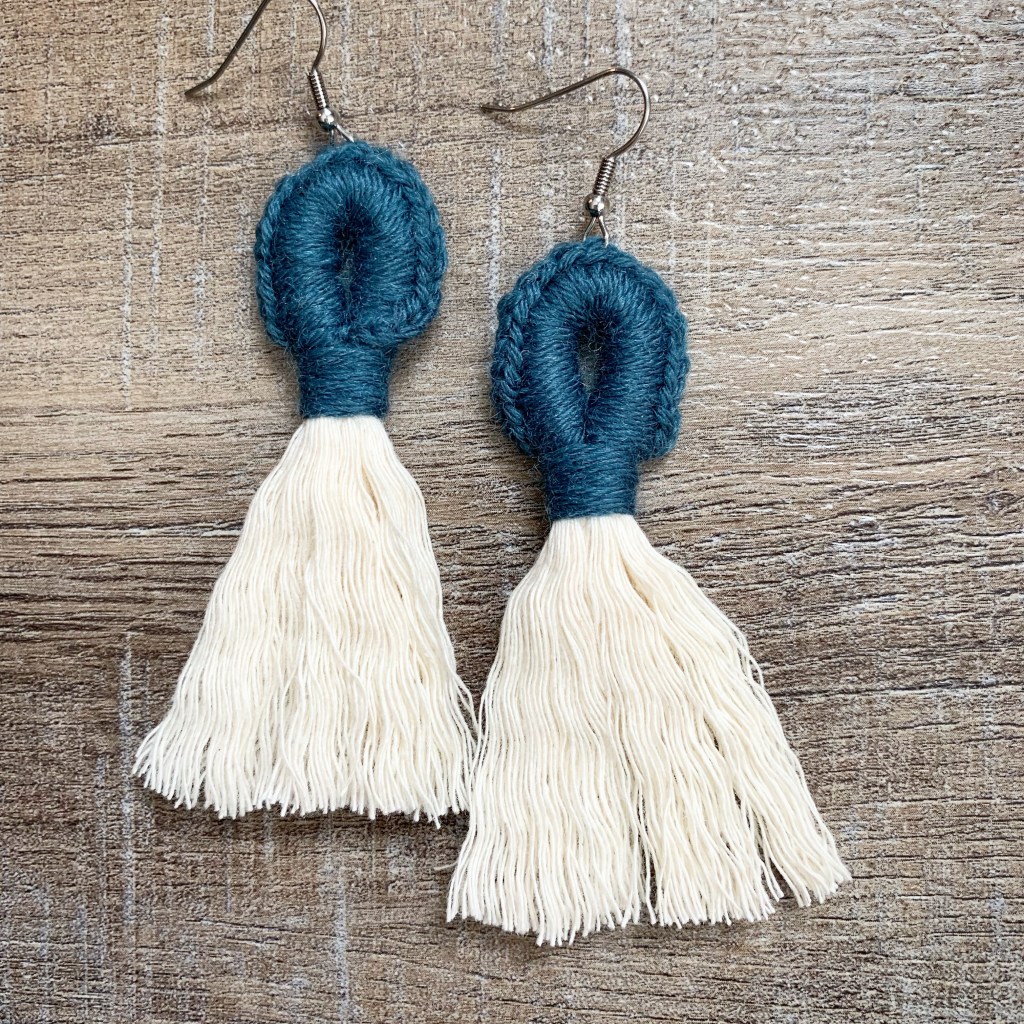
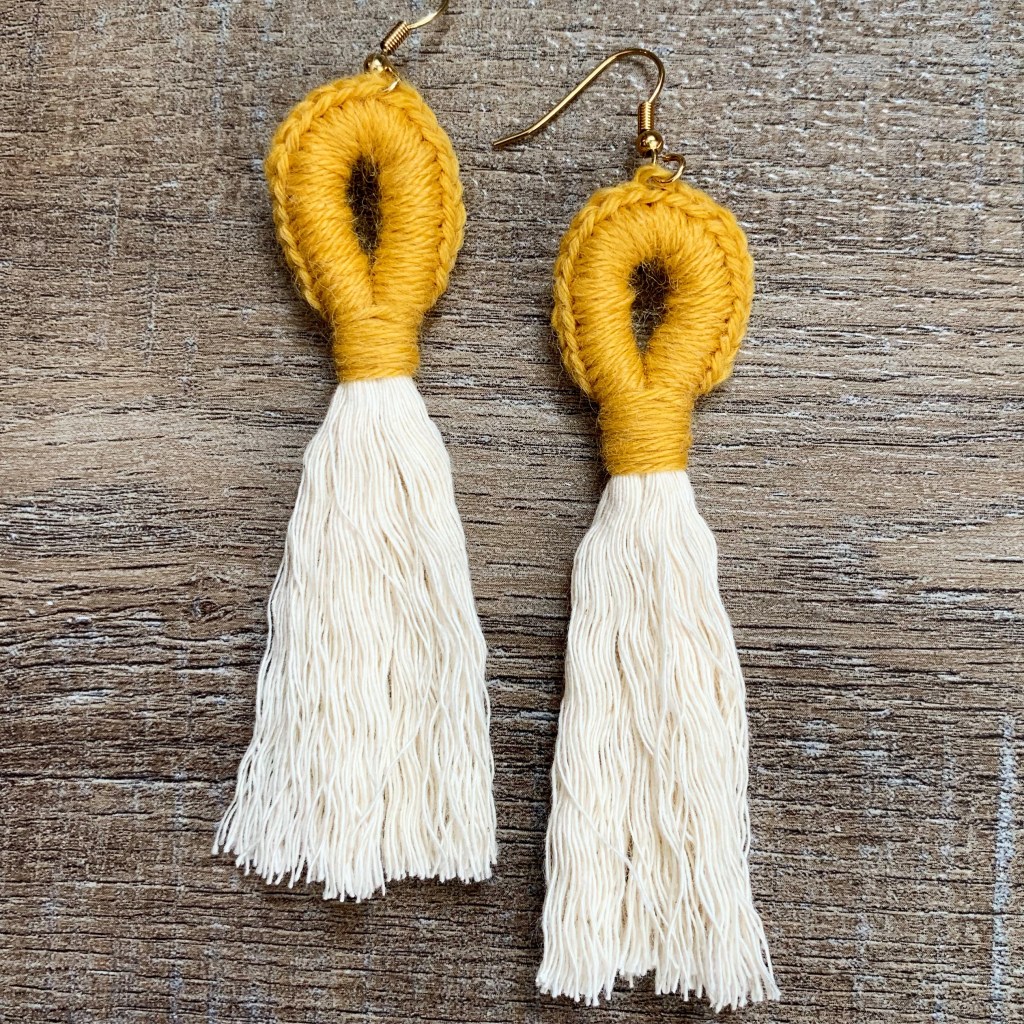
You’ll need fingering weight yarn, 4mm cotton cord, a C/2.75mm hook, and fish hook earring wires. The pattern is super fun and fast – you will be making a ton of these! 🙂
You can make the tassel as short or as long as you’d like. And of course there are tons of yarn colors to choose from! The cotton cord is also available in several different colors. These would make wonderful gifts – they work up so quickly – you can make several pairs while watching your favorite Netflix show…
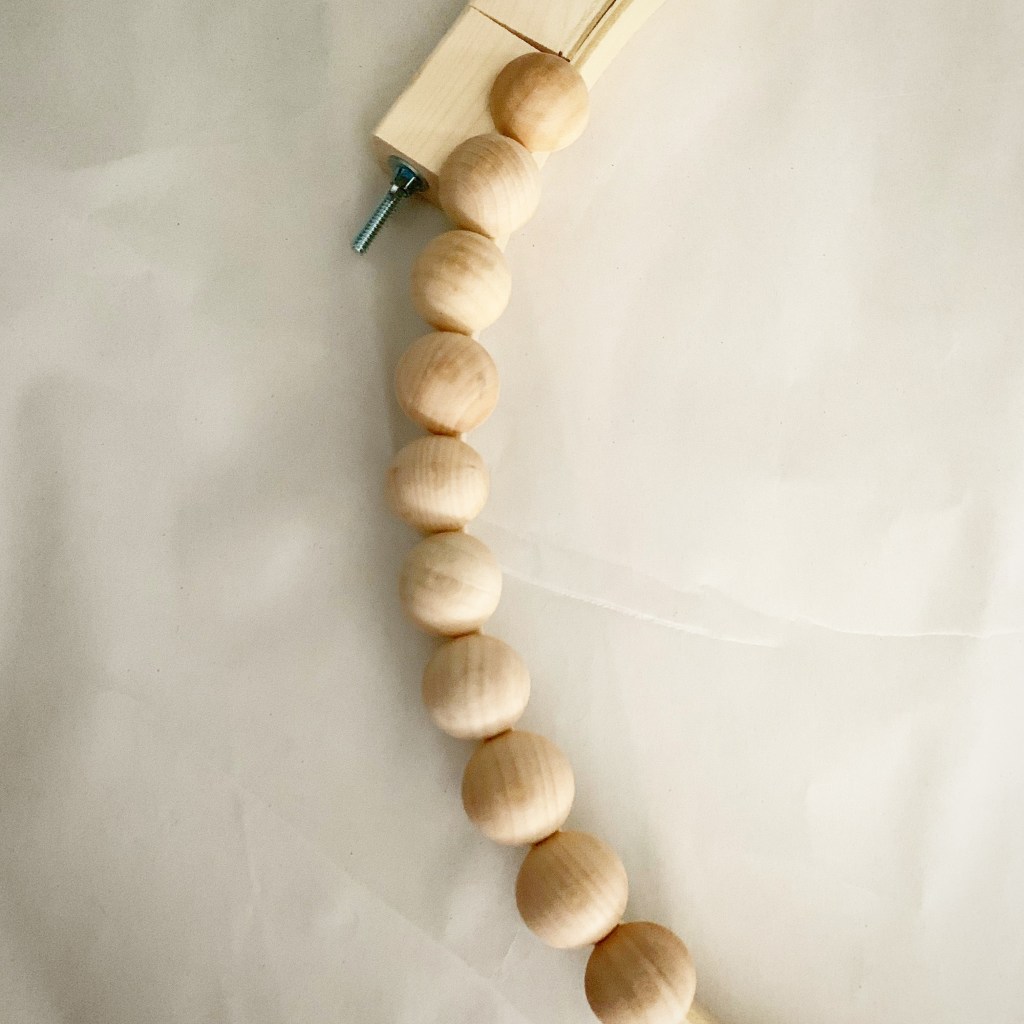
I used both pieces of the hoop – just make sure that the outer part of the hoop is screwed tightly to the inner part. Then simply glue your split wood beads to the hoop. I started at the top and worked my way around. I used 46 beads on the 14-inch hoop.
While the glue was drying on the beads, I painted my wood word with 2 coats of white chalky finish paint, letting it dry completely between coats. Then I glued it to the wreath at an angle. I attached my greenery with glue to the top part of the outer hoop. (There’s probably a name for it, but I don’t know what it is 😛 )
I made a bow using the super easy method over on re-fabbed. If you don’t follow Brooke on re-fabbed, you should! She is so cute and has the most amazing ideas! The bow is glued to the hoop over the stems of the greenery. Then I tied a piece of the monofilament thread around the top of the hoop to hang my wreath.
And here’s my finished wreath…
The split wood beads I used came in a package of 100 which is enough to make 2 (14-inch) wreaths. Hobby Lobby carries other wood words like welcome, hello, and thankful. You could leave the word natural and not paint it at all. I painted mine because the edges of the word were darker than I wanted. This wreath would also be cute with a galvanized metal word. And of course you can change the size of the wreath by changing the size of your embroidery hoop.
I’ve got a fun crochet pattern for you today. I wear glasses all the time and I’ve invested in a pair of prescription sunglasses which I love! They are so worth the money to me…as you can probably tell from the pic below, I wear bifocals (yes, age has caught up with me 😉 ). Having a pair of sunnies that enable me to see everything and read that book on the beach has been one of my best purchases!
I carry my sunglasses in my purse so having an eyeglass pouch is a must! I’ve included my free pattern for the Waffle Stitch Eyeglass Pouch below along with a link to the pdf for easy printing.
This is the right side of the pouch before sewing up the seam.
Here’s a close up of the waffle stitch.
This is the wrong side of the pouch before sewing.
And a closeup of the wrong side…which actually looks pretty good!
Sewing up the seam with a whip stitch.
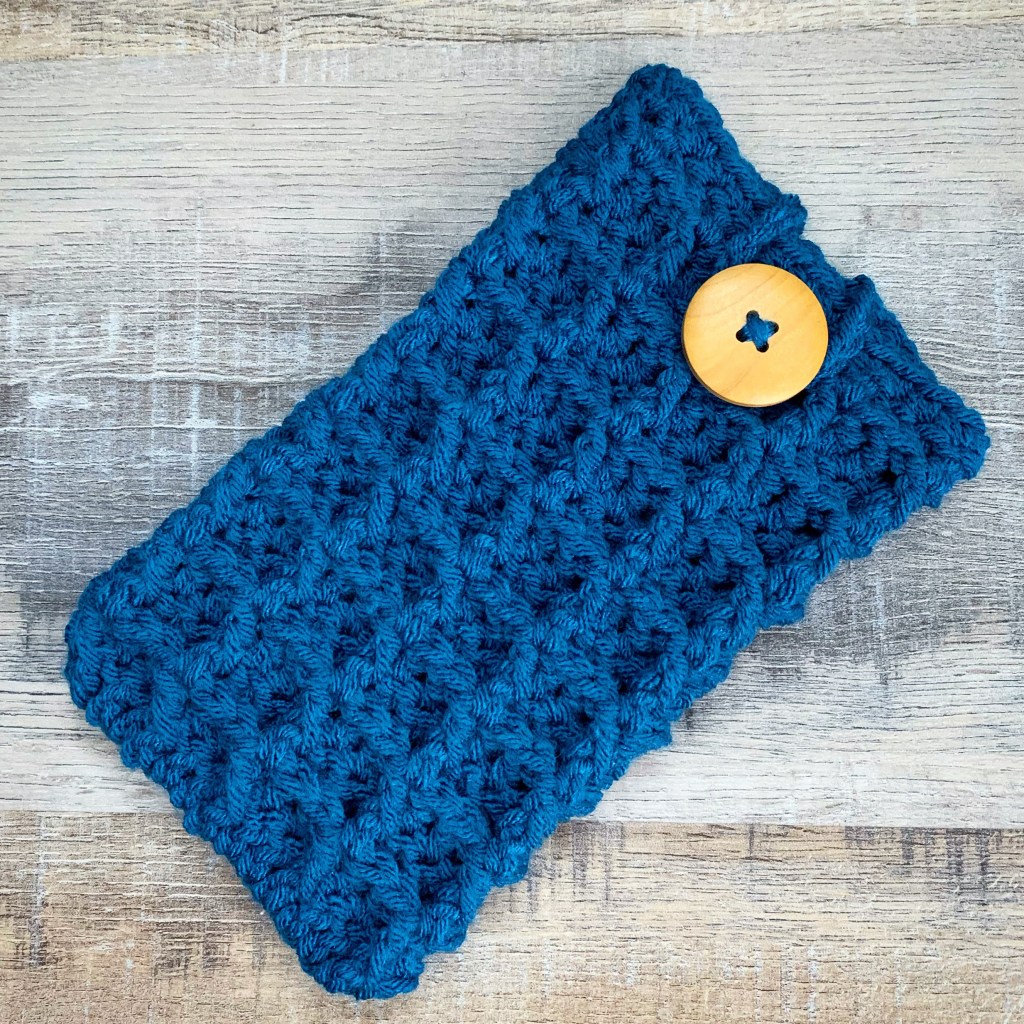
After the button has been added.
And here’s the pattern…
Waffle Stitch Eyeglass Pouch
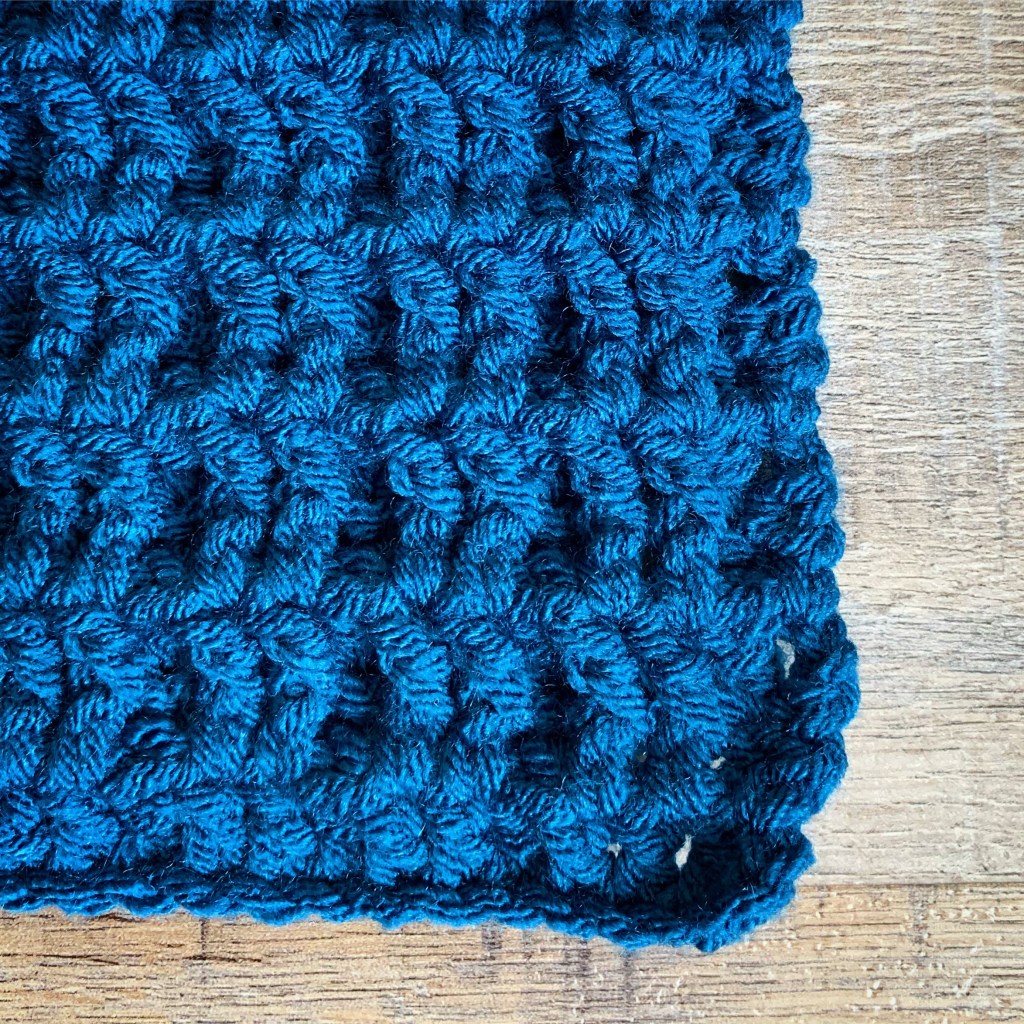
Worsted weight (4) yarn – I used Yarn Bee Soft & Sleek in Teal Blue
1 inch button
Hook size H/5mm
Stitches used (US terms):
Chain – ch
Double crochet – dc
Front post double crochet – fpdc
Ch 32
Row 1: Dc in 4th ch from hook and in each stitch across. 3 Skipped ch counts as 1 stitch. (30 stitches)
Row 2: Ch 3 (counts as 1st dc). *fpdc in next stitch, dc in next 2 stitches*. Repeat from * to * across to last 2 stitches. Fpdc in next stitch, dc in top of ch. Turn. (30 stitches)
Row 3: Ch 3 (counts as 1st dc). *Dc in next stitch, fpdc in next 2 stitches*. Repeat from * to * across to last 2 stitches. Dc in next stitch, dc in top of ch. Turn. (30 stitches)
Row 18: Ch 1. Sc in 1st stitch and next 6 stitches. Ch 15. Skip next stitch. Sc in next stitch and in each stitch to the end of the row.
Fasten off leaving a very long tail to sew up eyeglass pouch.
Fold pouch in half lengthwise with right side on the inside. Sew with a whip stitch down the side and across the bottom using the long tail. Fasten off and weave in tail.
I made my pouch a little oversized so there would be plenty of room for my sunglasses. You can easily adjust the size of the pouch by taking away or adding stitches to your beginning chain. Just be sure your chain is in multiples of 3 plus 2.
UPDATE: The beginning chain count in the PDF should be 32 not 29! I have changed it in the pattern in the post and will change the PDF as soon as I can get to my computer. 🤪 So sorry for the mistake!!
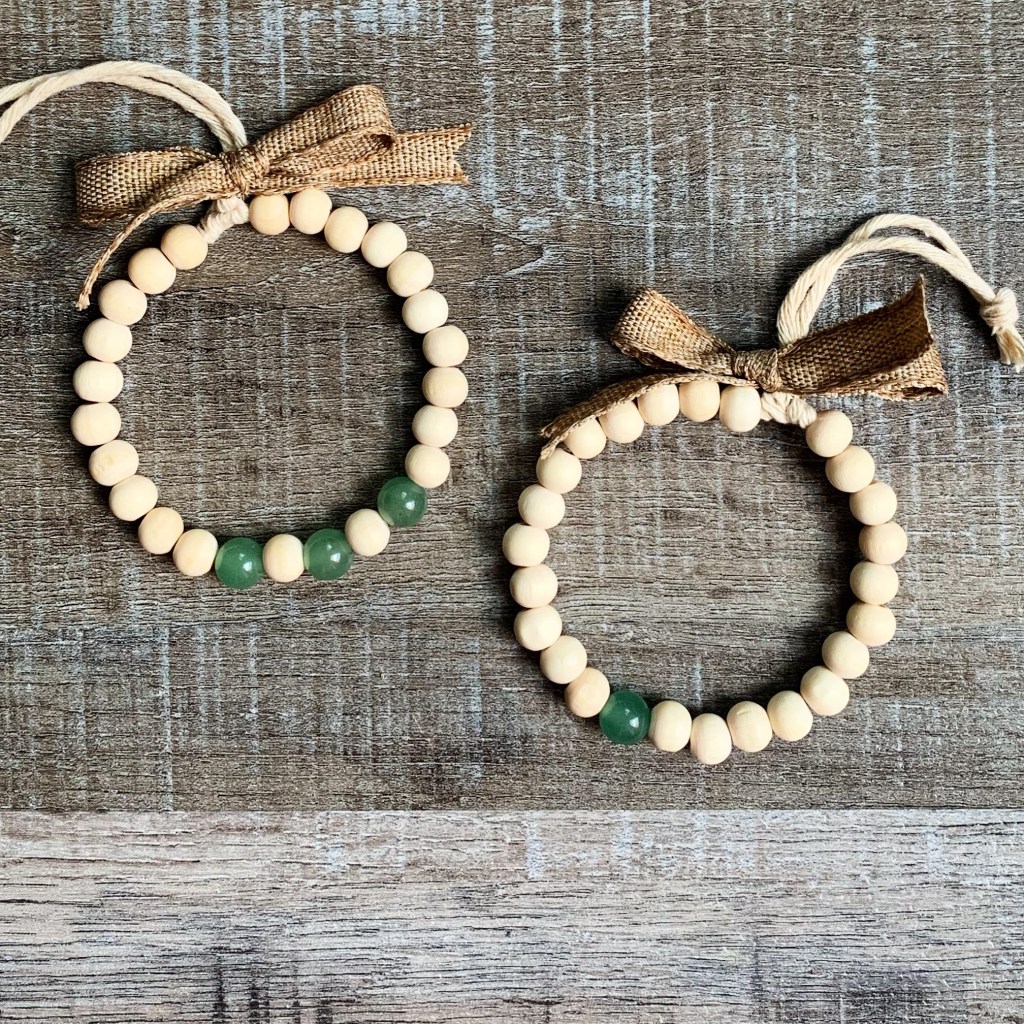
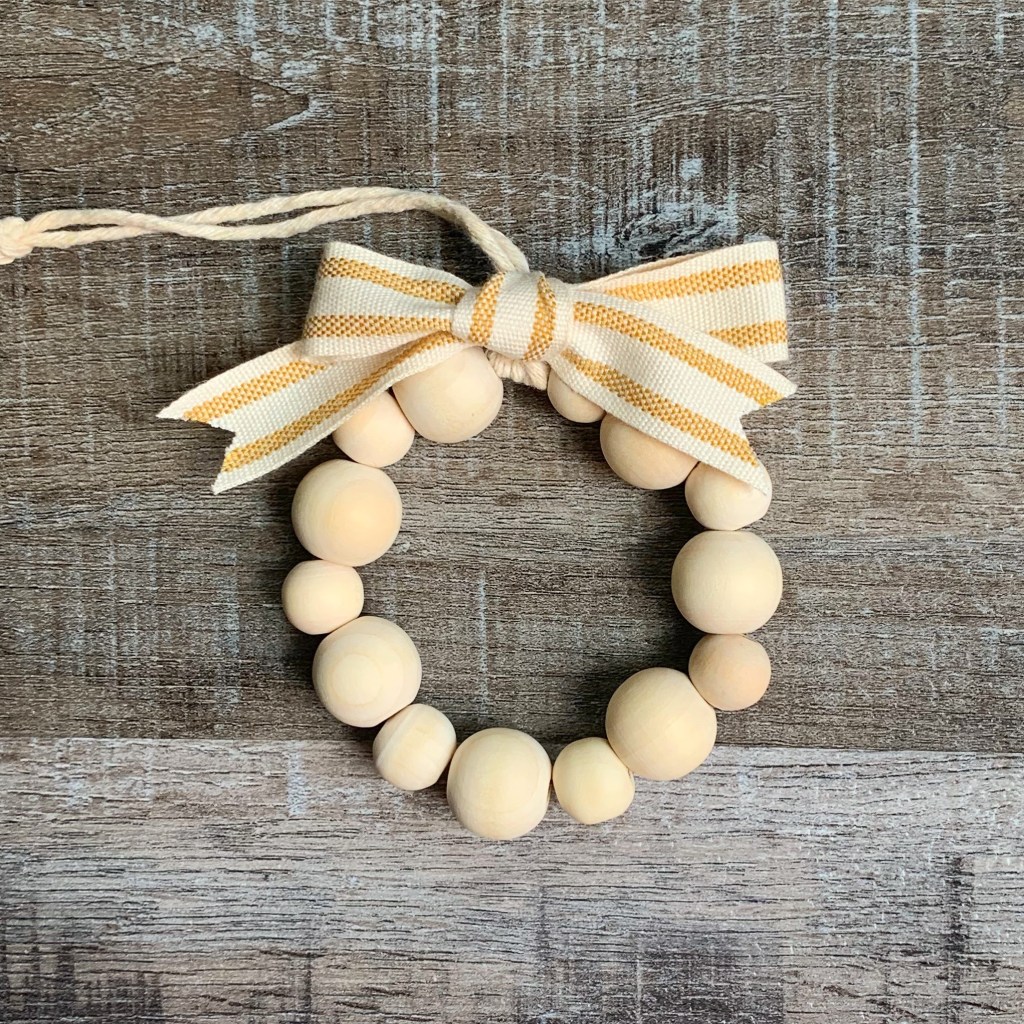
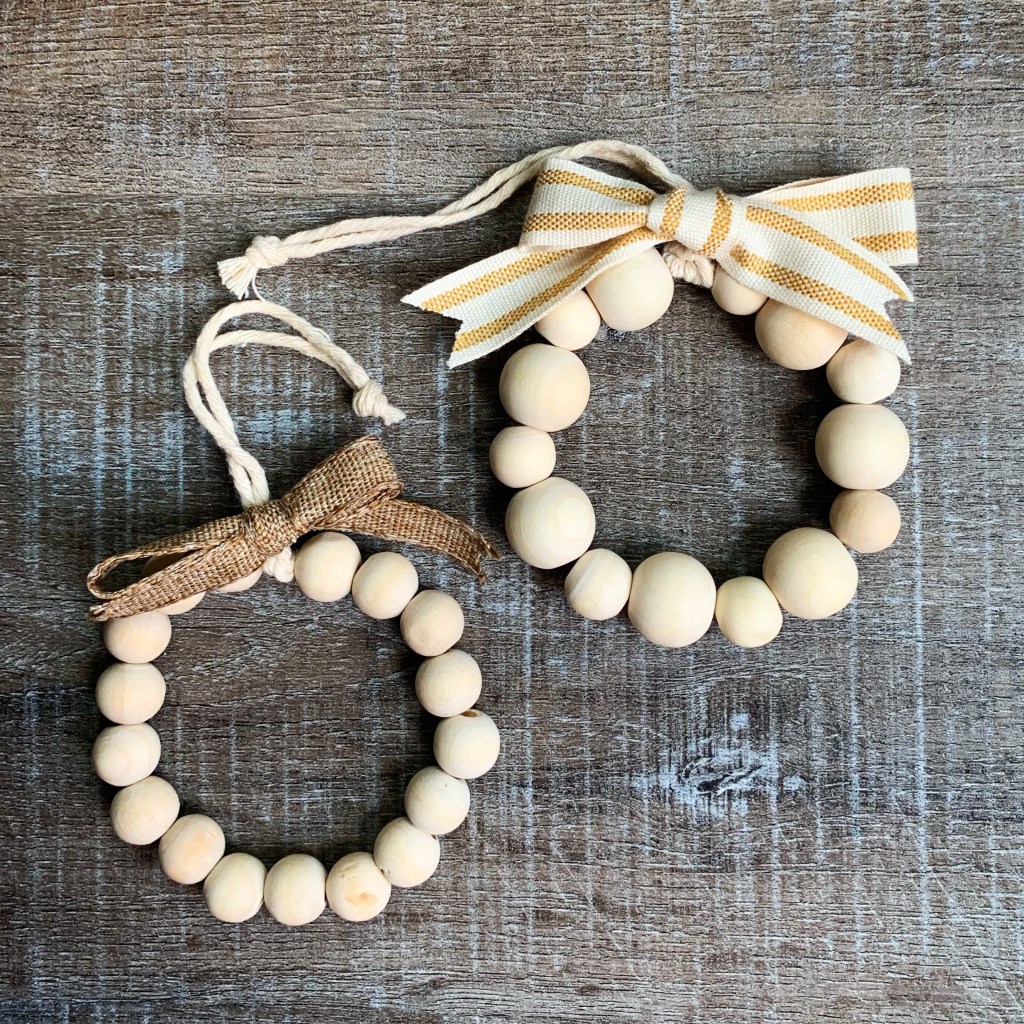
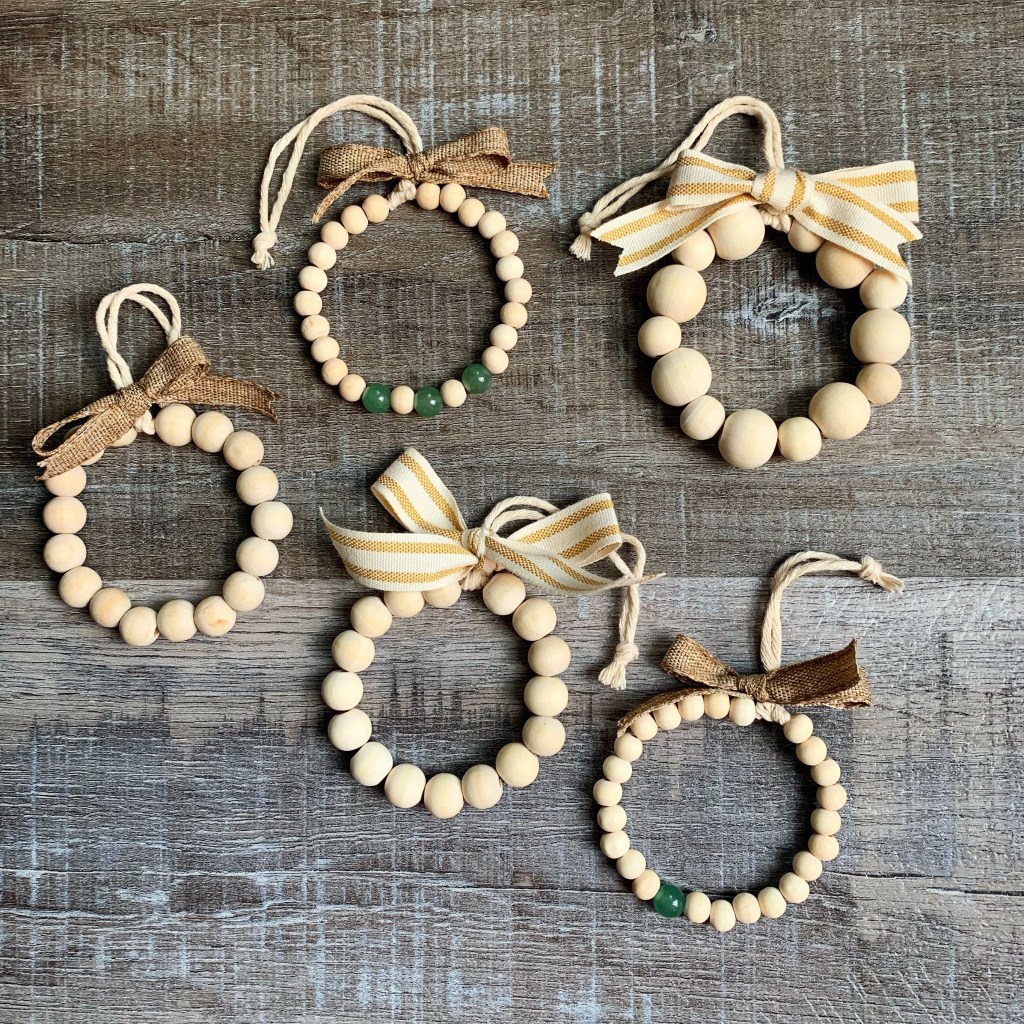
And the one on the left below is made with 12mm wood beads. I made 2 of this size and tied them with different ribbons – the other one is in the bottom picture.
These ornaments look just as cute without the ribbon bow if you choose to leave it off.
These Mini Farmhouse Wood Bead Wreath Ornaments will look great on your tree or as a cute package tie-on. You could also add it to a cutely wrapped gift from your kitchen. They would be perfect for an ornament exchange party. Lots of fun uses for these cute ornaments!
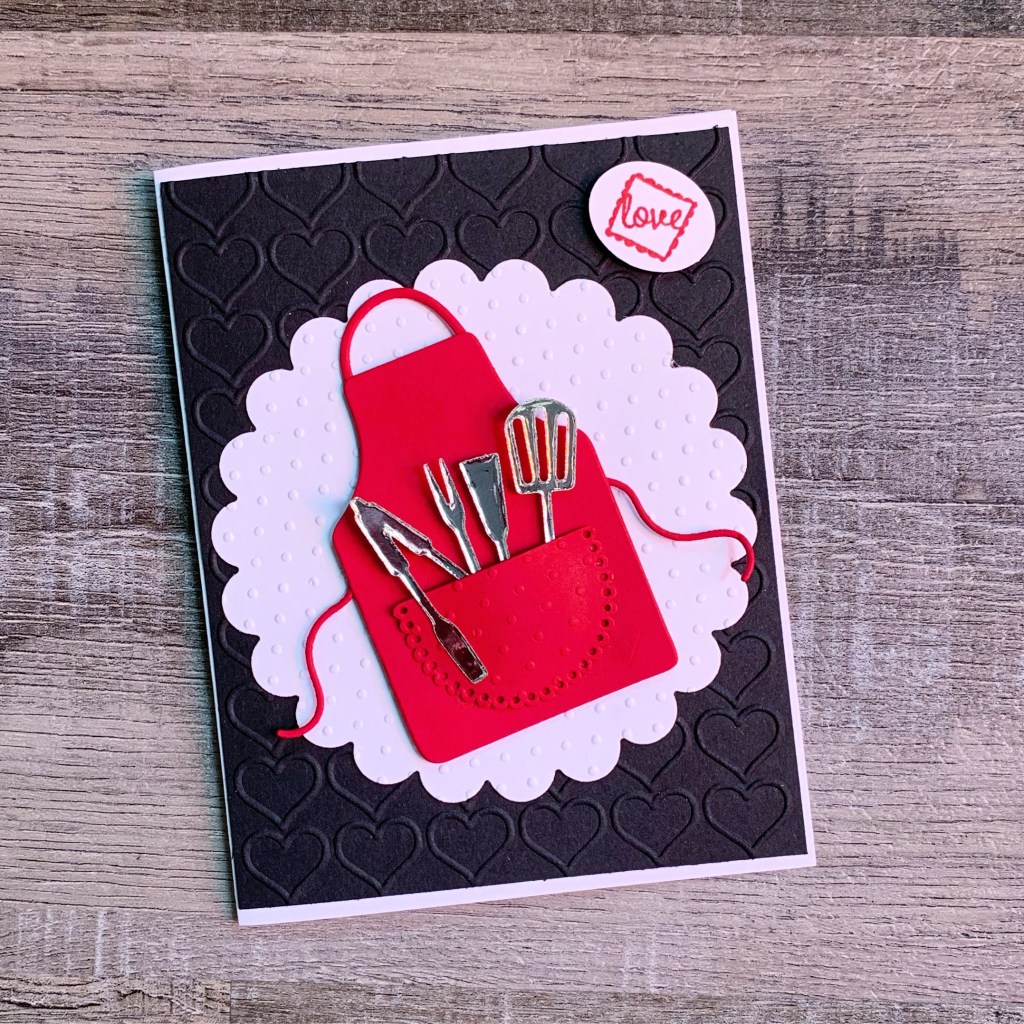
We recently attended a wedding shower for a sweet couple. We purchased a gift card for them from Williams Sonoma and I wanted to make a card to go along with the cooking theme.
I used the discontinued Apron of Love stamp and die set from Stampin’ Up. It’s too bad this is no longer available – it is such a great set to use when giving gifts from your kitchen or inviting friends to a summer BBQ. I did a quick search on Ebay and there are a few sets available there if you are interested.
To make the card, I embossed a panel of black card stock with the hearts embossing folder and attached it to a white card. I die cut the apron, ties, and apron pocket from red card stock. I embossed the pocket with the tiny dots folder. I die cut a scalloped circle from white card stock and embossed it with the tiny dots folder. (This is a great set of scalloped circle dies if you are looking for some.) I also die cut the utensils from silver mirror card stock.
The scalloped circle is attached to the card over the heart embossed panel. I assembled the apron, attaching the utensils to the back of the pocket and used foam tape to attach the pocket to the apron. The apron is attached to the scalloped circle with foam tape. The “love” sentiment is stamped with red ink on white card stock, punched with an oval punch similar to this, and attached to the card. I’m not sure where that stamp is from – it was a random stamp in my collection. A little heart stamp would also be really cute!
I love creating cards to match the theme of a gift! I hope this sweet couple finds lots of love in their kitchen. 🙂
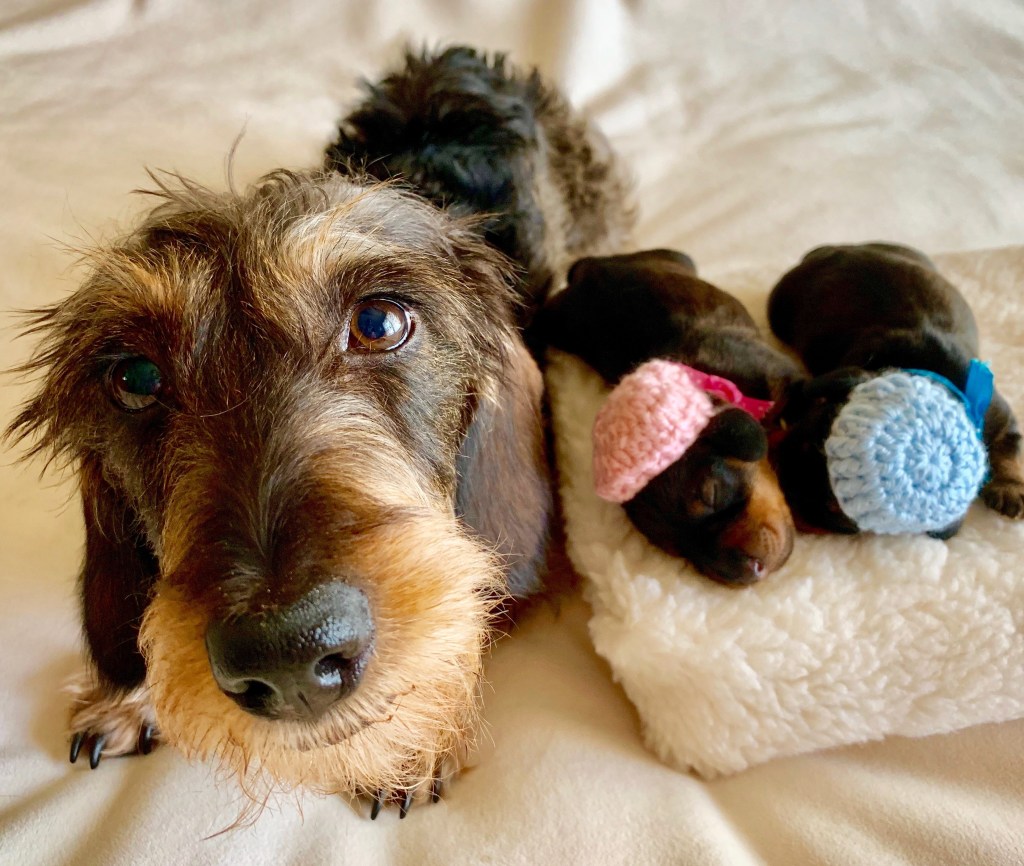
I have a friend who is crazy in love with all of her animals. And I have to admit that she has some of the best and sweetest animals I’ve ever known. 🙂
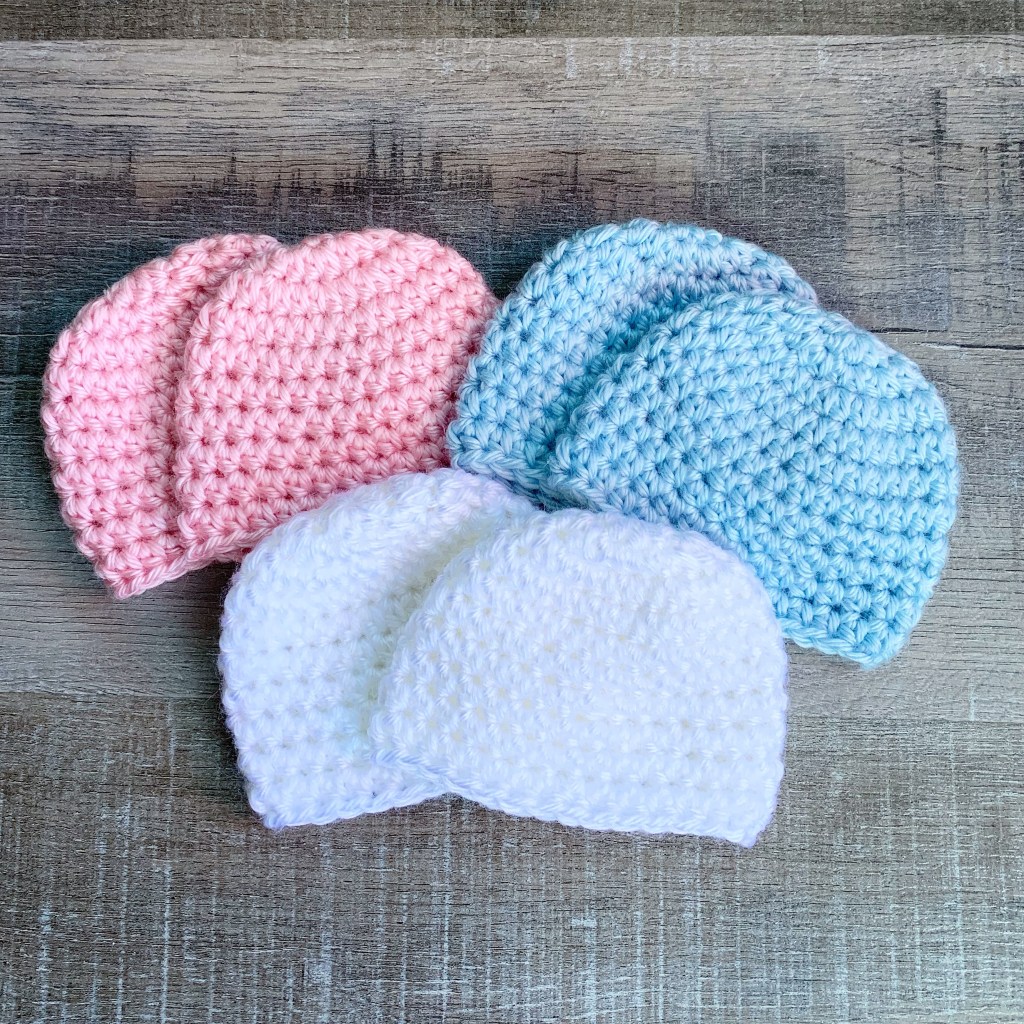
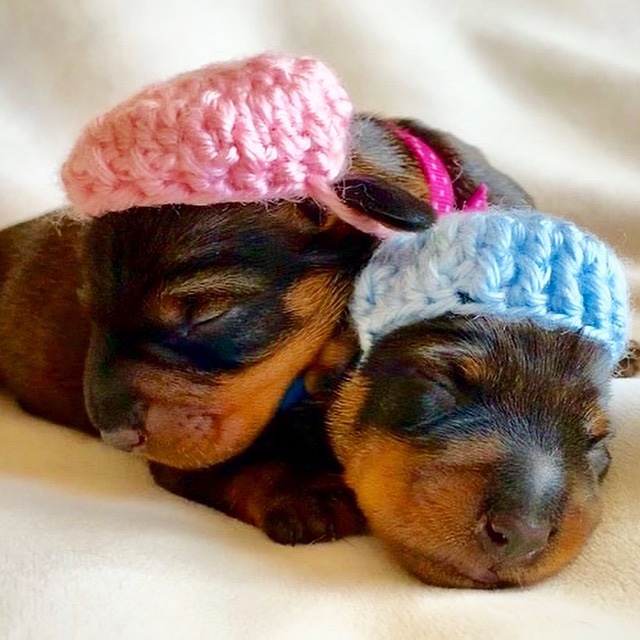
Her sweet wire-haired dachshund named Daria just had 2 of the most adorable puppies! My friend saw a picture of some sweet puppies in tiny crocheted beanies and knew that she had to have some for her new puppies.
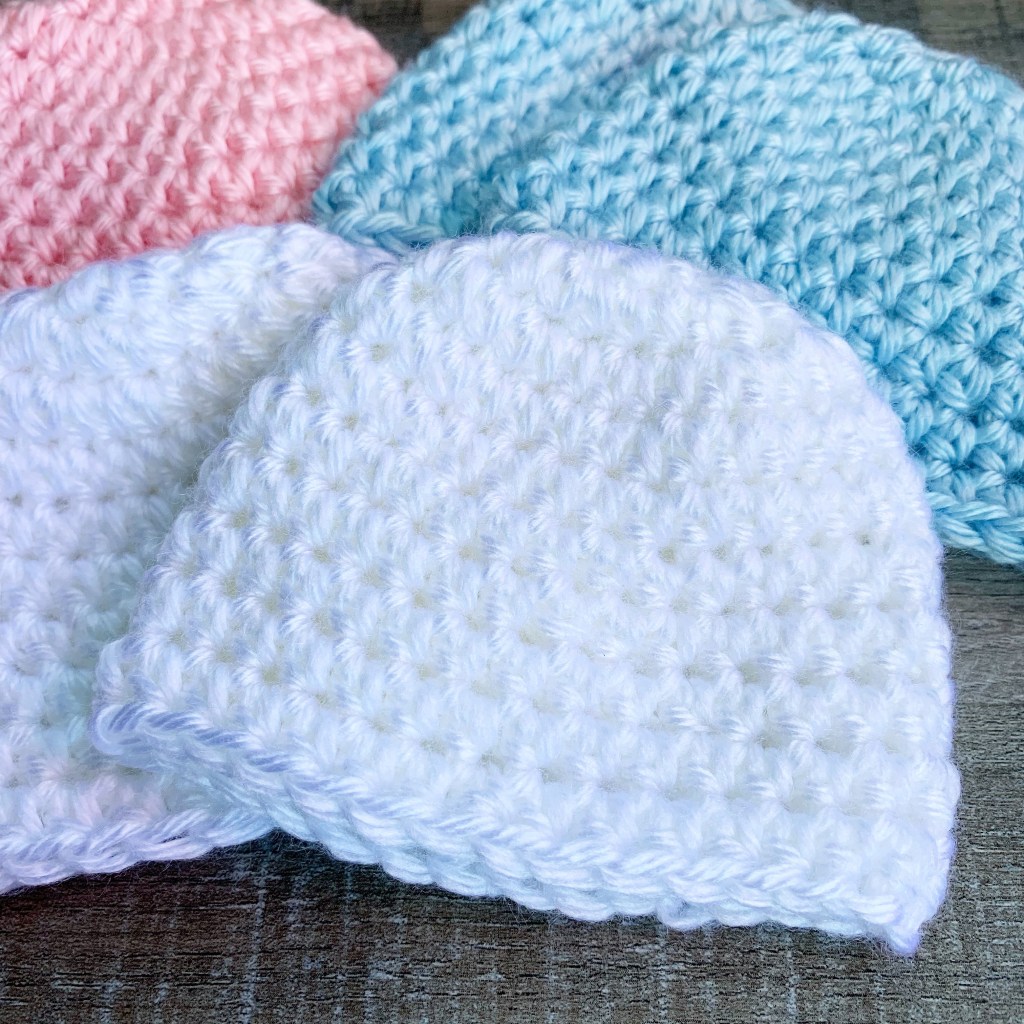
I found this free pattern for premie baby beanies and adjusted it just a little for the new puppies. I used Caron Simply Soft yarn and a G/4mm hook to stitch up the beanies. The only adjustment I made to the pattern was to stop after 10 rounds.
By using a larger hook, you can adjust the finished size of the beanies. The larger the hook, the larger the beanie. The pattern shows the difference in size using 4 different size hooks.
Here is the sweet tiny little girl!
Unfortunately, even though these beanies are super tiny, they are still too big for the new little puppies! 😳 My friend took out several rows on the beanies so they would sit on their tiny little heads for a photo shoot. 😊 They will have to grow into the other beanies later – but they are so adorable!!! ❤️
Here’s a closer picture of the beanies. I forgot to measure them but I think they are about 3 – 4 inches across and 3 – 4 inches from top to bottom.
This pattern was designed to make beanies for precious babies born a little too early. They work up super fast and would be a great donation for your local NICU – just check with them first before donating.
Disclosure: Some of the links on my site are affiliate links, meaning, at no additional cost to you, I will earn a small commission if you click through and make a purchase. As an Amazon Associate I earn from qualifying purchases.