He was so fun to make – I knew I had to try my hand on a different one! I found this paid pattern for this cutie, Tina the Triceratops, here on Etsy.
I noticed that the pattern says it is sold out 😦 I found another similar Triceratops pattern here.
I used worsted weight yarn and an F/4mm hook to crochet her. I think the yarn was I Love This Yarn from Hobby Lobby in Sungold and Mid Green – the labels were missing from my stash. 😕
Isn’t she just the sweetest?!?! You can make her in your little one’s favorite color combo!
I stamped the images with Memento Tuxedo Black ink on white card stock and colored them with Copic markers. I die cut the images with a circle die and layered them to a larger circle of green card stock. This is a great set of circle dies.
(If you don’t have a die cutting machine and are looking for a smaller, less expensive machine to get started, I highly recommend this Cuttlebug Machine. I’ve had mine for a long time and it’s the one I use over and over to die cut or emboss when I’m making cards or smaller paper projects. It doesn’t take up much room on my desk so it’s easy to keep handy. It comes in this pretty Blue or Rose color. If you decide to purchase a Cuttlebug Machine, I suggest you also purchase an Adapter C Plate. You will need that when using some of the dies to cut your shapes.)
But back to the card… I layered polka dot patterned paper to turquoise card stock and attached it to a white card. I stamped “Happy Birthday” with turquoise ink on white card stock and punched it with a label punch. (The stamp is from the Itty Bitty Greetings set from Stampin’ Up. The label punch, also from Stampin’ Up, is discontinued but here’s a similar one.) I attached the sentiment to the card and added a turquoise enamel dot. The stamped and colored image is attached to the card with foam tape.
I just love this Delightful Flutterbys set – by changing the sentiment, this card would be great for a thank you, thinking of you, or just a hello card!
Is this not the cutest little elephant? Such fun for a child’s birthday card! I found this stamp set called Birthday Celebration at Simon Says Stamp. I just love how this card turned out. 🙂
Happy Birthday!
I embossed a panel of red card stock with a numbers embossing folder and attached it to a white card. (This one is discontinued, but here is a similar one.) I stamped the elephant and balloon with Memento Black ink on white card stock and colored the images with Copic markers. I trimmed the stamped piece, layered it to blue card stock, and attached it to the card with foam tape.
“Happy Birthday” is from the Itty Bitty Greetings set from Stampin’ Up, but any birthday stamp would work just fine. I stamped it with red ink on white card stock, punched it with a label punch (here’s a similar one), and attached it to the card. To finish the card, I added a red gem next to the sentiment.
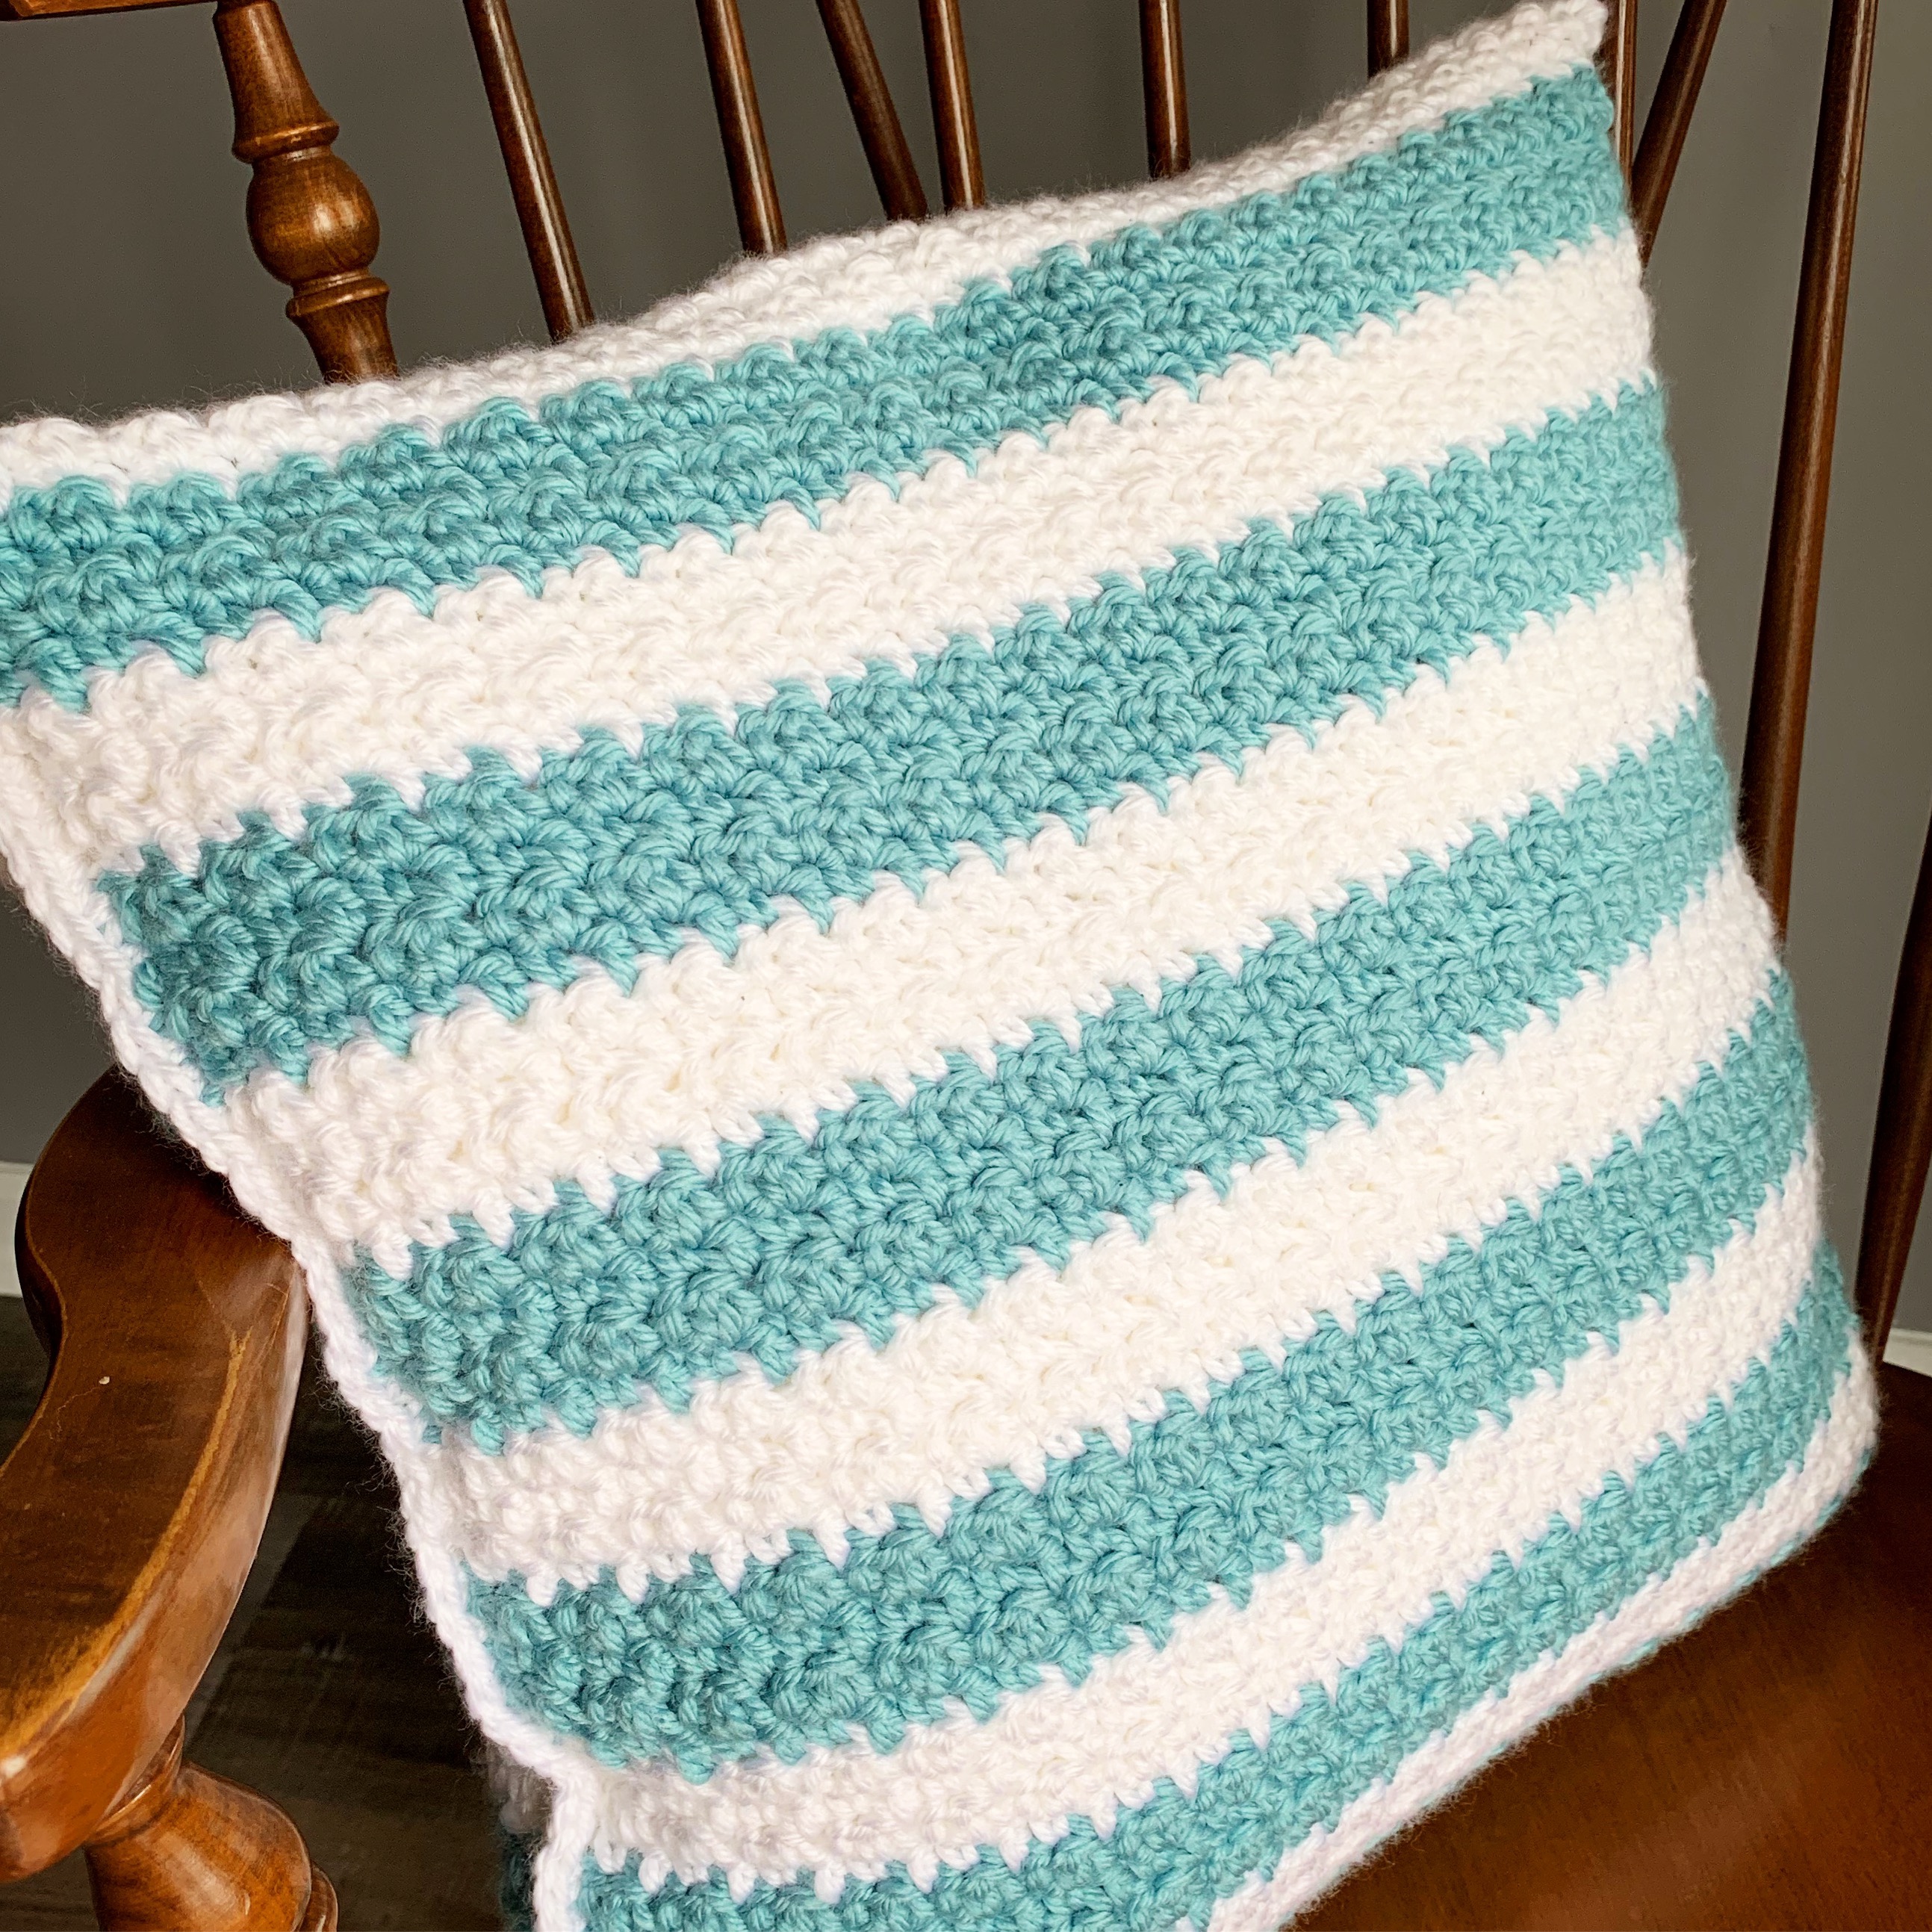
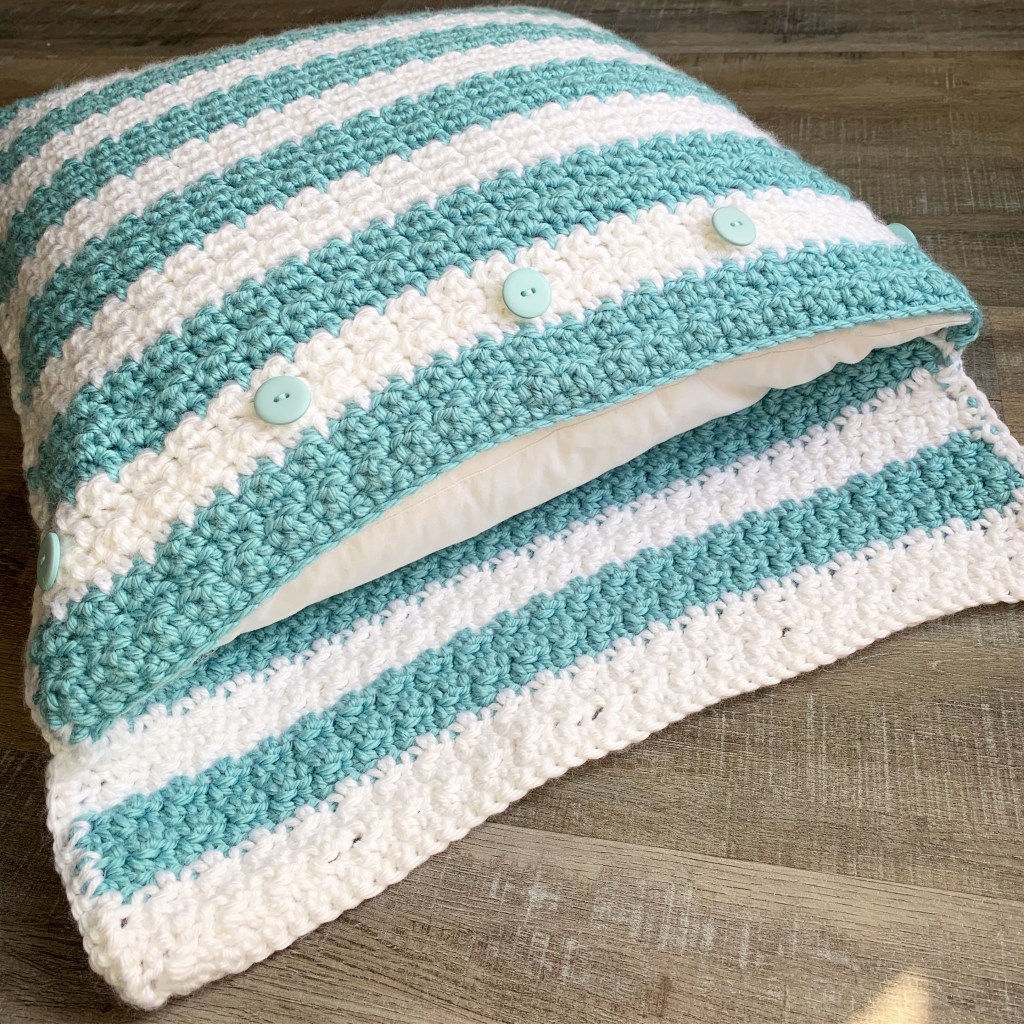
Have you ever crocheted anything with the Griddle Stitch? It’s really simple – just alternating single and double crochet – but it gives a great texture. It was perfect for the pillow cover I wanted to make.
I crocheted my pillow cover using Red Heart Soft Essentials yarn in White and Seafoam and a J/6mm hook. My pillow insert is 18-inches square.
Row 1: sc in 2nd chain from hook. Dc in next stitch. Repeat alternating sc and dc across – ending with a dc in last ch.
Row 2: ch 1. Sc in first dc. Dc in next sc. Repeat alternating sc and dc across row.
Repeat row 2 until you have 104 rows, changing color every 4 rows.
I carried my yarn up the side rather than cutting it at each color change because I hate weaving in all those ends!
Fold your pillow cover up so that the carried yarn is on the inside, leaving 12 rows at the top to fold over.
Attach the white yarn to the bottom right corner and sc through both layers, around the top (being sure to crochet over the carried yarn), and through both layers on the other side down to the bottom left corner.
Fasten off and weave in ends.
Sew on 5 (3/4-inch) buttons about 6 rows down from the opening of the pillow cover. Put in your pillow insert, fold over the top, and button it closed.
This is a really easy pattern to adjust. Just be sure that your beginning chain is an odd number of stitches.
I’m always looking for new ideas for weeknight dinners. Pinterest is a great place to get inspiration – like this One Skillet Dijon Chicken with Mushrooms. It’s quick and simple to make – perfect on a busy weeknight!
The recipe also calls for chopped fresh chives for garnish, but I forgot to get them. 🙄
This recipe was a hit with my husband! I will be making it again. 😊
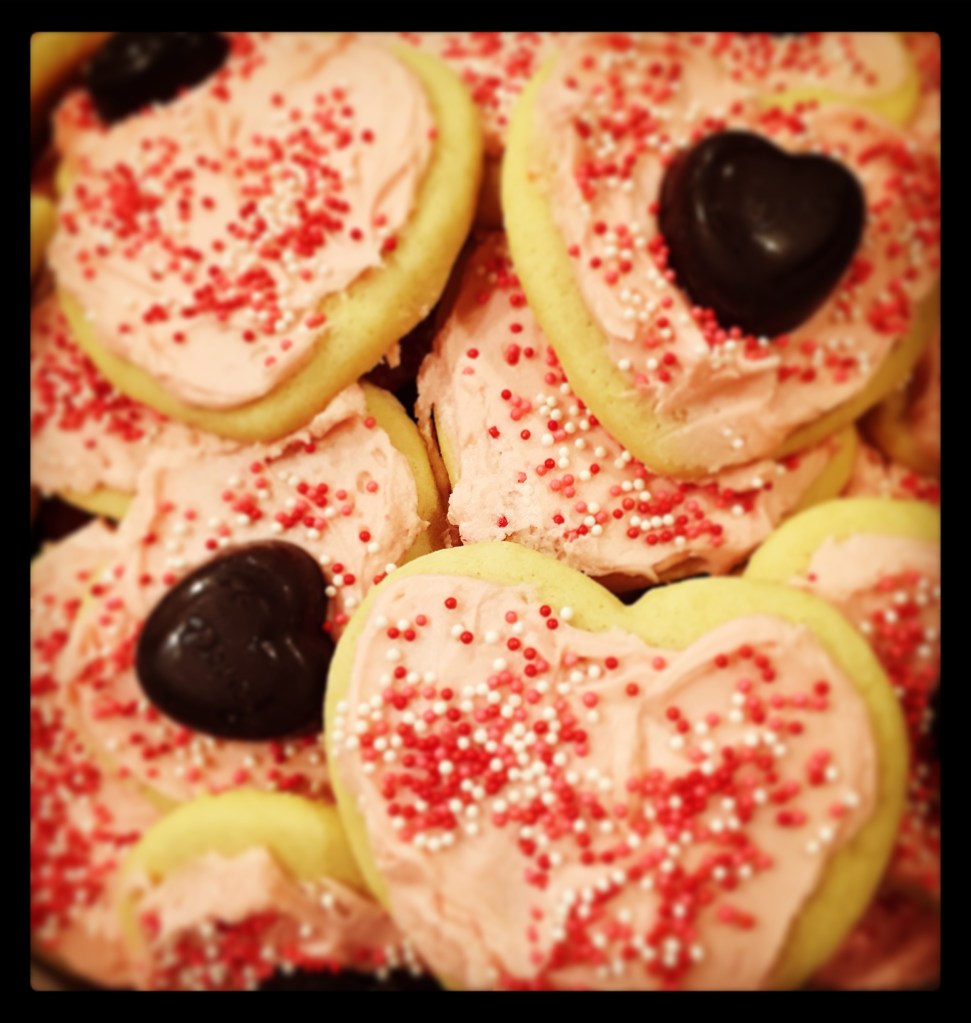
I shared this yummy Sugar Cookies recipe a couple of years ago and just had to share it again! It’s the perfect cookie to make with the kids – let them decorate their own treats! Enjoy!
These are the most yummy sugar cookies! They are soft, light, and just wonderful with homemade buttercream icing and sprinkles!
As you can see by the photos, I made these for Valentine’s Day, but you can change the shape of your cookie cutter for any holiday (Easter is coming!) – or just use a round cookie cutter and make them any time. 🙂
Soft Sugar Cookies
1/2 cup butter, softened
1/2 cup crisco
1 cup sugar
1 1/2 teaspoons vanilla
3 eggs
Cream together until smooth.
3 1/4 cups flour
1 teaspoon baking soda
3/4 teaspoon salt
2 teaspoons cream of tartar
Mix together and add to creamed mixture. Mix well. Cover dough and chill for at least 8 hours or overnight.
Preheat oven to 400°. Roll dough to 1/4-inch thickness on a floured surface and cut out with cookie cutter. Bake on an ungreased baking sheet or non-stick baking mat 6 to 8 minutes. Cookies will be pale in color. Let cool completely on cooling rack before icing.
Buttercream Icing
1/2 cup (1 stick) butter, softened
1 teaspoon vanilla
1 lb powdered sugar (or more if needed)
2 to 4 tablespoons milk
food coloring if desired
Cream butter with vanilla until smooth. Slowly add powdered sugar, mixing well. Add milk as needed to make icing spreadable. Add food coloring if desired. Make sure icing is not too thin; add more powdered sugar if needed.
I added a little red food coloring to make the icing light pink for my Valentine cookies. I topped them off with sprinkles and some of them with dark chocolate hearts – because you can never have enough chocolate. 🙂
This is a great recipe to make with your little ones – let them decorate their own cookies just the way they like them!
I stamped the owl with Memento Tuxedo Black ink on white card stock, colored him with Copic Markers, and punched him out with a circle punch. Then I layered him to a scalloped circle punched from patterned paper.
I embossed a panel of white card stock with a heart embossing folder. (This one is discontinued, but here’s a similar one.) The embossed panel is attached to a white card. The sentiment, from the My Kinda Favorite Owl, is stamped with red ink on white card stock and punched with an oval punch. (Great set of oval dies here.) Both the sentiment and the owl image are attached to the card with foam tape.
This is a simple layout that you can use to make a card for any occasion. Just change the focal image, sentiment, and embossing folder for a quick and easy birthday, thinking of you, or Christmas card!
I have another quick and easy Valentine card to share with you today. This one uses the set called A Guy and his Truck from Unity Stamp Company. If you haven’t checked this stamp company out yet, you NEED to!! Seriously, they have the best red rubber stamps and sales all the time!
I stamped the truck with Memento Tuxedo Black ink on white card stock and colored it with Copic markers. I layered it to turquoise card stock and attached it to a white card.
The sentiment is stamped with red ink on white card stock and punched with a label punch. (Here’s a similar punch.) I attached it to an oval punched from red card stock with foam tape. (This is a great set of oval dies.) The oval is attached to the card with foam tape.
And that’s it! Ready to be delivered with love! ❤️
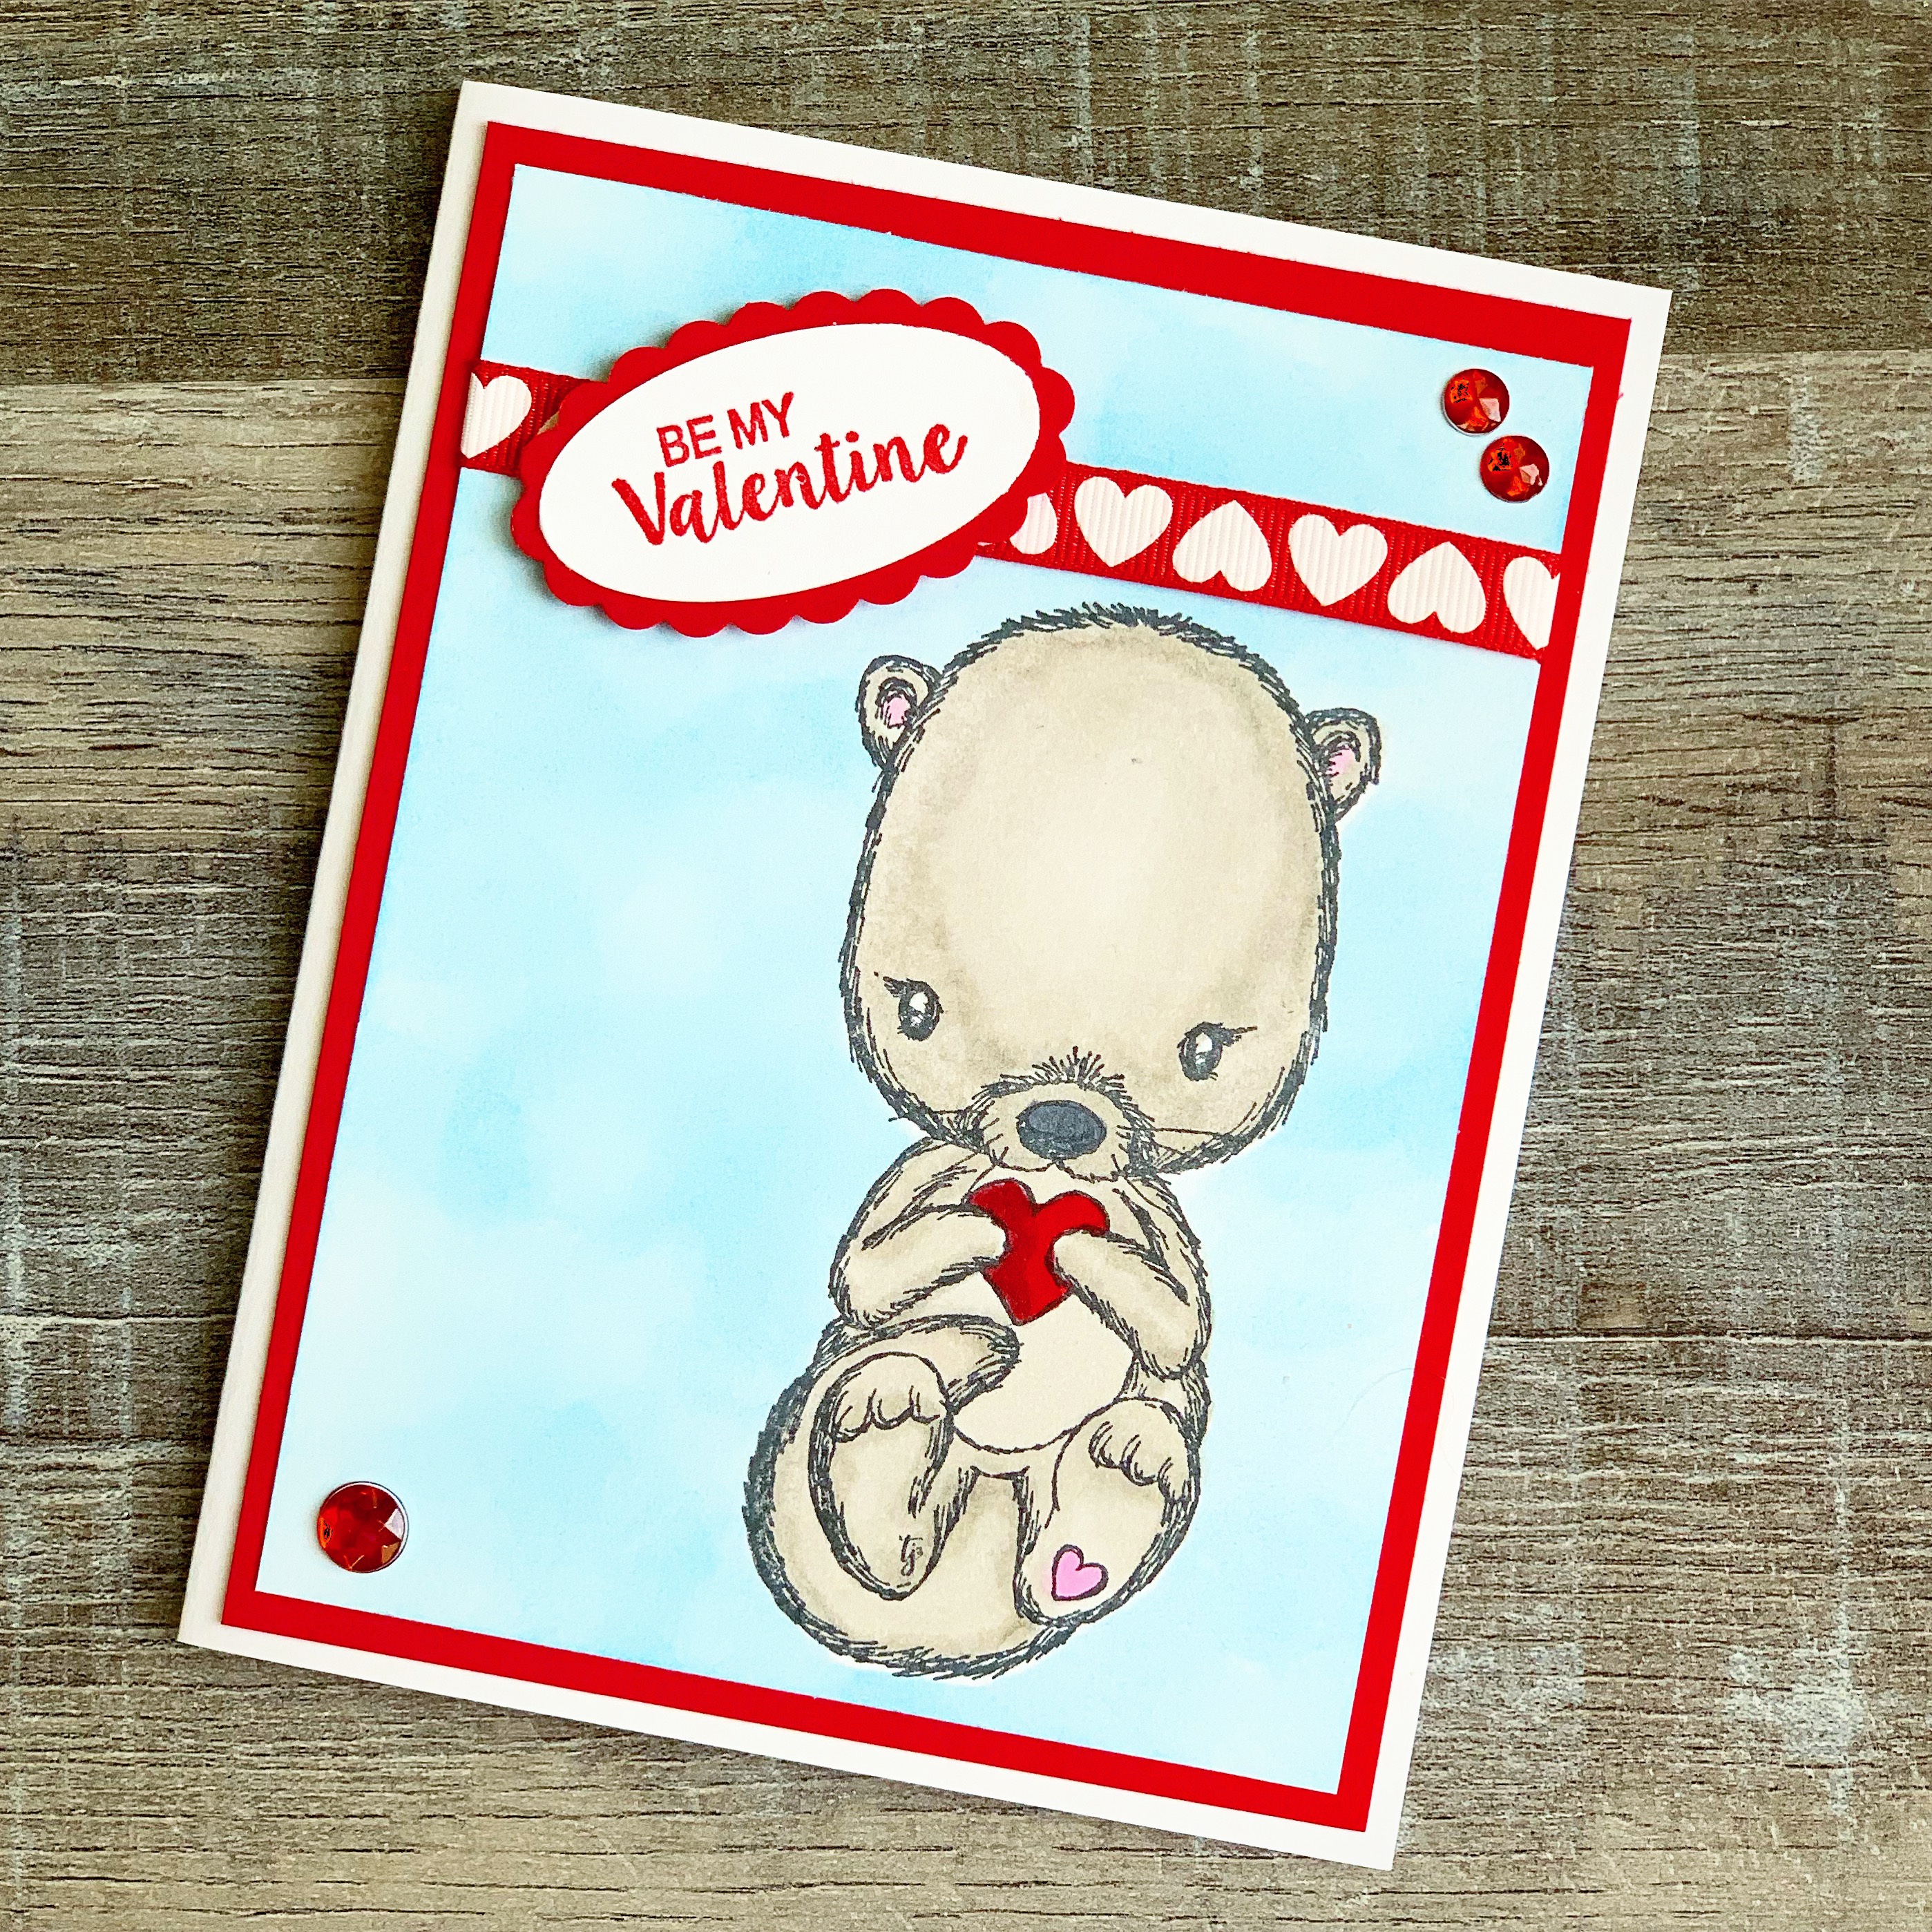
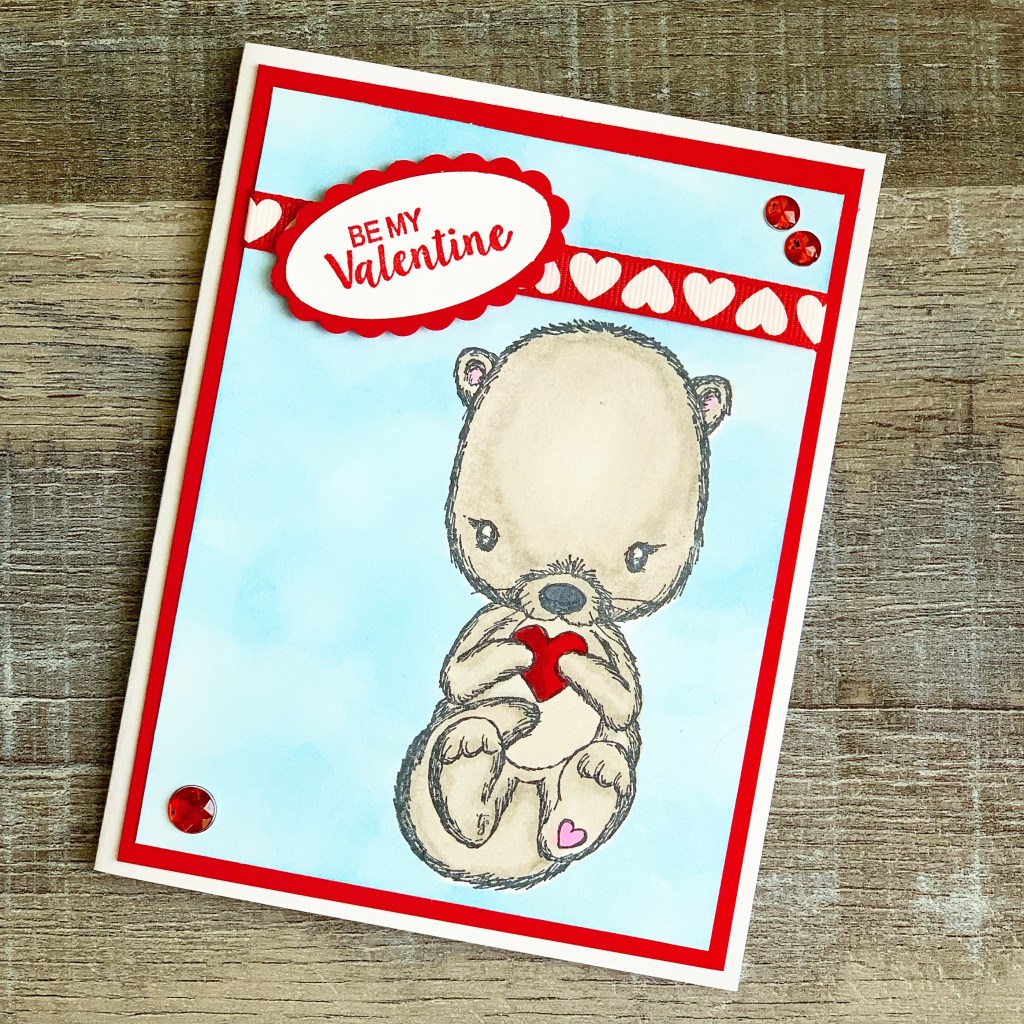
This card is super quick and easy to make! Stamp the otter with black ink (my favorite is Memento Tuxedo Black) on a panel of white card stock. Color with Copic markers. Then make a mask of the otter by stamping him on text weight paper and cutting out the image. Using a little removable adhesive, attach the mask over your colored image. Sponge a background of light blue ink over the entire stamped panel of white card stock. (This Mini Ink Blending Tool works great for this technique.)
Add a ribbon across the top of the panel and layer the panel to red card stock. Attach entire panel to a white card.
Stamp “Be My Valentine” with red ink on white card stock. (This stamp is from the Love You Every Day set by Unity Stamp Company.)Punch with an oval punch and layer to a scalloped oval punched from red card stock. (The punches I used are discontinued from Stampin’ Up, but this is a great set of oval dies and another set of scalloped oval dies.) Attach to the card with foam tape. Finish the card by adding three red gems.
Isn’t he just adorable?!?!? ❤️
If you don’t have the stamps or punches I used, no worries! Just use my card as inspiration and use what you do have!!
Disclosure: Some of the links on my site are affiliate links, meaning, at no additional cost to you, I will earn a small commission if you click through and make a purchase. As an Amazon Associate I earn from qualifying purchases.