Crochet Ribbed Pillow Cover

Hi friends,

When we remodeled our home last year (you can see some before and after pics in this post), I decided I wanted to add some pops of turquoise to our decor. I crocheted this Griddle Stitch Pillow Cover, which I loved so much, that I thought I would make another one in a different pattern!

This one is super easy to make. It is all single crochet and crocheted in one piece.

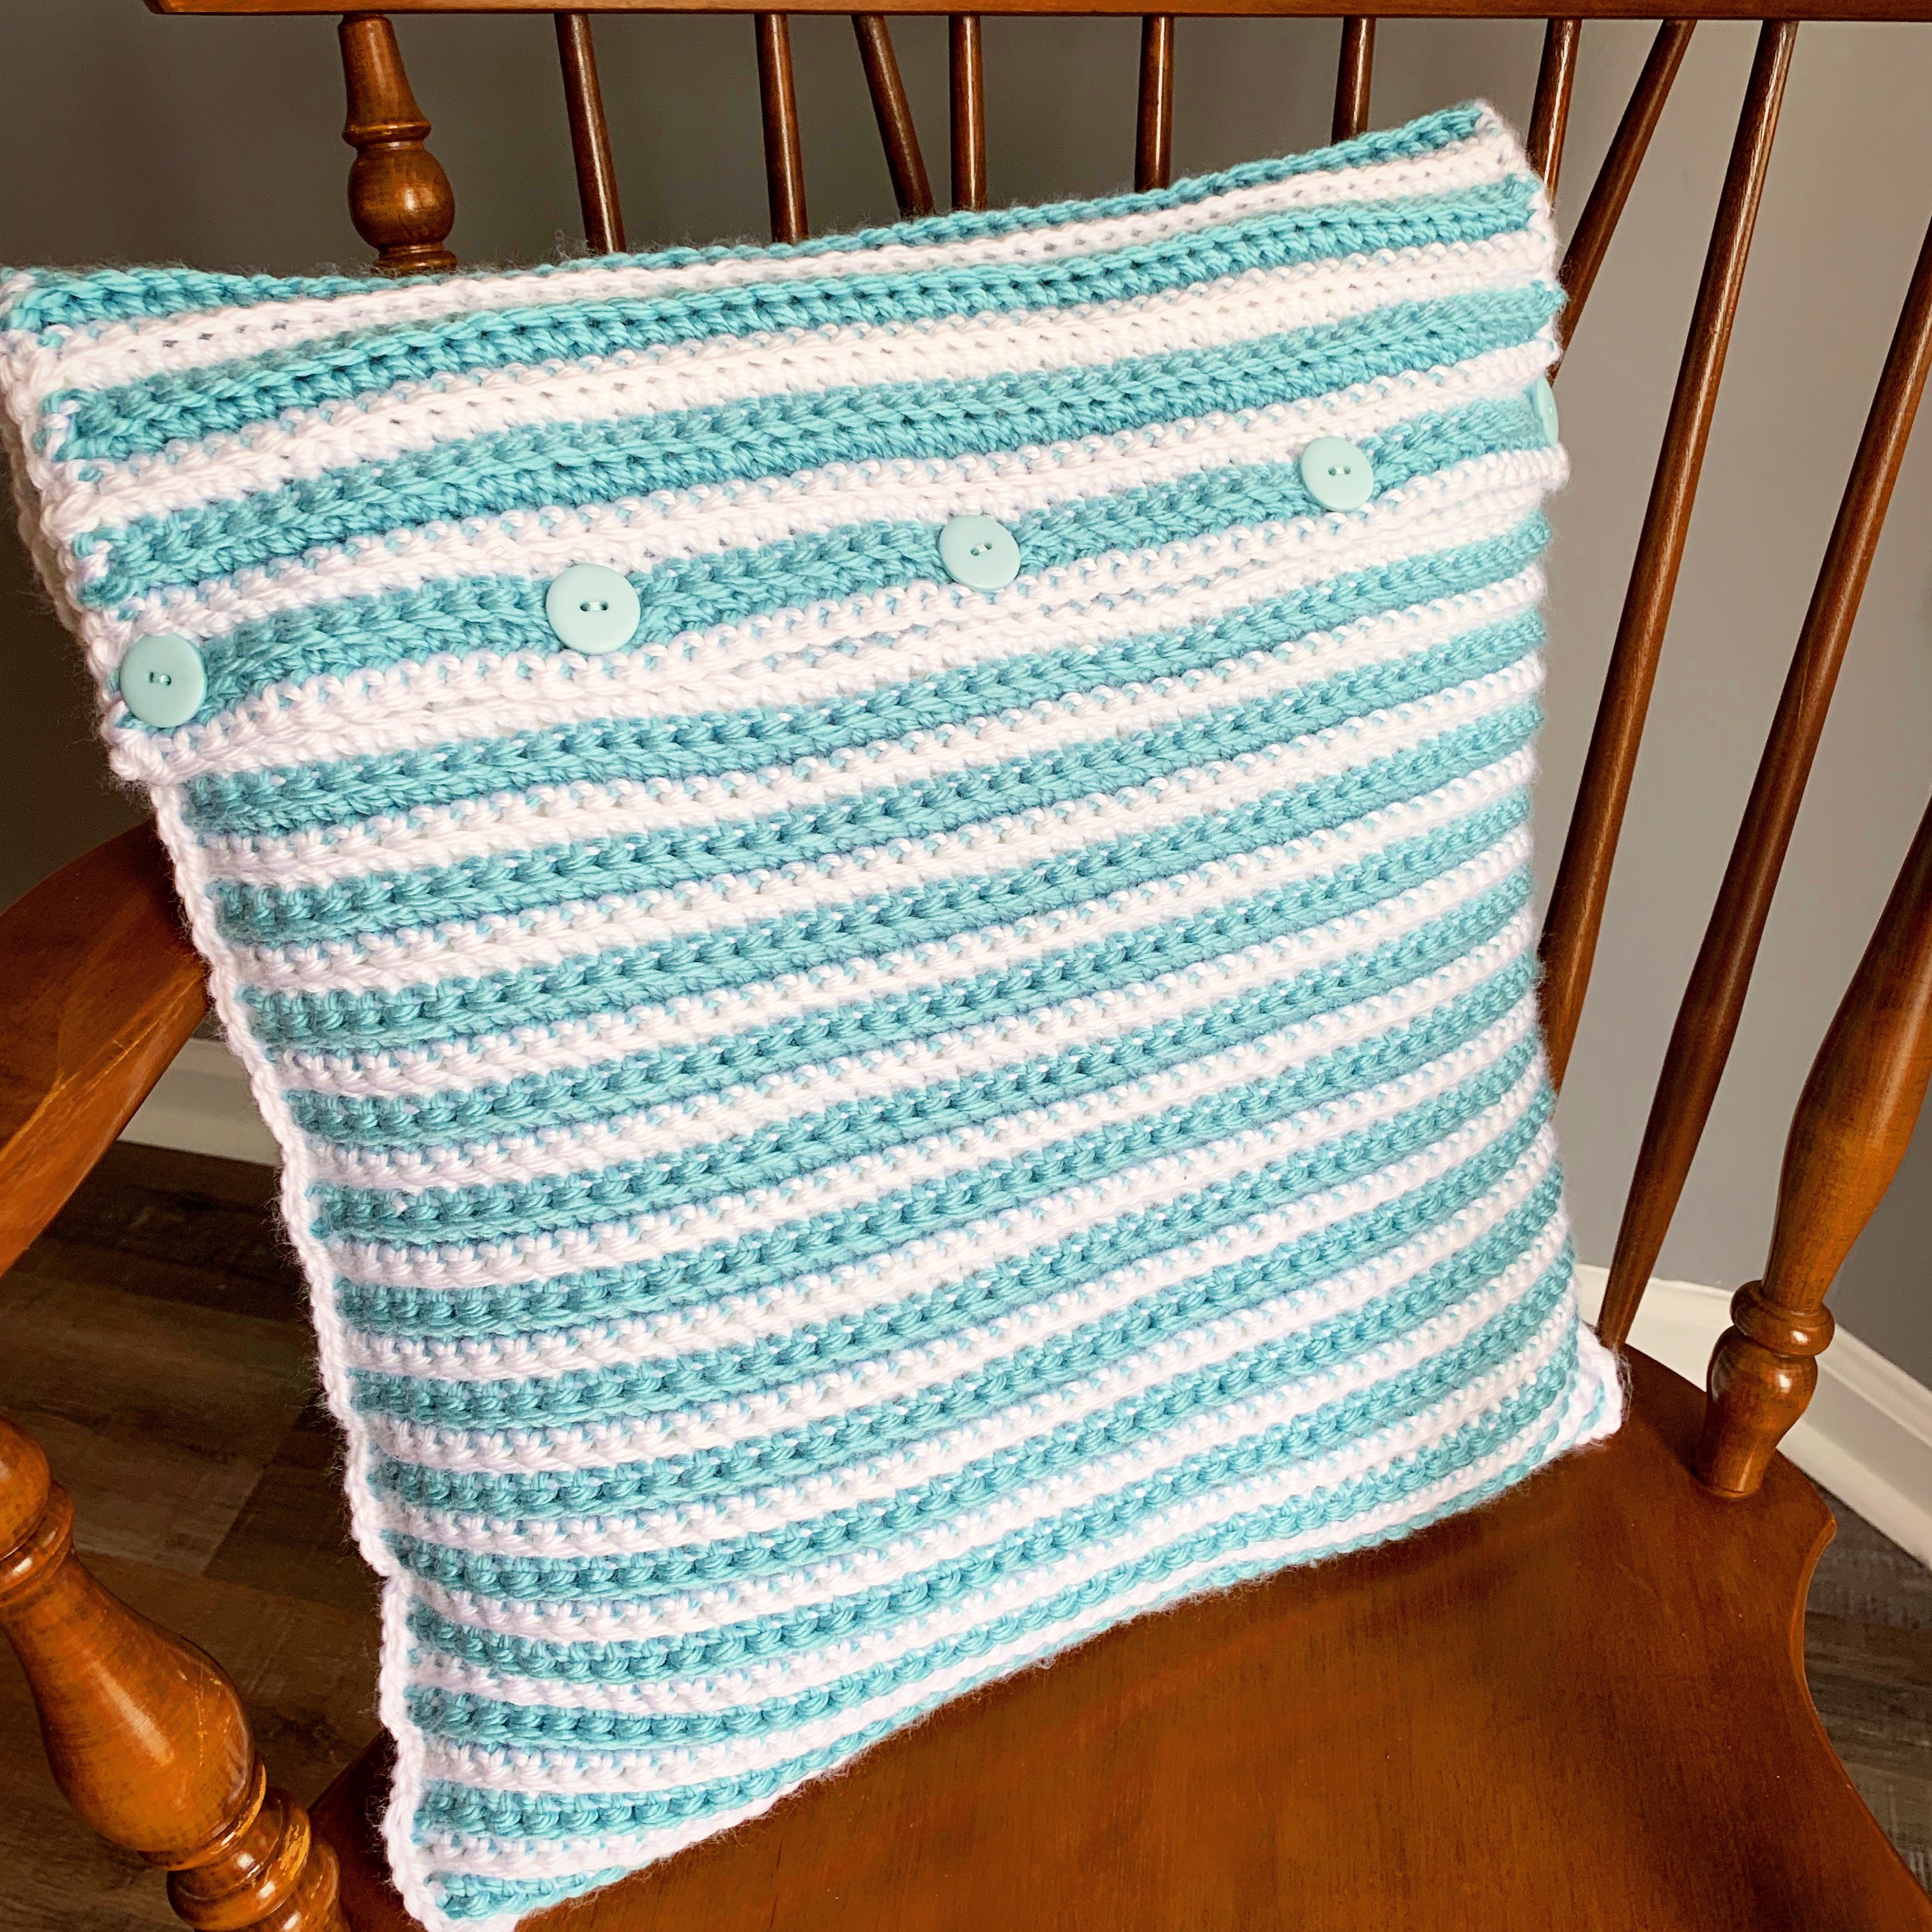
My pillow insert is 18-inches square. I used Red Heart Soft Essentials yarn in White and Seafoam with a J/6mm hook to make my pillow cover.

It’s super simple to make.

Begin by chaining 49 with Seafoam. Single crochet in the second chain from hook and in each chain across. Chain one and turn.

Single crochet with Seafoam in the Back Loop Only of each stitch across, changing to White at the end of the row. Chain one and turn.

Single crochet with White in the Back Loop Only of each stitch across. Chain one and turn. Repeat another row of white and change to Seafoam at the end of the 2nd white row.

Note: I didn’t fasten off after each color change. I carried the yarn up the side of the cover as I went.

Continue with the pattern, 2 rows of Seafoam and 2 rows of White, until your pillow cover is long enough to fit over your insert with about 6 – 8 inches extra to fold over like in the picture below. End the cover with Seafoam. You will have a long rectangular piece. (Mine has 150 rows total.)

Fold the bottom of the cover up (with the carried yarn on the inside), leaving enough to fold over so it can be buttoned closed. Attach White yarn to the bottom right corner and single crochet through both layers, around the top with 3 single crochet in each corner (being sure to crochet over the carried yarn), and through both layers on the other side down to the bottom left corner. Fasten off and weave in ends.

Sew 5 (3/4-inch) buttons about 14 rows down from the opening of the pillow cover. Put in your pillow insert, fold over the top, and button it closed. It will be a tight fit to button through the stitches, but it will work.

Here’s a PDF for easy printing…

I love the texture of this simple stitch!

This is a really easy pattern to adjust to whatever pillow size or weight of yarn you may have on hand. Simply use a hook size that corresponds to your yarn. Make your beginning chain long enough so when it is slightly stretched across the middle of your pillow insert, it reaches half way around the pillow. Then start with your first row of single crochet.

Make one in colors to match your decor!

Thanks for stopping by,

Anita

Posted in Crochet, Decor, Gifts, Uncategorized | Leave a comment

Bunny Silhouette Canvas

Hi friends,

I shared these Bunny Silhouette Canvases a couple of years ago, but they are so cute that I thought I would share them again! It’s a great, inexpensive project to do with the kids. 🙂

Bunnies bring a little whimsy to spring and Easter. Here’s a fun way to add some cuteness to your Easter decor. All you need are a 5 x 7 white canvas, a little paint, some patterned paper, and a fluffy pom pom for a tail. 


Start by painting the canvas. I found that a foam brush worked well for this. I chose to use light blue and light pink acrylic paint, but use whatever color strikes your fancy! I painted 2 coats, letting the paint dry between coats. I then dry brushed a little cream colored paint onto the canvas to add a little depth. It’s a bit hard to see in the picture, but I think it added a little something to the project. 


I used the largest bunny from the die set by Amuse Studio to cut out my bunnies from patterned paper. Unfortunately, the die set is discontinued 😦 . You can search “printable bunny templates” on Pinterest or Google to find similar patterns (like this one) you can trace onto your patterned paper and cut out by hand. I attached a bunny to each canvas and then glued on a 1-inch pom pom for his fluffy tail. 


Simple, easy, and cute…use your favorite colors and patterns to make some for your home!

Thanks for stopping by,

Anita


Posted in Decor, Easter, Uncategorized | 3 Comments

Farmhouse Bunny Wreath

Hi friends,

I have an easy to make Farmhouse Bunny Wreath to share with you today. It’s fun to make and will add a little whimsy to your door this Spring.

You’ll need a styrofoam wreath (mine is 14-inches), some chunky orange yarn (I used I Love This Chunky yarn in Orange Spice), an unfinished wood bunny, small buffalo plaid fabric for the bunny, some ribbon for the bow, and a white pom pom for the tail. You may also want some white paint to paint the back and sides of the bunny. I found all my supplies at my local craft store.

First decide which side of the bunny you want to be the front. I decided to have the droopy ear facing out from the wreath. Trace the bunny on the back side of the fabric and cut it out.

I painted the edges and back of the bunny with white paint. This step is optional, but I like the finished look it gives the project. After the paint is dry, brush a thin layer of Mod Podge on the front of the bunny and attach the fabric, smoothing out any wrinkles or bubbles. Set aside and let dry. Then hot glue a pom pom to the bunny and tie a ribbon bow around his neck.

Now it’s time to start wrapping the wreath. I attached the yarn to the wreath with a couple of straight pins and then started wrapping the yarn – and wrapping and wrapping. 🙂 You’ll want to pull it taut, but be careful not to stretch it too much, and keep it close together. Continue until you cover the entire wreath and secure the end with a couple more straight pins.

Attach the bunny to the wreath with hot glue. Make a bow using your favorite ribbon and attach to the wreath with hot glue. I tied some twine around the wreath behind the bunny to use as a hanger.

I really like the way this Farmhouse Bunny Wreath turned out – I hope you like it, too!

Thanks for stopping by,

Anita

Posted in Decor, Easter | 2 Comments

Easter Cards using On a Hinge from Taylored Expressions

Hi friends,

This On a Hinge idea from Taylored Expressions is such a fun way to add something extra to your card making! They have a Halloween set called On a Hinge-Wicked (I made a card with this set in this you’re fa-boo-lous post), a Santa set called On a Hinge-Merry, and this adorable Easter set called On a Hinge-Chick. They all have matching die sets and the key to making these cards is this On a Hinge die.

Taylored Expressions has a fantastic video in their blog post with instructions on how to make these great cards. Click here for all the info.

I stamped the images with Memento Tuxedo Black ink on white card stock, colored them with Copic markers, and die cut each image. I assembled the images according to the On a Hinge instructions so their little legs would swing back and forth.

To make the card, I attached a piece of light blue card stock to a white card. Then I layered a piece of green card stock that I embossed with the Dotted Lattice embossing folder from Taylored Expressions. I die cut a piece of pink dotted Swiss card stock (here’s a similar die set) and attached it to the card. I attached the stamped images to the card with foam tape. The sentiment is stamped with green ink on white card stock, die cut with a scalloped oval die (here’s a great set), and attached to the card with foam tape. To finish off the card, I added 2 green pearls to the upper right corner.

These cards are so fun to make – and I hope fun to receive! 🙂

Thanks for stopping by,

Anita

Posted in Cards, Easter, Stamping, Uncategorized | Leave a comment

Easter Treat Bags

Hi friends,

Do you like to give little treats for Easter? These fun little treat bags are cute and so easy to make. 🐰

All you need are some little brown paper bags, patterned paper, twine, and tiny white pompoms to make these fun Easter Treat Bags.

I used a die to cut out my little bunnies. The one I have is a discontinued die, but here is one that is very similar. You can also search for clipart images like this one to use as a template to cut the bunnies. I found my paper bags at Hobby Lobby along with my other supplies.

I cut my little bunnies using my Cuttlebug die cutting machine. This is a great little machine to keep handy for small die cutting jobs. I die cut the bunnies from the patterned paper and then attached them to the bags. I glued the tiny pompoms to the bunnies and after the glue was dry, I folded the top down, punched 2 holes, and tied a bow with the twine.

Of course, treats need to be added to the bag before tying the bow. 🙂

I have to tell you about this great tool called Crop-A-Dile Eyelet and Snap Punch Tool. It has 2 different size hole punches and also sets snaps and eyelets. It punches holes easily in lots of different materials – so easy on the hands! I love this tool and use it all the time!

Crop-A-Dile Eylet and Snap Punch Tool

These would be so cute at each place setting on your Easter table or great to give as a special treat to kids – or even adults! 🐰

Thanks for stopping by,

Anita

Posted in Easter, Gifts | Leave a comment

Yarn-Wrapped Carrots🥕

Hi friends,

Did you see this cute Farmhouse Bunny from last week’s blog post? Well…he needed a few carrots to nibble on. 🙂 🥕

They take a little time to make, but are super easy. You’ll need some styrofoam cones, yarn, and a hot glue gun. I found my supplies at Hobby Lobby – and don’t forget that ALL of their yarn is 30% off every other week!

Start by making a small circle with the orange yarn. Put a little hot glue in the center top of the cone and attach the yarn.

Then continue wrapping the yarn around the cone, using hot glue to secure it. Be careful not to stretch the yarn too much. I put a thin line of hot glue close to the yarn already on the cone, about an inch or so at a time, and carefully placed the yarn on the glue. Be careful you don’t burn your fingers!

It will take a little time, but be patient and wrap all the way to the bottom, completely covering the cone.

Then take the green yarn and wrap it around your fingers 6 or 8 times. Take another piece of green yarn and tie a knot close to one end of the loops. Cut open the loops at the other end and trim the strands to the length you want. Hot glue the uncut loops to the center top of the carrot.

My styrofoam cones measured 1.8 x 2.7 inches. If you want to make larger carrots, there are several sizes of styrofoam cones to choose from. If you decide to make them larger, you may want to consider getting thicker yarn – otherwise you’ll be wrapping forever! 🙂

These would be so cute in a basket or bowl next to your favorite bunny! Don’t have a bunny? Try making this cute Farmhouse Bunny I made in this post. 🐰

Thanks for stopping by,

Anita

Posted in Decor, Easter, Uncategorized | Leave a comment

Bacon Cauliflower Chowder

Hi friends,

Looking for a yummy, lower-carb chowder recipe? This Bacon Cauliflower Chowder might be just the thing… It’s a great way to add more vegetables to your diet, too! 🙂

Bacon Cauliflower Chowder

You can find the full recipe here at Delish .com. It can be on your table in 35 – 40 minutes so it’s great for a weeknight dinner. Just add your favorite side you like to serve with soup and maybe some fruit for dessert. I think this Bacon Cauliflower Chowder would also be great with a little shredded cheddar cheese sprinkled on top!

Happy Eating! 😋

Anita

Posted in Recipes, Uncategorized | Leave a comment

Farmhouse Bunny

Hi friends,

I have a sweet little bunny to share with you today! 🐰 He’s super simple to make and will add a touch of whimsey to your Easter decor.

You’ll need an unfinished wood bunny, some fabric, Mod Podge, some ribbon, twine, and a pompom for the tail. You may also want some white chalky finish or acrylic paint for painting the edges and back.

I found the unfinished wood bunny at Hobby Lobby where I also found the small buffalo plaid fabric. Of course, you can pick up all the other supplies you’ll need at Hobby Lobby as well – that is if you don’t already have them in your craft room! 😉

First, I traced the bunny onto the back of my fabric and cut it out. Then I painted the edges and back of the bunny with one coat of chalky finish white paint. I didn’t worry about making it perfect – I just didn’t want the bare wood to show completely. This is totally optional. Then I brushed a thin coat of Mod Podge onto the front of the bunny and smoothed the fabric onto it, making sure to remove any bubbles or puckers.

The bow is super easy to make. Simply cut two pieces of each ribbon you are using and lay them in an “x” over a length of twine.

Then tie the twine tightly around your ribbon.

Trim your ribbon so your bow is the size you want and hot glue to your bunny. Add a 1.5-inch pompom to the bunny with hot glue.

This is a very quick and easy project and I just love the way it turned out! I may even keep this Farmhouse Bunny out all year long! 🐰

Happy crafting!

Anita

Posted in Decor, Easter, Gifts, Uncategorized | 1 Comment

Crochet Bunny Jar Cozies

Hi friends,

Look at these adorable Crochet Bunny Jar Cozies! So fun to fill with treats to wish someone a Happy Easter.🐰

Crochet Bunny Jar Cozies – so cute!

The free pattern is available here on Ravelry. If you don’t have a Ravelry account, it’s really easy and free to set up. There are hundreds of free and paid patterns available – such a great place to find new projects to stitch up!

I used worsted weight yarn in white and pink that I had left over from previous projects and size H/5mm and G/4.25mm hooks to stitch up my Bunny Jar Cozies. I did have to add rows to the main part of the bunny to fit around my jar. I ended up with 46 rows instead of the 36 called for in the pattern. You may be fine with the 36 – just fit it around the jar to check before you finish it off.

I picked up my buttons at my local craft store. I wasn’t able to find orange heart buttons as suggested so I got little round orange ones for the nose. I found my jars at the Dollar Tree.

So sweet!

These cute Bunny Jars filled with treats would make a fun Easter basket. Or a sweet hostess gift at Easter dinner.

Have fun making these Crochet Bunny Jar Cozies! 🐰

Anita

Posted in Crochet, Easter, Gifts, Uncategorized | 6 Comments

Sausage Egg Roll in a Bowl

Hi friends,

I’ve got a super fast, super easy, super tasty recipe to share with you today! And it’s low carb! I really love the flavor of this Sausage Egg Roll in a Bowl. And the fact that you can have it on the table in less than 25 minutes makes it a great weeknight meal!

I found the recipe here at Buns in my Oven. Click over to her blog and scroll down to get the full recipe.

Sausage Egg Roll in a Bowl

Another great thing about this Sausage Egg Roll in a Bowl is that it’s made in one skillet – not a lot of clean up. Always a plus in my book! 🙂

Add some brown rice, some fresh fruit for dessert and you have a great dinner for any night of the week.

Happy Eating!

Anita

Posted in Recipes, Uncategorized | Leave a comment