Happy Fall

It’s now officially Fall!! I love this time of year – the cooler temps, beautiful colors, sweaters, and scarves (although we’re still waiting for the temps to drop to sweater weather here in Alabama 😉) Here’s a card to celebrate the season.

img_6726

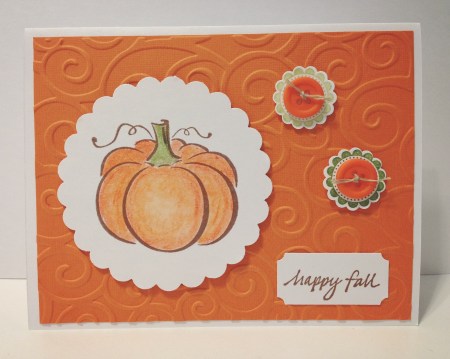
The pumpkin and scalloped circle stamps are from Hero Arts. The sentiment is from Savvy Stamps. The swirl embossing folder is from Cuttlebug. The large scalloped circle punch is from Marvy Uchida. The small scalloped circle punch and ticket punch are from Stampin’ Up.

To make the card, emboss a panel of orange card stock and attach to a white card. Stamp the pumpkin with brown ink on white card stock, color with colored pencils, and punch with the large scalloped circle punch. Attach to the card with foam tape. Stamp the small scalloped circle with 2 different colors of green ink on white card stock. Punch with the small scalloped circle punch and attach to the card with foam tape. Tie 2 orange buttons with twine and attach to the small scalloped circles. Stamp “happy fall” with brown ink on white card stock, punch with the ticket punch, and attach to the card.

You could change the sentiment and add a face to the pumpkin to make this a Halloween card. Or change the sentiment to “Happy Thanksgiving” and you have a great Thanksgiving card.

Enjoy the Fall season and all its goodness!!

Thanks for stopping by,

Anita

Posted in Cards, Fall, Uncategorized | Leave a comment

Friends Card

Just sharing a fun little card with you today. It’s quick and easy and perfect for so many different occasions.

img_6727

The lattice background and flower stamps are both from Hero Arts. I’ve had them for a long time, so they may not be available any longer. But check out their website, they have great stamps and other products!

To make the card, stamp the lattice background on patterned card stock with orange ink and layer the panel to orange card stock. Attach a piece of grosgrain ribbon and tie it with a piece of twine. Attach the panel to a white card. Punch a scalloped circle from orange card stock, ink the edges with orange ink, and attach to the card. Stamp the flower with orange ink on white card stock, ink the edges with orange ink, and attach to the scalloped circle with foam tape. Add a tiny button to the center of the flower.

A great card for a birthday, thinking of you, or just a little encouragement for a friend…

Thanks for stopping by,

Anita


Posted in Cards, Uncategorized | Leave a comment

Mini Chalk-Painted Pumpkins

I wanted some white and turquoise mini pumpkins to fill up a lantern I have, but I couldn’t find any… So what do you do??? You paint your own! 🙂

I found these little pumpkin picks at my local Hobby Lobby (40% off, of course!). They are about 3-4 inches in diameter. Obviously not the colors I was looking for…

img_6713

I cut the picks off of the bottom and got out my chalk finish paints in white, turquoise, and brown. I painted 7 of the pumpkins white and 3 turquoise. All the stems are painted brown. I painted 2 coats of each color, making sure to let them dry thoroughly between coats – if it’s not dry, you will just rub off the previous coat (trust me 😉). Then I brushed on a light coat of clear wax. If you would like a more antiqued/distressed look, use antique wax and immediately wipe off the excess.

Here are my painted pumpkins…

img_6714

And here they are stacked in my lantern…

img_6715

It’s beginning to look a little like Fall around here!

Thanks for stopping by,

Anita

Posted in Decor, Fall, Uncategorized | Leave a comment

5 Minute Fall Centerpiece

Seriously!! This will take 5 minutes 🙂!

All you need are 3 glass hurricanes, three candles, raffia, and some popcorn kernels. Yes – popcorn kernels. Get the cheapest store brand bag you can find – no sense spending money on the gourmet stuff since you won’t be popping and eating it!! I found my candles at the Dollar Tree, I liked the look of the glass holder, but any pillar candle will work.

Put your candle in the middle of the hurricane, pour some popcorn kernels around it, and then tie the raffia around the hurricane. That’s it!! Told you it will only take 5 minutes 😉. Such a simple way to add a touch of Fall to your table.

img_6698

I have used these glass hurricanes all year to decorate my dining room table. You can find those posts here, here, and here.

Thanks for stopping by,

Anita


Posted in Decor, Fall, Uncategorized | Leave a comment

A Simple Thank You

There is just beginning to be a slight hint of Fall to the air here in Alabama. The days are still quite warm (OK, hot!!!), but there is just a little something promising cool, crisp days to come!

Here’s a simple thank you card bringing in just a little Fall color. The stamp is from the Take Care of You set from Unity Stamp Company. The “thank you” stamp is also from Unity. I don’t know what set it is from – it was a freebie that they included with one of my orders. Did you know that they include an extra little something with every order?!?!? Such a fun company! 🙂

IMG_6690

I stamped the image with brown ink on white card stock and colored the flower with Copic markers. I lightly distressed the edges of the panel with brown ink and stamped “thank you” with brown ink. The panel is then layered to green card stock. I tied the panel with brown polka dot ribbon and attached it to a yellow card with foam tape. To finish it off, I attached 2 dew drops to the upper right corner.

I’m ready for a little bit of Fall!!

Thanks for stopping by,

Anita

Posted in Cards, Fall, Uncategorized | Leave a comment

Magnetic Chalkboard 

I have been trying to figure out a cute way to corral all those little notes, appointment cards, and invitations that always seem to be hanging around. I wanted to keep them handy, but I was tired of cluttering up the front of my fridge!


I happened upon this magnetic chalkboard panel at Home Depot. And it was only $5.00!!! It is 12 x 24 inches and I thought it would work great on the inside of my pantry door. But it needed a frame! I took it to my local frame shop and picked out a pretty distressed white frame. (If you are local, I highly recommend Alabama Framers in Madison. I have used them for years and have never been disappointed.)

Using white, chalk finish paint, I stenciled “NOTES” at the top. If you like your handwriting better than I like mine, you could also write it with a paint pen. 

My magnetic chalkboard hangs on the inside of my pantry door, keeping all those little things handy but out of sight.

Sometimes an idea works out even better than you imagine. This is one of those times 🙂. I am really loving this tiny bit of organization!

Thanks for stopping by,

Anita

Posted in Decor, Gifts, Organization, Uncategorized | 2 Comments

Pink Petals Crochet Baby Blanket

I just finished this pretty baby blanket that will go to a special little one later this Fall.

IMG_6672

I chose a brighter pink than the one used in the pattern and really like the way it turned out! The yarn I used is Lion Brand Pound of Love in Bubble Gum. It is a soft worsted weight yarn that comes in lots of colors. If you are making a blanket in just one color, I highly recommend using one of these giant skeins of yarn. The entire blanket can be worked without having any joins – which means the only ends you’ll have to weave in are at the beginning and the end!! A big plus in my book! 🙂

I followed this pattern to crochet the blanket. The only thing I did differently was to continue the shell edging around the entire blanket instead of just 2 sides like the pattern calls for. 

IMG_6668

A pretty pink blanket for a sweet little girl who will be here soon!

Thanks for stopping by,

Anita

Posted in Crochet, Gifts, Uncategorized | 4 Comments

Pineapple-Blueberry Delight

Do you like pineapple? How about blueberries? If you do, then you will love this yummy dessert! It is super easy to make and just tastes delightful. 😉

A dear friend of mine gave me the recipe a long time ago (thanks, Cheree’!) and I can’t remember the last time I made it – and I have no idea why it’s been so long!! Maybe it’s because I could eat the whole pan…🙄

Here’s the recipe…

Pineapple-Blueberry Delight

  • 1 (15 oz) can crushed pineapple
  • 3 cups blueberries (fresh or frozen)
  • 3/4 cup sugar
  • 1 box yellow or lemon cake mix
  • 1/4 cup sugar
  • 2 sticks butter
  • 1 cup chopped pecans

Preheat oven to 350°. Layer 1/2 of the pineapple, 1/2 of the blueberries, and 1/2 of the 3/4 cup sugar in a 9 x 13 pan. Repeat layers. Sprinkle cake mix over the layers, then sprinkle with the 1/4 cup sugar. Slice butter and place all over the top. Sprinkle with pecans. Bake for 45 minutes. (I used frozen blueberries and had to bake it about 10 minutes longer.)

Ready for the oven…

IMG_6650

Hot, bubbly, and yummy…

IMG_6651

So good warm, at room temperature, or even cold from the fridge! A great dessert to take to a pot luck or brunch. I hope you enjoy it!!

Thanks for stopping by,

Anita


Posted in Recipes, Uncategorized | Leave a comment

Tiny Clipboard Note Pad

These little note pads come together in just a few minutes and will use up some of those pretty scraps of paper and ribbon you’ve not been able to throw away. 🙂

IMG_6642

Start with some chipboard coasters – mine are 3 1/2 by 3 1/2 inches with rounded corners. You can pick them up in the scrapbook section of your local craft store. Or cut your own from thin chipboard and round the corners – or not, whatever tickles your fancy. 🙂

I adhered patterned paper to the coasters and trimmed around the rounded corners. Then I sponged the edges with a coordinating ink color. 

IMG_6635

I picked up the hinge clips at Hobby Lobby in the scrapbook section during a 50% off sale, but they are probably available at your local office supply store as well. I glued them with a strong craft glue to the coaster with the top off the edge. I thought that by doing that you could use the tiny hole in the clip to hang the note pad from a pin on a cork board or a hook on a peg board. You could also add some magnets to the back and hang it on your fridge. Then I tied a small piece of ribbon to the clip. I finished them off with tiny buttons on the bottom right corner. 

The tiny note paper is actually 3 x 5 inch index cards trimmed to 2 1/2 by 2 1/2 inches. I put about 20 pieces in each clip. 

IMG_6643

These were so fun to make! The color combinations are endless – you can make them to match any craft room, kitchen, office, or dorm room. They would make a great little thinking of you gift…perfect to jot down those little things you don’t want to forget. 🙂

Thanks for stopping by,

Anita

Posted in Gifts, Organization, Uncategorized | Leave a comment

New Take Ten Magazine

The September/October/November 2016 issue of Take Ten Magazine will hit the bookstores in a couple of weeks. I’m so excited to have one of my cards published in this issue!!! 🙂

And here it is!!

IMG_6623

The stamp set is Happy Owl-i-days from Darcie’s Heart & Home Art Rubber Stamps. They have several other owl sets with different themes – they are so cute!

I stamped the owl with black ink on white card stock, colored him with Copic markers, punched it out with a scalloped circle punch, and layered it to a circle punched from red card stock. The sentiment is stamped with black ink on white card stock, punched with a scalloped oval punch, and layered to an oval punched from red card stock.

To put the card together, cut triangles from 2 different patterned papers and attach to a white card. Attach sentiment to the card. Punch a small red circle from red card stock and attach to the card, overlapping the edge of the oval from the sentiment. Tie a green button with red twine and attach to the circle. Attach owl image to the card with foam tape.

This was a fun card to make and I’m so happy that they picked it to be in the magazine!! 🙂

Thanks for stopping by,

Anita

Posted in Cards, Christmas, Uncategorized | Leave a comment