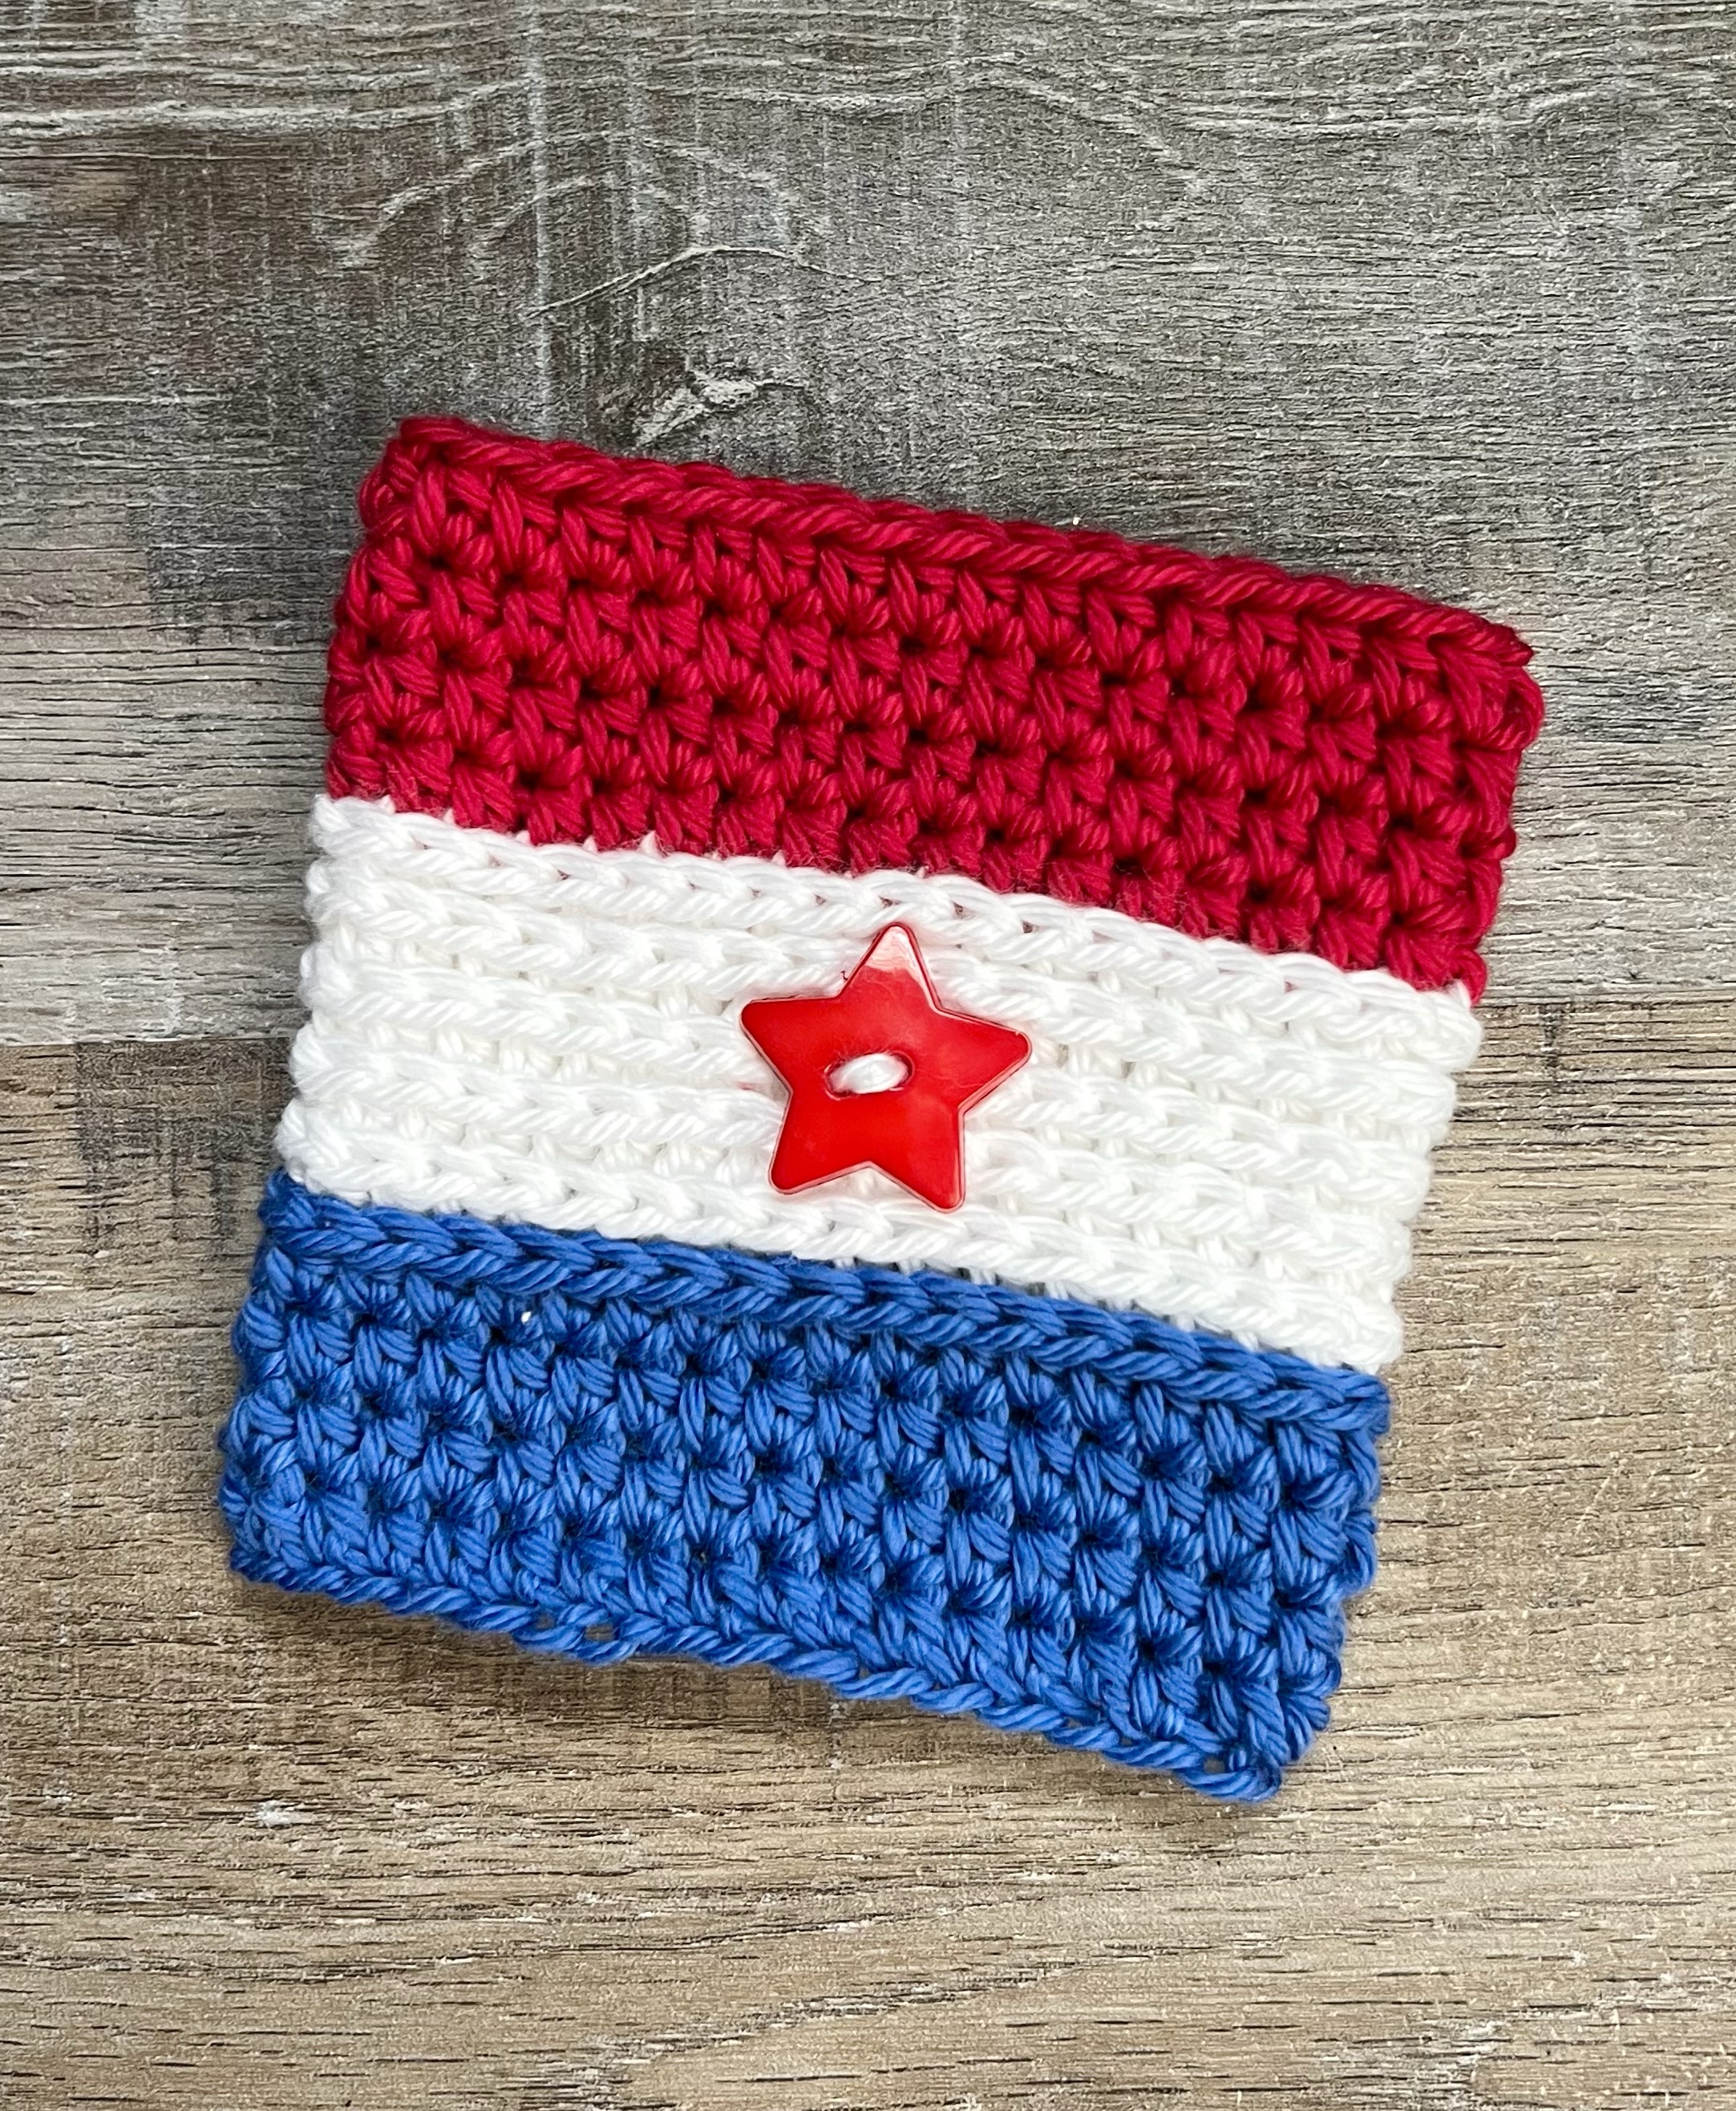
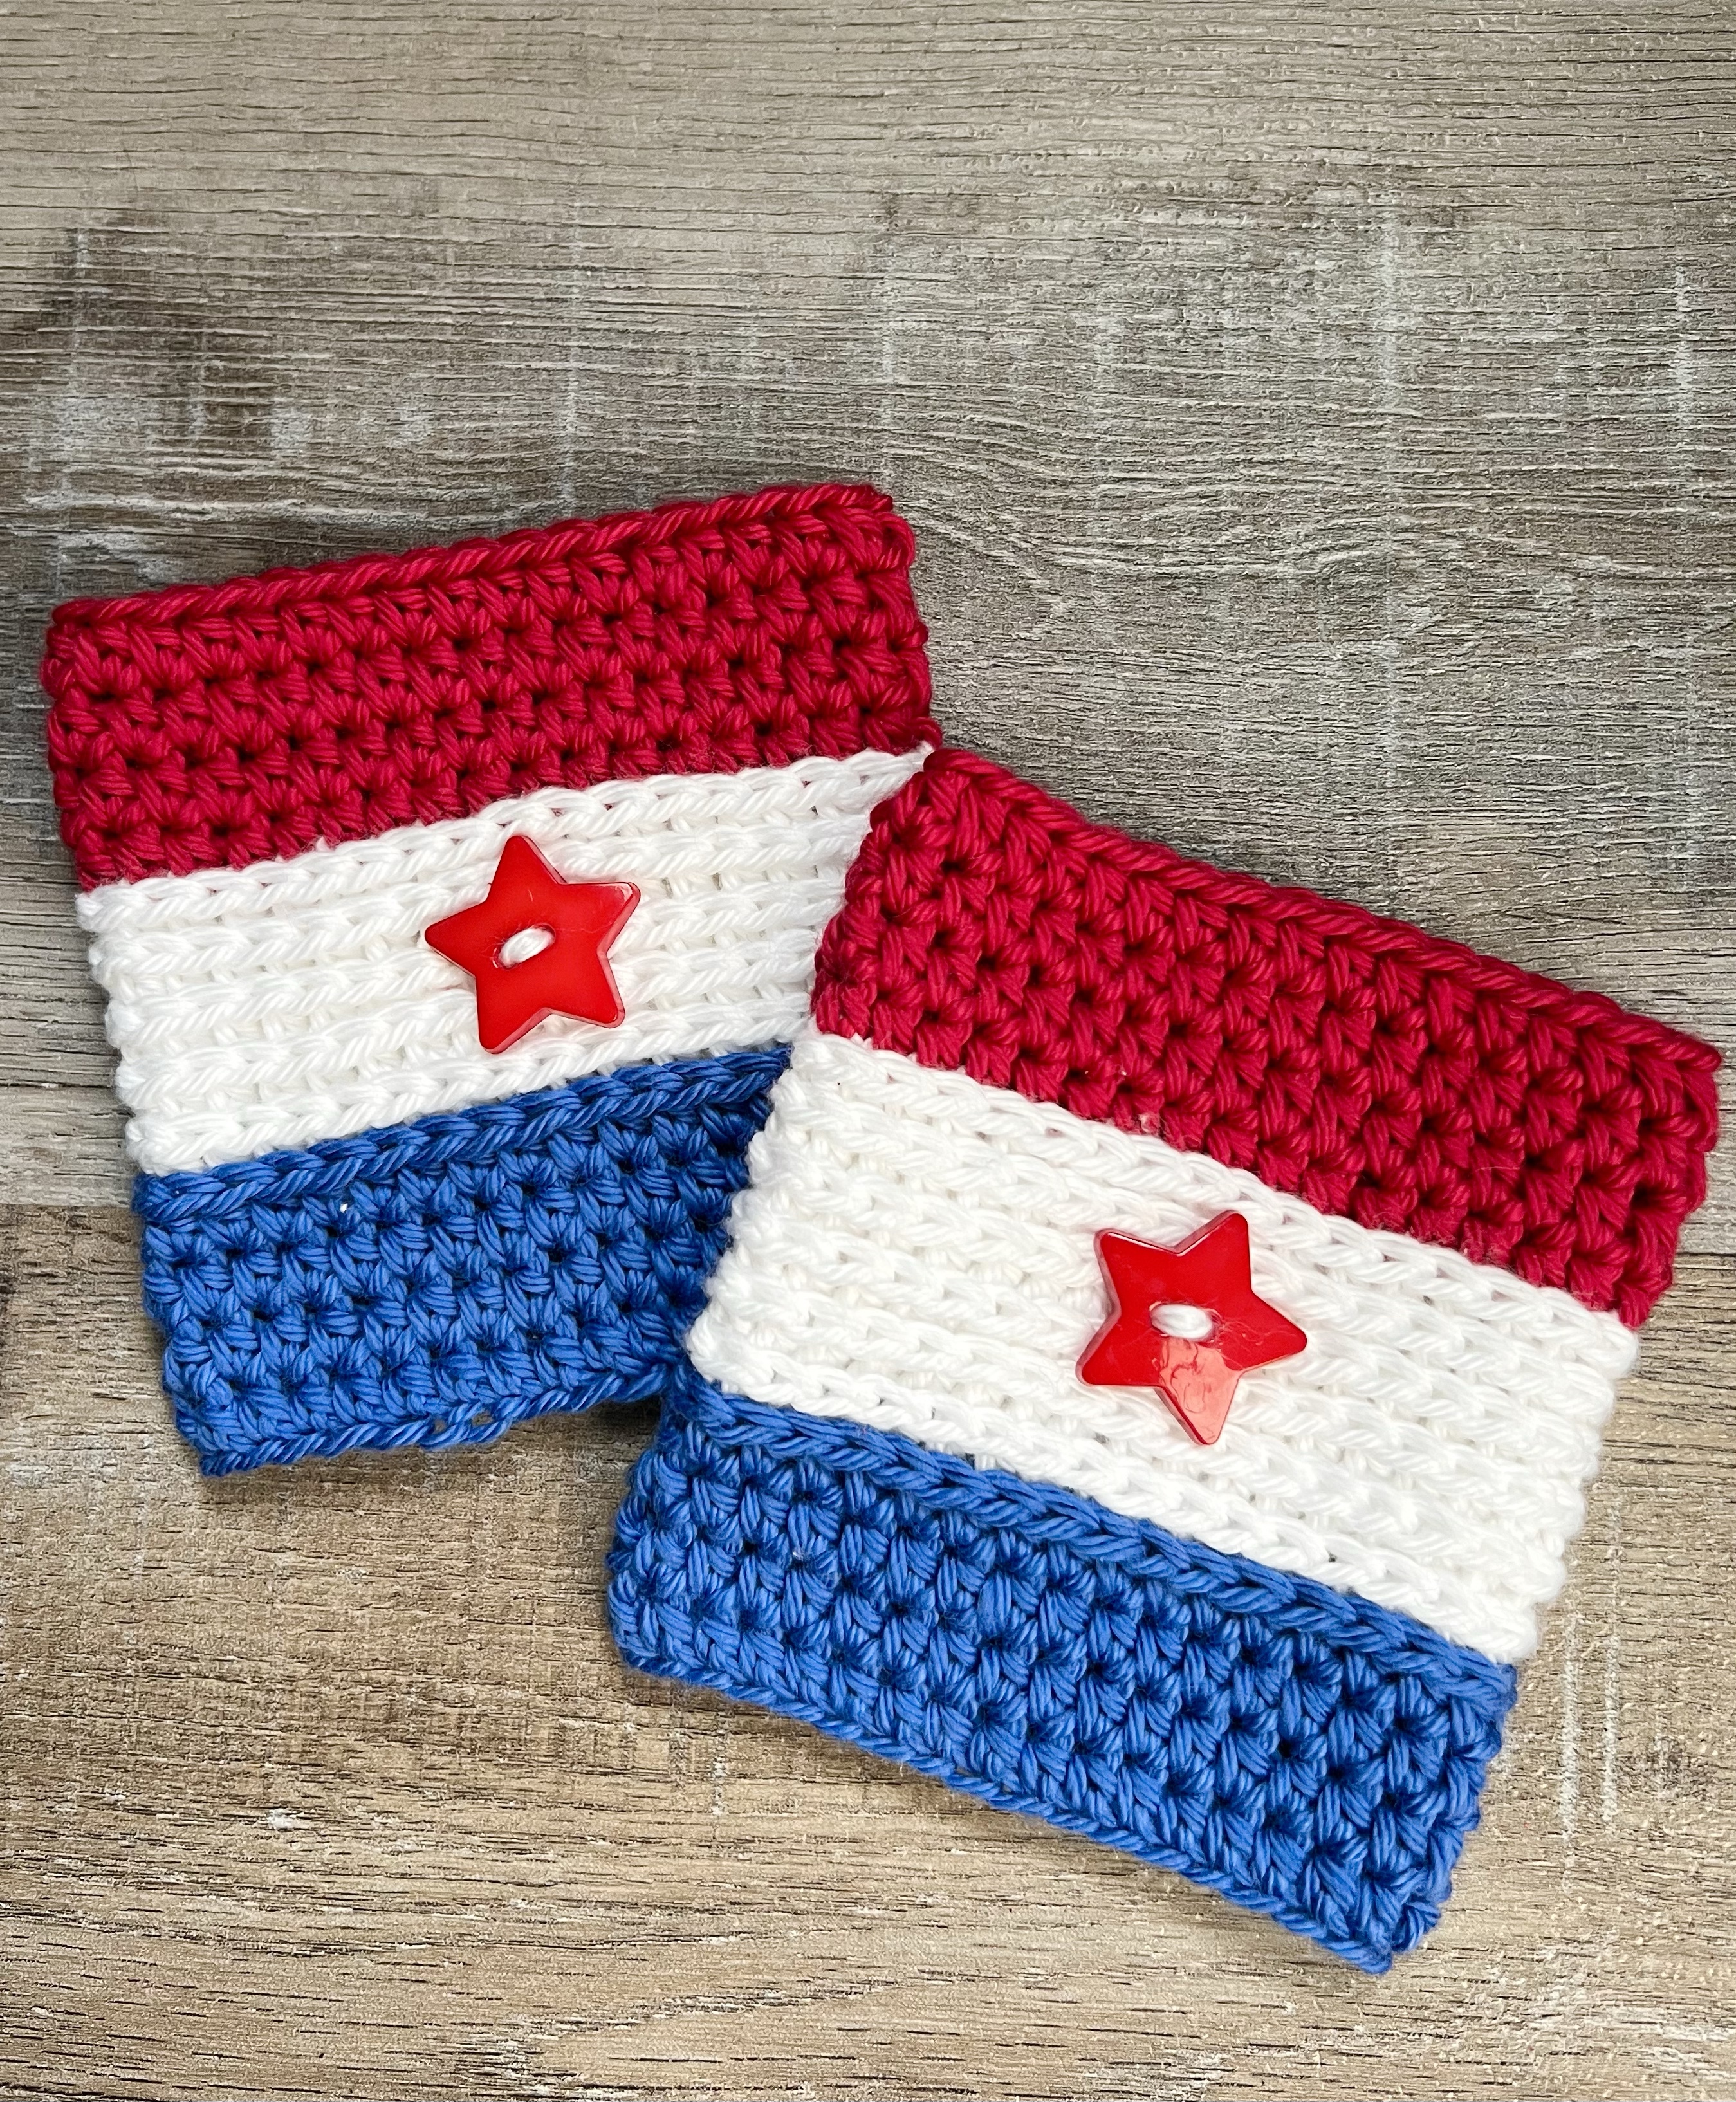
Are you having a BBQ or picnic for the 4th of July? Or maybe you just want a new cup cozy for Summer? This easy Crochet Patriotic Cup Cozy works up so quickly that you can make one for all of your guests to take home with them after the party. 🙂
Disclosure: Some of the links on my site are affiliate links, meaning, at no additional cost to you, I will earn a small commission if you click through and make a purchase. As an Amazon Associate I earn from qualifying purchases.
It’s a super easy pattern using half double crochet stitches. The white section is worked in the 3rd loop to give it a little more texture. (Here’s a great tutorial on crocheting in the 3rd loop.) I used I Love This Cotton yarn with a G/4.0mm hook to stitch up my cozies.
Here’s the pattern along with a link to a free PDF for easy printing.
Crochet Patriotic Cup Cozy
Worsted weight yarn (size 4) – I used I Love This Cotton in White, Red, and Royalty
G/4.0mm hook
Star button – optional
Stitches used in US terms:
Chain – ch
Slip Stitch – ss
Half Double Crochet – hdc
Note: chains at beginning of rounds do not count as stitches.
Chain 34 with Royalty and join to first chain with ss to form a ring.
Rounds 1-4: ch 1. hdc in each stitch around. Join with ss to first hdc. (34 stitches)
Change to White.
Rounds 5-9: ch 1. hdc in the 3rd loop of each stitch around. Join with ss to first hdc. (34 stitches)
Change to Red.
Round 10: ch 1. hdc in the 3rd loop of each stitch around. Join with ss to first hdc. (34 stitches)
Rounds 11-13: ch 1. hdc in each stitch around. Join with ss to first hdc. (34 stitches)
Of course you can always make the Crochet Patriotic Cup Cozy in any color combo or even a solid color. It would be so fun in bright Summer colors like orange, white, and lime green!
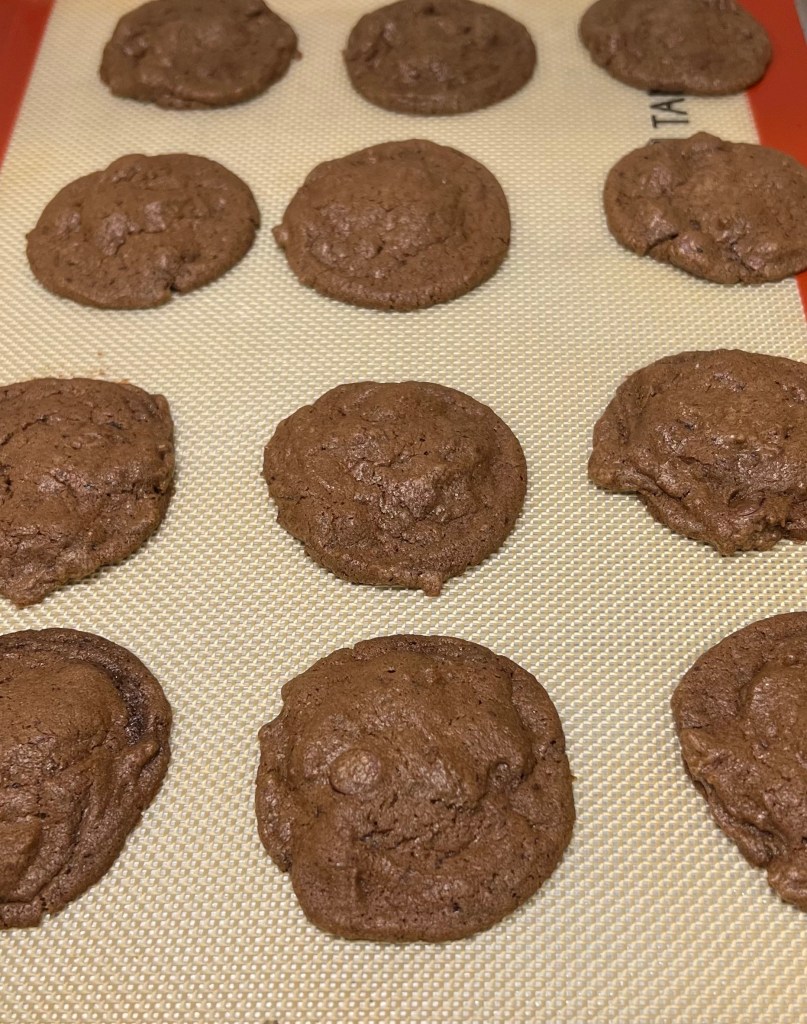
Who likes chocolate chip cookies? 🙋🏼♀️ These Double Chocolate Chip Cookies take them to the next level! There are chocolate chips, cocoa, and to kick the flavor up a notch, instant coffee granules added to the batter. Oh my!
Disclosure: Some of the links on my site are affiliate links, meaning, at no additional cost to you, I will earn a small commission if you click through and make a purchase. As an Amazon Associate I earn from qualifying purchases.
Don’t worry if you’re not a coffee fan. It’s not my favorite either – the coffee just enhances the chocolate to a richer flavor. The cookies are so tasty! You can find the recipe here at Chef Savvy.
Here they are just out of the oven. They smell amazing! If you don’t have any, I highly recommend silicone baking mats for making cookies – no more cookies sticking to your baking sheets. 😊
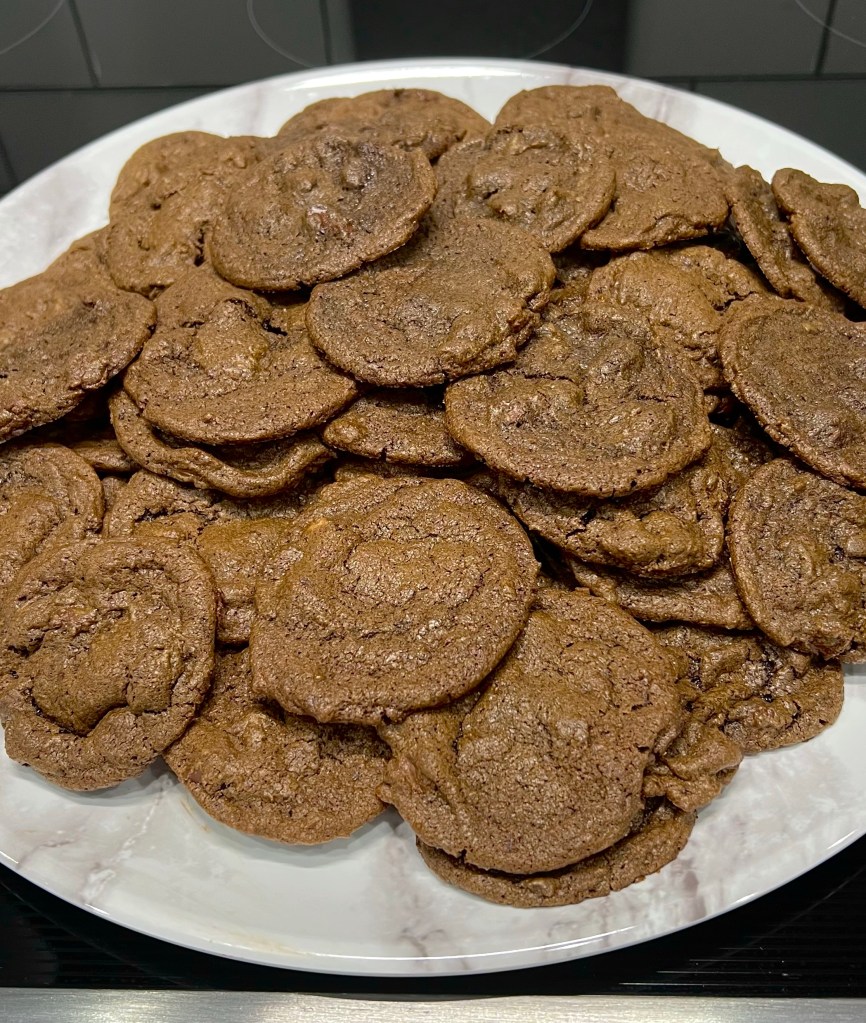
I made a double batch to take to a graduation party and there were only 3 or 4 cookies left so I think they enjoyed them!
Oh, and they are amazing warm and fresh from the oven – so gooey and yummy!
My husband and I just celebrated our 40th anniversary last month! How can it possibly be 40 years?!?!? It has gone by so quickly and been filled with so much – joy, laughter, fun, hard times, good times, travel, rest, sickness, but most of all love.
Disclosure: Some of the links on my site are affiliate links, meaning, at no additional cost to you, I will earn a small commission if you click through and make a purchase. As an Amazon Associate I earn from qualifying purchases.
Unity Stamp Company has so many great Winnie the Pooh stamps! If you are a fan, you might want to check them out. I’m hoping they will add many more to the collection.
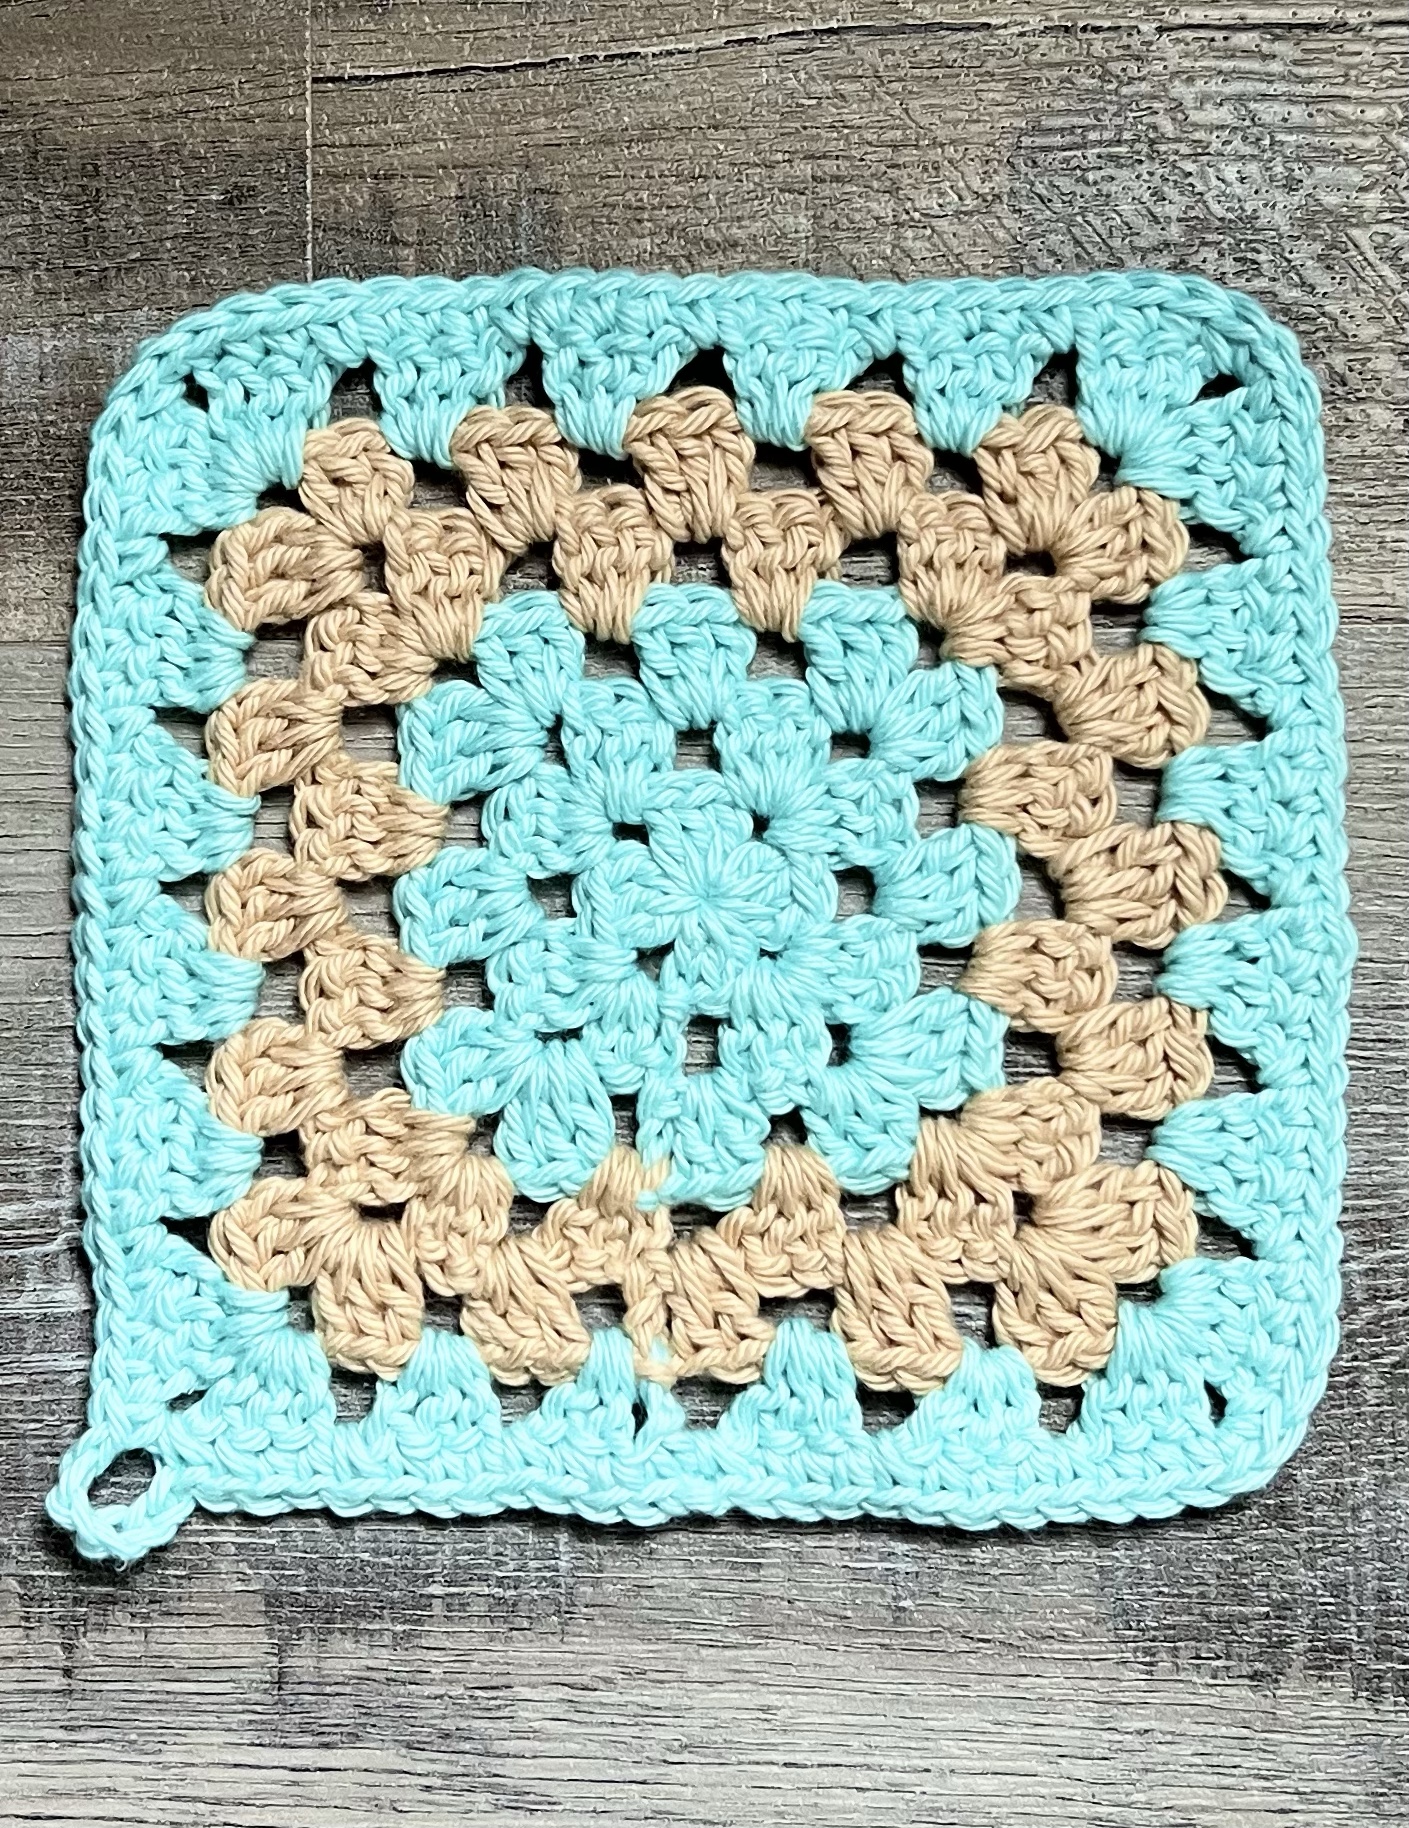
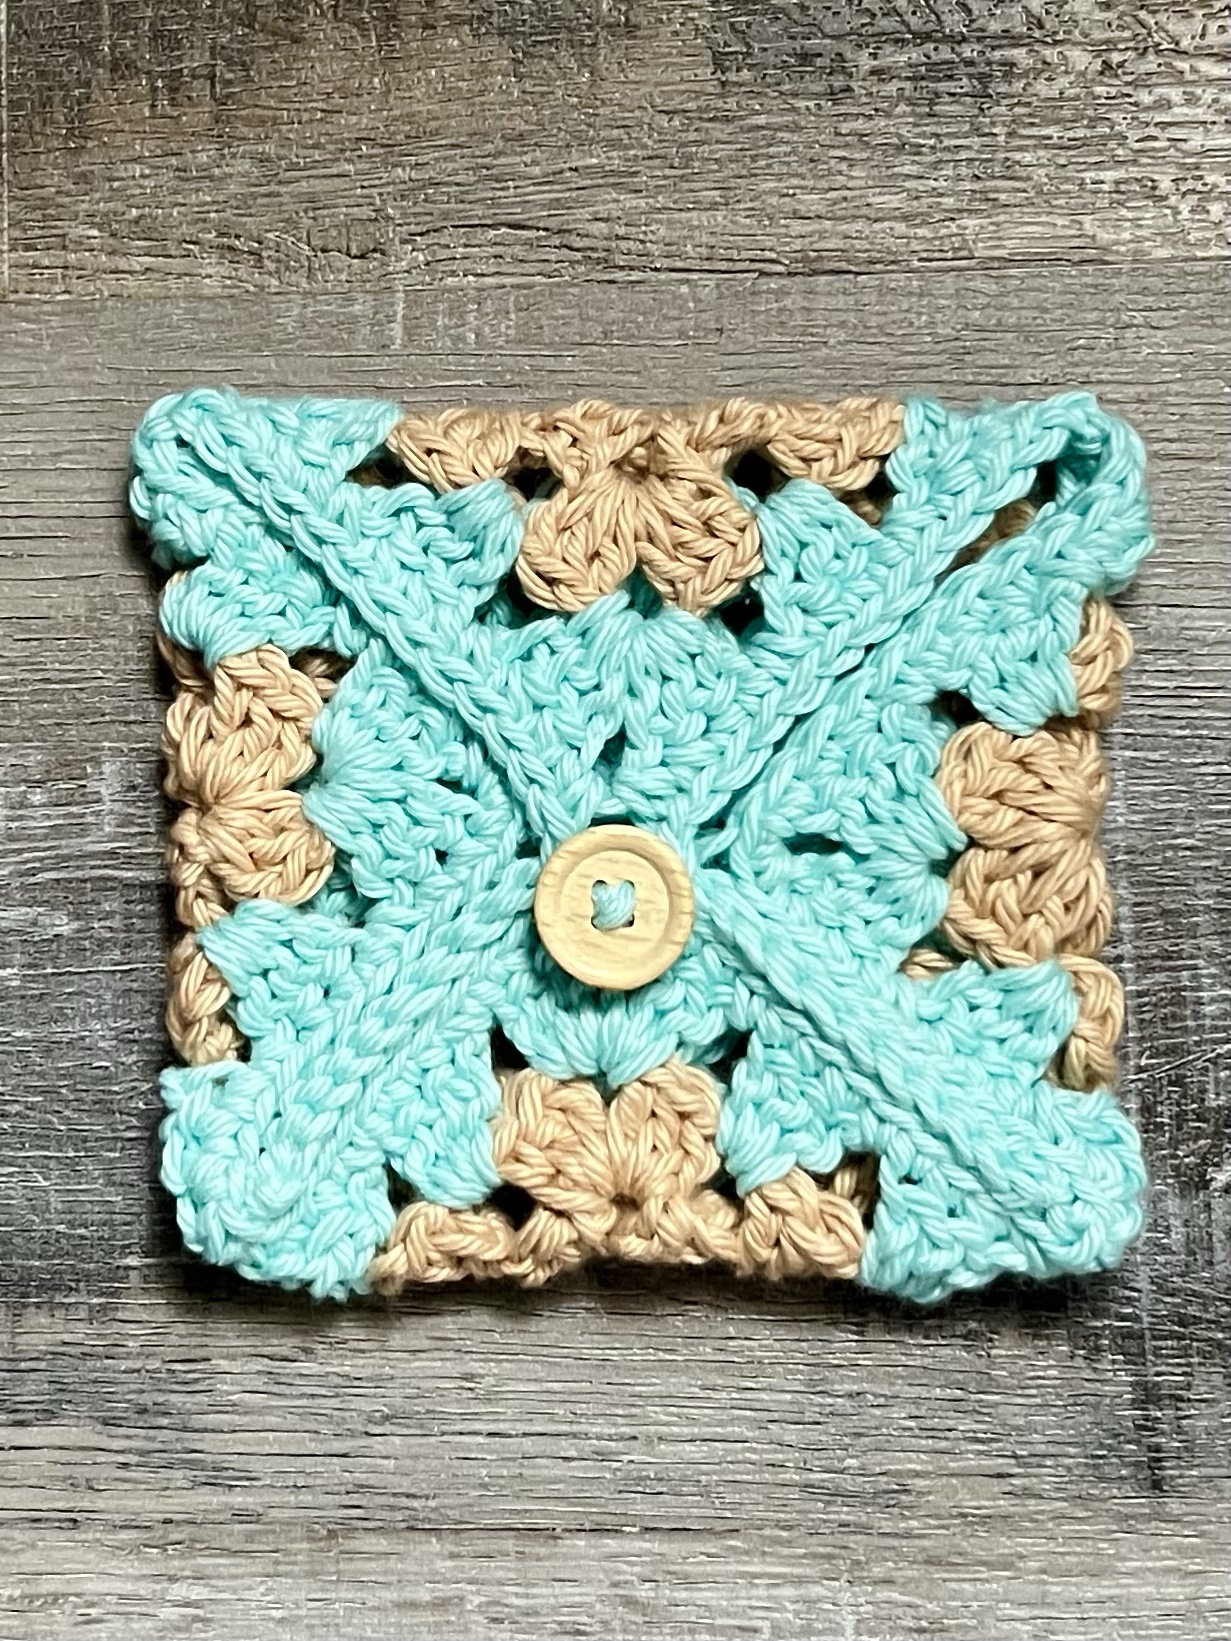
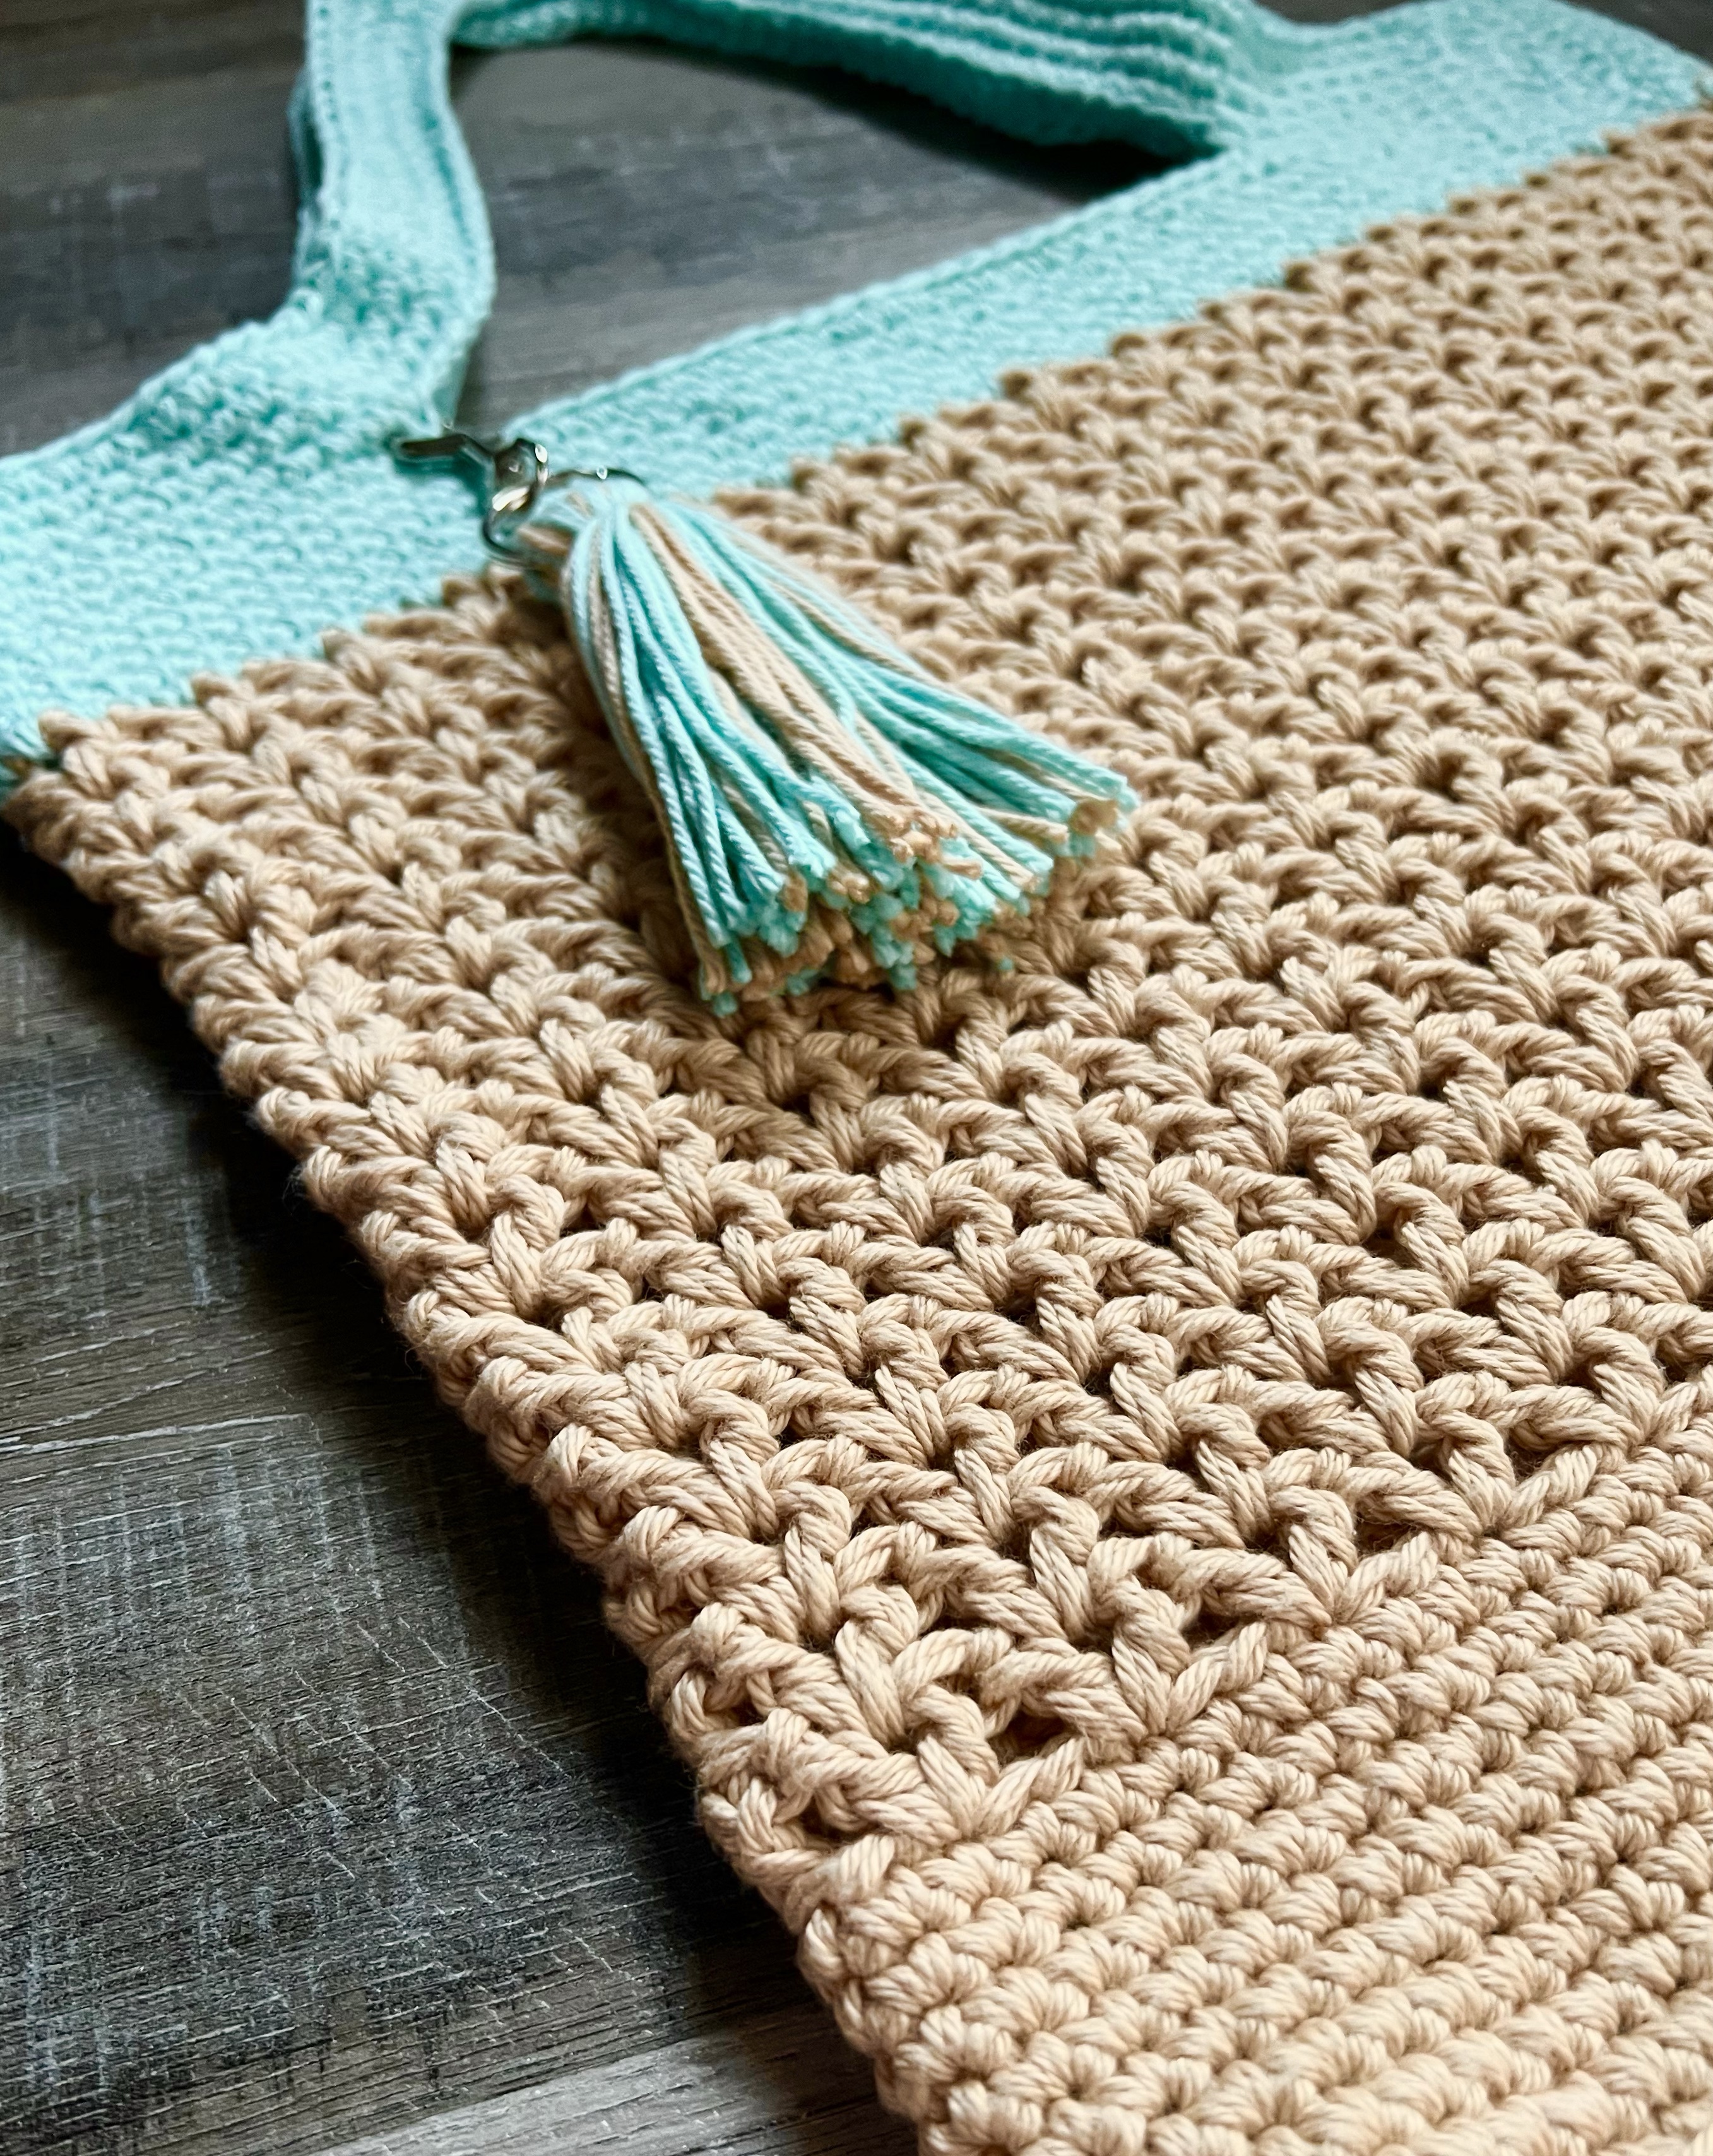
Did you see the post for my Crochet Sand and Sea Summer Tote Bag? It’s a great tote for all the Summer things! I had leftover yarn from making my tote and thought it would be great to have a little pouch to hold my drivers license, credit card, or cash that I could tuck into my bag.
Disclosure: Some of the links on my site are affiliate links, meaning, at no additional cost to you, I will earn a small commission if you click through and make a purchase. As an Amazon Associate I earn from qualifying purchases.
I went super easy and just made a granny square. If you need a refresher on making a simple granny square, this is a great tutorial. After making my granny square, I crocheted a single crochet border working 2 single crochet in each corner. For the last corner, I worked one single crochet, chained 10, and then worked the 2nd single crochet to create the button loop.
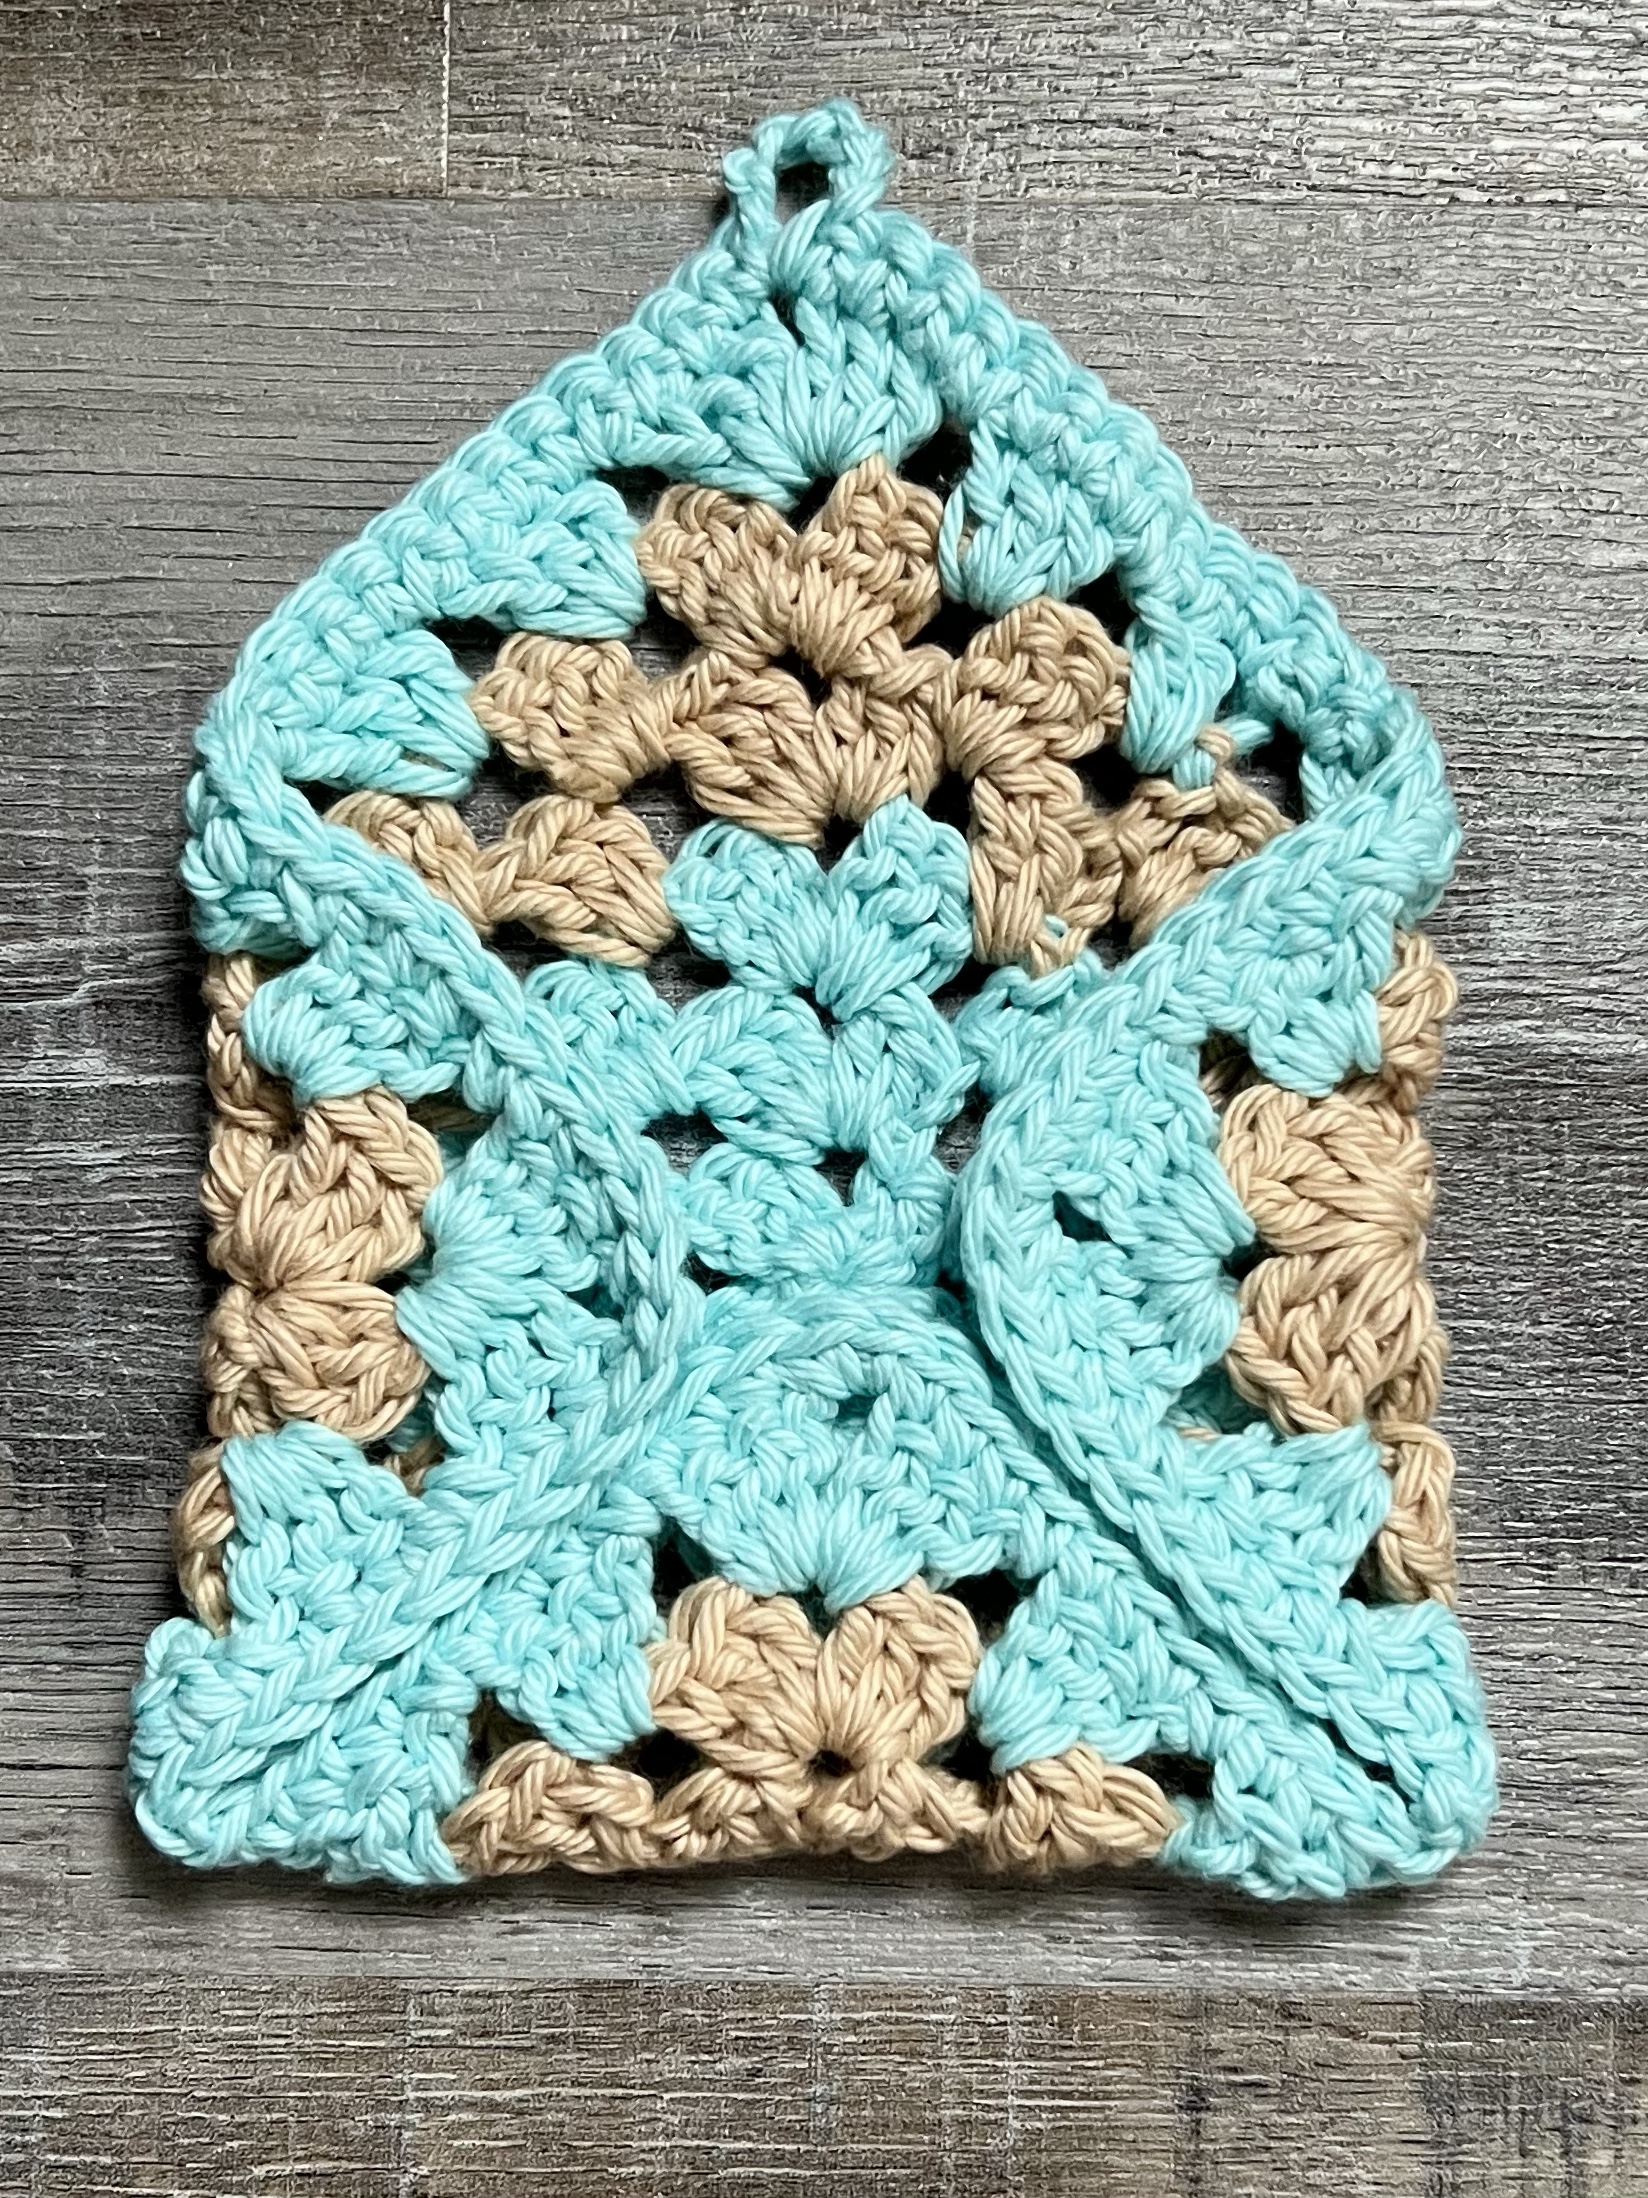
To make the square into a pouch, fold in 3 corners, leaving the corner with the chains at the top. Starting at the bottom right corner, attach the yarn with a slip stitch. Slip stitch the sides together, continuing the slip stitches around the top of the bottom corner to the other side, and slip stitch the sides together down to the bottom left corner. Fasten off and weave in the ends. Sew on the button.
Such a quick and easy project to keep all your necessary cards and cash together in one place!
You can make the Easy Crochet Granny Square Pouch in just minutes! It’s a great stash buster project. 🙂
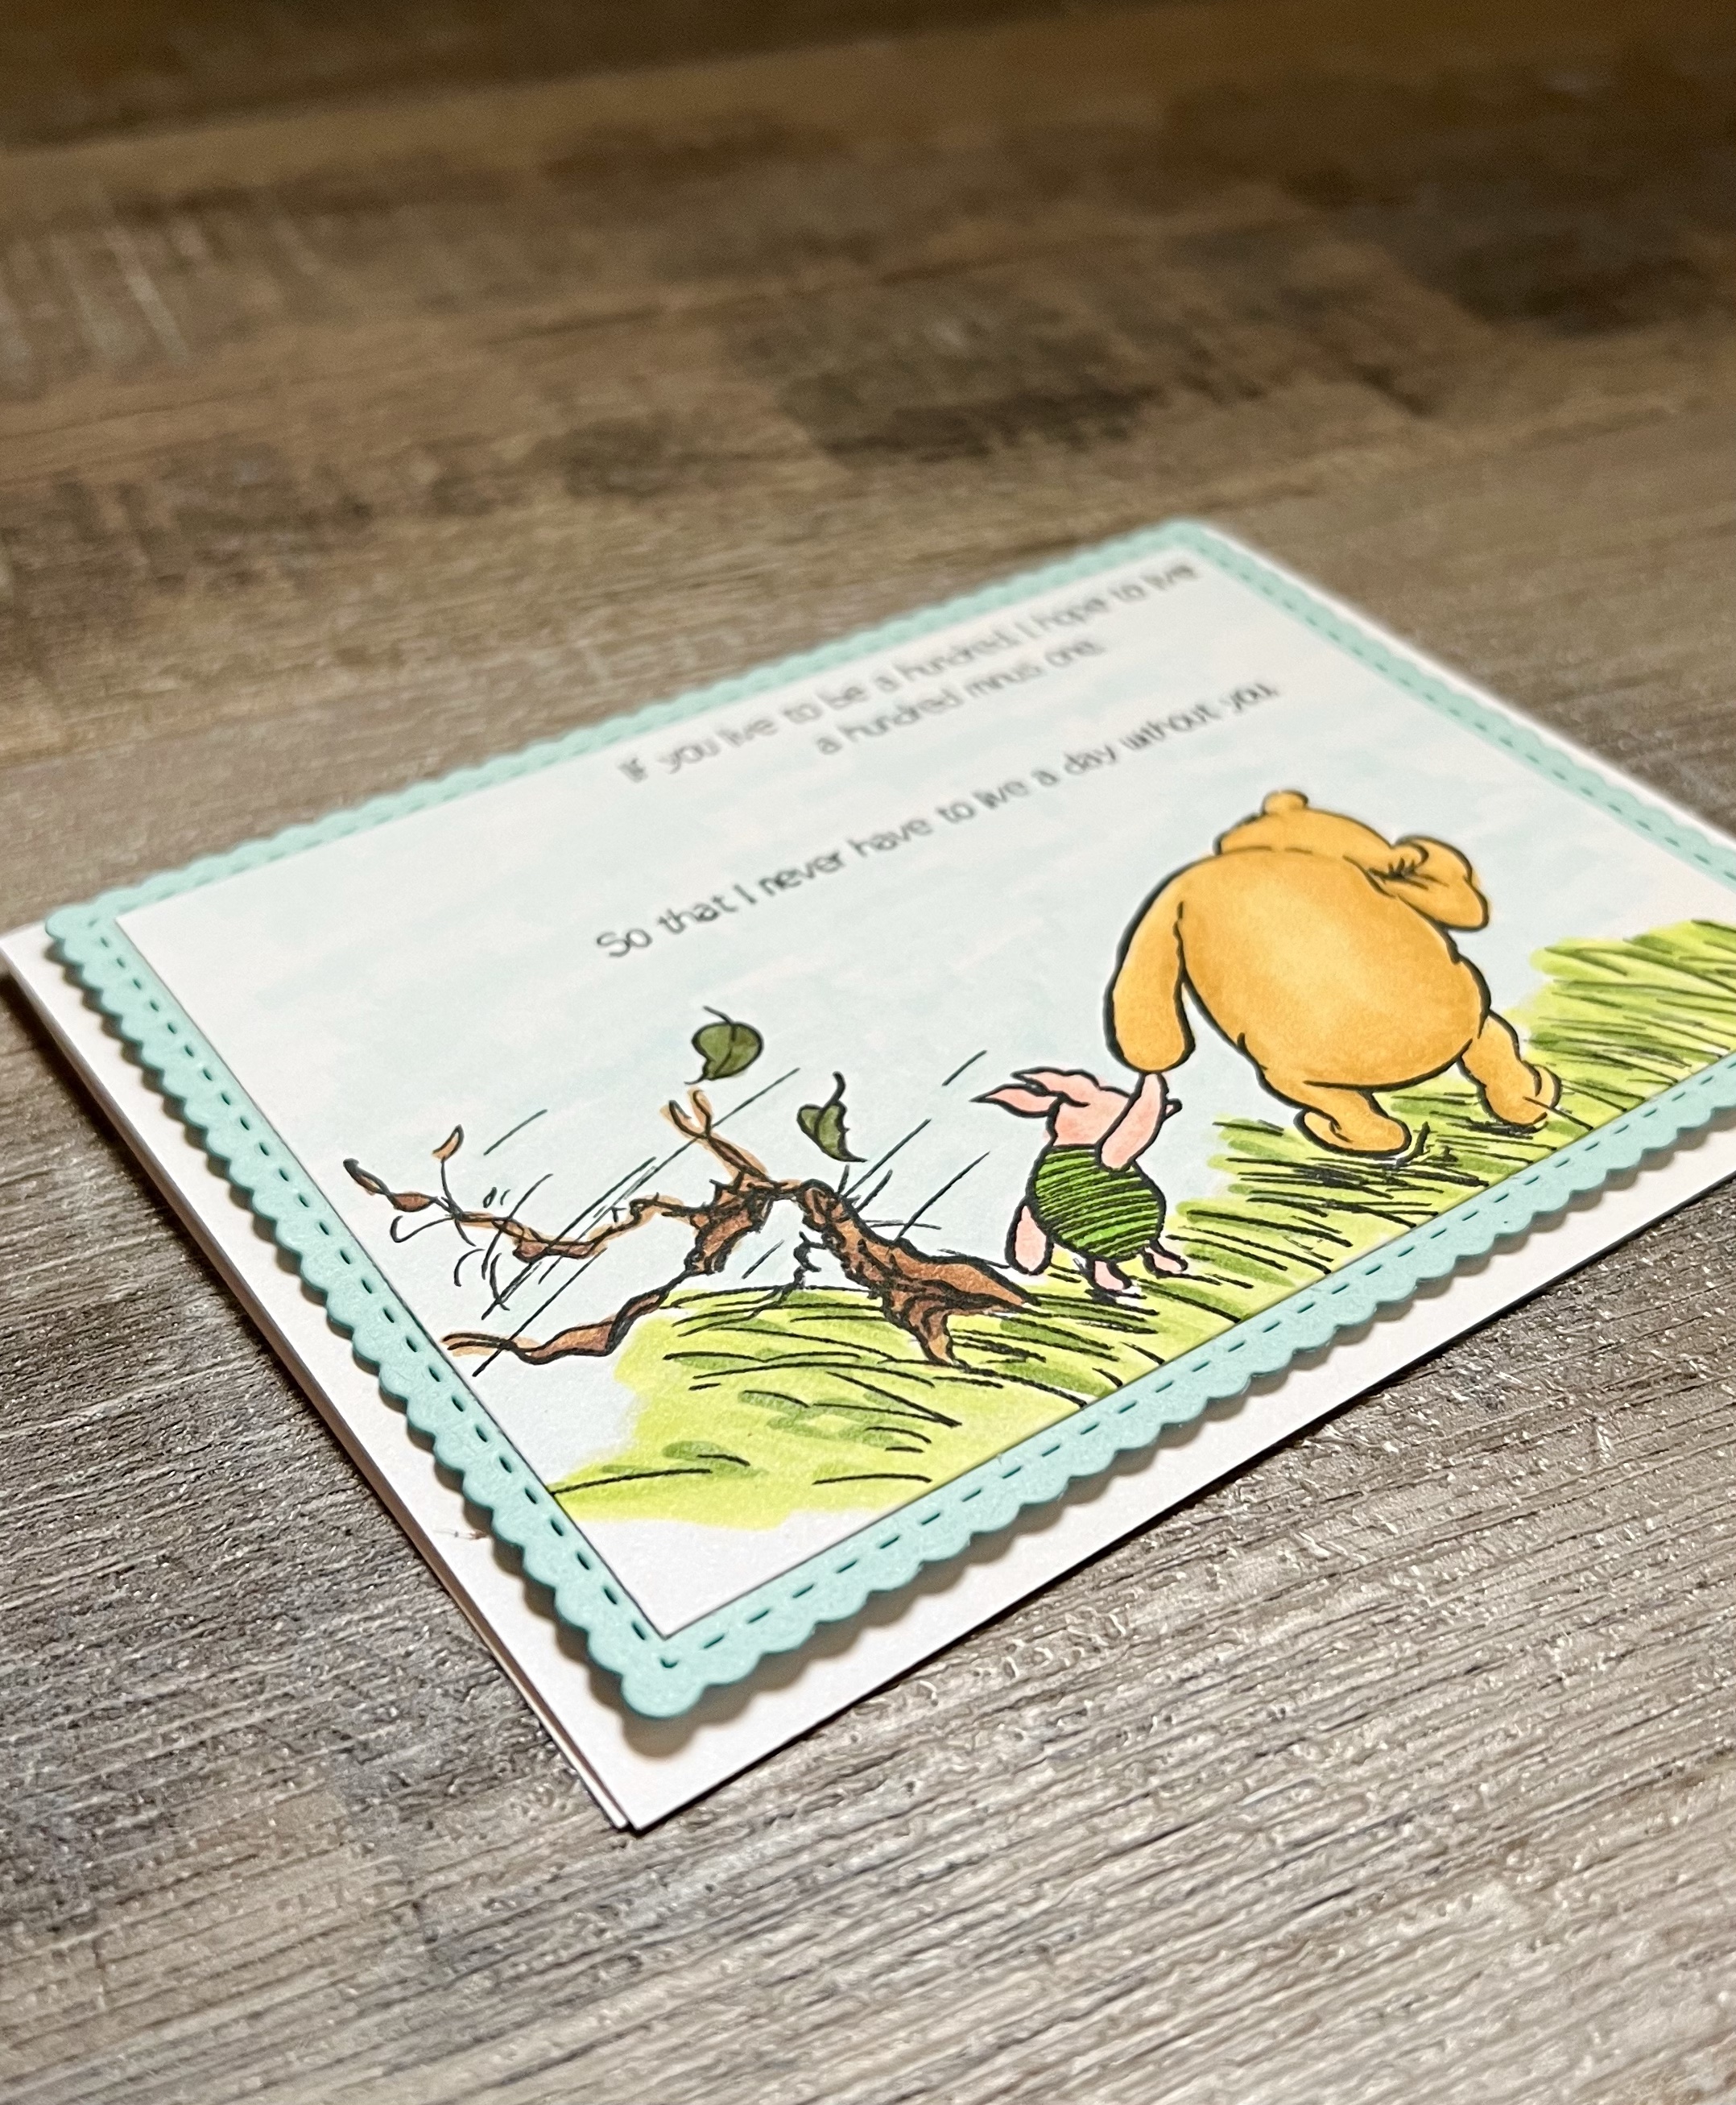
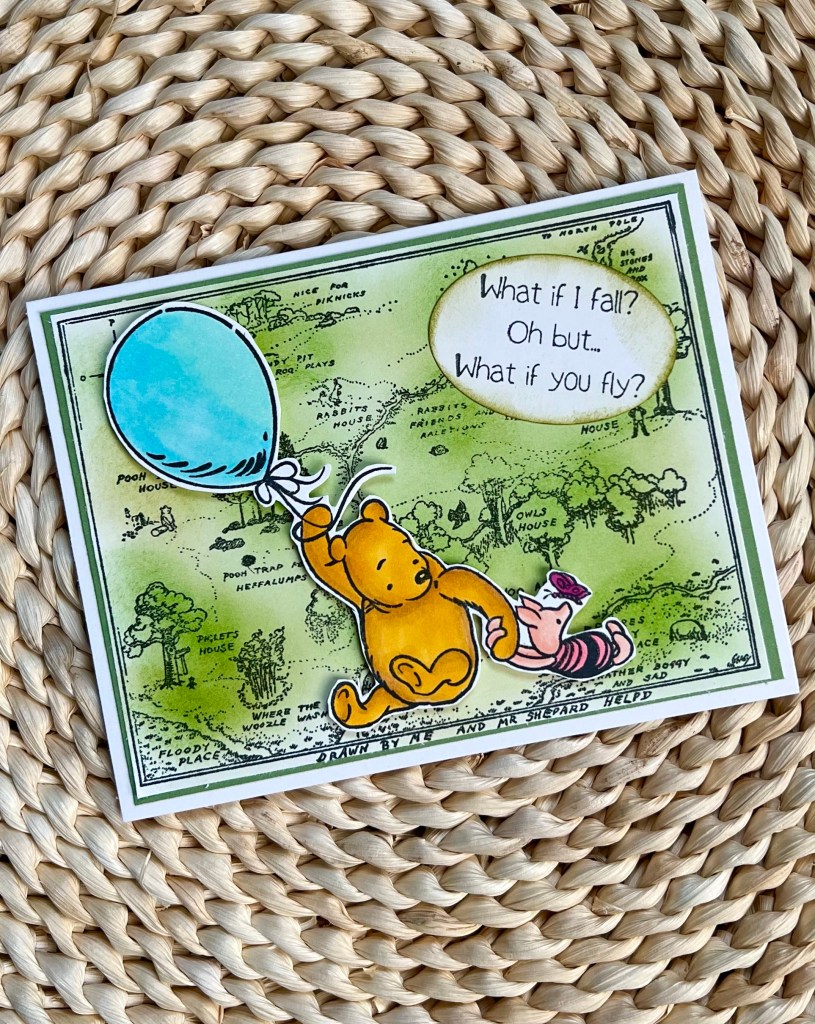
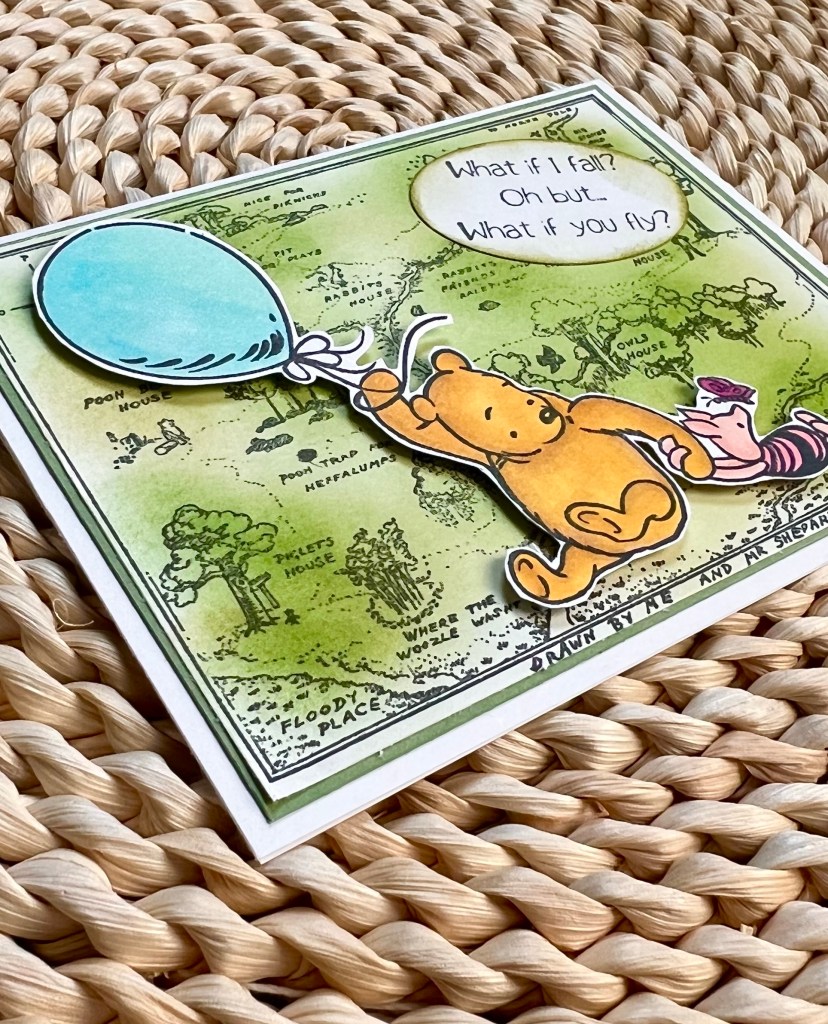
If you’ve followed me for a minute, you know that I absolutely love Unity Stamp Company! I love them even more since they recently released a line of Winnie the Pooh stamps. I have been a huge Pooh fan for as long as I can remember, so of course I had to add the stamps to my collection. 😉
Disclosure: Some of the links on my site are affiliate links, meaning, at no additional cost to you, I will earn a small commission if you click through and make a purchase. As an Amazon Associate I earn from qualifying purchases.
I stamped the Hundred Acre Wood image with Memento Tuxedo Black ink on white card stock. Then using these Blender Brushes from Taylored Expressions, I brushed on 3 different shades of green ink. I layered the stamped image to green card stock and attached it to a white card.
I stamped the Pooh and Piglet image with Memento Tuxedo Black ink on white card stock and colored it with Copic markers. I fussy cut around the image and attached it to the card using foam tape. I stamped the sentiment with the same black ink on white card stock, punched it out with an oval punch (similar to this), inked the edges with green ink using a blender brush, and attached it to the card.
I gave this card to a very special high school graduate and wrote her an encouraging note inside. I hope she will always take the chance to fly!
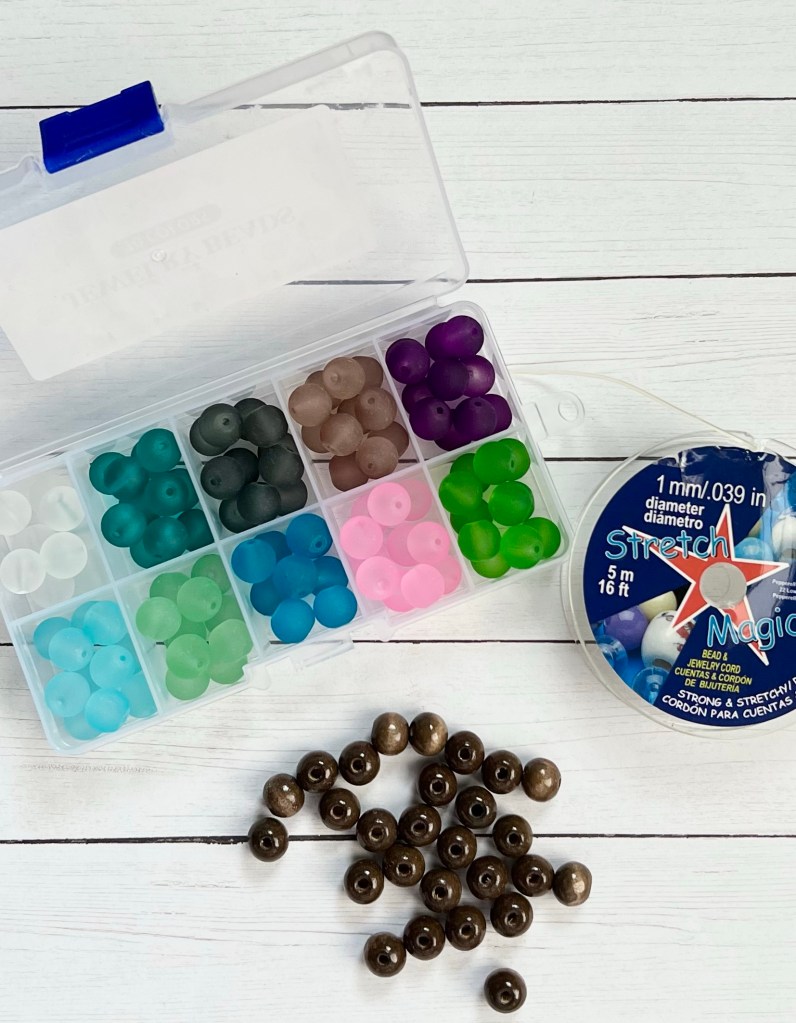
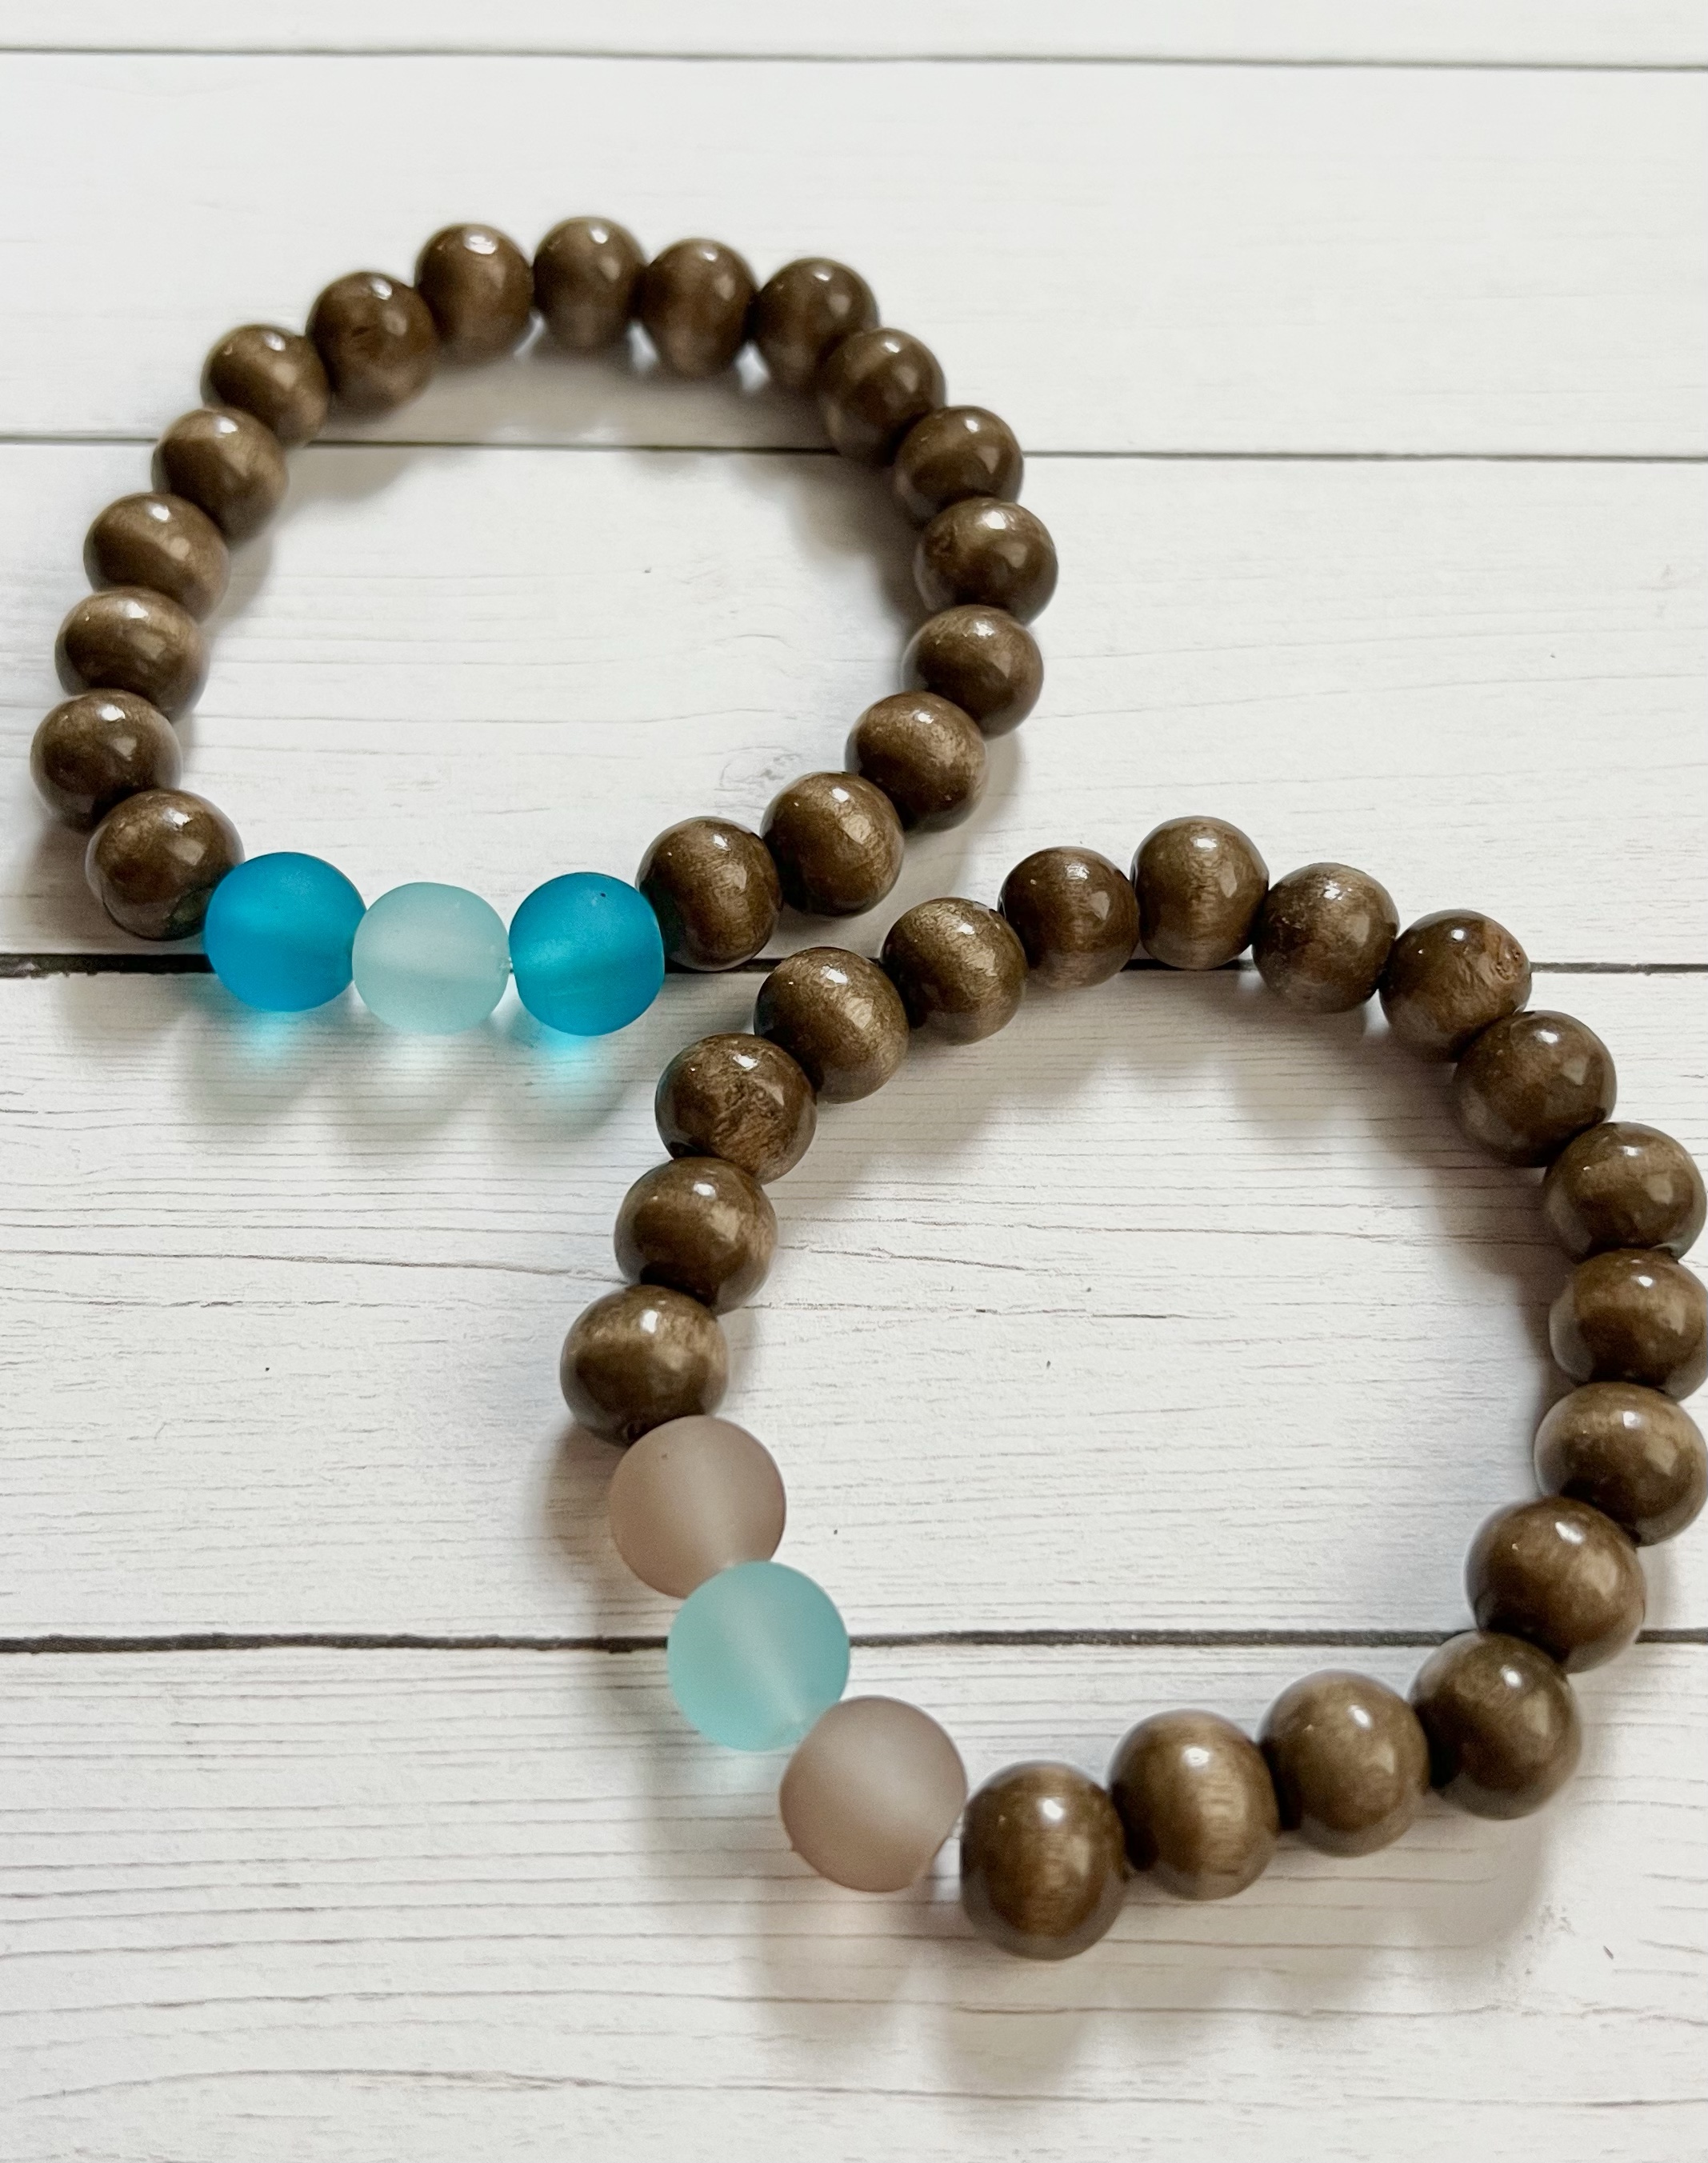
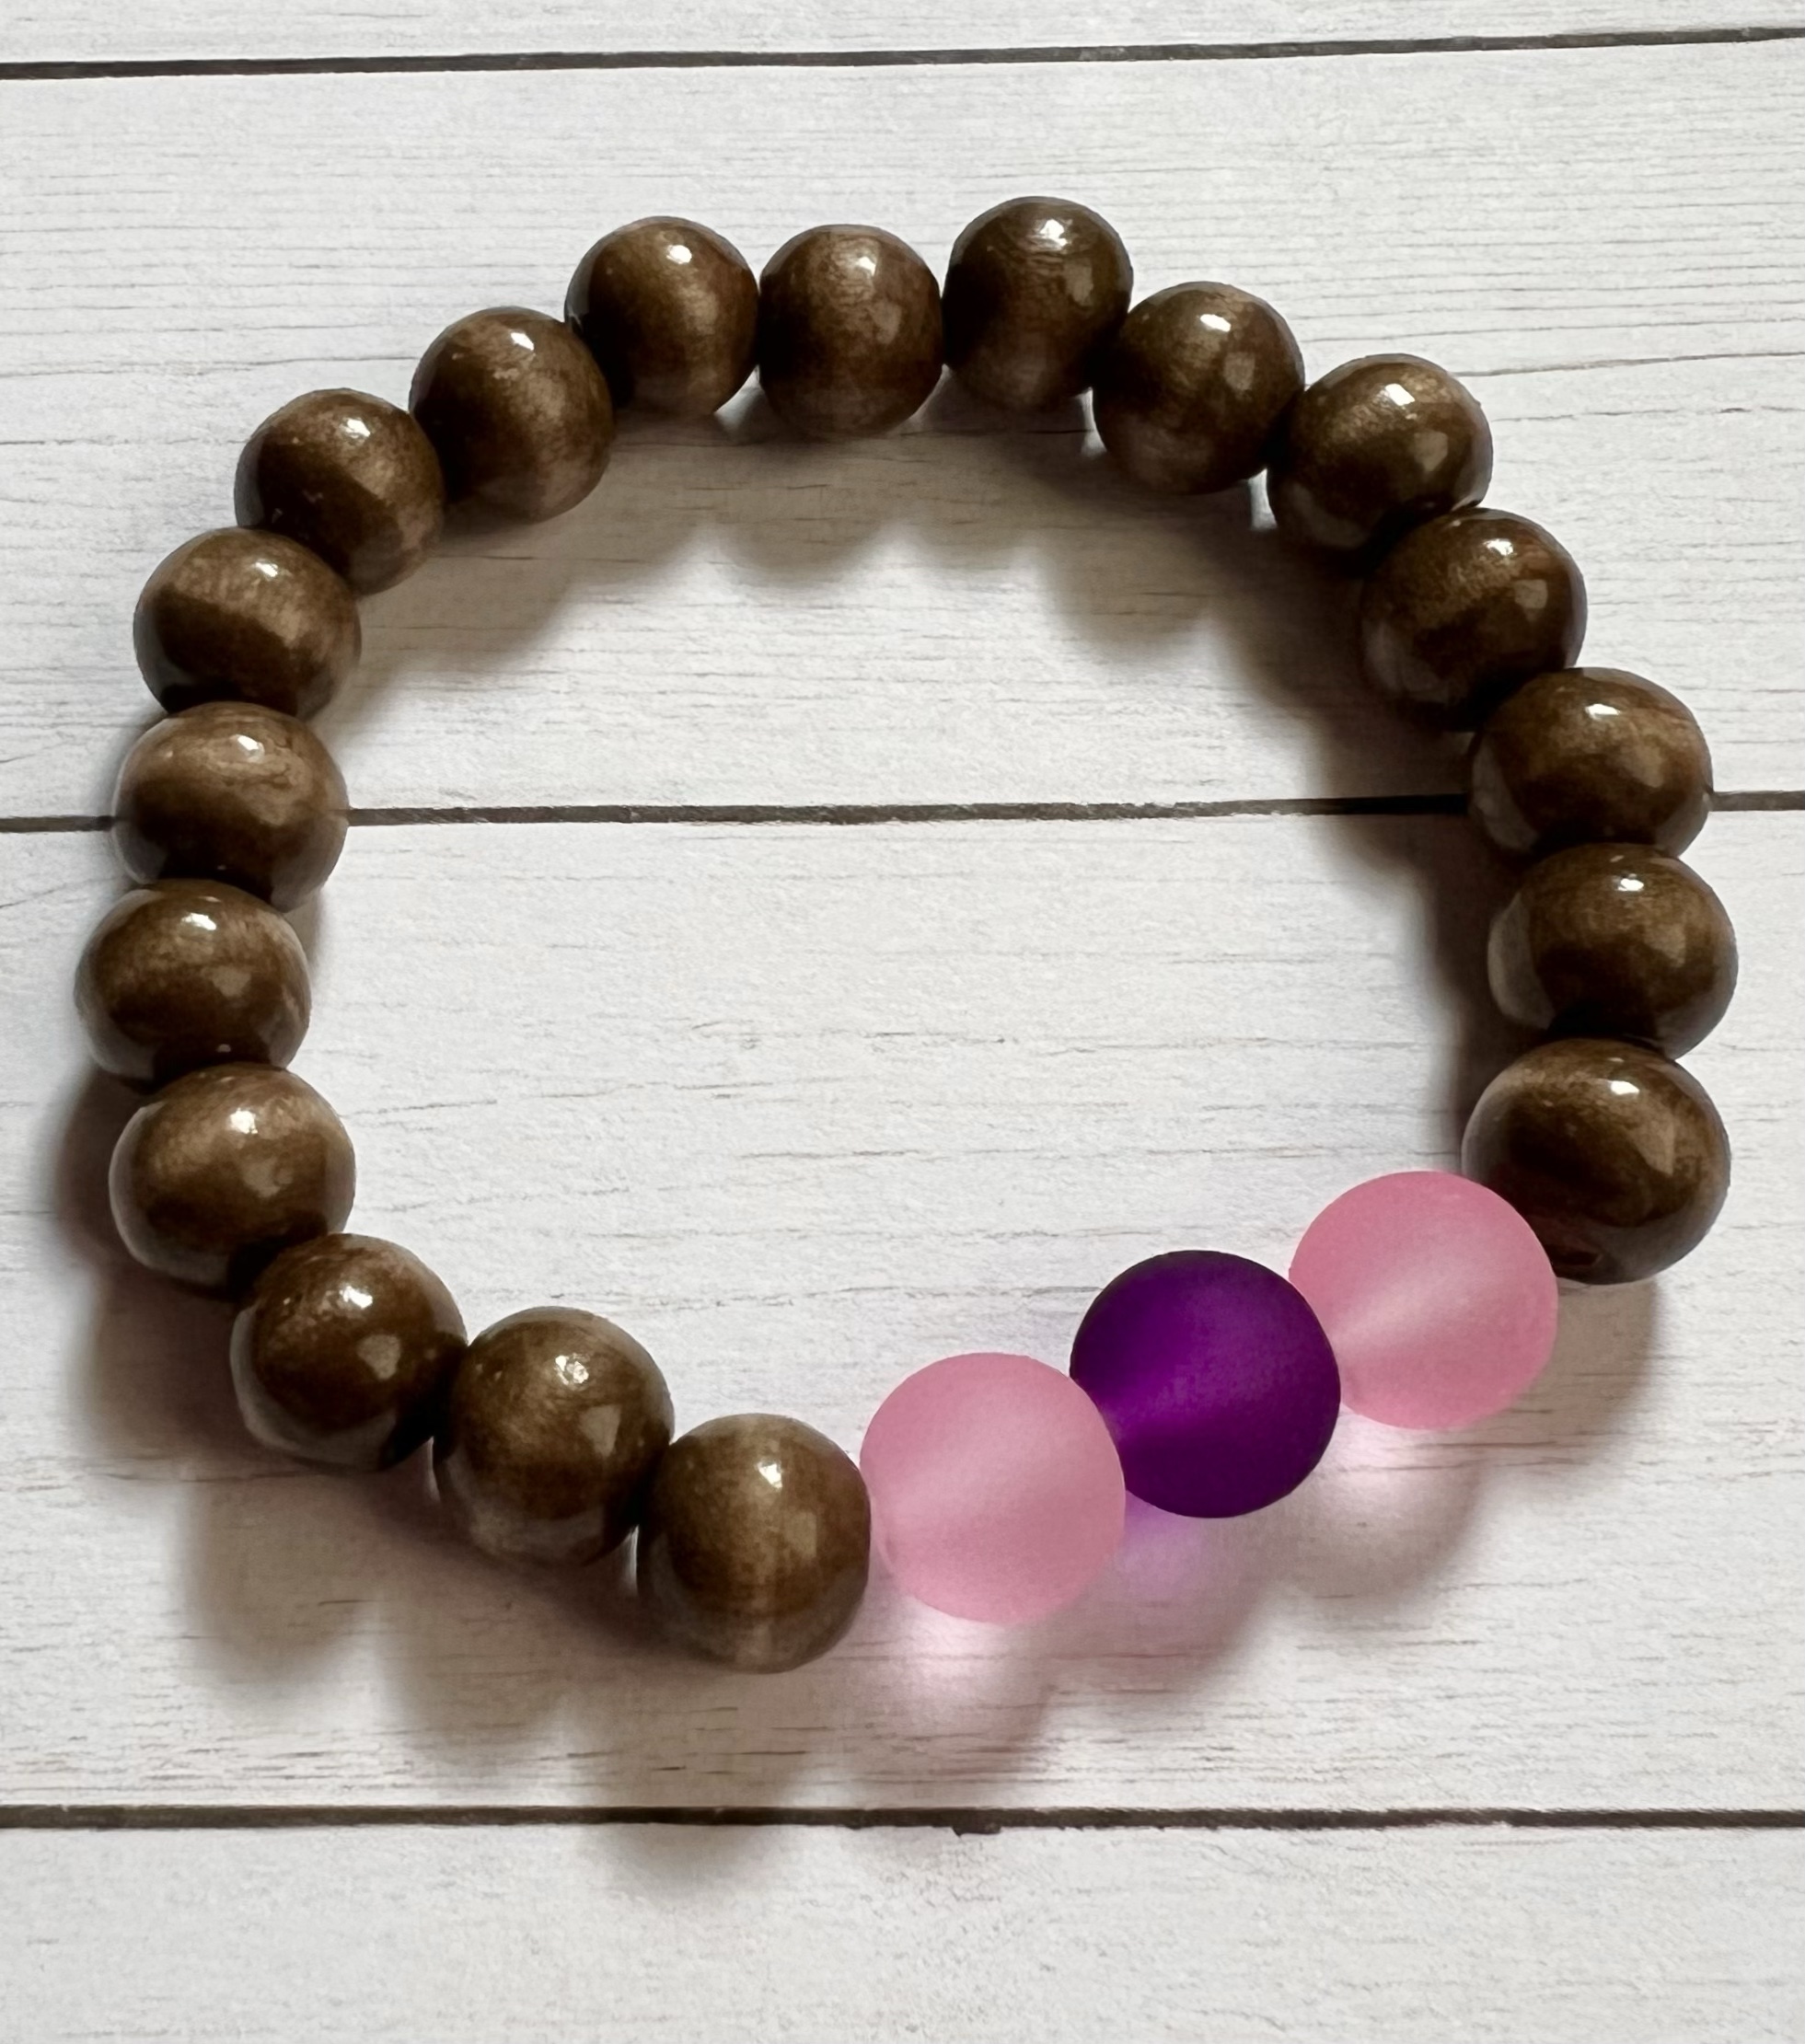
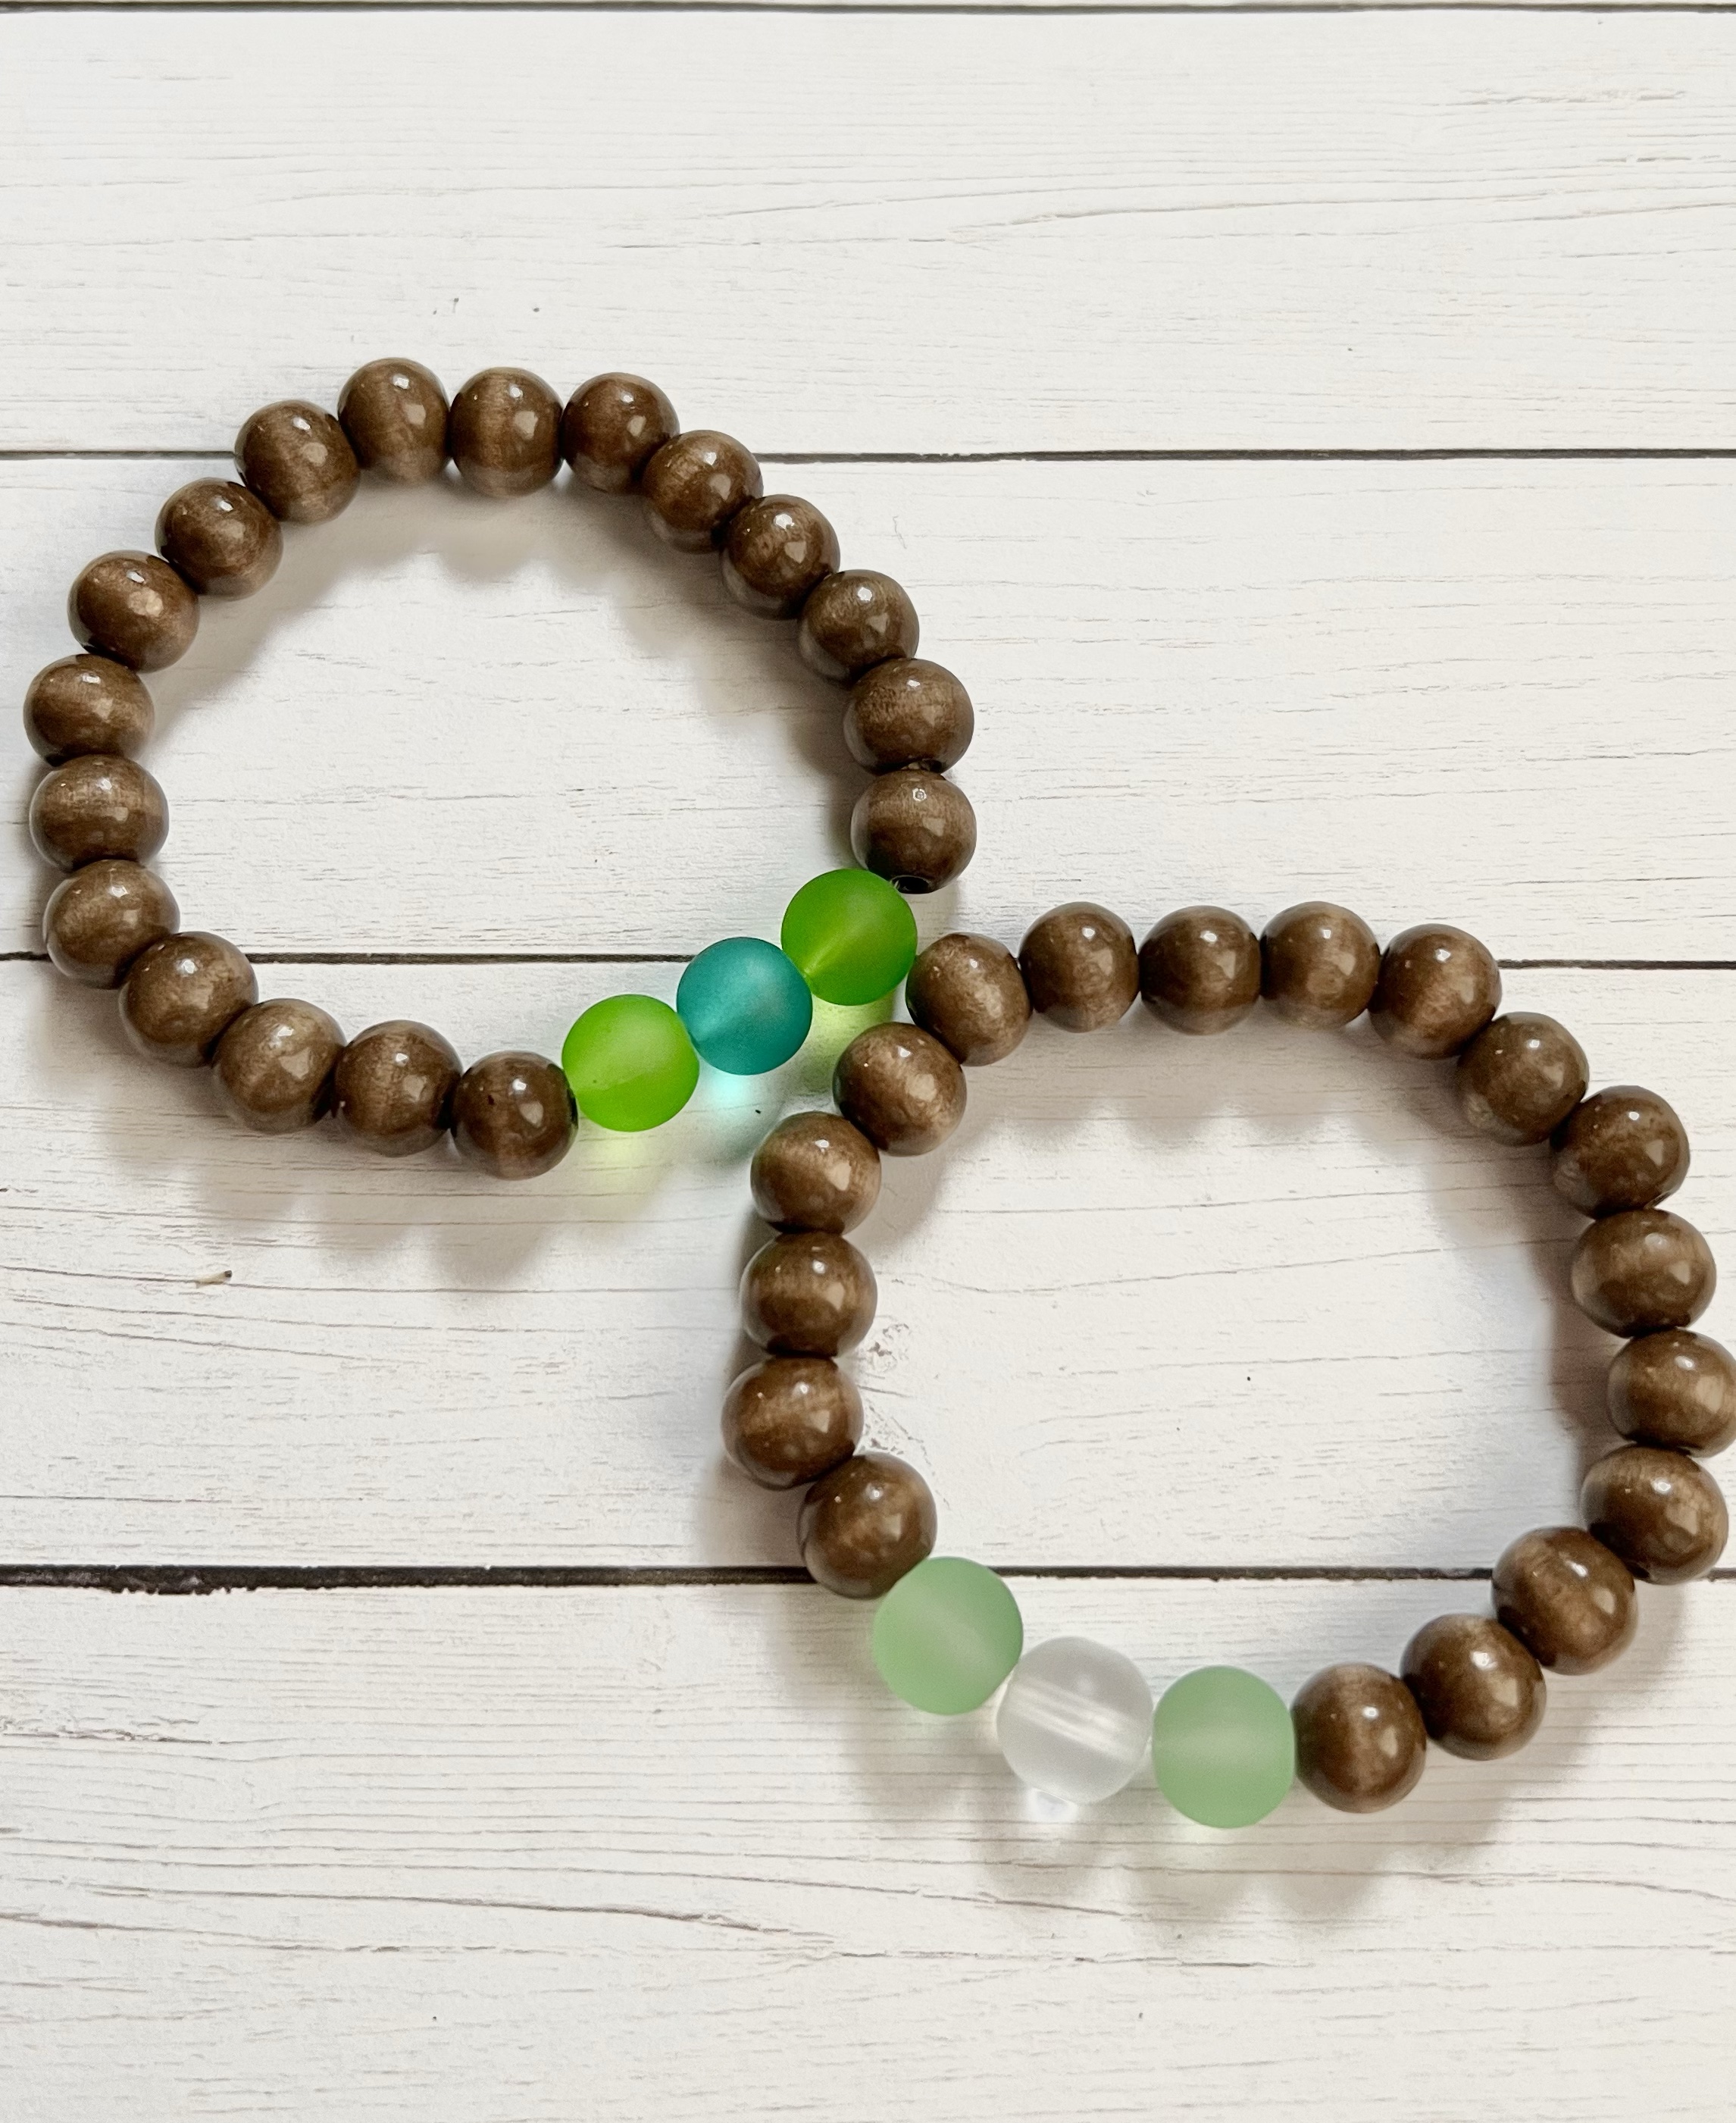
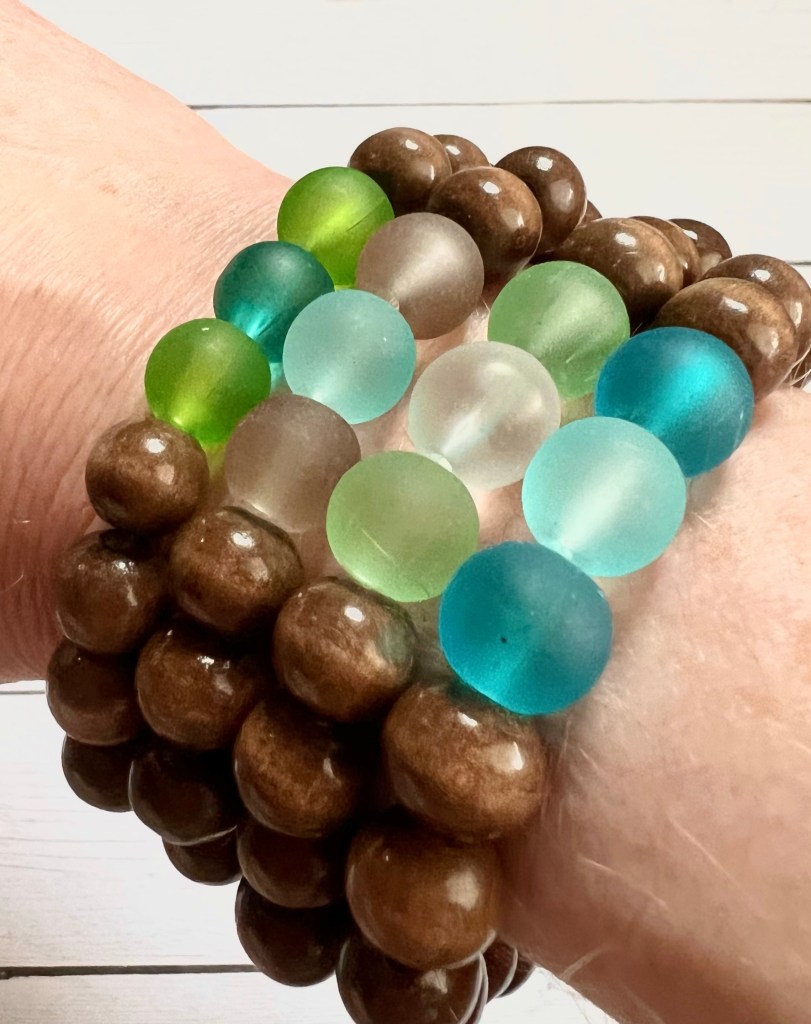
I found these beautifully colored glass beads here and they reminded me of pieces of sea glass with their soft muted colors. I thought they would make pretty Summer Beaded Stretch Bracelets paired with dark brown wood beads – so I made some! 🙂
Disclosure: Some of the links on my site are affiliate links, meaning, at no additional cost to you, I will earn a small commission if you click through and make a purchase. As an Amazon Associate I earn from qualifying purchases.
To make your own Summer Beaded Stretch Bracelets, you’ll need your favorite beads along with Stretch Magic bead and jewelry cord. I used the 1mm size cord to make my bracelets – use any size cord that will work with your beads. You can also use 2 strands of a thinner cord together so in case one of the strands happens to break your beads won’t scatter everywhere!
To make your bracelet, cut a piece of Stretch Magic cord about 10 inches long – or longer if that makes it easier for you to work with. Before stringing any beads, give the cord a good stretch. This will keep your bracelet from over stretching as you wear it. I tie a loose knot at one end to keep my beads from sliding off. Then string your beads in any design you like! I added several brown beads, 3 sea glass beads, and then the same number of brown beads after them. Tie your cord tightly in a knot and trim the excess cord. (Here’s a great tutorial for tying the Stretch Magic into a knot.) Drop a dot of strong clear glue (like E6000 clear adhesive) onto the knot to help secure it. And that’s it!
Stretch bracelets are so easy to make and your options are endless with all the bead choices available. There are beads for just about any season or occasion you can think of – what kind of beads will you use to make your Summer Beaded Stretch Bracelets?
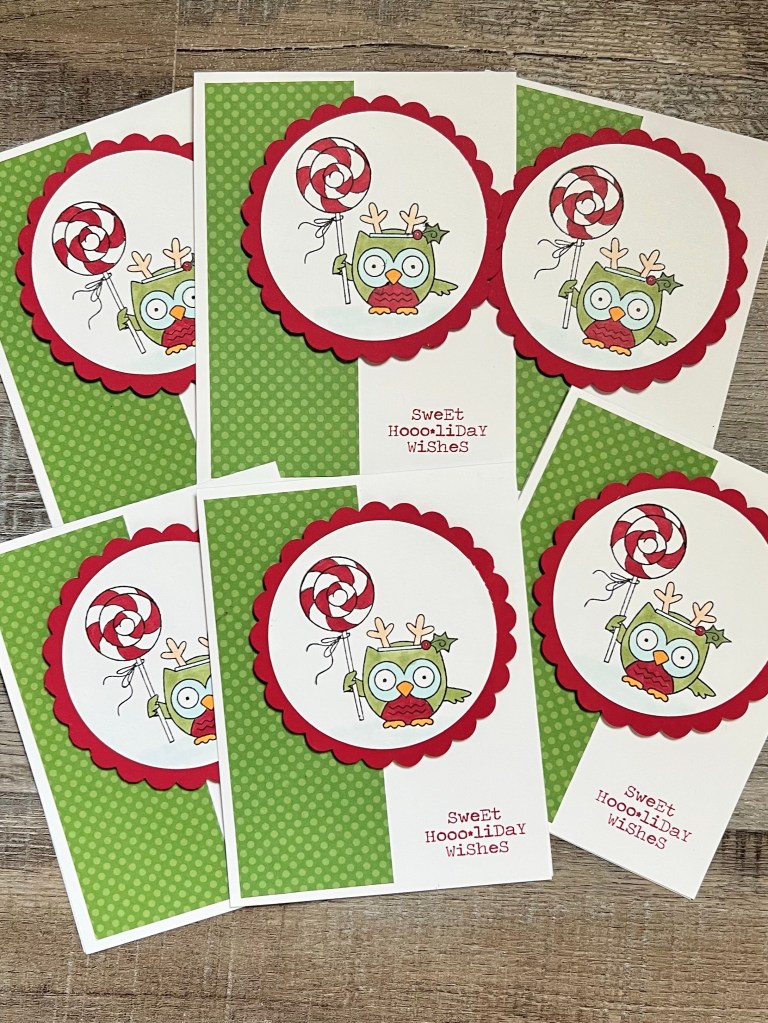
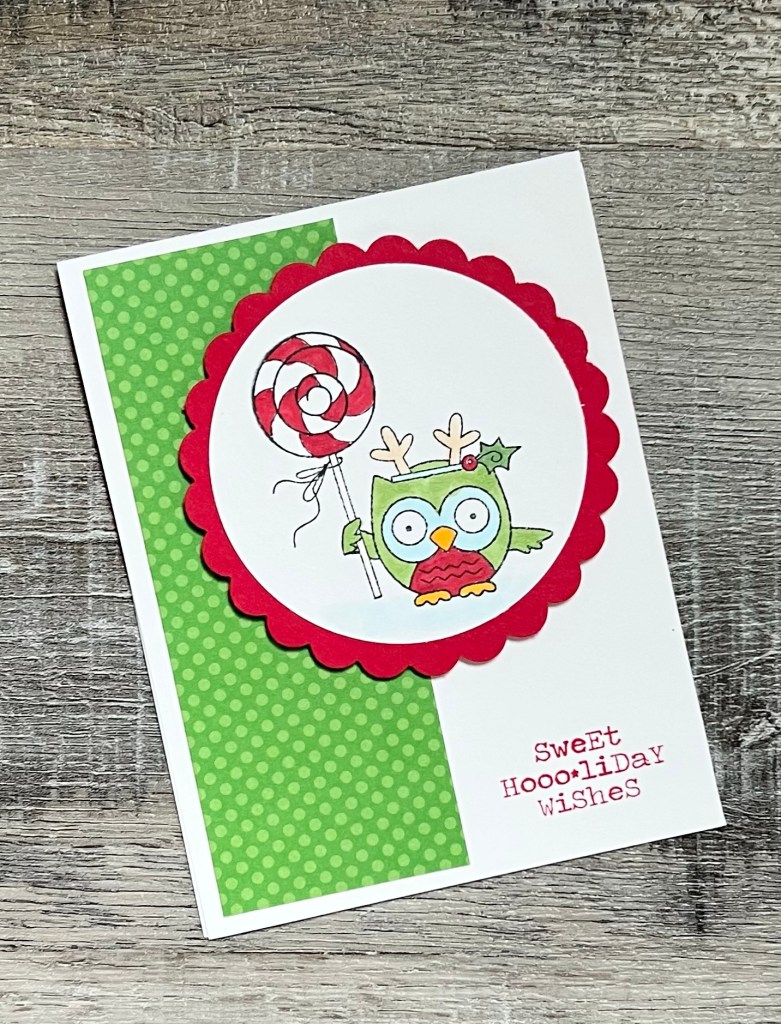
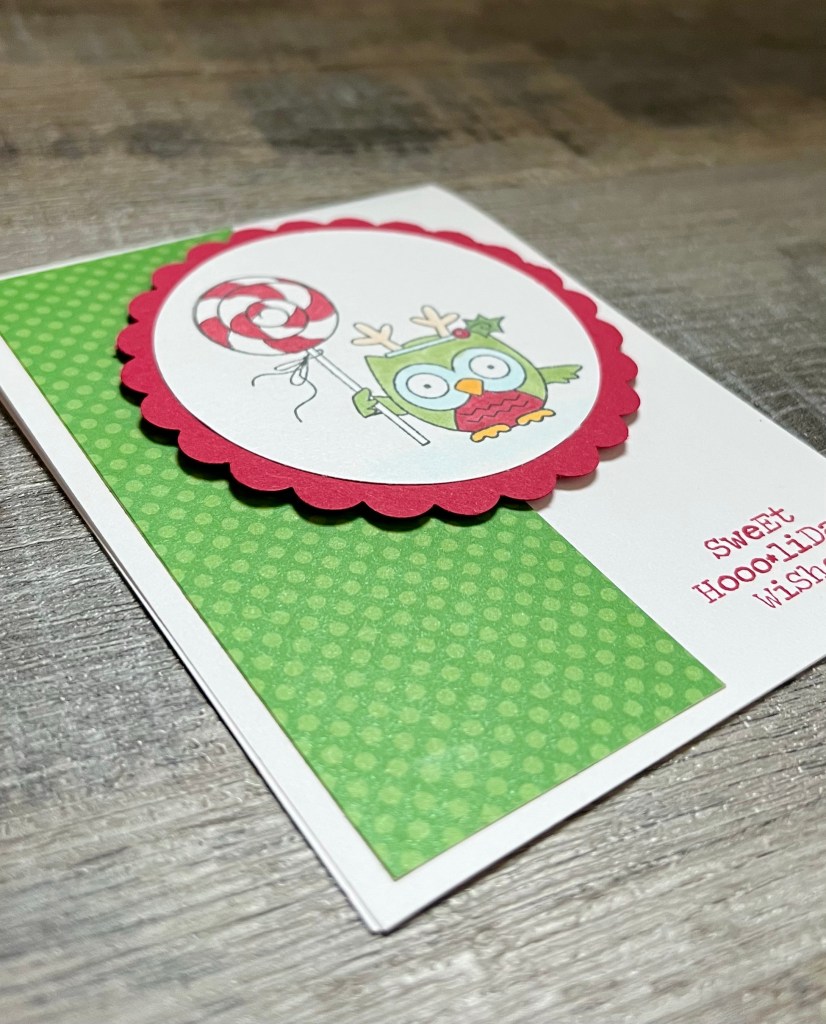
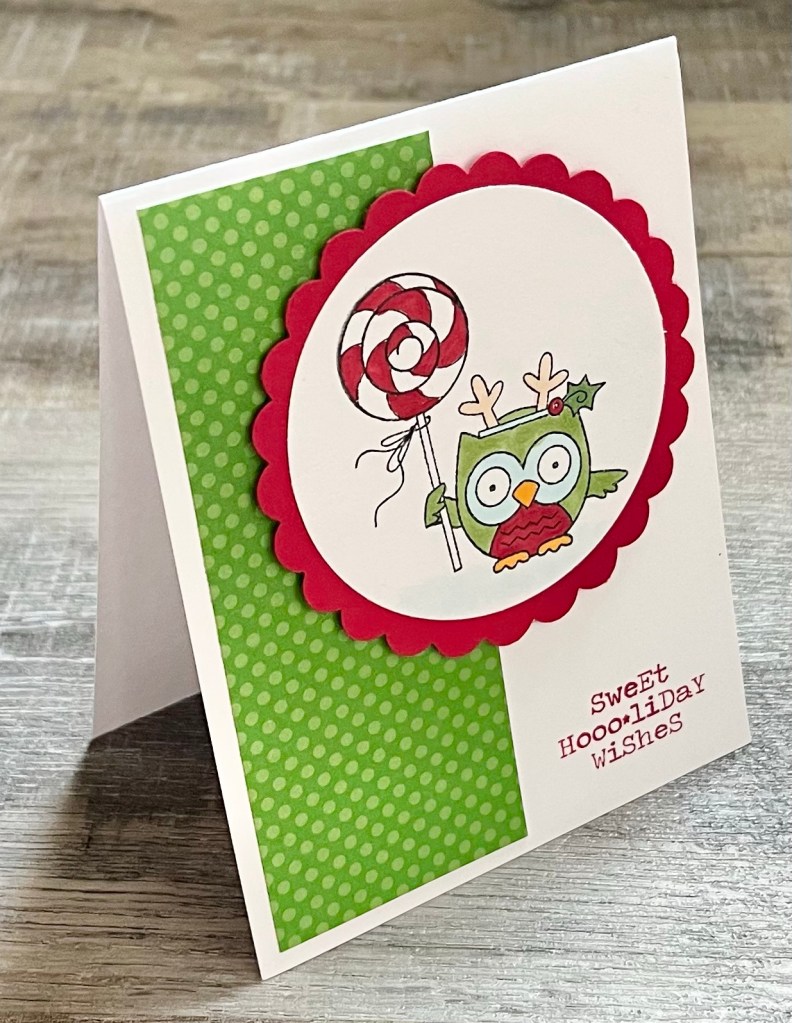
It’s time for May’s Christmas card! I’ve managed to design and make at least 4 Christmas cards each month so far this year. Have you joined me in building your Christmas card stash? You can find the other cards I’ve made so far in these posts – January, February, March, and April.
Disclosure: Some of the links on my site are affiliate links, meaning, at no additional cost to you, I will earn a small commission if you click through and make a purchase. As an Amazon Associate I earn from qualifying purchases.
This month I decided to pull out one of my older Christmas stamps because it’s still just so cute! This sweet owl is from the Ho Ho Hoot set by Darcie’s. Sadly, this set is no longer available but you can find some other adorable Darcie’s Christmas stamps here.
I stamped the owl with Memento Tuxedo Black ink on white card stock, colored it with Copic markers, and punched it with a circle punch. Then I layered the image to a scalloped circle punched from red card stock. I have a collection of circle and scalloped circle punches that I bought years ago that I use a lot on my cards. If you have a die cutting machine, there are sets of nesting circle dies (like these) and scalloped circle dies (like these) that will take up much less space in your craft room!
I added a piece of patterned paper to a white card and then added the stamped image using foam tape. I stamped the sentiment in the bottom right corner with red ink.
I made this card a top fold card to make it just a little different. Simply cut your card stock to measure 4.25 by 11 inches and fold it in half lengthwise.
You can use any of your favorite images and sentiments to make your own cards using this layout. I encourage you to pull out your older Christmas stamps and show them some love. 🙂
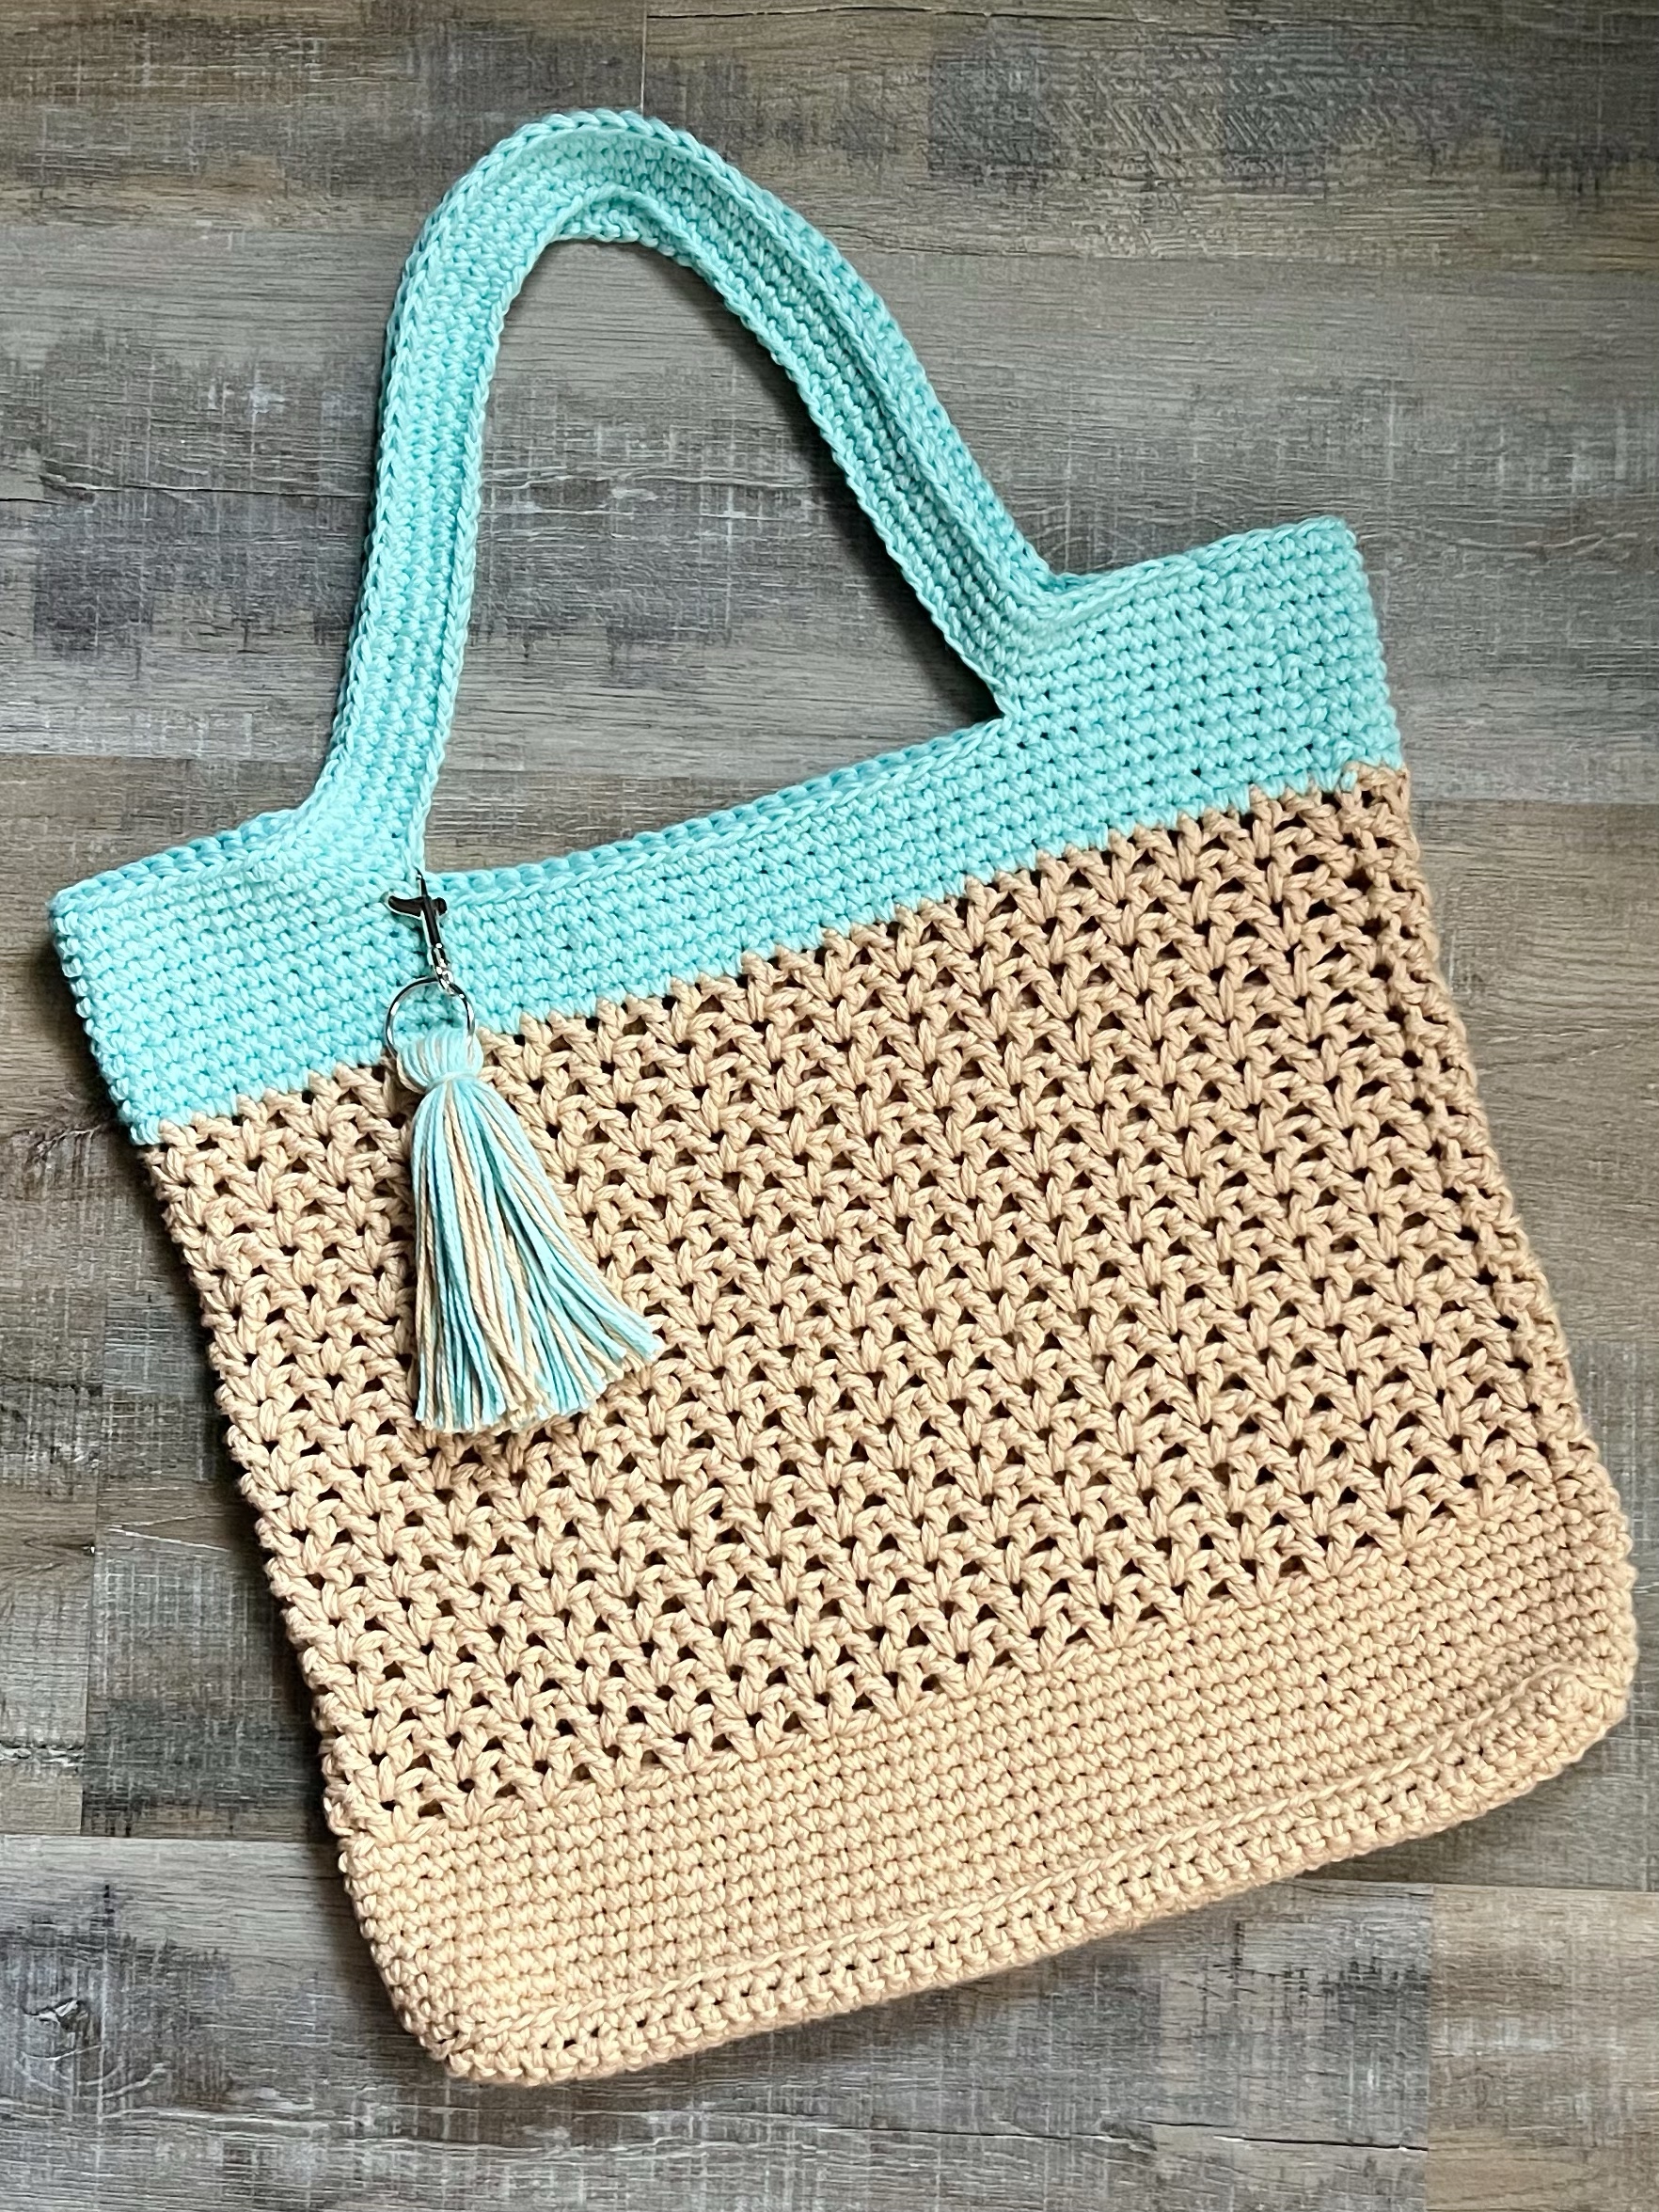
I love the beach! The sound of the waves rolling in is so relaxing. Give me a comfy chair, a beach umbrella, a cold drink, and a good book and I can spend all day hanging out on the beach. 🙂
Of course you’ll need a nice tote bag to carry all the things. My Crochet Sand and Sea Tote Bag is a great size to hold everything you need for a nice relaxing day at the beach – or the pool. It’s made using 2 strands of cotton yarn held together so it’s sturdy as well as pretty.
Disclosure: Some of the links on my site are affiliate links, meaning, at no additional cost to you, I will earn a small commission if you click through and make a purchase. As an Amazon Associate I earn from qualifying purchases.
The free pattern for the Sand and Sea Summer Tote Bag is below along with a link to a free PDF for easy printing.
Crochet Sand and Sea Summer Tote Bag
Worsted Weight Cotton yarn – I used I Love This Cotton yarn in Taupe (four 3.5 ounce skeins) and Aqua (two 3.5 ounce skeins)
You’ll need approximately 14 ounces of the main color and 7 ounces of the accent color.
J/6mm hook
For optional tassel:
1-inch split key ring
Swivel Eye Snap Hook
Stitches used US terms:
Chain – ch
Single crochet – sc
Slip stitch – ss
Back loop only – blo
Special Stitch – v-stitch (dc, ch 1, dc) in same stitch
Note: Bag is crocheted using 2 strands of yarn held together.
Ch 47 with Taupe (holding 2 strands together)
Row 1: sc in 2nd ch from hook and each ch across. Ch 1 and turn. (46 stitches)
Rows 2-5: sc in each stitch across. Ch 1 and turn. (46 stitches)
Row 6: sc in each stitch across. Ch 1. DO NOT TURN (46 stitches)
Begin working in rounds.
Round 1: Work 4 sc across end of rows. Work 2 sc in next stitch. sc in next 44 stitches. (This is the opposite side of the beginning ch.) 2 sc in last stitch. Work 4 sc across end of rows. 2 sc in next stitch. sc in next 44 stitches. 2 sc in last stitch. Join with ss to 1st sc. (104 stitches)
Round 2: ch 1. sc in blo only of same stitch as ss and in each stitch around. Join with ss to 1st sc. (104 stitches)
Round 3: ch 1. Skip stitch that has the ss. sc in next stitch and in each stitch around, ending with final sc in skipped sc at the beginning of the round. Join with ss to 1st sc. (104 stitches)
Round 4: ch 1. sc in same stitch as ss and in each stitch around. Join with ss to 1st sc. (104 stitches)
Round 11: ch 3 (counts as first dc and ch 1) dc in same stitch as ss. *skip next 2 stitches, work v-stitch in next stitch* Repeat from * to * around to last stitch. Skip last stitch and join with ss to 2nd ch in beginning ch 3. (35 v-stitches)
Rounds 12-26: ss into ch 1 space. ch 3 (counts as first dc and ch 1) dc in same ch 1 space. (First v-stitch made) Work v-stitch in each ch 1 space of v-stitch in previous row. Join with ss to 2nd ch of beginning ch 3. (35 v-stitches)
Change to Aqua.
Round 27: ch 1. sc crochet in first ch 1 space. sc in each dc and ch 1 space around. Join with ss to first sc. (104 stitches)
Round 28: ch 1. sc in same stitch as ss and in each stitch around. Join with ss to 1st sc. (104 stitches)
Round 29: ch 1. Skip stitch that has the ss. sc in next stitch and in each stitch around, ending with final sc in skipped sc at the beginning of the round. Join with ss to 1st sc. (104 stitches)
Round 30: ch 1. sc in same stitch as ss and in each stitch around. Join with ss to 1st sc. (104 stitches)
Round 31: ch 1. Skip stitch that has the ss. sc in next stitch and in each stitch around, ending with final sc in skipped sc at the beginning of the round. Join with ss to 1st sc. (104 stitches)
Round 32: ch 1. sc in same stitch as ss and in each stitch around. Join with ss to 1st sc. (104 stitches)
The next round will form the handles of the tote.
Round 33: ch 1. Skip stitch that has ss. sc in next 10 stitches. Ch 60. Skip next 24 stitches. sc in next 28 stitches. Ch 60. Skip 24 stitches. sc in next 18 stitches. End the round with a sc in the stitch that was skipped at the beginning of the round. Join with ss to first sc. (176 stitches)
Round 34: ch 1. sc in same stitch as ss and each sc and ch around. Join with ss to first sc. (176 stitches)
Round 35: ch 1. Skip stitch that has the ss. sc in next stitch and in each stitch around, ending with the final sc in skipped stitch at the beginning of the round. Join with ss to first sc. (176 stitches)
Round 36: ch 1. sc in same stitch as ss and in each stitch around. Join with ss to first sc. (176 stitches)
Round 37: ch 1. Skip stitch that has the ss. sc in next stitch and in each stitch around, ending with the final sc in skipped stitch at the beginning of the round. Join with ss to first sc. (176 stitches)
Fasten off and weave in ends.
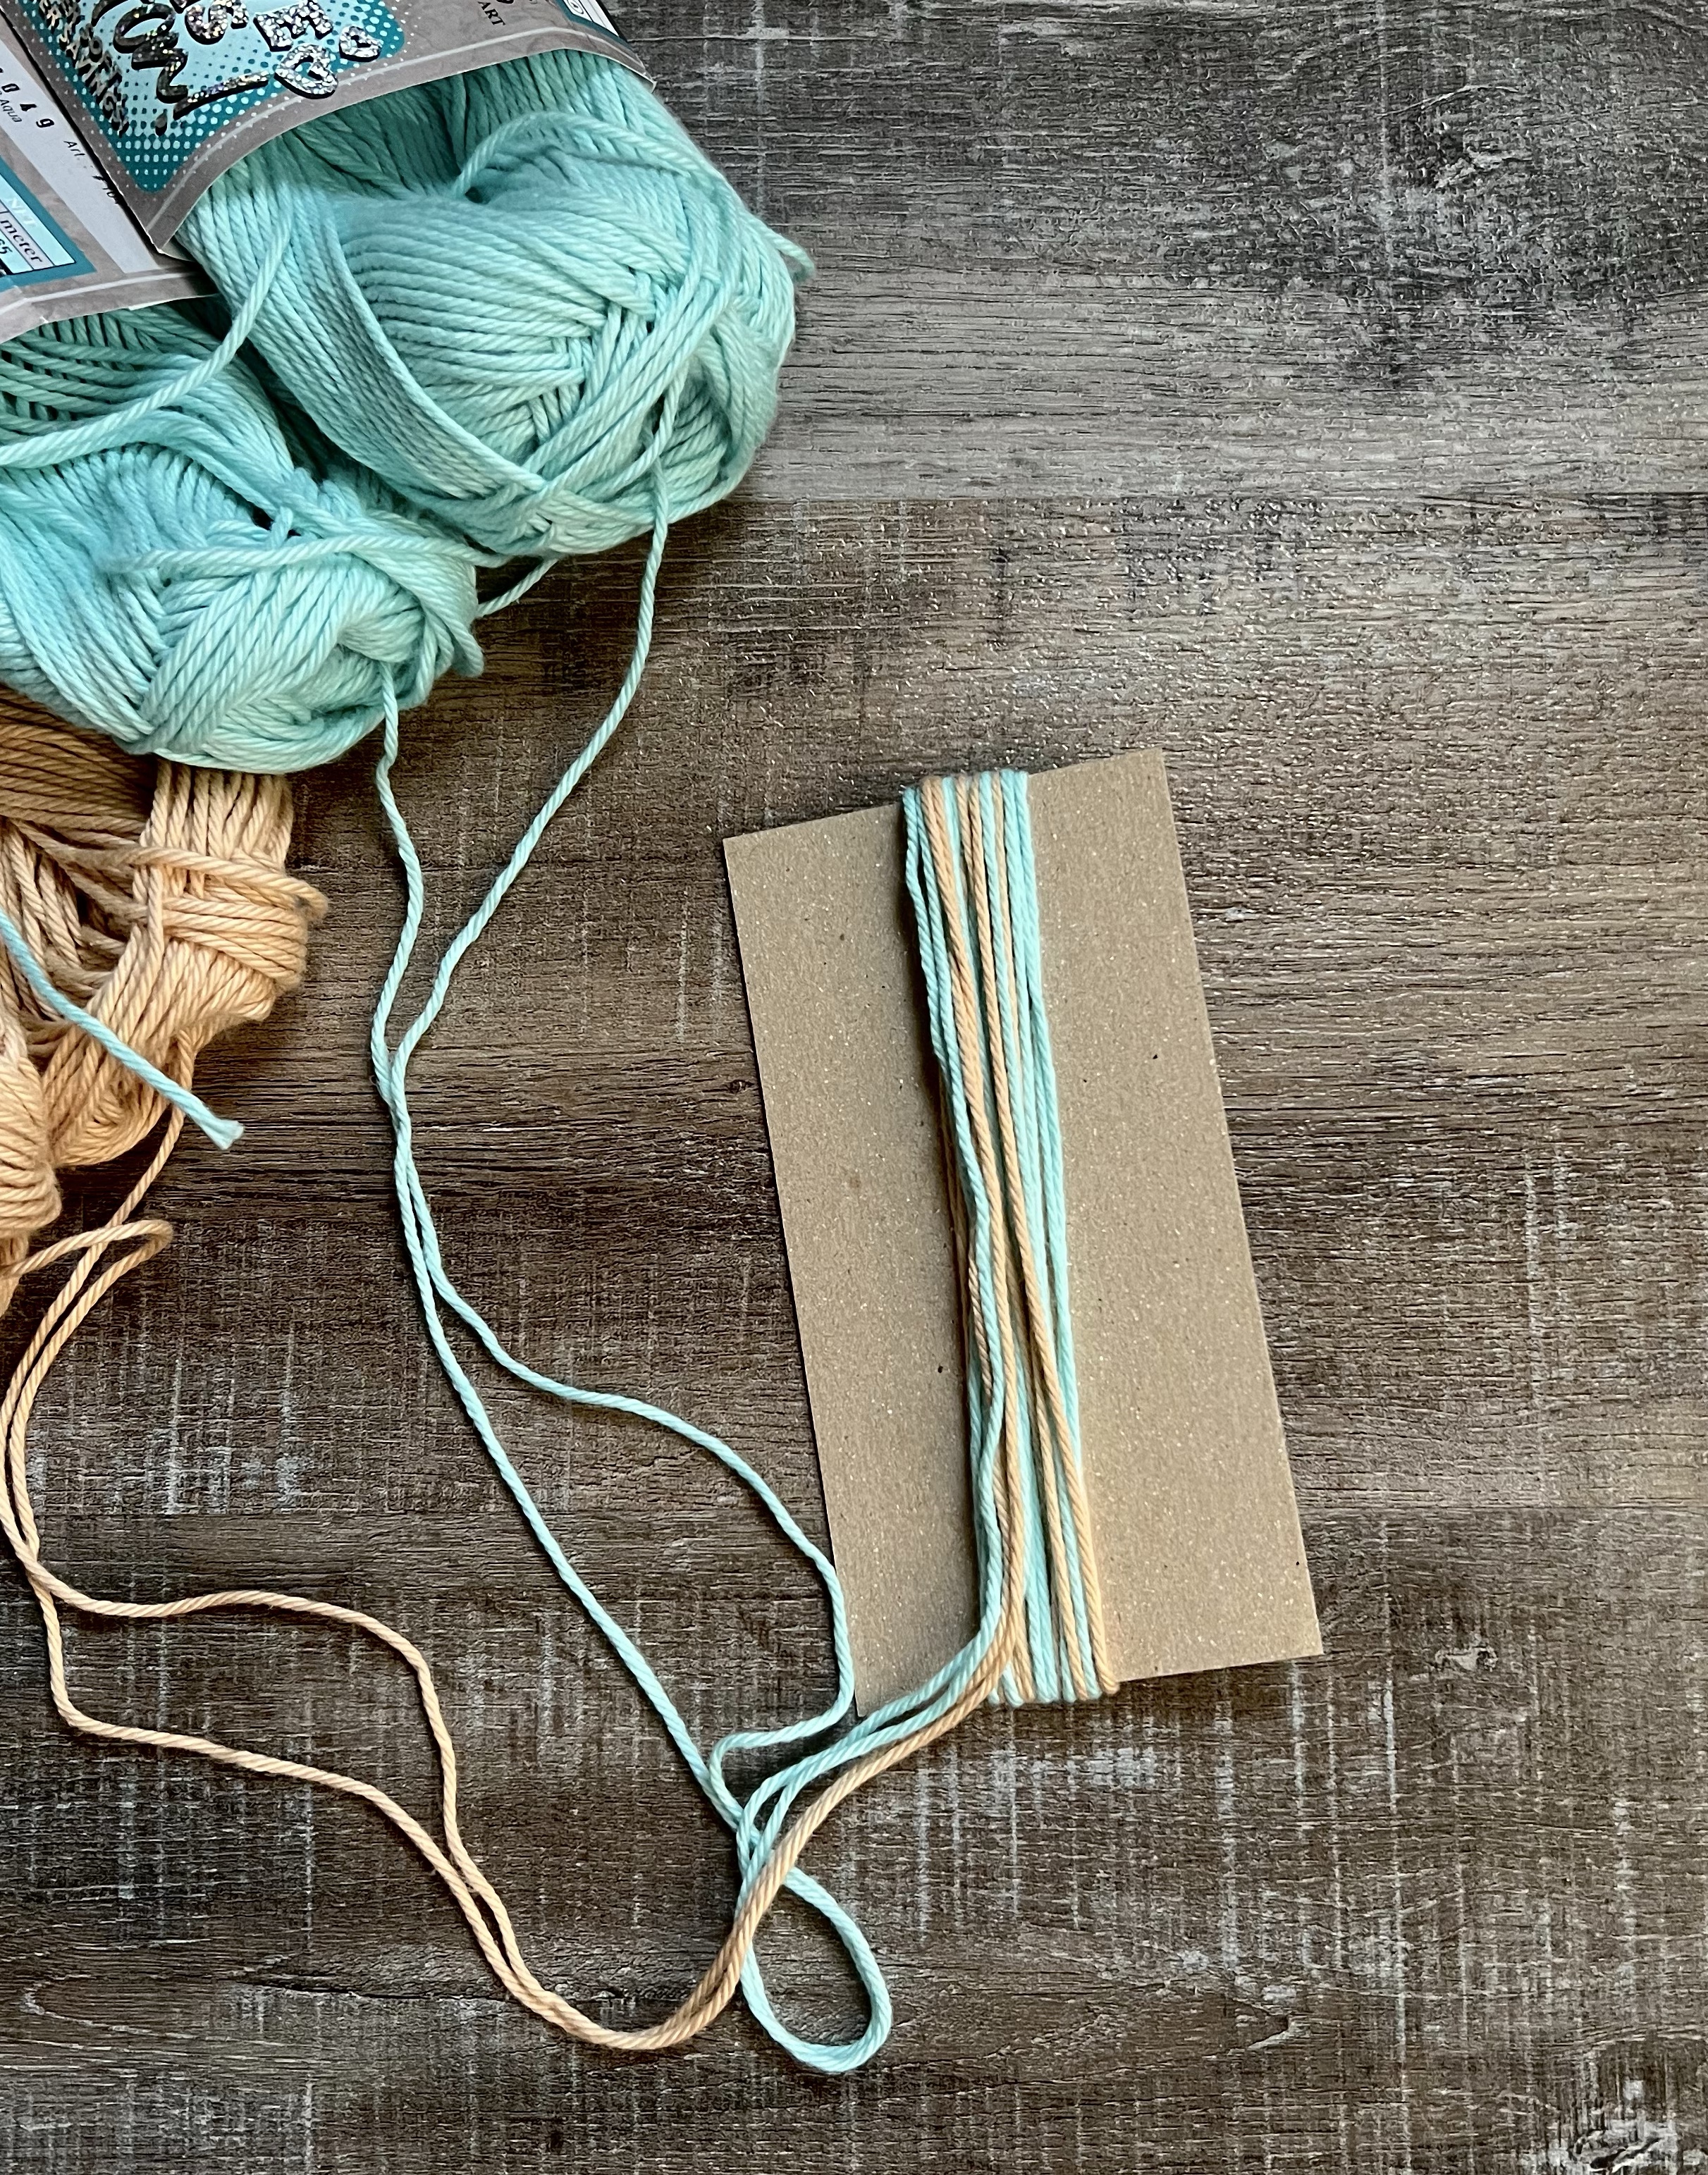
To make optional tassel key ring :
Cut a piece of cardboard about 6-inches long by 3-inches wide. Using 2 strands of each color yarn, wrap the yarn around the cardboard piece on the 6-inch length to desired thickness.
Cut one end of the yarn and slip the key ring onto the strands of yarn. Remove the cardboard piece and using a strand of yarn, tie tightly around all of the strands close to the key ring. Trim the tassel to desired length. Attach swivel eye snap hook and attach to bag.
Finished tote bag measures approximately 17 inches wide by 16 inches tall plus the handle.
The Sand and Sea Summer Tote Bag can be used for so much more than a beach or pool tote! It’s perfect to take to the Farmer’s Market, Craft and Vendor Markets, Saturday morning shopping, or to carry your current crochet project. You can also use it to carry all the things your little ones need on a trip to the park or playground.
What color will you make your Crochet Sand and Sea Summer Tote Bag?
Disclosure: Some of the links on my site are affiliate links, meaning, at no additional cost to you, I will earn a small commission if you click through and make a purchase. As an Amazon Associate I earn from qualifying purchases.
I attached a piece of patterned paper to a white card and then attached the pink card stock. I attached the tulips to the card using foam tape. I stamped the sentiment with the brown ink on a strip of white card stock, layered it to a strip of pink card stock, and attached it to the card. I added 3 pink gems to finish the card.
My sentiment stamp is one I’ve had in my stash for a long time. Use your favorite sentiment – thinking of you, happy birthday, or anything else you may have.
I changed things up and made this a top fold card. Cut your card stock base to measure 4.25 by 11 inches and fold it in half the long way. I like the way the top fold works with this layout.
Look through your stamps and see what simple images you may have that will make a beautiful focal point for a card. I would love to see what you make!
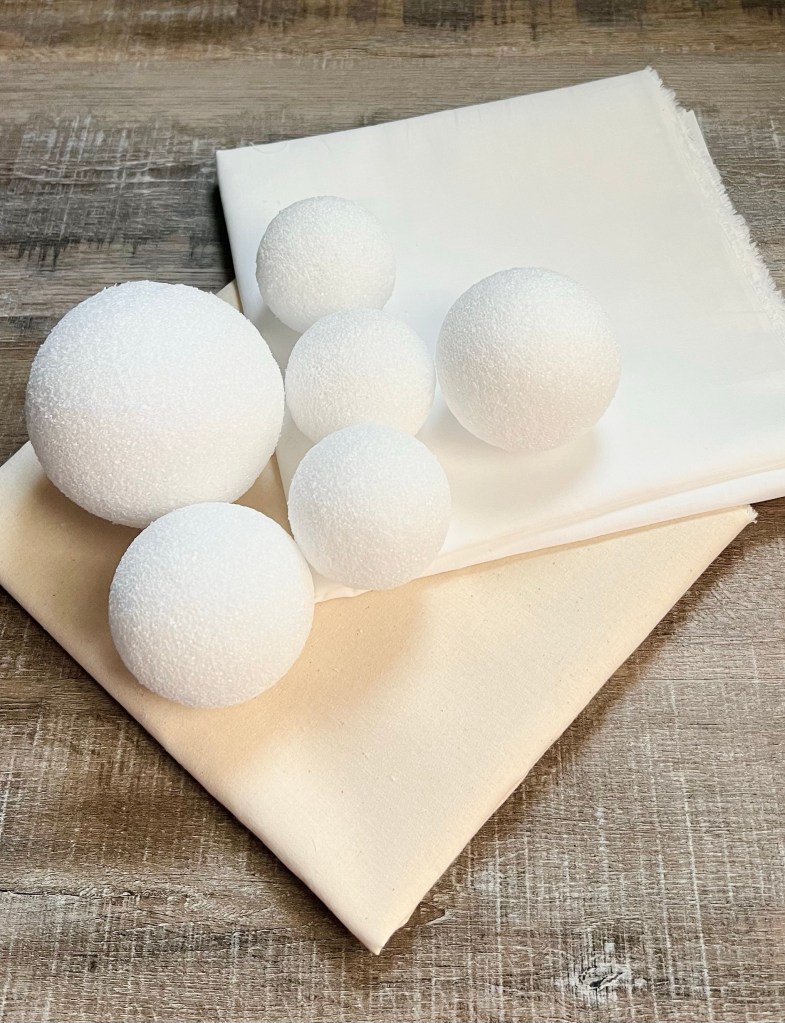
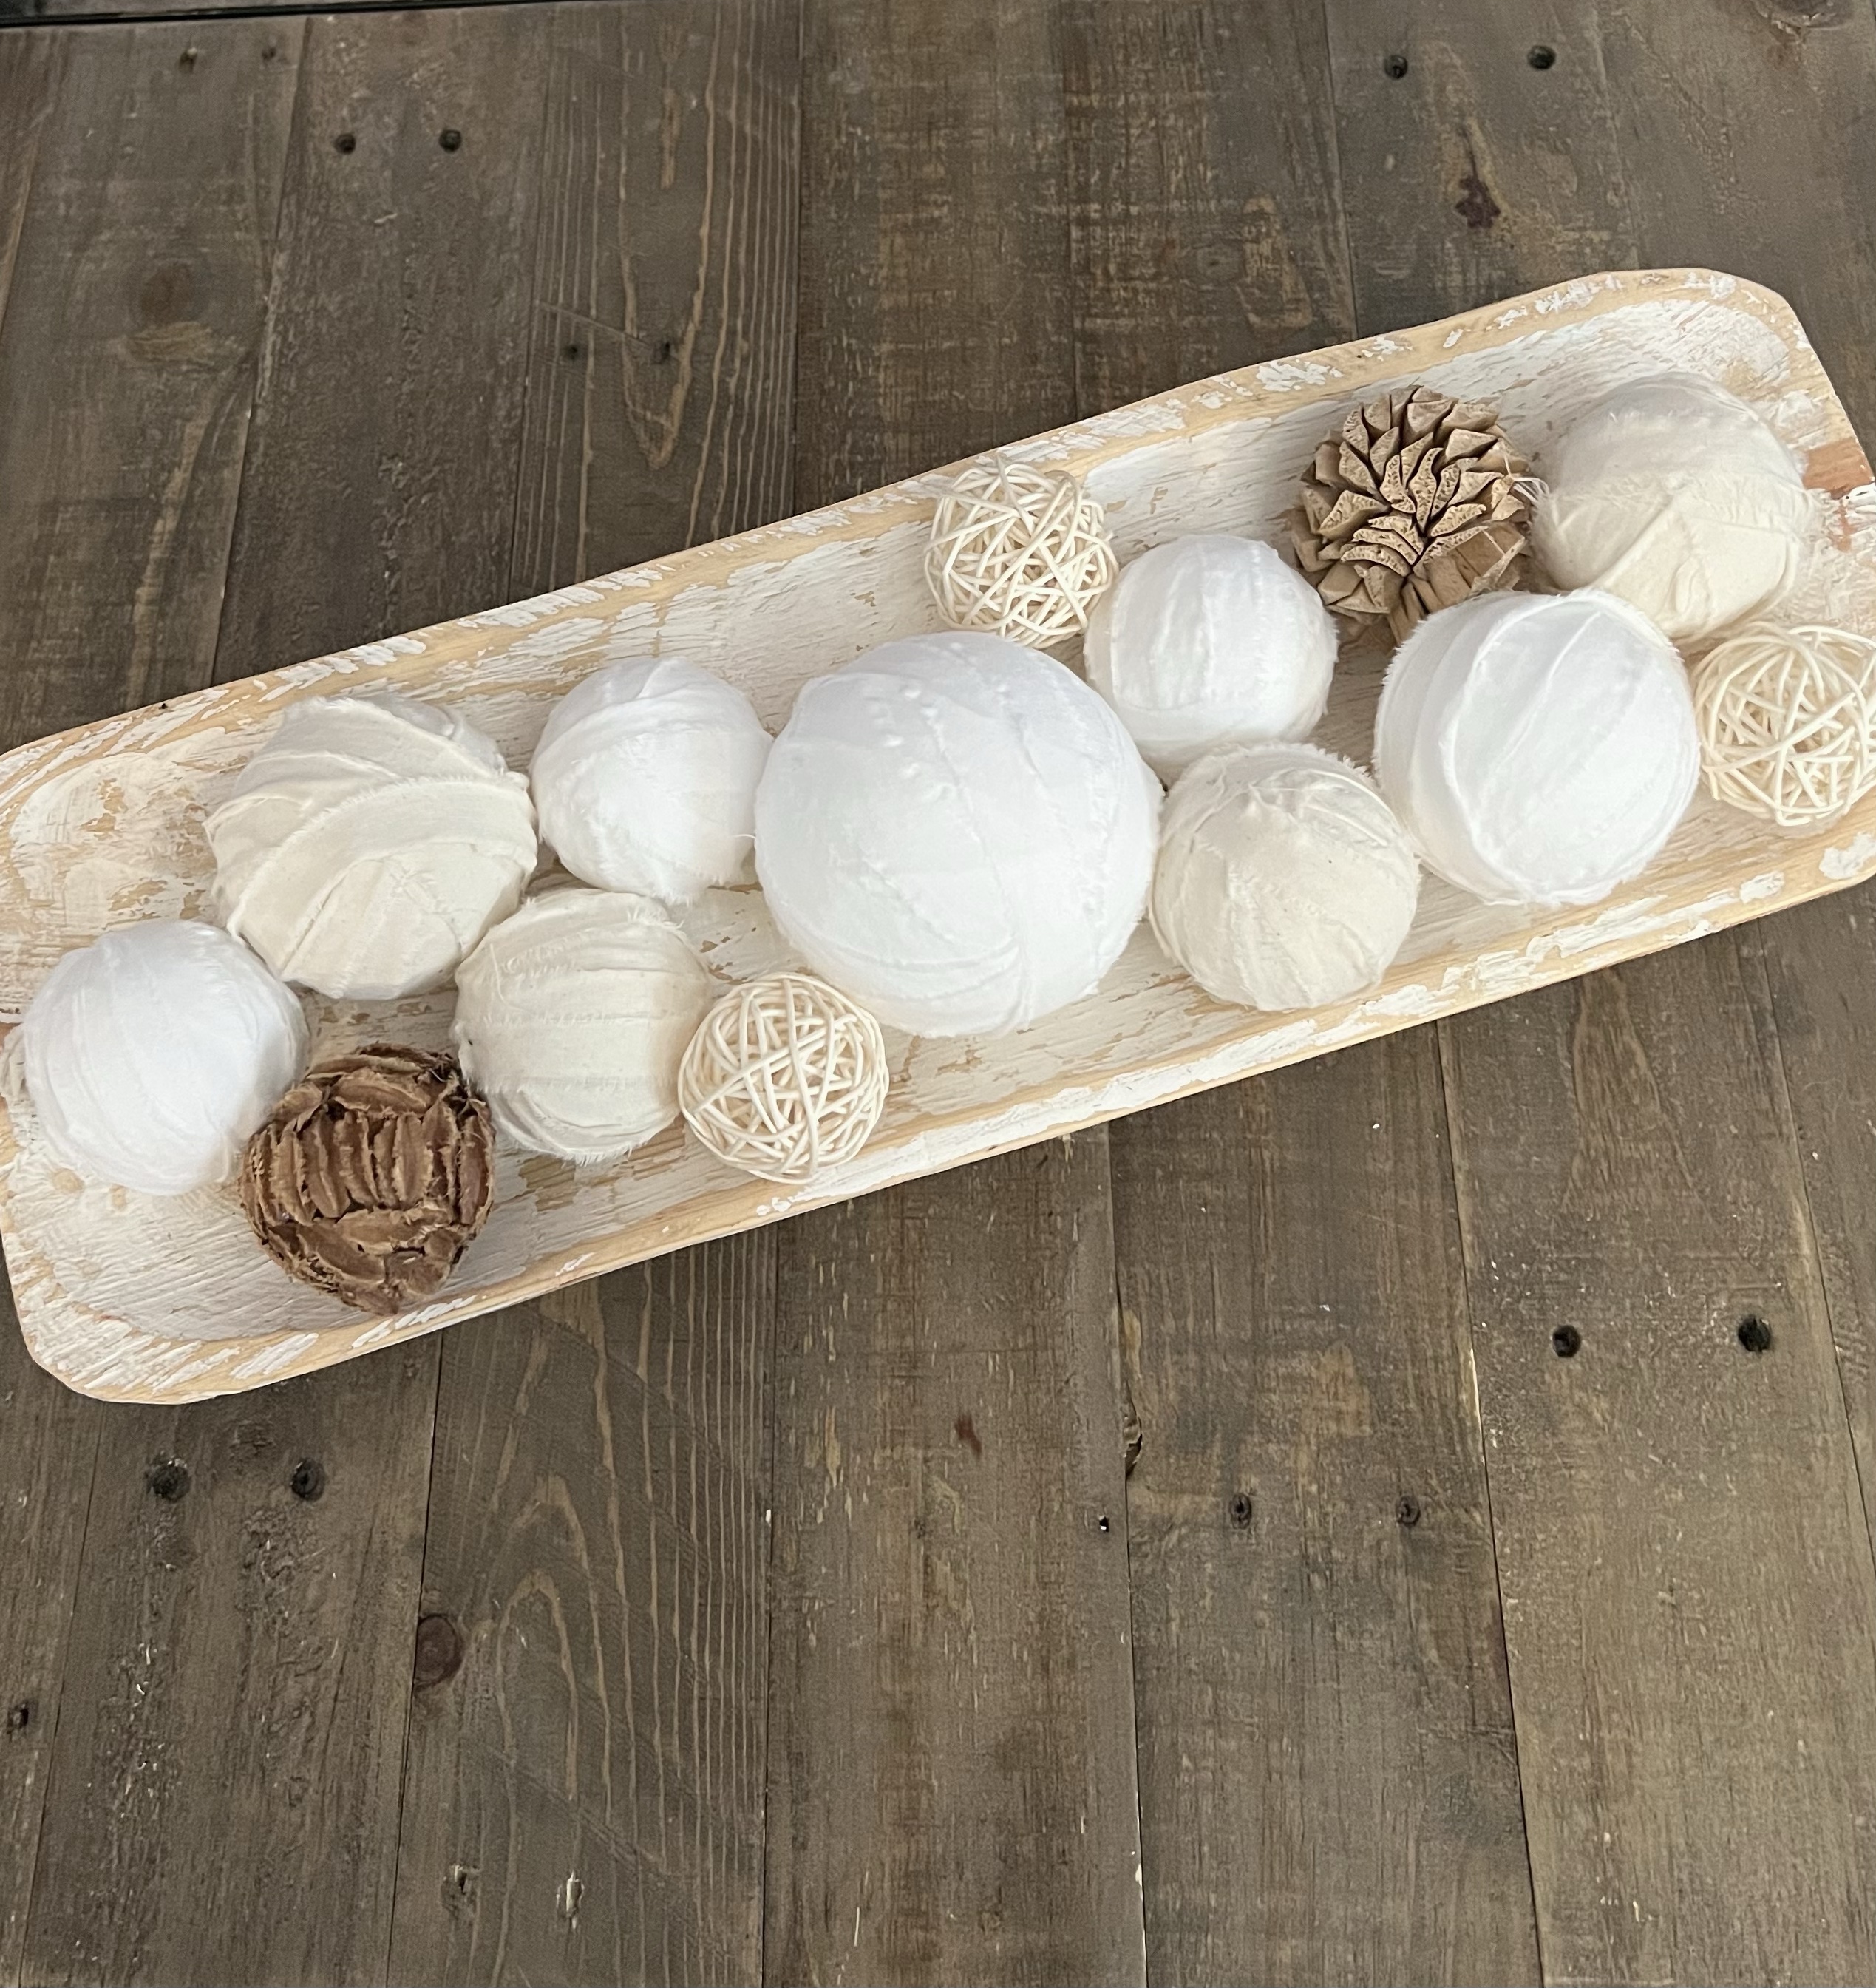
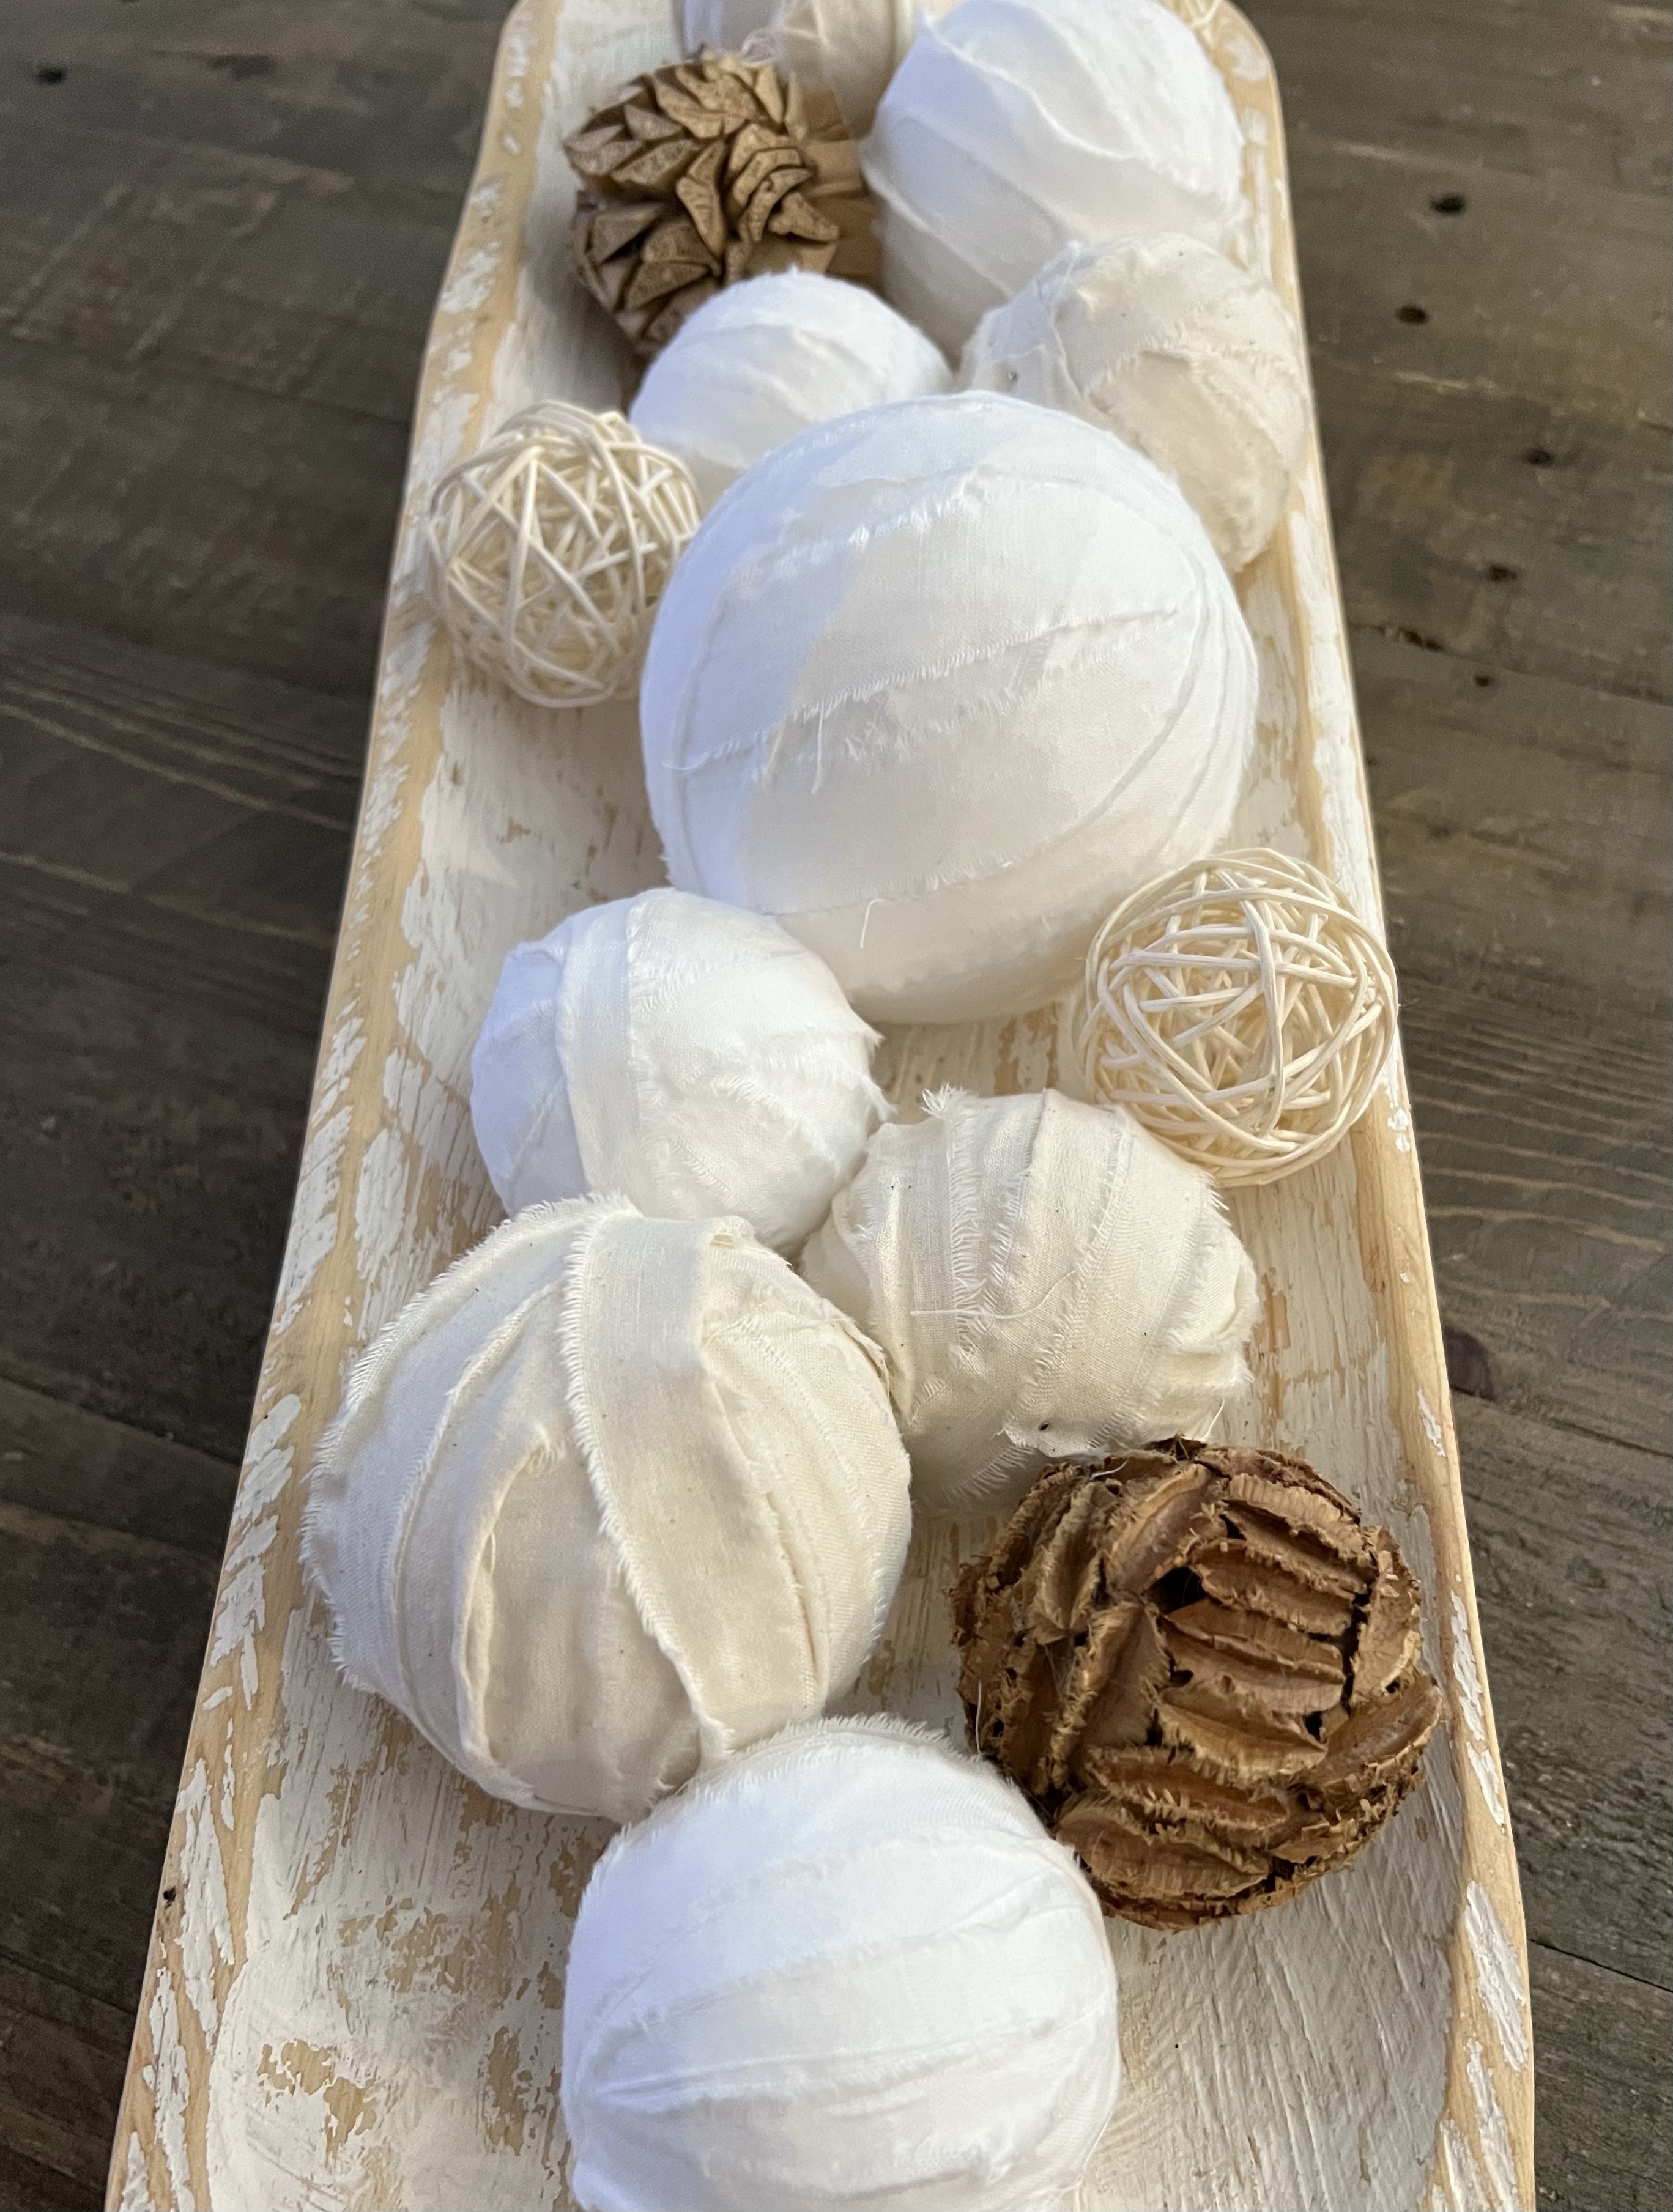
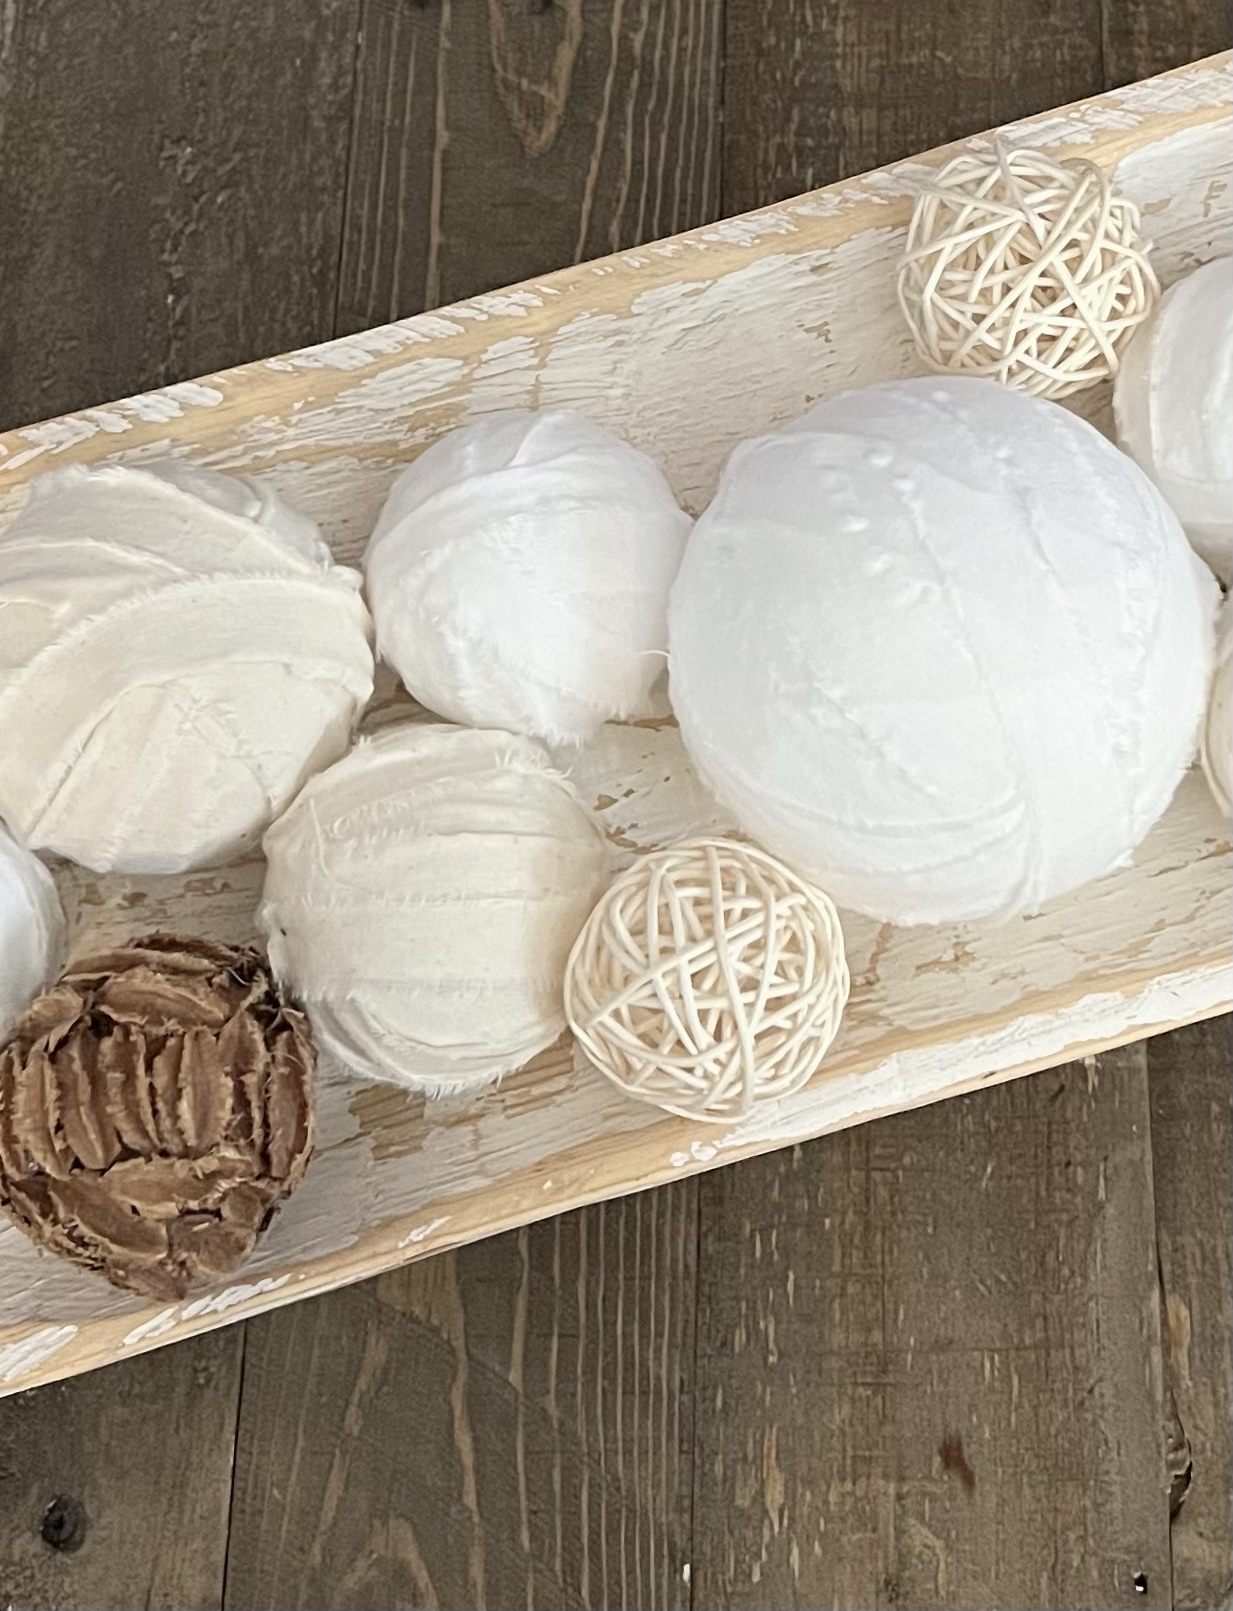
I have a dough bowl that I picked up at a vintage market several years ago and it has a home on my dining room table. I change out what I fill it with for the different seasons and holidays. I finally got around to making these Farmhouse Rag Balls for a lighter Summery feel. The idea to make these has been in my head for a few years – not sure why it took me so long! 🤷🏼♀️
Disclosure: Some of the links on my site are affiliate links, meaning, at no additional cost to you, I will earn a small commission if you click through and make a purchase. As an Amazon Associate I earn from qualifying purchases.
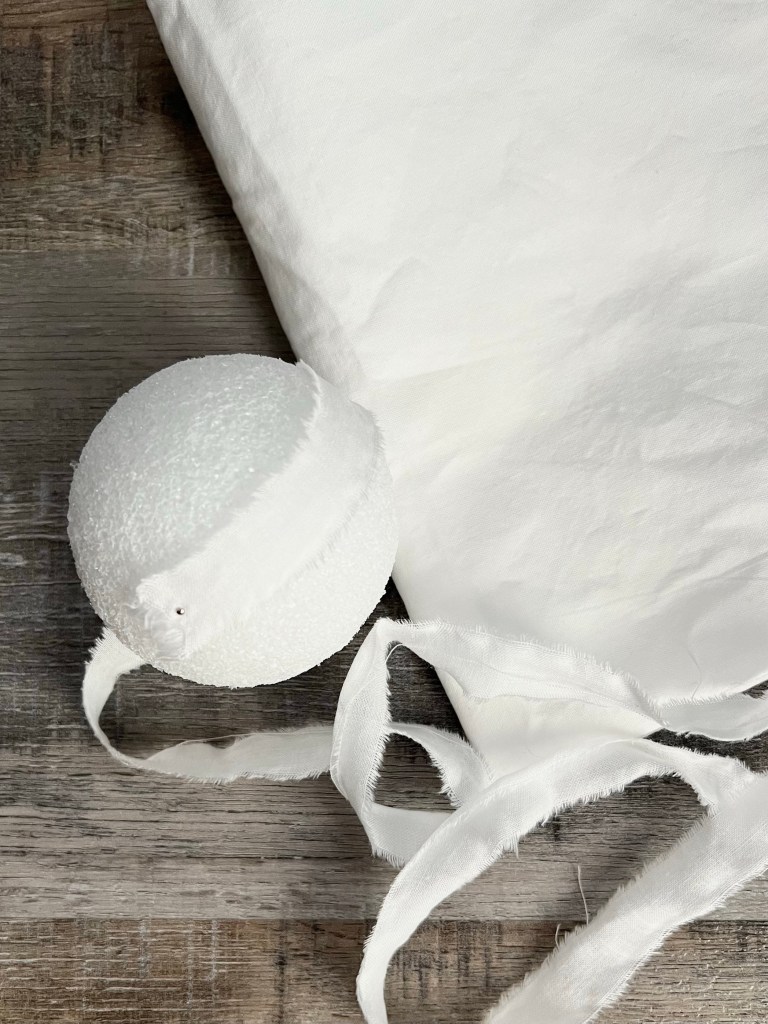
They are so easy to make! You’ll need some styrofoam balls in different sizes and cotton fabric – I used bleached and unbleached muslin to make my rag balls. Of course you can use any color or patterned fabric to make your rag balls.
I washed and dried my fabric first. I’m not sure this is absolutely necessary, but it gets any sizing out of the fabric making it softer and easier to work with. Then you’ll want to tear strips of fabric. Just snip the edge of the fabric and tear the strip. I made my strips approximately 3/4-inch wide, but don’t stress about keeping them exactly the same size – mine certainly aren’t! 😉
Then attach one end of the strip of fabric using a straight pin and begin wrapping it around the styrofoam ball. Keep wrapping the strips around the ball. securing with pins as needed, until the entire ball is covered. I tried to start a new strip over the end of the previous strip so I would only need one pin to secure both ends. I also tried to cover the pins as I was wrapping.
And here they are in my dough bowl along with a few other decorative balls I had to add a little texture. I really love the light and Summery Farmhouse feel of these rag balls. Why did it take me so long to make them??? 🙃
Disclosure: Some of the links on my site are affiliate links, meaning, at no additional cost to you, I will earn a small commission if you click through and make a purchase. As an Amazon Associate I earn from qualifying purchases.