Happy Birthday Chicks Cards

Hi friends,

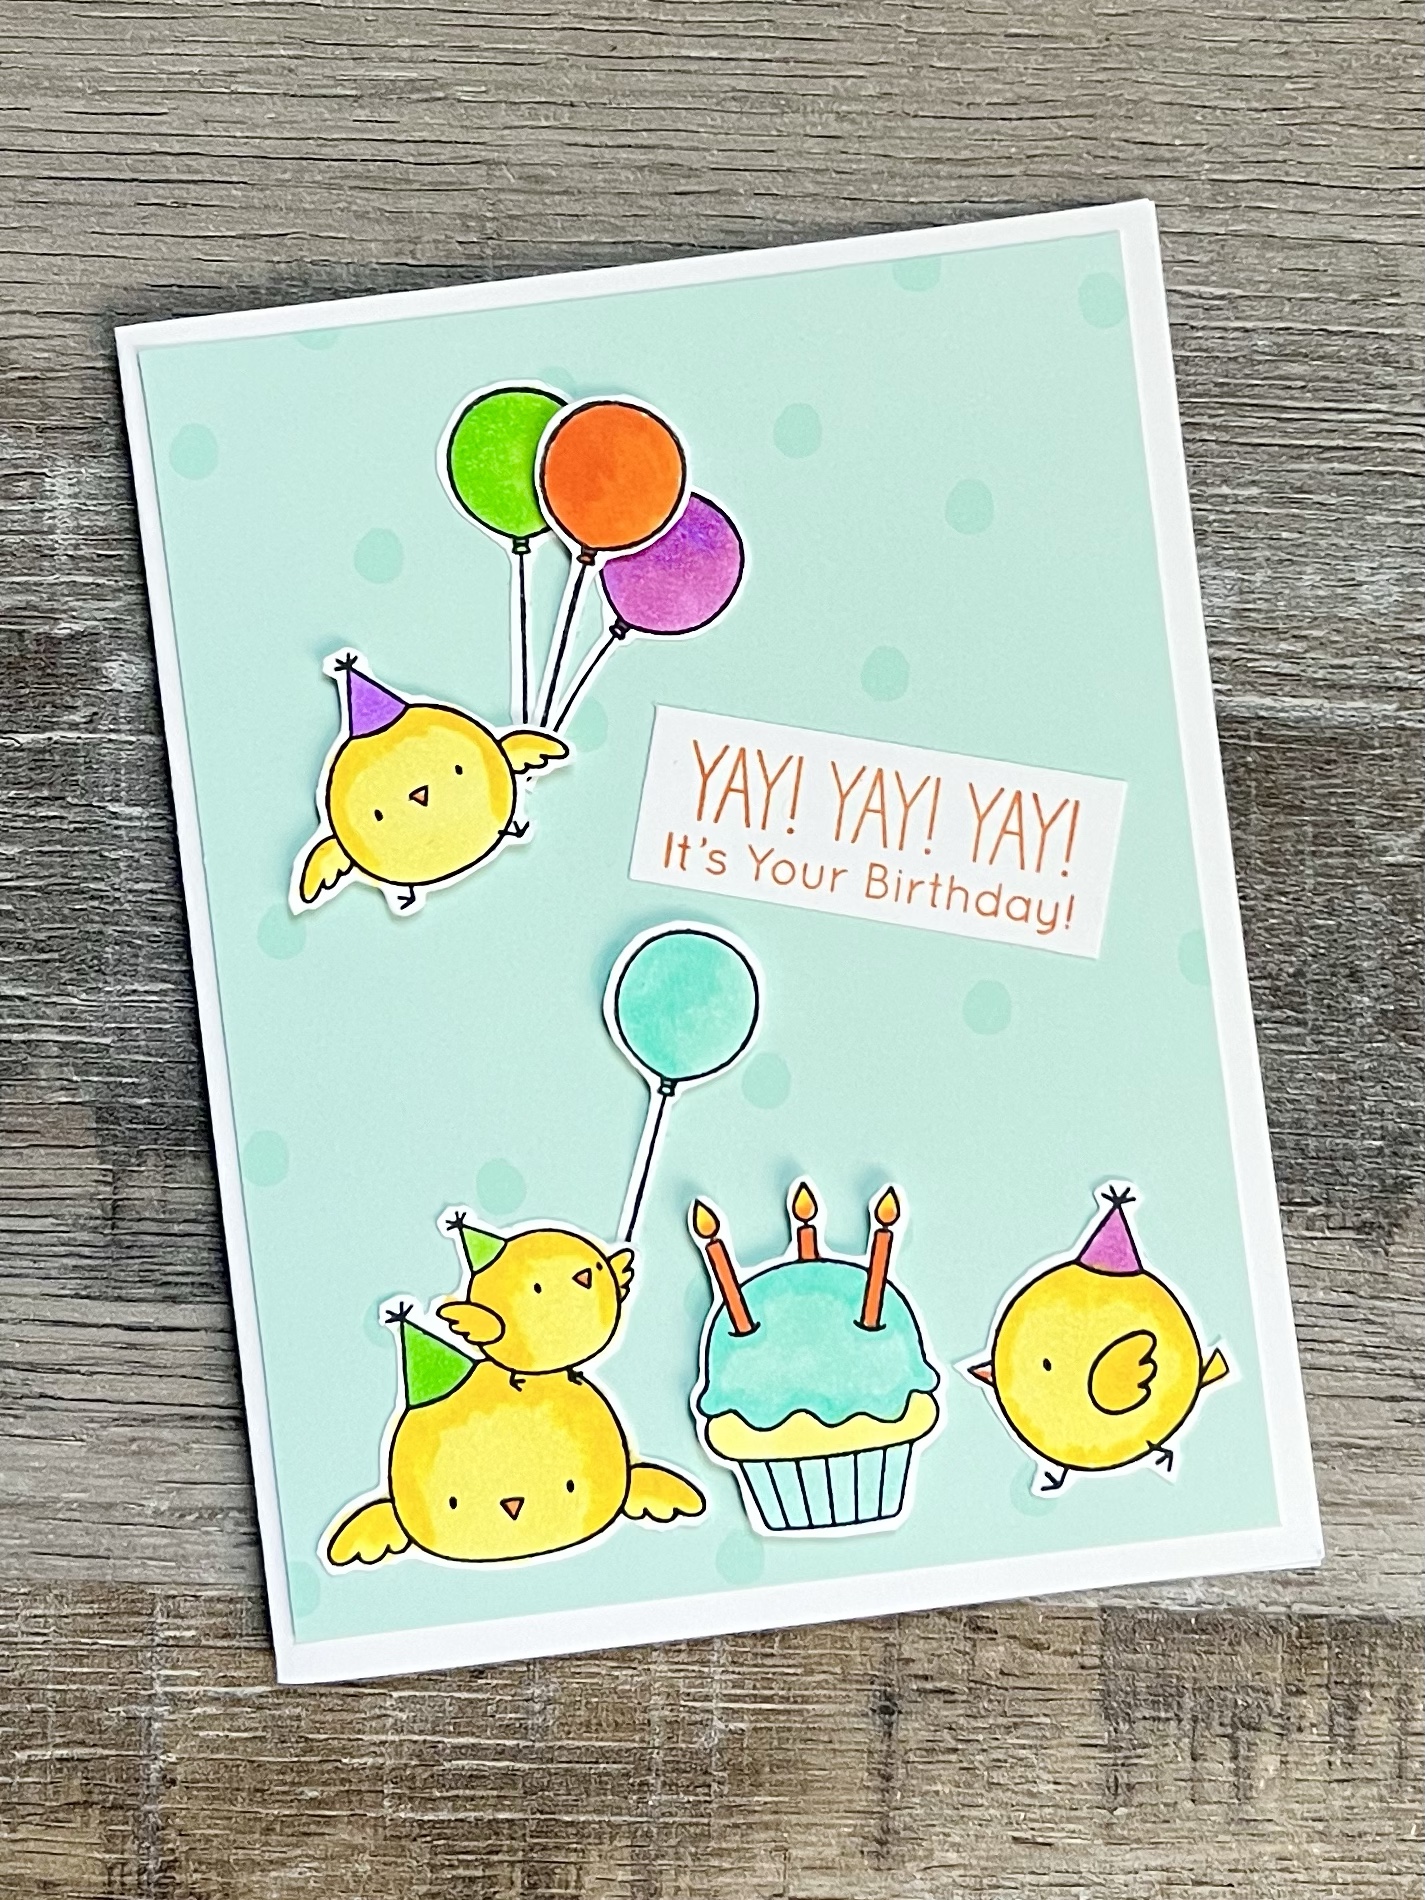
This Birthday Chicks stamp set from My Favorite Things is so cute! I found it on sale at a stamp store recently and I believe it’s discontinued. ☹️ Do you have it in your stash? If not, My Favorite Things has so many other cute stamp sets and fun dies to choose from.

Disclosure: Some of the links on my site are affiliate links, meaning, at no additional cost to you, I will earn a small commission if you click through and make a purchase. As an Amazon Associate I earn from qualifying purchases.

I made a couple of simple and fun birthday cards using these cute little chicks. All of the images are part of the Birthday Chicks stamp set except for the “happy birthday” sentiment. That one is from the Extended Celebration set from Unity Stamp Company.

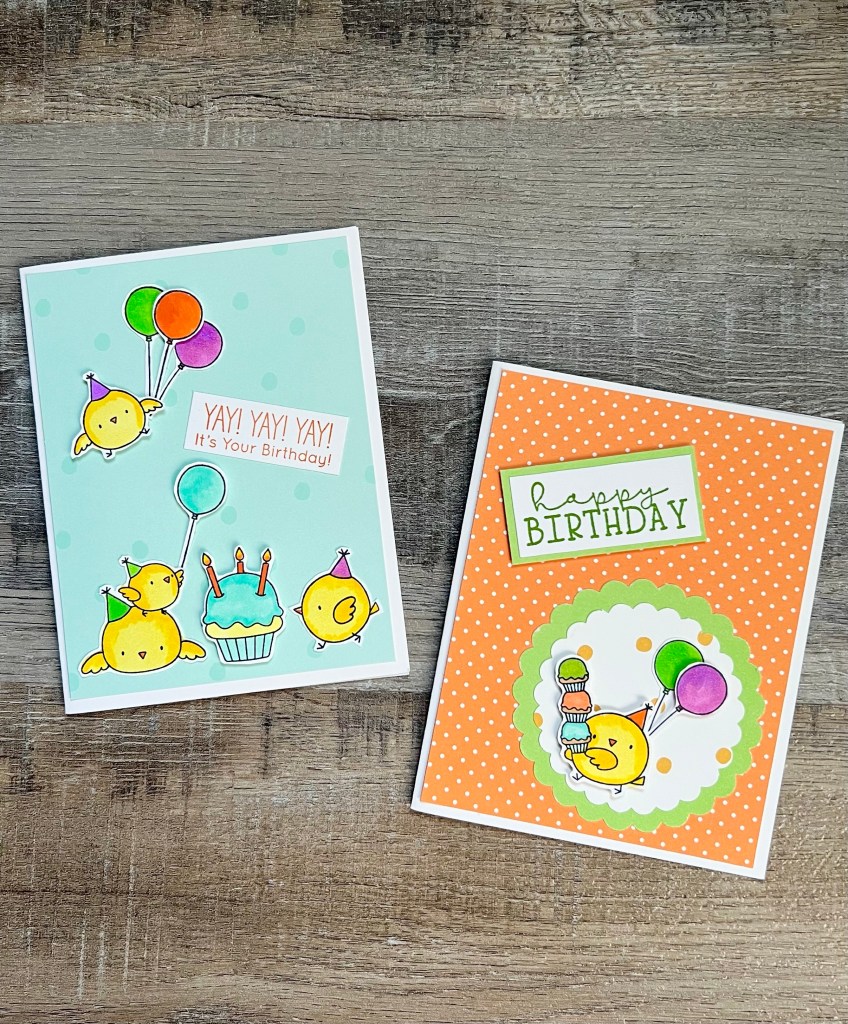
To make the cards, I stamped the images with Memento Tuxedo Black ink and colored them with Copic markers. Then I trimmed closely around the images. Many of the stamp sets from My Favorite Things have matching die sets, which makes cutting out images so much easier. Since I found this stamp set on sale, I wasn’t able to get the matching dies. ☹️

I attached a piece of patterned paper to a white card. I attached the images to the cards, popping some of them with foam tape. I stamped the sentiments on white card stock and added them to the cards.

I used 2 different scalloped circle punches (similar to this and this) on the card below and popped the images with foam tape. I also layered the sentiment to matching card stock and attached it to the card with foam tape.

I love how bright and cheery these cards turned out! They are sure to bring a smile to the birthday girl or boy. 🙂

Anita

Posted in Cards, Stamping | Tagged , | Leave a comment

Dollar Tree Fall Is Here

Hi friends,

Just popping in to let you know that Dollar Tree has stocked their seasonal aisles with all the Fall and Halloween things! 🍂 🎃

Disclosure: Some of the links on my site are affiliate links, meaning, at no additional cost to you, I will earn a small commission if you click through and make a purchase. As an Amazon Associate I earn from qualifying purchases.

Here’s what I picked up (at least so far😉)

The velvet pumpkins are really cute, but I will have to do something about the plastic stems. I’m not sure what I’ll do with the pumpkin and jack-o-lantern wood cutouts yet. Or the wood and leather words. 🤷🏼‍♀️ And the tiny wood pumpkins were just too sweet to pass up!

I have some other Dollar Tree Fall things I got last year that I haven’t used yet so I’m sure I have plenty of fun crafty items to make things with. But I may just have to visit another Dollar Tree store to see what they have…🙃

Don’t forget that Dollar Tree seasonal items go out the door super fast!! Head to your local store soon if you want to stock up!

Anita

Posted in Decor, Fall | Tagged , | 1 Comment

Easy Blueberry Pie Bars

Hi friends,

There’s nothing quite like fresh blueberries! The sweetness just tastes like Summer and they are so good by the handful – or baked into a tasty treat!🫐

Disclosure: Some of the links on my site are affiliate links, meaning, at no additional cost to you, I will earn a small commission if you click through and make a purchase. As an Amazon Associate I earn from qualifying purchases.

I found the recipe for these yummy Easy Blueberry Pie Bars here. They really are super easy to make and don’t be afraid of the sour cream in the filling – you won’t taste it, but it adds a wonderful creaminess to the bars.

Here they are fresh from the oven. Your kitchen will smell heavenly! It will be hard to wait for them to cool a little before you cut into them. 😉 The recipe makes a 9×13 pan so there will be plenty for everyone.

I took the bars to a potluck recently and everyone loved them. Such a fresh summery dessert! The recipe says there are 12 servings, but I cut them into smaller bars since I knew there would be other desserts to sample. I think they would be so yummy warm with a scoop of vanilla ice cream on top. 😋

I think this recipe would be great with other berries, too…I’m thinking raspberries might be really good!

Anita

Posted in Recipes | Tagged | Leave a comment

Crochet Christmas Cowl

Hi friends,

I can’t believe July is almost over! I hope you’ve enjoyed Christmas in July on Creating Me! I’ve had fun sharing Christmas posts with you and I have one more to share today. 🎄🎄🎄

Disclosure: Some of the links on my site are affiliate links, meaning, at no additional cost to you, I will earn a small commission if you click through and make a purchase. As an Amazon Associate I earn from qualifying purchases.

Cowls are a great accessory to add a little color to your outfit. They aren’t as bulky as a scarf can sometimes be, but are just enough to keep you warm on a cold winter’s day.

My Crochet Christmas Cowl is a quick make that you can stitch up in an evening. It has great texture and uses basic crochet stitches so I think it would be beginner friendly. I used I Love This Yarn in Red and a J/6mm hook to stitch up my cowl. I’ve included the pattern below along with a link to a free PDF if you’d like to easily print it.

Crochet Christmas Cowl

Worsted weight (4) yarn, approximately 5 ounces – I used I Love This Yarn in Red

J/6mm hook

Stitches used in US terms:

Foundation Half Double Crochet – fhdc

Back Loop Only – blo

Half Double Crochet – hdc 

Double Crochet – dc

Chain – ch

Special Stitch – v-stitch (dc, ch 1, dc) in same stitch

Row 1: work 33 fhdc. Turn. (33 stitches)

Rows 2-4: ch 1. Working in blo, hdc in each stitch across. Turn. (33 stitches)

Row 5: ch 2 (counts as first stitch). Skip first stitch, dc in next 2 stitches. Skip next stitch, (dc, ch 1, dc) in next stitch (v-stitch made), *skip next 2 stitches, v-stitch in next stitch* Repeat from * to * across to last 4 stitches. Skip next stitch, dc in last 3 stitches. Turn. (9 v-stitches and 3 dc at beginning and end of row.)

Rows 6-8: ch 2 (counts as first stitch) Skip 1st stitch, dc in next 2 stitches. Work v-stitch in next ch 1 space. Repeat v-stitch in each ch space across to last 4 dc. Skip next dc, dc in last 3 stitches. Turn. (9 v-stitches and 3 dc at beginning and end of row)

Row 9: ch 1 (does not count as a stitch). hdc in each stitch and ch 1 space across. Turn. (33 stitches)

Rows 10-12: ch 1 (does not count as a stitch). hdc in blo of each stitch across. Turn. (33 stitches)

Rows 13-60: Repeat Rows 5-12  six times. 

Rows 61-64: Repeat Rows 5-8 one time. 

Fold cowl in half and slip stitch ends together. 

Fasten off and weave in ends. 

Finished Cowl measures about 9 inches wide by 31 inches long before slip stitching ends together. 

Here’s the link to the PDF…

The Crochet Christmas Cowl will make a great gift for all of your friends. 🎁 It works up so quickly and you can make it in their favorite color. I hope you enjoy this pattern!

I’ll be back later this year with more Christmas creations. But in the meantime, stay tuned for more fun crafting and recipes…Fall is just around the corner! 🍁🍂🍁

Anita

Posted in Christmas, Crochet, Gifts | Tagged , , | 3 Comments

Handmade Christmas Gift Tags

Hi friends,

It wouldn’t be Christmas in July without some handmade Christmas Gift Tags! These are super easy to make and will add a special touch to all of your gifts this year. 🎄

Disclosure: Some of the links on my site are affiliate links, meaning, at no additional cost to you, I will earn a small commission if you click through and make a purchase. As an Amazon Associate I earn from qualifying purchases.

Here’s what you’ll need to make your own gift tags…

I made 2 different styles of tags using the same basic layout. Just by changing the color scheme, you can make tags to match any wrapping paper or gift bag.

To make the tags, I used the larger tag die to cut a tag from the patterned paper. I cut a tag using the smaller tag die from matching card stock. I embossed the smaller tags using the embossing folders and attached them to the larger tags.

I punched the snowflakes and Christmas trees from matching card stock and attached them to the tags, overlapping the edge of the tag.

I die cut the little round reinforcement ring from card stock and attached it to the top of the tag. Using my Crop-A-Dile, I punched a hole through the tag, added matching ribbon, and tied a knot.

These cute snowflake tags are made with non-traditional colors and have a bit of a whimsical feel. ❄️

These Christmas tree tags are made in traditional Christmas colors and have a vintage feel. I also flipped over my smaller tags so they are debossed rather than embossed for a different look. 🎄

To finish off the tags, I stamped “To and From” on the back. Here’s a similar stamp to what I used.

Tags are really fun and quick to make. Craft some now so you’ll be ready when you start wrapping all those gifts in December!

Anita

Posted in Cards, Christmas, Tags | Tagged , , | 6 Comments

Wood Snowflake Tags

Hi friends,

You know I love to shop the after holiday clearance sales! 😉 I shopped Hobby Lobby last year after Christmas and found these great wood tags and this box of little wood snowflakes. I had no idea what I would do with them 🤷🏼‍♀️ but I packed them away in my Christmas craft bin to use later. Hobby Lobby has had both of these items for several years so hopefully they will have them again this year…

Disclosure: Some of the links on my site are affiliate links, meaning, at no additional cost to you, I will earn a small commission if you click through and make a purchase. As an Amazon Associate I earn from qualifying purchases.

I added some 1/2 inch split wood balls and Folkart Home Decor Chalk Paint in White Adirondack to my supplies to make these cute Wood Snowflake Tags.

Here’s a closer pic of the snowflakes. There are 9 different patterns for a total of 54 snowflakes in the package – so many crafty options! 😊

First I removed the twine hanger from my tags so I wouldn’t get any paint on them. Then I glued 4 split balls along the bottom edge of the tags and attached 2 snowflakes. I used E6000 Clear Adhesive to attach the split balls and snowflakes. You don’t have to completely cover the surface of the snowflakes – a little goes a long way. I squeezed some of the E6000 onto a scrap of paper and used a toothpick to spread a little onto the back of the snowflakes.

After the adhesive was dry, I used a chip brush to dry brush white chalk paint over the front and back of the tags. Start with a light coat and then add more to get the coverage that you want. Then thread the twine back onto the tag and tie the ends together in a knot.

These Wood Snowflake Tags will make great ornaments for your tree. They have a rustic feel that would work great with farmhouse Christmas decor. Or use them as a package tie on – they would be cute attached to a plate of homemade cookies from your kitchen. 🙂

Anita

Posted in Christmas, Gifts, Tags | Tagged , , | Leave a comment

It’s Penguining To Look A Lot Like Christmas – July Christmas Card

Hi friends,

What is Christmas in July without Christmas cards? I made this month’s cards using the Penguining To Look A Lot Like Christmas stamp set from My Favorite Things Stamps. They also have a matching die set available so you can easily cut out the images.

Disclosure: Some of the links on my site are affiliate links, meaning, at no additional cost to you, I will earn a small commission if you click through and make a purchase. As an Amazon Associate I earn from qualifying purchases.

If you want to take a look at the other Christmas cards I’ve made so far this year, you can find all the info by clicking on each month – January, February, March, April, May, and June.

I couldn’t decide which Penguin to use so I made a card using each one. 🙂 I stamped the images with Memento Tuxedo Black ink on white card stock and colored them with Copic markers, I used the matching dies to cut out each image.

I used a postage stamp die to cut the green card stock. (This is a similar die set.) To make the card, I attached a piece of red patterned paper to a white card and attached the green piece over the patterned paper. I attached the penguins with foam tape. The sentiment is stamped with black ink on white card stock, trimmed close, and attached to the card with foam tape.

I am in love with these cute Penguins! If penguins aren’t for you, check out My Favorite Things Stamps – they have lots of other cute animal sets. Like these adorable dachshunds or these cute barnyard animals in this set. Happy Stamping!

Anita

Posted in Cards, Christmas, Stamping | Tagged , , | 5 Comments

Crochet Christmas Tree Cuddler

Hi friends,

Christmas in July continues with this adorable Crochet Christmas Tree Cuddler. 🎄 Just look at that cute face and those sweet little arms waiting for a hug! 🤗 It’s the perfect size for little hands – he measures about 7 inches tall and 6 inches wide.

Disclosure: Some of the links on my site are affiliate links, meaning, at no additional cost to you, I will earn a small commission if you click through and make a purchase. As an Amazon Associate I earn from qualifying purchases.

I found the pattern here at Heather-Corinne.com. It’s a super easy pattern to follow and works up quickly. I stitched up my Cuddler in one evening using a G/4mm crochet hook with Yarn Bee Soft & Sleek yarn in Green Apple, Mustard, and I Love This Yarn in Brown for his little legs. The color Green Apple is discontinued but Kale is a similar color that would work great. Use your favorite worsted weight (4) yarn to stitch him up.

Here he is sitting on my little rocking chair. He would look so cute peeking out of the top of a Christmas stocking or tucked under the tree. He is sure to bring a smile to a little one’s face.🎄

If you haven’t discovered Heather-Corinne.com yet, you might want to check her out. She has a ton of really cute patterns on her site. I have so many more I want to make… 🙂

Anita

Posted in Christmas, Crochet, Gifts | Tagged , , | 1 Comment

Soft and Chewy M&M Cookie Bars

Hi friends,

Taking a break from Christmas in July to share these yummy Soft and Chewy M&M Cookie Bars. But don’t worry…I’ll be back with more Christmas ideas so stay tuned! 🎄

Cookie bars are the perfect Summer treat! They don’t take long to make and since you bake the whole batch of dough at once, your kitchen doesn’t get too hot. 😊

Disclosure: Some of the links on my site are affiliate links, meaning, at no additional cost to you, I will earn a small commission if you click through and make a purchase. As an Amazon Associate I earn from qualifying purchases.

There are lots of recipes for M&M cookie bars out there. This Soft and Chewy M&M Cookie Bar recipe is one of my favorites! It has chocolate chips as well as M&Ms because you can never have too much chocolate! 😋 You may even have most everything you need already in your kitchen.

This is a large batch recipe – you’ll make them in an 11 x 17 rimmed baking sheet – so it’s a great recipe to take to BBQs and potlucks. The recipe calls for lining your baking sheet with parchment paper – do not skip this step! It makes everything so much easier! I also got my hands a little wet to make it easier as I was spreading the dough.

Here’s the dough ready to go into the oven and after about 22 minutes baking. My kitchen smelled so good!

After the cookies are cool, cut them into bars and enjoy!!

These Soft and Chewy M&M Cookie Bars are really easy to make. And you can make them start to finish – including cooling time – in about an hour! I promise everyone will love them! 😋

Anita

Posted in Recipes, Summer | Tagged | Leave a comment

Farmhouse Christmas Tiered Tray Decor

Hi friends,

Do you like to shop the clearance aisles after holidays? I do! You never know what you might find that you can alter or repurpose for another holiday at deeply discounted prices. 🙂

Disclosure: Some of the links on my site are affiliate links, meaning, at no additional cost to you, I will earn a small commission if you click through and make a purchase. As an Amazon Associate I earn from qualifying purchases.

Here’s a storage tip for you… 🙂 I have 3 plastic bins that I keep my clearance items in. That way I have easy access so I can remember what I bought and I can keep my items sorted by season or theme – making it easier to see what I have to alter or repurpose.

I found these little signs last Fall at the Hobby Lobby clearance sale for about $1.00 each. I’ve seen similar sized signs for different holidays so you may be able to find them on clearance other times, too. They measure 4.75 inches square and are cute just as they are, but I bought a couple thinking maybe I could alter them. I also had these wood ornaments that I picked up at Dollar Tree last year. They come in a package of 5 and they usually have them when they start stocking Christmas items. (These are similar.)

You’ll also need some white chalk paint, patterned scrapbook paper, Mod Podge, sandpaper, natural twine, and pop dots or foam tape.

The first thing I did was to remove the screw eye at the top of the sign since I wasn’t going to hang it. Then using FolkArt Home Decor Chalk Paint in White Adirondack and a chip brush, I painted the frame of the sign with 2 coats of paint letting it dry thoroughly between coats. I didn’t bother painting over the words because my patterned scrapbook paper was thick enough to cover them. If you’re paper is thinner, go ahead and paint over the words, too. I also painted my ornaments with 2 coats of the white paint.

Once the paint was dry, I used the sand paper to sand the paint off the edges of the frame to give it a rustic farmhouse look.

I cut my scrapbook paper to fit inside the frame. I applied a thin coat of Mod Podge with a foam brush to the inside of the frame and then adhered the scrapbook paper. Make sure to put the hole from the screw eye on the bottom before adhering your paper so the pattern will be the right way and the hole won’t show. I put the pop dots on the back of the ornament and attached it to the frame. If you want the ornament to pop up a little more, just add another pop dot on top of the first one. I finished it off with a twine bow on the top of the ornament.

I really like the way they turned out! They are so simple, yet so pretty! They are the perfect size for tiered tray decor, shelf sitters, or to tuck into some greenery on your mantel.

Keep your eyes open as you shop the clearance aisles in your favorite stores – you never know what you might find that you can turn into the perfect gift or decor item. 🙂

Anita

Posted in Christmas, Decor | Tagged , | Leave a comment