Farmhouse-Inspired Crochet Wreath Ornament

Hi friends,

It’s the last day of July and today is my last post for Christmas in July. 🎄 But don’t worry, I’ll have more Christmas posts later this year! I hope you have enjoyed this month’s posts and that I’ve inspired you to get a jump on your Christmas crafting. 🙂 🎅🏼

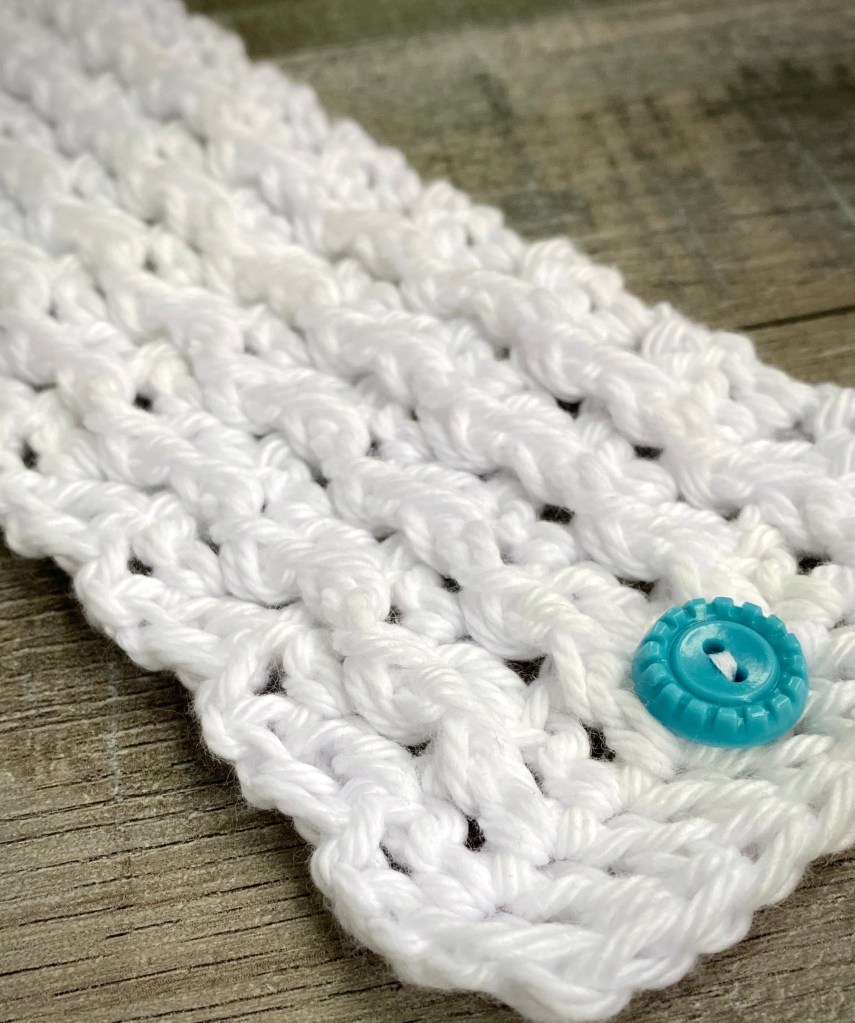
Today’s project is a simple and quick to make Farmhouse-Inspired Crochet Ornament. It’s a great stash buster and although I made mine in white, you can make them in any color you’d like.

Disclosure: Some of the links on my site are affiliate links, meaning, at no additional cost to you, I will earn a small commission if you click through and make a purchase. As an Amazon Associate I earn from qualifying purchases.

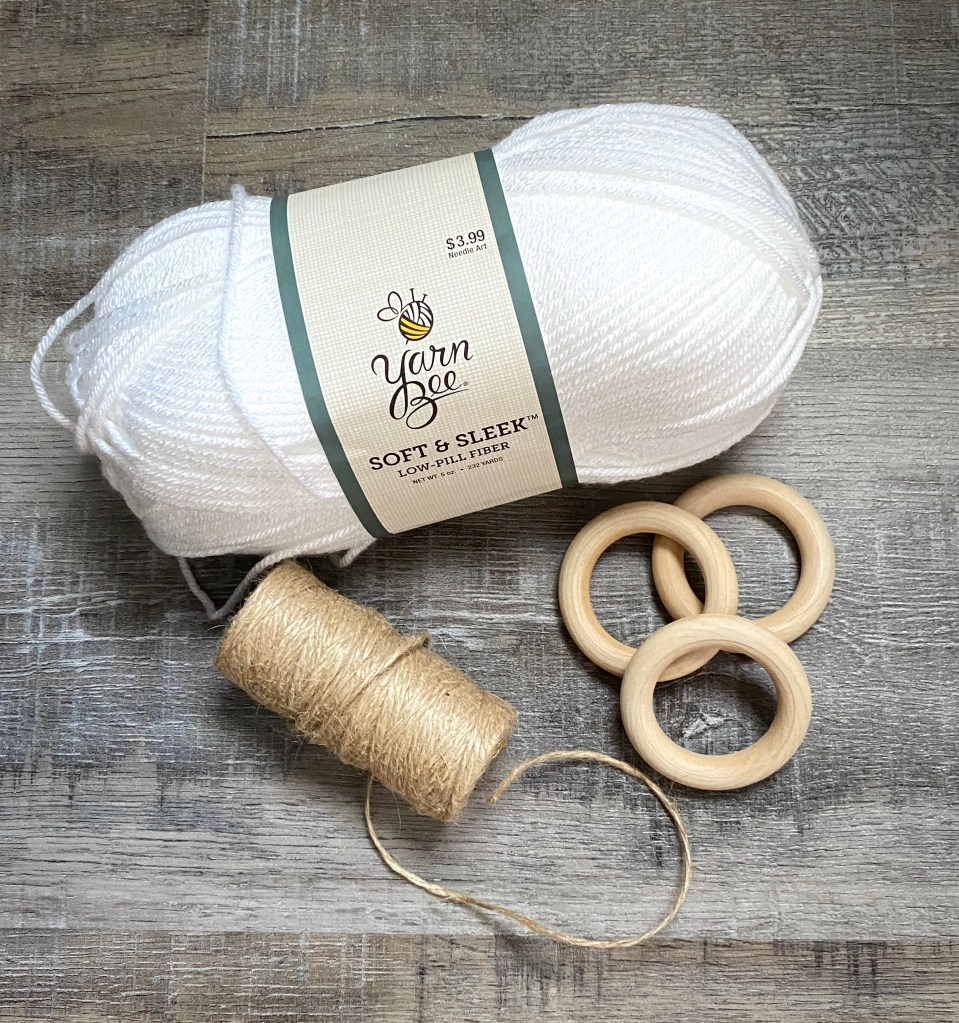
You’ll need some 2 to 2.5 inch unfinished wood rings (these are similar to what I used). You’ll also need worsted weight yarn (I used Yarn Bee Soft & Sleek in white), natural jute twine, and a large-eyed blunt end needle for weaving in the twine.

You’ll find the pattern below and also a link to a free PDF for easy printing.

Farmhouse-Inspired Crochet Wreath Ornament

Finished wreath ornament measures about 3.75 inches across

Worsted weight yarn – I used Yarn Bee Soft & Sleek in White

H/5mm hook

2 to 2.25 inch unfinished wood ring

Natural jute twine

Large-eye blunt needle

Stitches used US terms:

Slip stitch – ss

Single crochet – sc

Half double crochet – hdc

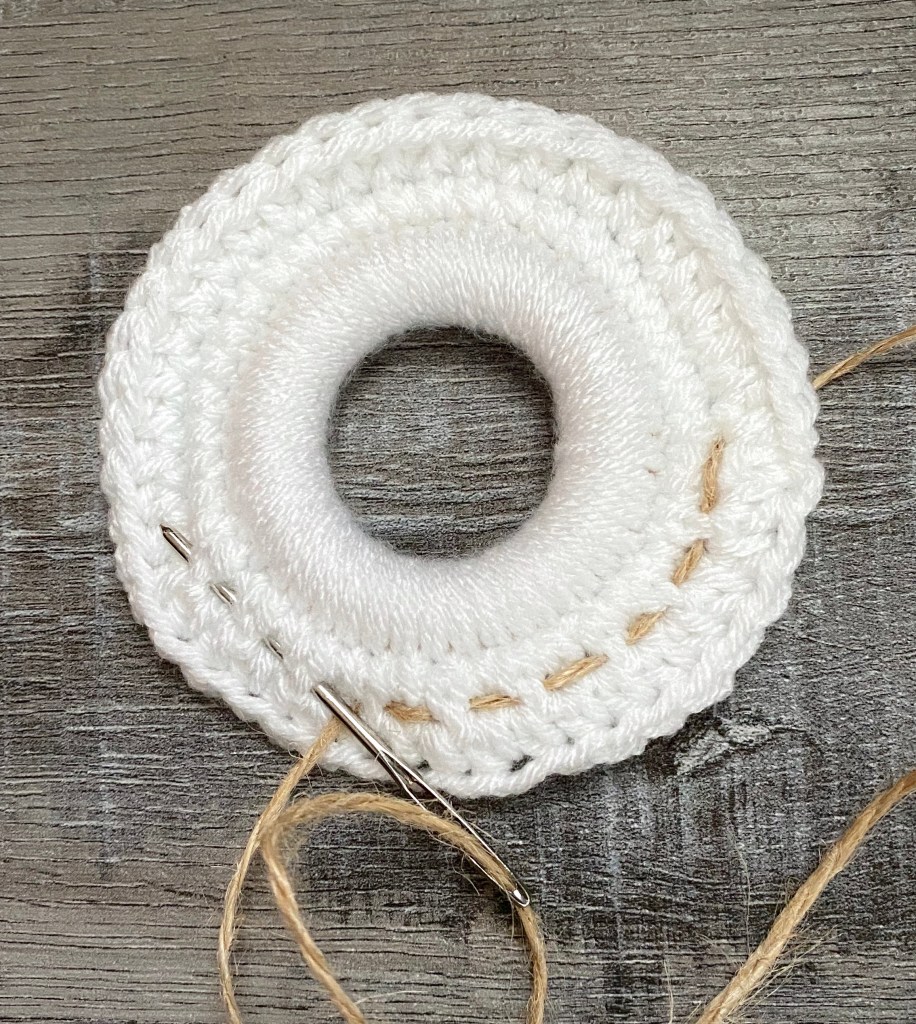
Round 1: Attach yarn to ring with sc. sc around the ring, pushing stitches tightly together. Join with ss to 1st sc. (I made 42 sc, your number may vary depending on your ring size and your tension) 

Round 2: ch 1. sc in same stitch as ss and in each stitch around. ss to 1st sc.

Round 3: ch 1. hdc in same stitch as ss and in each stitch around. ss to 1st hdc.

Fasten off and weave in ends.

Using the large-eye blunt needle, weave a length twine around the wreath between the 2nd and 3rd rounds. Leave ends long enough to tie in a bow. 

Attach a length of twine to the top of the wreath for hanging.

Here’s the link to the free PDF…

These Wreath Ornaments are really fun to make! They would make a cute package tie-on and look great on your Christmas tree. You could even make several and string them on twine for an amazing garland for your mantel.

Happy Stitching!

Anita

Posted in Uncategorized | 2 Comments

Dollar Tree Fall Craft Supplies Are In The Store!

Hi friends,

I’m just popping in with a quick post to let you know that Dollar Tree has all of their Halloween and Fall craft supplies in the store! If you are wanting to stock up for Fall crafting, you need to head over to your local store soon – they sell out of all the fun stuff quickly!

Disclosure: Some of the links on my site are affiliate links, meaning, at no additional cost to you, I will earn a small commission if you click through and make a purchase. As an Amazon Associate I earn from qualifying purchases.

Here’s what I picked up today. Each of the ornament and burlap leaf packages have 5 shapes each. Yes – that’s 5 of each for $1.00!! The “Boo” and “Gather” words are about 1/2-inch thick. The big leaf measures about 11 1/2-inches across. I think I may have to visit another Dollar Tree tomorrow because you know each one is always a little different. 😉

Not a bad haul for $9.00! I’m not sure what I’ll do with all my goodies yet, but stayed tuned to the blog because Fall will be upon us before we know it! 🍁🎃

Happy Crafting!

Anita

Posted in Decor, Fall | Tagged , | Leave a comment

Handmade Christmas Gift Tags

Hi friends,

Christmas in July continues with some handmade gift tags. 🎄 They are super quick and easy to make – you can whip them up for all of your gift giving in just an afternoon! They can also double as ornaments for the tree.

You’ll need some chipboard tags, patterned paper, your favorite Christmas rubber stamps, and some ribbon. I found my tags last year in the after Christmas clearance at Hobby Lobby. They are already stocking the stores with Christmas merchandise so you may be able to find them in your store very soon!

You could also use kraft tags, they just won’t be quite as sturdy – it might help to adhere a couple of the kraft tags together before you start. These kraft tags are a little smaller than the size of the chipboard tags I used, but it’s a great deal for 100 kraft tags along with some twine if you want to use that instead of ribbon. Keep in mind that they are a card stock tag and not a chipboard tag so they are thinner!

Disclosure: Some of the links on my site are affiliate links, meaning, at no additional cost to you, I will earn a small commission if you click through and make a purchase. As an Amazon Associate I earn from qualifying purchases.

I traced the tag onto the back of my patterned paper and cut it out. I used my Tombow Dot adhesive to adhere the paper to the tag. Then I added a coordinating strip of patterned paper along the bottom of the tag.

I stamped some of my favorite simple Christmas images on white card stock and colored them with Copic markers. I cut them out and adhered them to the tags with foam tape. I stamped “to” and “from” on the back of the tags. I punched through the paper at the top, lining it up with the hole in the tag, and tied some matching ribbon to the tags.

If you are looking for a selection of Christmas ribbon I found this great set of 12 different styles of grosgrain ribbon on Amazon for only $6.99 (that’s the price now, of course that could change)!

Grab your favorite Christmas stamps, some fun patterned paper, and spend an afternoon making these cute tags! It would be a fun activity to do with the kids. 🙂

Happy Crafting!

Anita

Posted in Christmas, Gifts, Stamping, Tags | Tagged , , , | 3 Comments

Chalk Painted Christmas Bud Vase

Hi friends,

Do you have any of these clear glass bud vases hiding around your home? I picked these up from an estate sale. You can find the ribbed one at Dollar Tree for, you guessed it, $1.00 each. 😉 Thrift stores and garage sales are also great places to look for them.

I decided to add a little chalk paint and turn them into some vintage looking decor for another Christmas in July post. 🎄

Disclosure: Some of the links on my site are affiliate links, meaning, at no additional cost to you, I will earn a small commission if you click through and make a purchase. As an Amazon Associate I earn from qualifying purchases.

Here’s what you’ll need. Clear glass bud vase – a vase with some type of texture will work best. Chalky finish paint in white. (I like Americana Décor Acrylic Chalky Finish Paint in Everlasting White.) Chalky finish paint in gray. (I used FolkArt Home Décor Chalk Paint in Maui Sand.) Christmas pick and stems. I also used some natural jute twine and matte sealer spray that aren’t in the picture below.

First, wash your vase in warm soapy water and let dry completely. Then, apply 2 thin coats of the white chalky finish paint, letting it dry completely between coats. I like using these chip brushes to apply my paint.

They look so pretty just like this – a little like milk glass – you could skip the next step if you like them this way. But I wanted them to have a little more of a vintage look so I dry brushed some of the gray chalky finish paint over the texture of the vase. I took one of my 2-inch chip brushes and cut the bristles down to make the brush stiffer and used that to apply my paint. Then I took them outside and sprayed them with a light coat of the matte sealer spray.

I wrapped the twine several times around the vase, tying it off with just a simple double knot. I slipped the Christmas pick through the twine and added the berry stem to the vase. By the way, the red berry stems came from Hobby Lobby and they sell them all year, not just at Christmas time.

I really like the way they turned out! I was thinking that if I didn’t dry brush the gray on the vase and used glossy sealer spray instead of matte, they really would like like milk glass! I may have to get some more vases and try that…

These will look so nice on the mantel at Christmas! But you could also change out the pick and stems for Fall or to match your everyday decor. It’s a super inexpensive way to add a little vintage touch to your home.

Happy Crafting!

Anita

Posted in Christmas, Decor | Tagged , , , | 2 Comments

Crochet Winter Mug Cozy

Hi friends,

Everyone likes a mug of hot cocoa, tea, or coffee while munching on all the sweet treats at holiday time. Today’s Christmas in July 🎄 post is a crochet Winter Mug Cozy that is like putting a sweater around your favorite mug filled with a yummy hot beverage! 🙂

It’s a super easy pattern that you can make in less than 15 minutes using cotton yarn. It’s great for using up left over yarn from other projects and can be made in your choice of colors. You’ll find the pattern below along with a link to a free PDF if you’d like to easily print it.

Disclosure: Some of the links on my site are affiliate links, meaning, at no additional cost to you, I will earn a small commission if you click through and make a purchase. As an Amazon Associate I earn from qualifying purchases.

Crochet Winter Mug Cozy

Worsted weight cotton yarn (I used I Love This Cotton in White and Lion Brand 24/7 cotton in Taupe)

H/5mm hook

1/2-inch button

Finished size is about 3-inches wide by 12-inches long.

Stitches used (US terms)

Foundation double crochet – fdc

Double crochet – dc

Chain – ch

Front post double crochet – fpdc

Back post double crochet – bpdc

Slip Stitch – ss

Row 1: work 11 fdc. Turn. (11 stitches)

Row 2: ch 2 (counts as 1st dc) Skip 1st dc, dc in next stitch and in each stitch across. Turn. (11 stitches)

Row 3: ch 2 (counts as 1st dc) Skip 1st dc, dc in next stitch. *fpdc in next stitch, dc in next stitch * Repeat from *to* 2 times. fpdc in next stitch. dc in last 2 stitches. Turn. (11 stitches)

Row 4: ch 2 (counts as 1st dc) Skip 1st dc, dc in next stitch. *bpdc in next stitch, dc in next stitch * Repeat from *to* 2 times. bpdc in next stitch. dc in last 2 stitches. Turn. (11 stitches)

Rows: 5-20: Repeat rows 3 and 4 eight times.

Row 21: ch 1. Skip 1st stitch, ss in next 3 stitches. ch 2 (counts as dc) fpdc in next stitch, dc in next stitch. fpdc in next stitch, dc in next stitch. Leave the rest of the stitches unworked. Turn. (5 stitches)

Row 22: ch 2 (counts as 1st dc). skip 1st stitch, bpdc in next stitch, dc in next stitch. bpdc in next stitch, dc in last stitch. Turn. (5 stitches)

Row 23: ch 2 (counts as 1st dc). skip 1st stitch, fpdc in next stitch, dc in next stitch. fpdc in next stitch, dc in last stitch. Turn. (5 stitches)

Row 24: Repeat Row 22. (5 stitches)

Row 25: Repeat Row 23. (5 stitches)

Row 26: ch 2 (counts as 1st dc) Skip 1st stitch, dc in next 4 stitches. (5 stitches)

Fasten off and weave in ends.

Sew on button in middle dc of 2nd row.

Here’s the link to the free PDF…

(If you are in need of new crochet hooks, this set with the soft grip handles looks nice. I like the handles because sometimes my hand hurts when I crochet for a long time and they really help! These large eye blunt needles are also great for weaving in your ends)

The Winter Mug Cozy would make a great teacher or friend gift. Wrap it around a cute mug and fill the mug with tea bags, cocoa packets, or coffee beans. Add some cookies or tea biscuits and tie it all up in a cellophane bag with a pretty ribbon. A fun and tasty gift that everyone is sure to enjoy! 🎁

Don’t forget to pin the Winter Mug Cozy to your Pinterest crochet board using the button below!

Happy Stitching!

Anita

Posted in Christmas, Crochet, Gifts | Tagged , , | Leave a comment

Winter Hello Card

Hi friends,

Christmas in July continues with a fun snowman card! This can be used as a Christmas card or to send a Winter Hello. It would also make a great birthday card for a winter birthday. ☃️

The stamp set I used is Holiday Hello from Unity Stamp Company. The dies I used to die cut the image and layering pieces are from the Diagonal Stitched Squares die set from Pink Fresh Studios.

Disclosure: Some of the links on my site are affiliate links, meaning, at no additional cost to you, I will earn a small commission if you click through and make a purchase. As an Amazon Associate I earn from qualifying purchases.

I stamped the snowman using Memento Tuxedo Black dye ink on white card stock. I colored the image with Copic markers and added a little clear glitter glue to the snow. The image is die cut with the Diagonal Stitched Square dies and layered to a red card stock square cut from the same die set. (These are the numbers of Copic marker colors I used: B02, B04, C1, C2, G82, G84, R27, R46, Y19, YR68) I stamped the “hello” with red ink on white card stock, punched it with an oval punch (this is a similar one), and layered it to a scalloped oval punched (this is a similar punch) from blue card stock.

To assemble the card, I attached a panel of red polka dot paper to a red card. I die cut a piece of blue card stock using the Diagonal Stitched Square dies and attached it to the card. I attached the snowman image to the card using foam tape and added the greeting with foam tape, too.

Just in case you were wondering, I love this adhesive and the refills for card making. And foam tape is a must for adding dimension to your cards! These would also make great stocking stuffers for you or the paper crafter in your life. 😉

I hope this card inspires you to get a head start on your Christmas card making. Don’t forget to pin it to your card making or paper crafting Pinterest board using the button below!

Happy Stamping!

Anita

Posted in Cards, Christmas, Stamping, Uncategorized | Tagged , , | 5 Comments

Christmas Tree Reverse Canvas

Hi friends,

Today’s Christmas in July project is a reverse canvas using a simple Christmas tree ornament. I love how fun and inexpensive it is to take a regular stretched canvas and completely change how it looks!

To make the Christmas Tree Reverse Canvas, you’ll need a 5 by 7 inch stretched canvas, a wood Christmas tree ornament, some wood stain, chalk or acrylic paint in green, mustard, and brown, natural jute twine, and your hot glue gun. If your ornament doesn’t have a star shape on the top, you may want to add a small wood star.

Disclosure: Some of the links on my site are affiliate links, meaning, at no additional cost to you, I will earn a small commission if you click through and make a purchase. As an Amazon Associate I earn from qualifying purchases.

I had the ornament in my stash that I purchased from the Christmas crafts section last year at Dollar Tree – but I’ve noticed some stores are bringing out their Christmas merchandise already 😳 so you may be able to find some now. I picked up my canvas from Dollar Tree. I used chalk paint to paint my tree because I had the colors I wanted to use, but acrylic paint will work great, too. This is a great set of acrylic colors if you want to add a variety to your craft room. The wood stain I had was left over from another project. Since the canvas was $1.00 and the ornament was in a package of 5 for $1.00 and I had all my other supplies on hand, this was a super inexpensive project to make 🙂

First you’ll need to remove the canvas from the wood frame it is wrapped around. I used a screwdriver to gently pry the staple from the frame. Be careful doing this – it can be a little hard to get the edge of the screwdriver under the staple at first! Here is how it will look once the canvas is removed.

Then you’ll need to trim the canvas down because you will be glueing it to the back of the wood frame. You can cut just inside of the crease and it will be the perfect size to glue to the frame.

Use your wood stain with a paper towel to stain all the surfaces of the wood frame. Then hot glue your trimmed canvas to the back of the frame to cover up the holes from the staples. I wanted the oatmeal colored (back) side of the canvas to show through my frame but you can also glue it the other way if you prefer the white (front) side of the canvas.

I painted the front and edges of my tree ornament with 2 coats of green, mustard, and brown paint, letting it dry between coats. Then I dry brushed the entire tree lightly with brown paint to give it a more rustic feel. I didn’t like the hole at the top of my ornament so I added a little sparkly enamel dot to cover it. (If you are adding a star to your tree, you’ll want to glue it on now.) Then I hot glued my tree to the canvas. To finish off my project, I cut 2 lengths of twine (about 12-inches each), tied them into a bow and hot glued it to the top of the frame.

And here it is – such a simple idea, but I love how it turned out!

There are a lot of options with this project. You could paint the frame instead of staining it. You could use a different wood Christmas ornament shape in place of the tree. You could use a larger canvas and a larger wood cutout or even a word. Or you could use a wood cutout for any season or just for your everyday decor.

Don’t forget to save this to your Christmas or craft Pinterest board using the button below!

Happy Crafting!

Anita

Posted in Christmas, Decor | Tagged , , | 4 Comments

Crochet Mini Gift Bag

Hi friends,

Is it hot where you are? We are sizzlin’ here in Alabama!! But of course it is July so…

☀️🔥🥵

I’ve got another Christmas in July post for you today. These cute Mini Gift Bags are perfect for gift cards or cash – with a little extra room for some yummy chocolates! 🍫 They measure about 4.25 by 4.25 inches not including the handle, so they are also great for small gifts. 🎁

Disclosure: Some of the links on my site are affiliate links, meaning, at no additional cost to you, I will earn a small commission if you click through and make a purchase. As an Amazon Associate I earn from qualifying purchases.

Here’s the pattern for making these fun little gift bags. They work up super fast using worsted weight (4) yarn and an H/5mm hook. I used Yarn Bee Soft & Sleek yarn in White, Red, Kale, and Mustard to stitch up my bags – any worsted weight (4) yarn will work.

Mini Crochet Gift Bag

Finished Gift Bag measures approximately 4.25 by 4.25 inches plus the handle

Worsted weight yarn in 2 colors ( I used Yarn Bee Soft & Sleek in White, Red, Kale, and Mustard)

H/5mm hook

Stitches used US terms:

Chain – ch

Single Crochet – sc

Slip Stitch – ss

Back Loop Only – blo

Double Crochet – dc

Front Post Double Crochet – fpdc

Round 1: With color A, ch 11. sc in 2nd ch from hook and in next 8 ch. Work 3 sc in last ch. Working in the other side of beginning ch, sc in next 9 stitches. Work 3 sc in last stitch. Join with ss to first sc. (24 stitches)

Round 2: ch 1. sc in same stitch as ss and next 9 stitches. Work 3 stitches in next stitch. sc in next 11 stitches. Work 3 sc in next stitch. sc in next stitch. Join with ss to 1st sc. (28 stitches)

Round 3: ch 1. Working in blo, sc in same stitch as ss and in each stitch around. Join with ss to first sc. (28 stitches)

Rounds 4-5: ch 2. Working in both loops, dc in same stitch as ss and in each stitch around. Join with ss to first dc. (28 stitches)

Rounds 6-9: ch 2. dc in same stitch as ss. *fpdc in next stitch, dc in next stitch* Repeat from *to* around to last stitch, fpdc in last stitch. Join with ss to first dc. (28 stitches)

Round 10: ch 2. dc in same stitch as ss and in each stitch around. Join with ss to first dc. (28 stitches)

Change to color B.

Round 11: ch 1. sc in same stitch as ss and in each stitch around. Join with ss to first sc. (28 stitches)

The next round will make the handles to the gift bag.

Round 12: ch 1. sc in same stitch as ss and in next 3 stitches. ch 20. Skip next 4 stitches. sc in next 10 stitches. ch 20. Skip next 4 stitches. sc in next 6 stitches. Join with ss to first sc. (2 sections of 10 sc each and 2 sections of 20 ch each)

Round 13: ch 1. sc in same stitch as ss and in next 3 stitches. sc in each of the 20 ch. sc in next 10 stitches. sc in each of the 20 ch. sc in next 6 stitches. Join with ss to first sc. (60 sc stitches)

Fasten off and weave in ends.

I’ve included a link below to a free PDF for easy printing…

Of course, you can also make these bags in just one color – which would make them go even faster and you’ll have fewer ends to weave in. 😉

Be sure to save to your Pinterest Crochet Board using the button below so it will be handy when you are ready to get started.

What colors will you use to stitch up your Mini Crochet Gift Bags?

Happy Stitching!

Anita

Posted in Christmas, Crochet, Gifts | Tagged , , | 8 Comments

Wood Snowman Face Ornament

Hi friends,

Happy Christmas in July! 🎄☃️😊

I though it might be fun to share some crafty Christmas ideas this month to help us all get a jump on some handmade gifts and decorations for the holidays. Hopefully, the world will be in a better place by then and we will all be able to celebrate with family and friends. So we’ll want to be ready for that – not rushing around trying to finish up last minute gifts!

Disclosure: Some of the links on my site are affiliate links, meaning, at no additional cost to you, I will earn a small commission if you click through and make a purchase. As an Amazon Associate I earn from qualifying purchases.

Today I’m sharing this cute Wood Snowman Face Ornament that’s super fun to make. It would be a great project to make with the kids!

You’ll need wood snowflake ornaments (3-4 inches), 1-inch split wood balls, white acrylic paint, an orange and black ultra fine point sharpie, some twine, clear matte sealing spray, and a strong craft glue (I like E6000 clear adhesive).

Here are some links to supplies:

Paint the snowflakes, both sides and the edges, with 2 to 3 coats of white paint – letting the paint dry between coats. Also paint the the split balls with 2 to 3 coats of white paint. Once the paint is completely dry, draw a snowman face on the split balls.

Using a strong adhesive, glue the snowman face to the center of the snowflake. Let dry and the spray both sides of the snowflake with the sealing spray – you’ll want to do this outside! Attach twine to hang your ornament and you’re finished!

These would be a fun addition to a snowman Christmas tree, a cute tag on a plate of homemade treats for friends, a little something for your kids to give their friends, or add it to a gift card for that great teacher.

You could also use red/white bakers twine to hang your ornaments – I think that would be so cute on a jar of peppermint hot chocolate mix for a fun gift. I’m getting so many ideas…I need to make more ornaments. 😉

Want some other fun snowman/snowflake ornaments? Check out my Wood Bead Snowman Ornaments and my Wood Snowflake Ornaments.☃️❄️

Be sure to save to your Pinterest Christmas board using the button below!

Happy Crafting!

Anita

Posted in Christmas, Gifts | Tagged | 4 Comments

Coming Soon…Christmas in July

Hi friends,

Just popping in with a quick post to let you know that I’m having fun working on some Christmas in July posts! 🎄

As makers we all know just how fast time flies, so I thought I might be able to help you get a jump on your Christmas crafting with some ideas this month.

Disclosure: Some of the links on my site are affiliate links, meaning, at no additional cost to you, I will earn a small commission if you click through and make a purchase. As an Amazon Associate I earn from qualifying purchases.

Here are a few sneak peeks of what I’m working on…

I’m hoping to have posts with card/tag making, crochet, and crafting along with some ideas included for gifting your creations.

I hope you’ll join me and get started on your holiday crafting, too!

See you soon! 🎄

Anita

Posted in Cards, Christmas, Crochet, Gifts, Stamping | Tagged , , , , | Leave a comment