Simple Stripes Crochet Baby Blanket

Hi friends,

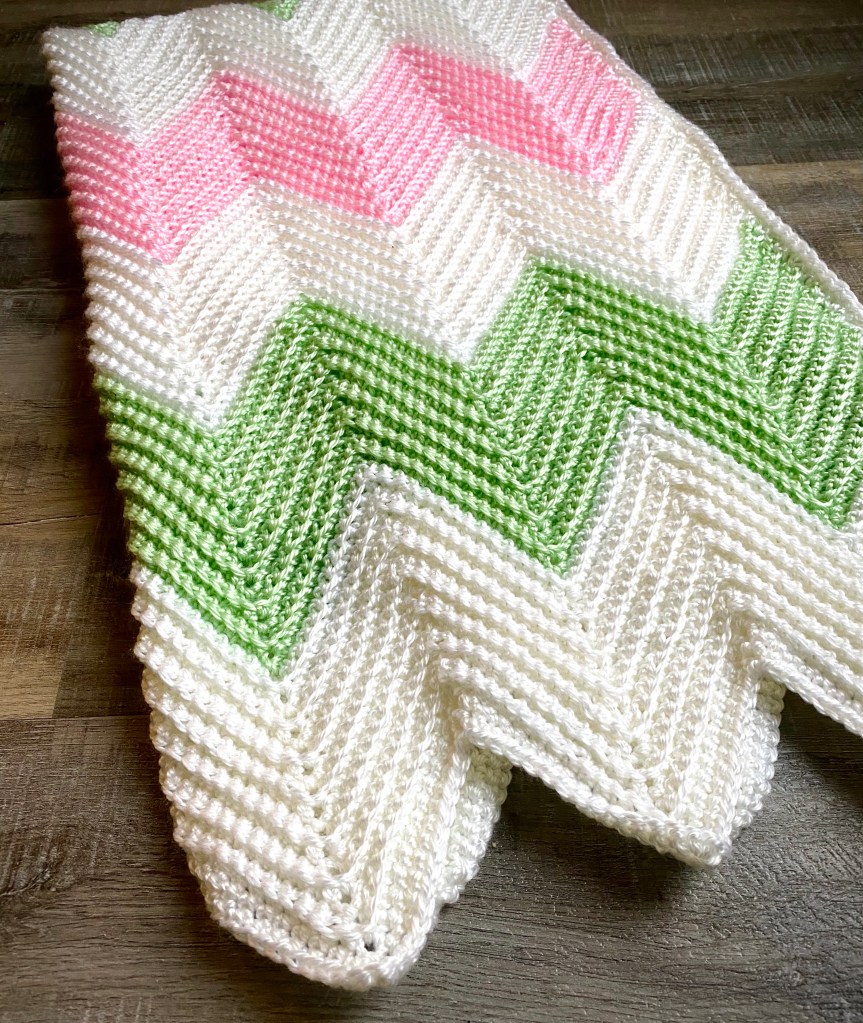
I designed this Simple Stripes Crochet Baby Blanket for a sweet baby boy. It’s crocheted using simple stitches so it’s perfect for beginners as well as seasoned crocheters. Once you get the pattern going, you can binge on your favorite Netflix show while you stitch away. 🙂

I made this blanket with a lighter worsted weight yarn. You can use whatever weight yarn you would like – just adjust the hook to match the yarn. If you use a heavier weight yarn, you may want to start with fewer stitches in the first row unless you want your finished blanket to be larger.

Disclosure: Some of the links on my site are affiliate links, meaning, at no additional cost to you, I will earn a small commission if you click through and make a purchase. As an Amazon Associate I earn from qualifying purchases.

Looking for some great crochet hooks? I love these Clover crochet hooks.

Simple Stripes Crochet Baby Blanket

Finished size is about 30 by 35 inches

Lighter worsted weight yarn – I used Yarn Bee Soft Secret in White (2 skeins), Sky Blue (1 skein), and Seafoam (1 skein)

H/5mm hook

Stitches used US terms:

Foundation Single Crochet – fsc

Single Crochet – sc

Half Double Crochet – hdc

Double Crochet – dc

Chain – ch

Note: chains do not count as stitches

Begin with White.

Row 1: work 110 fsc (or chain 111, sc in 2nd ch from hook and each ch across) Turn. (110 stitches)

Rows 2-3: ch 1. sc in first stitch and in each stitch across. Turn. (110 stitches)

Rows 4-5: ch 1. hdc in first stitch and in each stitch across. Turn. (110 stitches)

Row 6: ch 2. dc in first stitch and in each stitch across. Turn. (110 stitches)

Rows 7-8: ch 1. hdc in first stitch and in each stitch across. Turn. (110 stitches)

Rows 9-11: ch 1. sc in first stitch and in each stitch across. Turn. (110 stitches)

Change to Soft Sky.

Rows 12-14: ch 1. sc in first stitch and in each stitch across. Turn. (110 stitches)

Rows 15-16: ch 1. hdc in first stitch and in each stitch across. Turn. (110 stitches)

Row 17: ch 2. dc in first stitch and in each stitch across. Turn. (110 stitches)

Rows 18-19: ch 1. hdc in first stitch and in each stitch across. Turn. (110 stitches)

Rows 20-22: ch 1. sc in first stitch and in each stitch across. Turn. (110 stitches)

Change to White.

Rows 23-33: Repeat rows 12-22. (110 stitches)

Change to Seafoam.

Rows 34-44: Repeat rows 12-22. (110 stitches)

Change to White.

Rows 45-55: Repeat rows 12-22. (110 stitches)

Change to Soft Sky.

Rows 56-66: Repeat rows 12-22. (110 stitches)

Change to White.

Rows 67-77: Repeat rows 12-22. (110 stitches)

Change to Seafoam.

Rows 78-88: Repeat rows 12-22. (110 stitches)

Change to White.

Rows 89-99: Repeat rows 12-22. (110 stitches)

Change to Soft Sky.

Rows 100-110: Repeat rows 12-22. (110 stitches)

Change to White.

Rows 111-121: Repeat rows 12-22. (110 stitches)

Change to Seafoam.

Border (in Seafoam)

Round 1: Ch 1 and sc evenly around blanket, working 3 sc in each corner. Do not turn.

Rounds 2-3: Ch 1. sc in each stitch around, working 3 sc in each corner.

Fasten off and weave in ends.

Here’s a pdf for easy printing. 🙂

Make this blanket in your choice of colors for a precious little one. I hope you enjoy this pattern!

Happy Stitching! 🧶

Anita

Posted in Crochet, Gifts, Uncategorized | Tagged , , | 4 Comments

Happy Valentine’s Day

Hi friends,

Happy Valentine’s Day❣️

Disclosure: Some of the links on my site are affiliate links, meaning, at no additional cost to you, I will earn a small commission if you click through and make a purchase. As an Amazon Associate I earn from qualifying purchases.

(If you are looking for punches, this is a similar 1 1/2-inch heart punch and a 2-inch circle punch.)

I hope your day is sweet! ❤️

Anita

Posted in Gifts, Uncategorized, Valentine | Tagged | Leave a comment

Toffee Chocolate Bars

Hi friends,

It seems like I have been asked to bring desserts to all of our get togethers in the last couple of months. 😋I don’t really mind – I do like to bake and try new sweet recipes. And it also lets me share another yummy treat with you!

I found the recipe for Toffee Chocolate Bars here. I used butter instead of margarine because that’s what I had on hand. I should have sprayed my pan with non-stick spray before pressing the crust in the pan – just a tip. 🙂 But the bars were quite tasty! (Oh, and I also used a 14 ounce can of sweetened condensed milk because I couldn’t find a 10 ounce can.)

Disclosure: Some of the links on my site are affiliate links, meaning, at no additional cost to you, I will earn a small commission if you click through and make a purchase. As an Amazon Associate I earn from qualifying purchases.

The crust fresh from the oven..

After baking the sweetened condensed milk layer…

Can hardly wait for them to cool so I can cut them into bars..

Finally ready to eat!

Mine didn’t turn out quite as pretty as the ones from the recipe, but they tasted wonderful!

Happy Baking!

Anita

Posted in Recipes, Uncategorized | Tagged | Leave a comment

Crochet Ripple Blanket

Hi friends,

I love to crochet blankets for new babies! I made this one for a very special little one who will be here soon. 🙂

I followed this pattern from Daisy Farm Crafts. I used Yarn Bee Soft Secret yarn in White, Soft Pink, and Seafoam with a J/6mm hook to crochet my blanket. (I love these hooks.) I used 3 skeins of White and 1 skein each of the Soft Pink and Seafoam.

Disclosure: Some of the links on my site are affiliate links, meaning, at no additional cost to you, I will earn a small commission if you click through and make a purchase. As an Amazon Associate I earn from qualifying purchases.

I began my blanket with white, crocheting 14 rows of each color. I crocheted 9 stripes total (white, pink, white, seafoam, white, pink, white, seafoam, white) for a total of 126 rows. Then I crocheted a border of 2 rows of single crochet around the blanket, which is not in the pattern.

I love the texture this pattern has by working in the back loop only of each stitch.

The finished size of my blanket is about 31 by 45 inches. Your finished blanket size may vary depending on the yarn and hook that you use.

This is a classic ripple pattern that is easy and fun to make. Try it the next time you need to make a baby blanket.

Happy Stitching!

Anita

Posted in Crochet, Gifts, Uncategorized | Tagged , | 4 Comments

Vintage-Look Valentine Treat Jars

Hi friends,

Do you save jars to repurpose? Sometimes the jars are just too cute to toss into the recycle bin – like these little mason jars from Classico Pesto. I’ve had these for a while and thought they would be perfect to use for these Vintage-Look Valentine Treat Jars.

You’ll need jars, chalk-finish paint, antiquing wax, 1-inch wood hearts, and red/white bakers twine.

Disclosure: Some of the links on my site are affiliate links, meaning, at no additional cost to you, I will earn a small commission if you click through and make a purchase. As an Amazon Associate I earn from qualifying purchases.

I used DecoArt Americana Decor Chalky Finish paint in Everlasting White and Romance. I also used Home Decor Chalk Paint in Prominent Pink. Here are 1-inch wood hearts similar to what I used and the red/white bakers twine. I also used Home Decor Antiquing Wax that I forgot to add to the picture.

First, remove any labels from the jar and thoroughly wash and dry. Apply a thin layer of chalk paint to the jar using a foam brush. Let dry completely and then apply a second coat of paint. Let dry. Brush the jar with the antiquing wax, being sure to get into all the nooks and crannies. Wipe excess wax off with a paper towel. Let dry.

Paint the hearts with 2 coats of chalk paint, letting dry between coats. Apply antiquing wax and wipe off excess with a paper towel. Let dry.

Wrap a length of twine several times around the top of the jar and tie in a knot. Glue the painted heart over the knot.

Fill a treat bag with yummy chocolate hearts and kisses and place in the jar for a sweet Valentine! ❤️🤍💗

These would also be a cute addition to your Valentine Decor. 😍

Happy Valentine’s Day!

Anita

Posted in Decor, Gifts, Uncategorized, Valentine | Tagged , , | 7 Comments

Sending Love Valentine Cards

Hi friends,

Unity Stamp Company has the best stamps! They are made from red rubber and stamp crisp, clear images. And they have thousands of stamps to choose from! You will find so many that you need to have in your collection. 🙂 They are always having amazing sales to make it easy to get just what you want!

I love these 2 bunny sets that I’ve used on the cards below. The bunny images are just so sweet and Unity Stamp Company always has great sentiments in each set.

Disclosure: Some of the links on my site are affiliate links, meaning, at no additional cost to you, I will earn a small commission if you click through and make a purchase. As an Amazon Associate I earn from qualifying purchases.

This set is called P.S. I Love You. It includes the sweet bunny image and 2 sentiment stamps.

The set I used on the card below is called Easy to Love. It includes the bunny image and 3 sentiment stamps.

To make the cards, I stamped the bunny images with Memento Tuxedo Black ink on white card stock and colored them with Copic markers. Then I used these Blender Brushes from Taylored Expressions (which are ah-mazing!!) to lightly brush light blue ink around the images and light green ink around the bottom. I trimmed the stamped pieces and layered them to red card stock.

I stamped the sentiments with red ink (this is a great red) on white card stock. On the first card, I trimmed the sentiment and layered it to red card stock. On the second card, I die cut the sentiment with a scalloped oval die (here’s a great set) and layered it to an oval die (this is a good basic set) cut from red card stock.

To assemble the cards, I attached a piece of heart patterned paper to a white card. The bunny images are attached to the card with foam tape. Then I attached the sentiments to the cards using foam tape.

Another thing I love about these stamp sets is that they can easily be used for other occasions. I think the first set would be great for a new baby card and both sets could be used for birthday, miss you, or thinking of you cards. A simple change in the color scheme is all you need!

I hope these sweet cards inspire you to send a little love to those special people!

Happy Valentine’s Day! ❤️

Anita

Posted in Cards, Stamping, Uncategorized, Valentine | Tagged , | Leave a comment

Crochet Valentine Bobble Cup Cozy

Hi friends,

Looking for a fun Valentine crochet project? You can find the easy pattern for this Crochet Valentine Bobble Cup Cozy below. Pair it with a reusable coffee cup and a gift card to their favorite coffee shop for a great Valentine gift. You could even throw in a few chocolate hearts. ❤️

Disclosure: Some of the links on my site are affiliate links, meaning, at no additional cost to you, I will earn a small commission if you click through and make a purchase. As an Amazon Associate I earn from qualifying purchases.

Crochet Valentine Bobble Cup Cozy

Worsted weight yarn – I used I Love This Yarn in Red

G/4.5mm hook (I love these hooks)

One 1-1/16 inch round white button

One 7/8 inch red heart button

Stitches used in US terms:

Chain – ch

Slip Stitch – ss

Single Crochet – sc

Half Double Crochet – hdc

Bobble Stitch – Bobble

Special stitch: Bobble Stitch – Yarn over, insert hook into stitch, and pull up a loop. Yarn over, pull through two loops. Repeat 4 times – there will be 6 loops on the hook. Yarn over and pull through all 6 loops. Sc in next stitch to complete the Bobble stitch.

Chain 28 and join to first chain with ss to form a ring.

Rounds 1-3: ch 1. sc in same stitch as ss and in each stitch around. Join with ss to first sc. (28 stitches)

Rounds 4-6: ch 1. hdc in same stitch as ss and in each stitch around. Join with ss to first hdc. (28 stitches)

Round 7: ch 1. Work bobble in same stitch as ss. *sc in next stitch, work bobble in next stitch.* Repeat from * to * around to last 2 stitches. sc in each of the last 2 stitches. Join with ss to first bobble stitch. (9 Bobbles)

Round 8: ch 1. sc in same stitch as ss and in each stitch around. Join with ss to first sc. (28 stitches)

Round 9: ch 1. sc in same stitch as ss and in next stitch. *Work bobble in next stitch, sc in next stitch.* Repeat from * to * around until last 2 stitches. Work one more bobble. Join with ss to first sc. (9 Bobbles)

Rounds 10-12: ch 1. hdc in same stitch as ss and in each stitch around. Join with ss to first hdc. (28 stitches)

Rounds 13-15: ch 1. sc in same stitch as ss and in each stitch around. Join with ss to first sc. (28 stitches)

Fasten off and weave in ends.

Layer heart button onto white button and sew onto cozy.

Here’s a link to a pdf for easy printing. 🙂

Of course you don’t have to crochet this in red! Make it in your favorite color. Change the button to a different shape or leave it off completely. Make it your own. 🙂

Happy Stitching!

Anita

Posted in Crochet, Gifts, Uncategorized, Valentine | Tagged , | Leave a comment

Farmhouse Valentine Rag Wreath

Hi friends,

I have a fun Farmhouse Valentine Rag Wreath to share with you today. It’s super easy to make and may even help to relieve a little stress while you’re making it! 😉

You’ll need a wire heart wreath frame and 2 yards of white muslin – you may not need the full 2 yards. I found my wreath frame at my local Dollar Tree – it measures about 12-inches wide. (You can also find the heart wreath here – sadly it’s more than a dollar 😦 )

Disclosure: Some of the links on my site are affiliate links, meaning, at no additional cost to you, I will earn a small commission if you click through and make a purchase. As an Amazon Associate I earn from qualifying purchases.

Now comes the stress relieving part! Tear the muslin into strips 1 and 1/2-inches wide. The tearing part is so satisfying. 🙂 Then cut pieces 6-inches long from the strips. Fold the 6-inch piece in half and slip under the wire frame. Pull both ends through the loop of the folded piece, wrapping it around the frame and pull tightly.

Continue around each section of the heart frame, pushing the pieces close together as you go. You can see the back and the front of the wreath below.

When you’re finished tying on the strips, turn the wreath to the front side, fluff up the strips, and trim any stray threads.

Even though I’ve called this a Valentine Wreath, you can easily use it in your every day decor.

Happy Valentine’s Day! ❤️

Anita

Posted in Decor, Uncategorized, Valentine | Tagged , | 6 Comments

Faux Leather Earrings

Hi friends,

I have had so much fun making these earrings! They are super easy to make using the Designer Dangles dies from Taylored Expressions. The dies cut cleanly and even punch the tiny hole you need to attach the earring finding. They also have a great selection of faux leather and felt to make the earrings, as well as jump rings and earring wires to finish them off.

Disclosure: Some of the links on my site are affiliate links, meaning, at no additional cost to you, I will earn a small commission if you click through and make a purchase. As an Amazon Associate I earn from qualifying purchases.

Taylored Expressions has several videos on their YouTube channel showing how easy it is to make them. But really, all you have to do is die cut the earring shape, open the earring finding, thread the shape onto the finding, and close the finding. Super easy!!

This is a great jewelry making tool set to get started making these fun earrings. The needle-nosed pliers are perfect for opening the earring findings.

The possibilities for these fun, trendy earrings are endless! Combine the different colors and shapes to make a pair to match every outfit. 🙂

Happy Crafting!

Anita

Posted in Gifts, Jewelry, Uncategorized | Tagged , | 1 Comment

Yummy Peanut Butter Bars

Hi friends,

If you like peanut butter, you are going to love these Yummy Peanut Butter Bars! There are several recipes out there, but this is the one I have used for years – a co-worker shared this recipe with me a long time ago and it has been my go to for this tasty treat ever since. 😋

Disclosure: Some of the links on my site are affiliate links, meaning, at no additional cost to you, I will earn a small commission if you click through and make a purchase. As an Amazon Associate I earn from qualifying purchases.

You may have all the ingredients you need in your kitchen right now.

Yummy Peanut Butter Bars

1/2 cup margarine

2 cups peanut butter

1 Tbsp vanilla

1 cup brown sugar

1 lb powdered sugar

2 cups chocolate chips

3 Tbsp margarine

Melt 1/2 cup margarine and peanut butter in a large saucepan. Stir in vanilla and brown sugar. Then stir in powdered sugar. Mixture will be thick.

Press mixture into a 9×13 pan and place in the refrigerator – the chocolate will spread easier if the peanut butter layer is cool.

Place chocolate chips and 3 Tbsp margarine in a microwave safe bowl. Microwave on High for 30 seconds, remove and stir. Continue to microwave for 10 seconds at a time as needed to melt the chocolate.

Spread melted chocolate over peanut butter mixture. You can return the pan to the refrigerator to cool the chocolate or let it cool at room temperature.

Just before adding the powdered sugar.
Waiting for the chocolate layer.
Ready to enjoy!

This is a great after school treat for the kids – or anytime your sweet tooth is calling to you. 😉

Enjoy!

Anita

Posted in Recipes, Uncategorized | Tagged | 1 Comment