Crochet Candy Cane Cup Cozy

Hi friends,

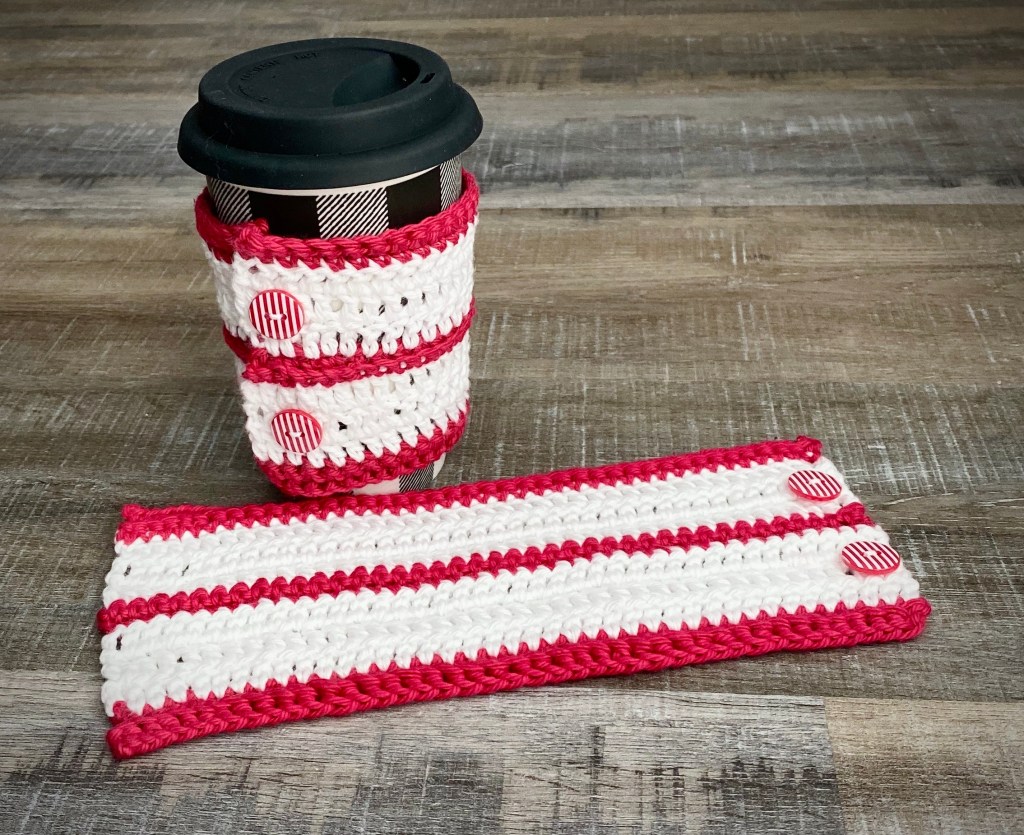
Here’s a super quick and easy Crochet Candy Cane Cup Cozy pattern that works up in just minutes! The thing I like about cozies with buttons is that you can adjust it to fit any size cup, bottle, or can – no worries about it slipping off or not being big enough. (I have another cozy pattern for Fall here.)

Disclosure: Some of the links on my site are affiliate links, meaning, at no additional cost to you, I will earn a small commission if you click through and make a purchase. As an Amazon Associate I earn from qualifying purchases.

Grab your favorite cotton yarn and whip up a few of these. Add a cup, some cocoa mix, and a candy cane or two for a fun gift – great for teachers, friends, babysitters or anyone you’d like to give a little something for Christmas!

If you need it, this is a great video on Foundation Single Crochet.

Crochet Candy Cane Cup Cozy

I Love This Cotton Yarn in White and Red

G/4mm hook

Stitches used US terms:

Foundation single crochet – fsc

Chain – ch

Back loop only – blo

Double crochet – dc

Pattern:

Row 1: With red, work 40 fsc. Turn. (40 stitches)

Row 2: Ch 1. Sc in blo across. Turn. (40 stitches)

Change to White at the end of Row 2.

Row 3: Ch 3 (counts as first dc). Skip first stitch, dc in next stitch and each stitch across. (40 stitches)

Rows 4-5: Ch 3 (counts as first dc). Skip first stitch, dc in next stitch and each stitch across, ending with last dc in top of ch 3 of previous row. Turn. (40 stitches)

Change to red at the end of Row 5.

Row 6: Ch 1. Sc in each stitch across ending with last sc in top of ch 3 of previous row. Turn.

Row 7: Ch 1. Sc in blo across. Turn. (40 stitches)

Change to White at the end of Row 7.

Row 8: Ch 3 (counts as first dc). Skip first stitch, dc in next stitch and each stitch across. (40 stitches)

Rows 9-10: Ch 3 (counts as first dc). Skip first stitch, dc in next stitch and each stitch across, ending with last dc in top of ch 3 of previous row. Turn. (40 stitches)

Change to red at the end of Row 10.

Row 11: Ch 1. Sc in each stitch across ending with last sc in top of ch 3 of previous row. Turn.

Row 12: Ch 1. Sc in blo across. Turn. (40 stitches)

Fasten off and weave in ends.

Attach 2 buttons to one end in the center of each white section.

Here’s a PDF for easy printing. 🙂

If you’re more of a spearmint fan, you could make these in white and green. 🙂

Happy Stitching!

Anita

Posted in Christmas, Crochet, Gifts | Tagged , , | 2 Comments

Unbelievably Easy Grape Jelly Meatballs

Hi friends,

Ok…these meatballs are so easy to make that I almost didn’t post about them. Because everyone knows about them, right??? But just in case someone doesn’t, I decided to write up a quick post. 🙂

Disclosure: Some of the links on my site are affiliate links, meaning, at no additional cost to you, I will earn a small commission if you click through and make a purchase. As an Amazon Associate I earn from qualifying purchases.

All you need is a 2 pound bag of frozen meatballs, a 10 oz jar of chili sauce, 1 and 1/2 cups grape jelly – and your slow cooker (this is mine and I love it!).

Add the frozen meatballs to your slow cooker. Mix the chili sauce and grape jelly together and pour over the meatballs. Stir the mixture to coat all the meatballs. Set your slow cook to LOW and cook for 4 hours.

And that’s it! Super easy and very tasty. These make a great appetizer or even a main dish served over rice or noodles.

I’ve also seen these made with BBQ sauce instead of chili sauce. You can easily double the recipe if you need more for a a party or potluck.

This is a great recipe to take to all those holiday gatherings during this busy season!

If you are in need of a new slow cooker, I love my Ninja Auto-iQ Multi/Slow Cooker. You can slow cook, sear, steam, and bake all on your counter top!

Thanks for stopping by,

Anita

Posted in Recipes | Tagged | 4 Comments

Farmhouse Christmas Candles

Hi friends,

Are you ready to decorate for Christmas? 🎄It will be here before we know it! I have a super easy Farmhouse Christmas Candle for you today. You can make several of these in just a few minutes and they look so cute grouped together!

Disclosure: Some of the links on my site are affiliate links, meaning, at no additional cost to you, I will earn a small commission if you click through and make a purchase. As an Amazon Associate I earn from qualifying purchases.

Here’s what you’ll need…(I’ve included links below to some of the supplies I used)

Measure around your candle to get the circumference. Mine measured about 7 inches. Cut a piece of the Craft Jute Webbing about an inch longer – I cut mine to 8 inches. Hot glue one edge of the webbing to the candle. Wrap the webbing tightly around the candle and hot glue the other end, overlapping the first edge.

Wrap the natural jute twine around the webbing 4 to 5 times and tie tightly with a double knot, leaving long ends. Tie on the bell and trim any excess twine. If desired, slip a piece of greenery under the twine.

A simple, cute Farmhouse addition to your Christmas decor! They would also be a great hostess gift during the holiday season.

Happy Crafting!

Anita

Posted in Christmas, Decor | Tagged , , | 7 Comments

Super Easy Spinach Dip

Hi friends,

Are you in charge of appetizers for Thanksgiving dinner? I have an incredibly easy, tasty recipe that takes just minutes to mix up. And it tastes better if you make it ahead of time – so make it a day early!

Disclosure: Some of the links on my site are affiliate links, meaning, at no additional cost to you, I will earn a small commission if you click through and make a purchase. As an Amazon Associate I earn from qualifying purchases.

Here’s what you’ll need to make this yummy Spinach Dip.

1 cup sour cream, 1 cup mayonnaise, 1 (10 oz) package frozen chopped spinach, and 1 package dry vegetable soup mix – I use Knorr vegetable soup mix.

Thaw the spinach according to package directions – just thaw, don’t cook it! Squeeze out as much liquid as you can. I squeeze it with paper towels – you want it to be really dry.

Mix the sour cream and mayonnaise together in a bowl. Stir in the vegetable soup mix and spinach. Mix well and refrigerate for several hours.

Serve this yummy dip with crackers and vegetables. Of course, you can easily double this recipe if you need to.

You can also serve this dip in a bread bowl made from Hawaiian bread (or your favorite bread). Tear the bread you’ve taken out of the loaf into bite sized pieces and serve alongside.

Super fast. Super easy. Super tasty!

Thanks for stopping by,

Anita

Posted in Recipes | Tagged | 2 Comments

Hand-Stamped Muslin Thanksgiving Favor Bags

Hi friends,

These little Hand-Stamped Muslin Thanksgiving Favor Bags turned out so cute and are a cinch to make!

Disclosure: Some of the links on my site are affiliate links, meaning, at no additional cost to you, I will earn a small commission if you click through and make a purchase. As an Amazon Associate I earn from qualifying purchases.

I found my muslin drawstring bags here at Amazon. These are 4 by 5.8 inches and come in a package of 50. They were $13.99 at the time I ordered them – so only about 28 cents per bag!! They also come in 3 other sizes – one smaller and 2 larger – if you want a different size. I did have to iron them a little before I stamped them to get a few wrinkles out.

It’s so easy to stamp on these bags. I used orange and brown dye ink to stamp the pumpkin and sentiment. Memento Rich Cocoa dye ink is my favorite brown and this Pinkfresh Studio Clementine dye ink is a great orange.

Slip a piece of scrap card stock into the bag before stamping so the ink doesn’t bleed through the bag. I didn’t have any issues with this, but better to be safe! Using your favorite pumpkin stamp, stamp the image onto the bag with orange ink. (This set from Honey Bee Stamps has some cute pumpkins, or this one from Concord and 9th is really nice.) Then stamp your favorite sentiment below with brown ink. (The “thankful” in the Concord and 9th set would be great, or this “Happy Thanksgiving” stamp would also work well.)

And that’s all there is to it! I really love the look of these – so cute and simple!

Fill them with some chocolates or other treats and they make the perfect little favor to give to friends and family on Thanksgiving – or even before to let them know you are thankful for them!

Happy Stamping!

Anita

Posted in Fall, Gifts, Stamping | Tagged , | 1 Comment

Crochet Pony Tail Beanie

Hi friends,

I found this great, free Crochet Pony Tail Beanie pattern here at Stitch & Hustle. My sister requested a beanie for a pony tail – not a messy bun – and I love that this one has buttons on the brim so the fit can be adjusted as needed. Also, the opening is large enough so you can put your pony tail wherever you want it.

Disclosure: Some of the links on my site are affiliate links, meaning, at no additional cost to you, I will earn a small commission if you click through and make a purchase. As an Amazon Associate I earn from qualifying purchases.

I used Lion Brand Vanna’s Choice Grey Marble and Yarn Bee Soft & Sleek in Burgundy with an H/5mm hook to make the beanies. Any worsted weight (4) yarn in your favorite color will work.

The pattern works up quickly and is easy to follow. You could even make it striped as well as a solid color. You could also use fun buttons to dress it up.

Happy Stitching!

Anita

Posted in Crochet, Gifts | Tagged , | 4 Comments

Fall Garland

Hi friends,

Sometimes Thanksgiving gets a little lost along the way to Christmas. I love the Fall season with all of its glorious colors and enjoy adding little Autumn touches to my home for the month of November. (I really start putting my Fall things out in October along with a few things for Halloween.) 😉

Disclosure: Some of the links on my site are affiliate links, meaning, at no additional cost to you, I will earn a small commission if you click through and make a purchase. As an Amazon Associate I earn from qualifying purchases.

I made this Halloween garland for my fireplace and now that it’s November I needed one that was a little less Halloween-y and a little more Fall-ish.

You’ll need some unfinished wood pumpkin and leaf ornaments – I used 5 of each. I picked mine up at Dollar Tree – but I did find these pumpkin and leaf ornaments on Amazon. You’ll also need 11 (1-inch) unfinished wood beads – I used beads similar to these, some natural twine, your favorite Fall colored scrapbook paper, and Mod Podge to glue the paper to the ornaments. You may also want some brown ink to distress the pumpkins and leaves a bit to add a little more dimension – I love this Memento Rich Cocoa dye ink.

Trace each shape on the back of the scrapbook paper and cut them out. Using a sponge brush with the Mod Podge, brush a thin layer onto the shape, place the cut scrapbook paper on the shape, and smooth out any bubbles. Let dry – it dries really quickly.

Next, dry brush a little of the Memento Rich Cocoa onto the the pumpkins and leaves using a stipple/stencil brush (this set has 4 different sizes). Apply a thin coat of the Mod Podge over the top and let dry. Using an awl or the tip of sharp scissors, punch through the paper in the hole of the ornament.

Once your shapes are ready, it’s time to make the garland! Cut a long length of twine, I cut mine about 8 feet. I started by tying a knot about 9 inches from one end of my twine. Then I threaded on a bead and tied a knot close to it to keep it from sliding on the twine. I tied another knot about 4 inches from the first bead, threaded on another bead, and tied a knot close to that one. Continue until all the beads are on the twine. Leaving about 9 inches, cut off any excess twine.

Then I tied the pumpkin and leaf shapes onto the twine between the beads using a thin brown twine I had in my craft stash and trimmed off the excess. Any thin, neutral color twine will work.

And here’s the finished garland!

I love how it looks on my mantel! 🍁

You can also tie ribbon onto the garland like I did in my Halloween Garland in this post for a little something extra.

A touch of Fall to warm up the season on the way to Thanksgiving! 🍁🍁🍁

Happy Crafting!

Anita

Posted in Decor, Fall | Tagged | 5 Comments

Happy Fall Treat Tags

Hi friends,

I’ve got a simple little Fall treat bag tag to share with you today. This would make such a fun favor for the kids table on Thanksgiving – or even for the adults. 🙂

Disclosure: Some of the links on my site are affiliate links, meaning, at no additional cost to you, I will earn a small commission if you click through and make a purchase. As an Amazon Associate I earn from qualifying purchases.

I used white card stock trimmed to 2-inches to 3-inches and punched the tag shape with this Scalloped Tag Topper Punch from Stampin’ Up. I stamped the pumpkin (similar to those in this set) with Memento Rich Cocoa ink (you can find the ink here or here) and colored the image with Copic markers. I stamped the sentiment with orange ink. The sentiment I used is an older stamp that I’ve had for a long time – I love this set from Taylored Expressions that has several harvest sentiments to choose from.

I brushed some of the Memento Rich Cocoa ink onto the tag using these wonderful Blender Brushes from Taylored Expressions, then tied a brown ribbon to the tag.

I found my treat bags and mini clothespins at Dollar Tree. There are yummy chocolates in the bag and then I clipped the tag on using the mini clothespins.

You could also add a few crayons to the bag and print out some fun Fall themed pictures for the kids (or adults!) to color while waiting for Thanksgiving dinner to be served.

Happy Stamping!

Anita

Posted in Uncategorized | Leave a comment

EEK. Happy Halloween

Hi friends,

Just stopping by with a Halloween greeting! 🕷🕸🎃 I hope you get to enjoy your favorite treat today!

Disclosure: Some of the links on my site are affiliate links, meaning, at no additional cost to you, I will earn a small commission if you click through and make a purchase. As an Amazon Associate I earn from qualifying purchases.

This card was made with the Cuddlebug Spider stamp set from Unity Stamp Company. I stamped the spider and sentiment on white card stock with Memento Tuxedo Black ink. The spider is colored with Copic markers and both stamped pieces are layered to black card stock.

I tied a purple gingham ribbon to a panel of patterned paper and attached the panel to a green card. The spider image is attached to the card with foam tape and the sentiment is attached to the spider image.

A quick and easy card to wish you all Happy Halloween! 🎃

Anita

Posted in Cards, Fall, Stamping | Tagged , | 2 Comments

No-Bake Chocolate Oat Bars

Disclosure: Some of the links on my site are affiliate links, meaning, at no additional cost to you, I will earn a small commission if you click through and make a purchase. As an Amazon Associate I earn from qualifying purchases.

Hi friends,

Are you looking for an easy after school treat for your kiddos? I found the recipe for these No-Bake Chocolate Oat Bars on Pinterest. They only take a few minutes to make, but you do need to make them early in the day so they’ll have time to chill and set.

It only takes a few ingredients to make these yummy bars – and the cinnamon adds an extra layer of flavor. (Looks like I need to freshen up my brown sugar label 😉 ) You can find the full recipe here at Tip Hero.

Here they are after a few hours in the refrigerator.

A tasty treat with a cold glass of milk after a hard day of school!

And they have oatmeal, dark chocolate, and peanut butter – what a great combo!!

Happy Eating!

Anita

Posted in Recipes | Tagged | 4 Comments