Chocolate Caramel Bars

I found this quick and easy recipe for Chocolate Caramel Bars on Pinterest. Chocolate, caramel, 4 ingredients, 20 minutes…I’m in!!!

Seriously, this is all you need to make these yummy bars! You may have everything you need in your kitchen right now…

IMG_8406

This is how they looked fresh out of the oven with the chocolate all melty on top…

IMG_8407

And after cooling and ready to eat…

IMG_8408

Mine look a little different from the recipe on Butter with a Side of Bread because I may or may not have used a few more chocolate chips on top…because…well…Chocolate!! πŸ˜‹

These really are simple and easy to make and taste so good!!!

Thanks for stopping by,

Anita


Posted in Recipes | 1 Comment

Thinking of You Card

This is a great set from Stampin’ Up called Jar of Love – it’s so versatile and can be used for so many different occasions. And there is a matching die set called Everyday Jars Framelits Dies. You can see a Thank You card that I made using this set in this post from a couple of weeks ago. 

I made this card for my Mom for Mother’s Day. 


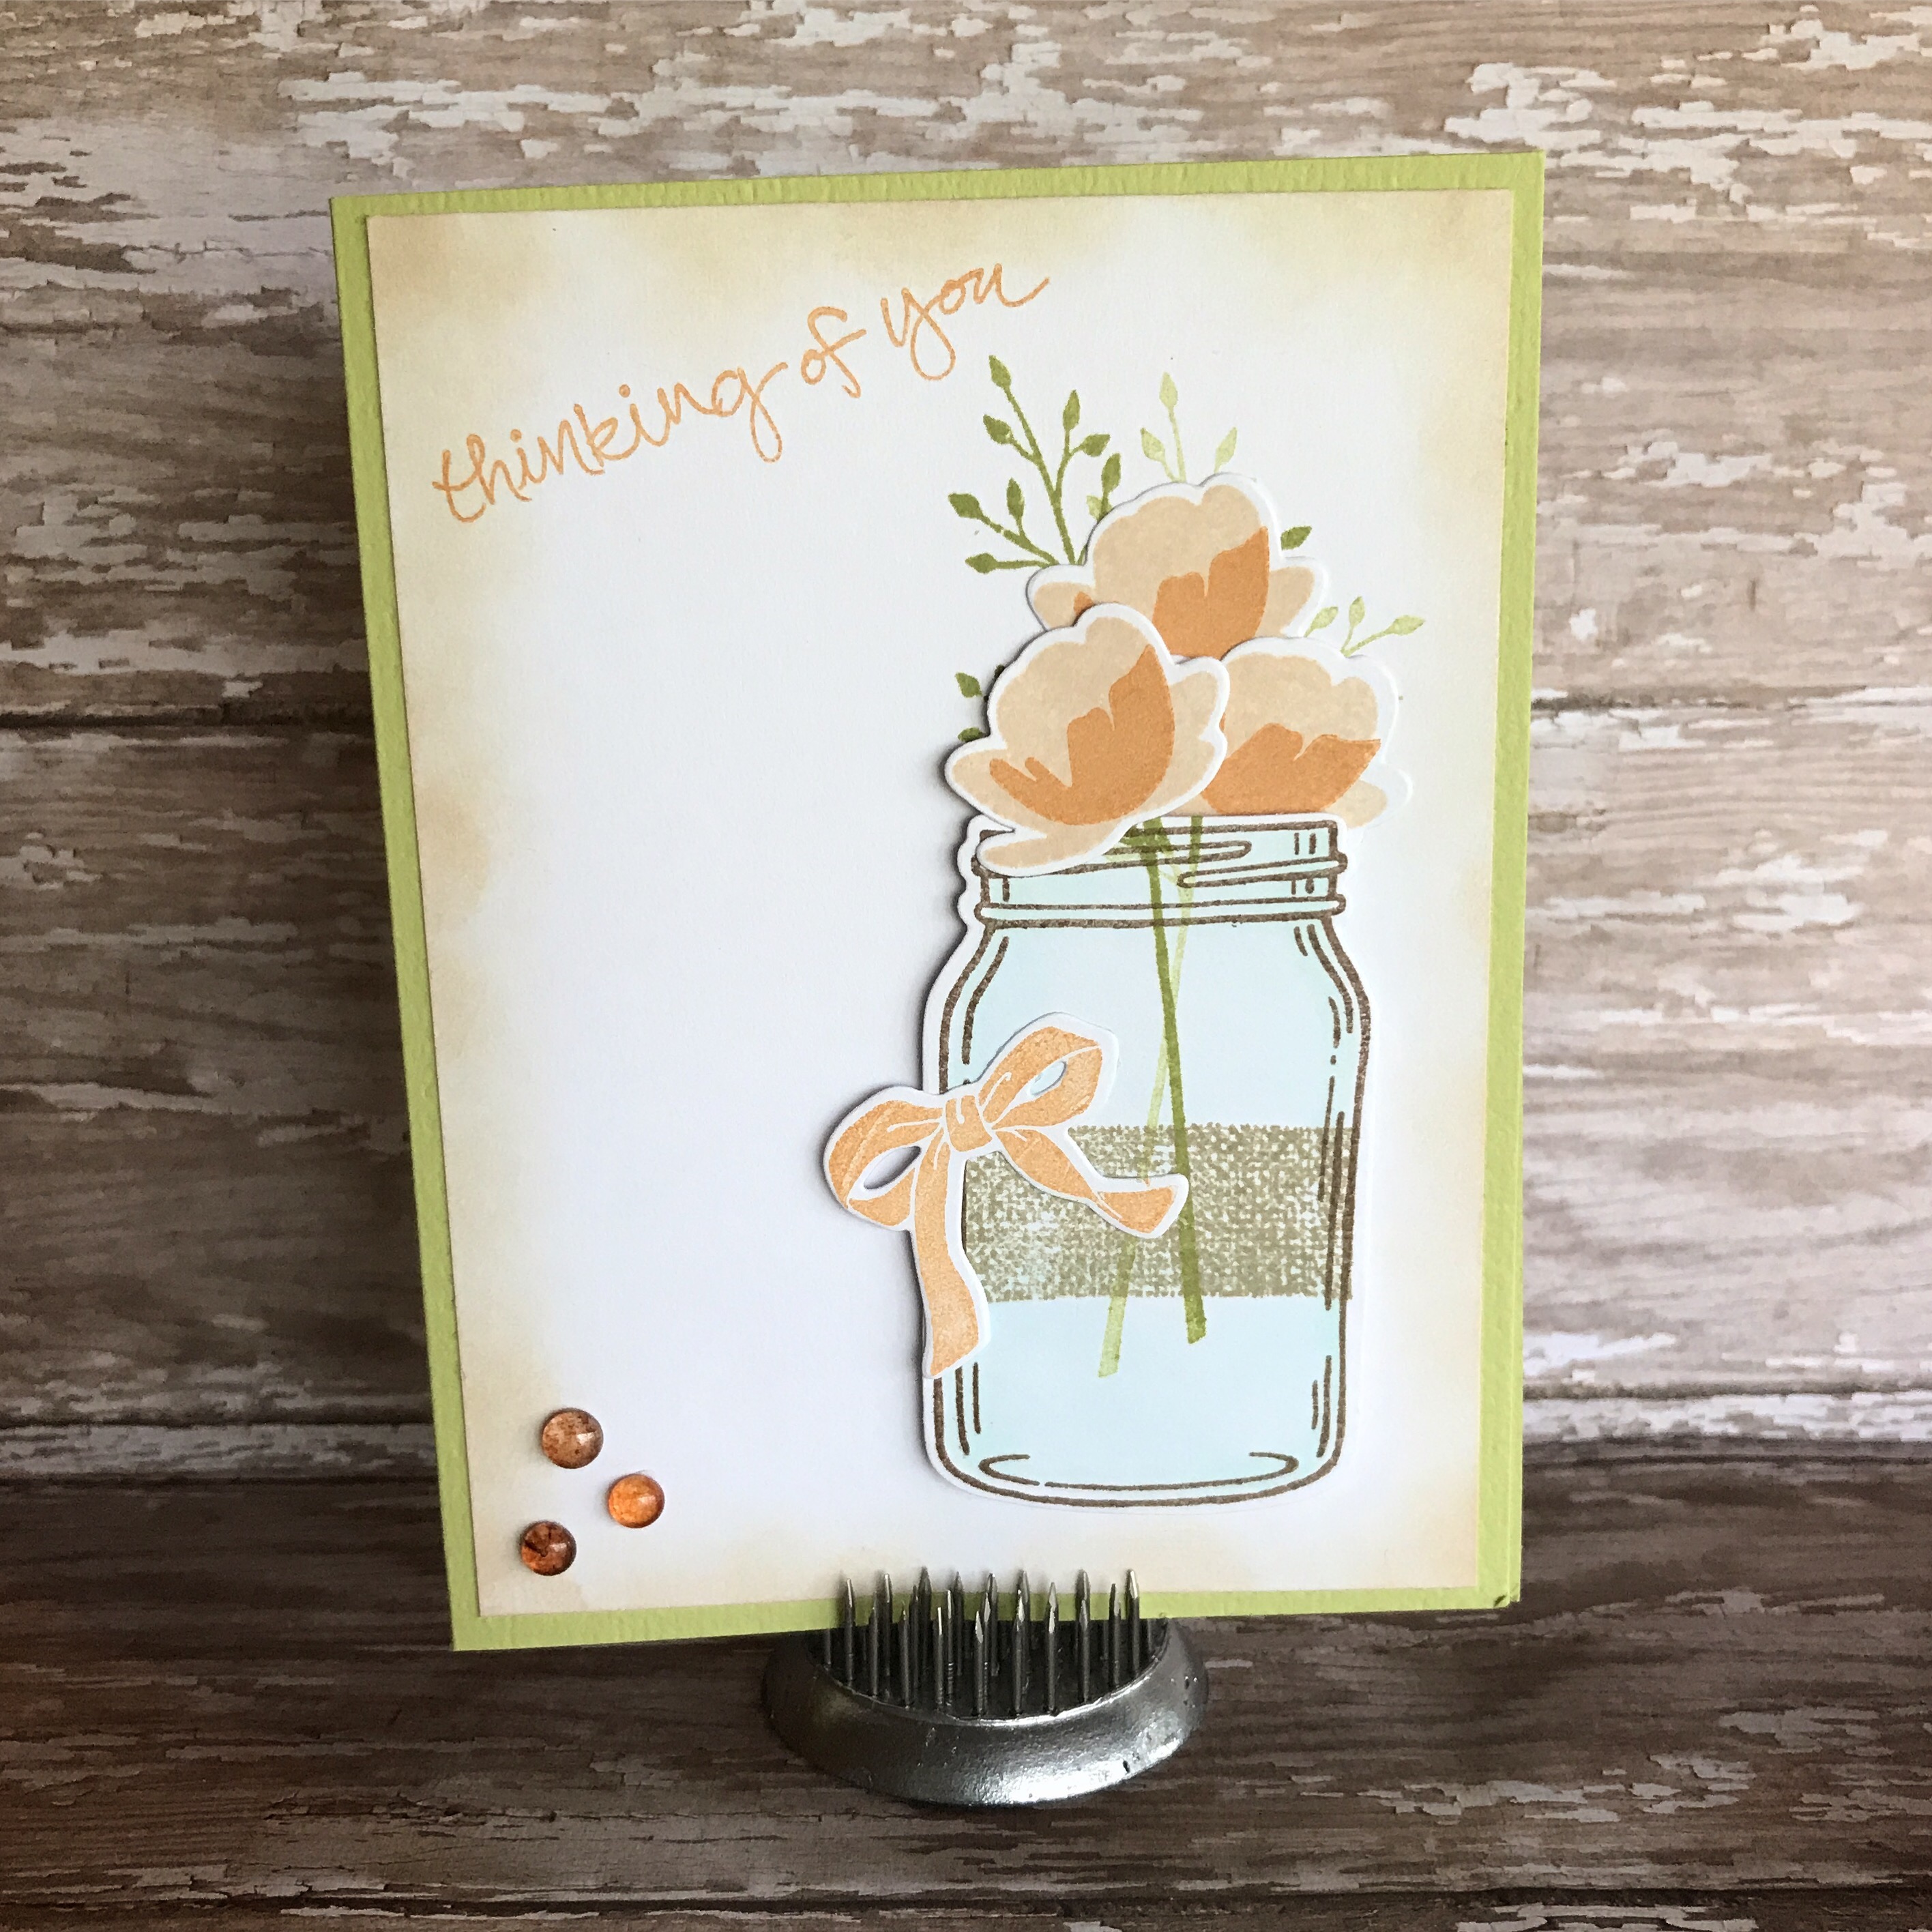
I first stamped the largest jar in the set on a white card stock panel (for the front of the card) with brown ink and stamped it a second time on another piece of white card stock. Then I die cut the second stamped jar using the framelits die. I placed the die cut image over the image on the white panel and stamped the greenery over both layers so the stems would be in the die cut jar. I inked my stamp with green ink and stamped my first image, then without re-inking the stamp, I stamped the second image.

After removing the die cut jar from the panel, I stamped the burlap ribbon with light brown ink on the jar (over the green stems) and colored the jar with a light turquoise Copic marker. The die cut jar is attached over the stamped jar on the white panel with foam tape.

I stamped the flowers with 2 shades of terra cotta ink, die cut them, and attached them to the white panel, overlapping them and using foam tape for the one in the front. The edges of the panel are lightly sponged with the darker terra cotta ink. The sentiment is stamped with the darker terra cotta ink, too. The bow is stamped with the darker terra cotta ink, die cut, and attached to the jar. I attached the panel to a green card and added 3 dew drops to the corner (enamel dots or gems would work great, too).

Mother’s Day, Birthday, Thank You, Thinking of  You…this set is great for so many things!

Thanks for stopping by,

Anita


Posted in Cards, Stamping, Uncategorized | Leave a comment

Gryffindor Colors Crochet Scarf

A very special girl graduated from high school this month. πŸŽ“

I wanted to make her a little something special and, since she is a huge Harry Potter fan, what could be better than a scarf made in Gryffindor colors?

I used Red Heart Super Saver yarn in Burgundy and Gold with a size H hook. The scarf is done in single crochet. I started by chaining 31. Then single crochet in the second chain from the hook and in each remaining chain – 30 single crochet. I stitched 15 rows of Burgundy and then 2 rows of Gold. I continued this pattern until my scarf measured about 72 inches, making sure to end the scarf with 15 rows of Burgundy. I added about 4 inches of fringe to each end. I used about 1and 1/2 (7 ounce) skeins of the Burgundy and just a small amount of the Gold yarn. The scarf may by a bit stiff when you are finished, but after washing it on the delicate cycle with fabric softener and drying it on low with a dryer sheet it will soften up nicely.

Don’t let the Muggles get you down!

Thanks for stopping by,

Anita

Posted in Crochet, Gifts | Leave a comment

Hand Stamped Flour Sack Towels

I love the look of stamped flour sack towels and thought it would be fun to try making my own. I found this package of 5 at Walmart for $4.34 – a great price in case I messed them up. πŸ˜‰

The first thing you need to do is to wash and dry the towels. Wash and dry them without fabric softener or dryer sheets. Then you’ll need to iron them. I know, not my favorite thing either, but it’s something you need to do. πŸ™‚

IMG_8362

I got out my Memento Luxe Ink for Mixed Media and some of my foam flower stamps.

IMG_8364

Then just have fun! I stamped a border on one edge of each towel using various flower stamps and different ink colors. I put paper towels under my flour sack towels to protect my counter not thinking about the fact that the paper towels had a texture to them. I kind of liked the way it added a little pattern to some of the flowers. If you don’t want that, just use plain paper. The ink really didn’t go through the fabric, but better to be safe than sorry!

After the ink has dried (which doesn’t take long), you will need to heat set the images so they won’t fade away the first time you wash the towels! You’ll need to get out your iron again (I’m sorry!!) along with an old towel or piece of fabric to put over the stamped area of the towel. Turn your iron on high with NO steam. Place your old towel over the stamped towel and iron for 3 to 5 minutes. You’ll need to do this on the front and the back of the towel. This should set the ink and then your towels are ready to use. I haven’t washed my towels yet, but I did get them wet and the ink did not run at all. Seems like all that ironing was worth it! πŸ™‚

Here are the finished towels…

IMG_8363

You could stamp a border on both ends or randomly stamp the entire towel. Using kitchen themed stamps would make cute towels. And you don’t have to limit yourself to using just foam stamps – I think rubber stamps and even clear stamps would work great! And if you have fabric paint instead of fabric ink go ahead and use that. Just don’t forget to heat set your images no matter what you use!

Thanks for stopping by,

Anita


Posted in Gifts, Stamping | 7 Comments

Graduation Card

It’s that time of year again – lots of high school and college grads to celebrate! Here’s a simple card that you can make for all of those special ones starting a new chapter in their lives.Β πŸŽ“

I dry embossed the graduation cap on black paper that is white on the back and lightly sanded the raised edges to highlight the cap. (Here’s a great tutorial on how to dry emboss.) I trimmed it close and rounded the corners.

This is the stencil from Dreamweaver Stencils that I used. I’m not sure it is stillΒ available, but a graduation cap stamp would also work. Here’s a simple stamp available at Hobby Lobby. You could stamp it with Versamark ink on black card stock and emboss it with white embossing powder. Or stamp it with black ink on white card stock, trim close, and layer it to black card stock before attaching to the card.

I embossed a panel of white card stock with the Dotted Lattice embossing folder from Taylored Expressions. I attached a strip of “congrats” washi tape from the Target Dollar Spot and then attached the panel to a white card. The graduation cap is attached to the card with foam tape. I added some gold sequins for a little bling.

This is a super quick card to make if you need several. Best wishes to all those special grads!!Β πŸŽ“

Thanks for stopping by,

Anita

Posted in Cards, Uncategorized | Leave a comment

Thanks Mason Jar Card

This is such a fun set from Stampin’ Up. It’s called Jar of Love – it comes with 3 different sizes of jars and tons of accessories. There is also a coordinating die set called Everyday Jars Framelits to make it easy to cut out your jars and accessories. 

To make the card, stamp the largest jar with brown ink on white card stock. Color the jar with a very light turquoise Copic marker. Stamp “thanks” with raspberry ink inside the jar. Die cut the jar using the matching die set. Stamp the leaves 3 times with green ink on white card stock and die cut. Attach to the back of the jar.

Stamp a background (this one is an older one from Hero Arts – use whatever you have in your stash) with green ink on light green card stock. Emboss a piece of raspberry card stock with a woodgrain embossing folder (mine is a discontinued one from Stampin’ Up – woodgrain embossing folders are available from many other companies, like this one from Cuttlebug) and attach to the green card stock at an angle. Attach the piece to a white card. Attach the stamped jar to the card with foam tape. Attach a green ribbon bow and add 3 dew drops or gems to finish the card.

Thanks for stopping by,

Anita

Posted in Cards, Stamping | 5 Comments

Script Wall Expressions Decor

When we visited Magnolia Market at the Silos last December (you can read about our visit here), I fell in love with these Script Wall Expressions. They are handmade metal signs by JDH Iron Designs and each one looks just a little different. Also be sure to check out his website for all of the other amazing things he has to offer! If you are a fan of Fixer Upper, you’ve seen the wonderful custom designs Jimmy Don has made for Joanna and Chip. πŸ™‚

If you can’t make the trip to Waco, TX, you can still get one of these Script Wall Expressions on the Magnolia Market website. There are 5 different words to choose from: Home, Inspire, Family, Fresh, and Gather. They look great alone on your wall, but here’s what I decided to do with mine. I chose the word Home…

I found this unfinished Slatted Panel with Rope Handle at Hobby Lobby. I liked that the edges were offset and also that the rope is attached on the back so it’s easy to hide if you want.

IMG_8315

I used 2 coats of chalky finish paint by Deco Art in the color Lace to paint the wood panel. Then I lightly dry-brushed it with dark brown acrylic paint to give it a distressed look.

IMG_8320

If you look closely, you can see the 2 tiny nails that I added to the panel so I could hang the word at an angle. And here’s how it looks all finished…

IMG_8321

I have my finished Script Wall Expression propped on my mantel, but it would also look great on the wall or on a shelf or on that perfect farmhouse cabinet you may have.

Thanks for stopping by,

Anita


Posted in Decor, Gifts | Leave a comment

DIY Mother’s Day Gift Ideas

Mother’s Day is Sunday, May 14th. Are you ready? Do you need a little inspiration? Here are a few links to some fun and easy DIY gifts I’ve made that your Mom, Mother-in-law, Grandmother  sister, or friend will love. Click on the photos for the info on making each gift idea.

These DIY Serving Dishes are so fun to make! 


Maybe a pretty Elastic Stretch Bracelet.


An Altered Canvas Clip Picture Frame to display her favorite photo. 

img_6391

A cute Laundry Room Wreath to make that chore a little brighter. 


Waffle Crochet Dishcloths to add a little color to her kitchen. 


Add her favorite flower to this cute Chalk Painted Bud Vase.

IMG_6388

A pretty Washer Pendant Necklace is always a good gift.

IMG_3909

And don’t forget the card! These cards aren’t your traditional Mother’s Day cards, but I think they would all be great. πŸ™‚

IMG_4181

IMG_5843

img_7845

IMG_4821

img_5841

I hope these ideas give you a little inspiration to make something special for those lovely ladies in your life!

Thanks for stopping by,

Anita

Posted in Gifts | 1 Comment

A Few Days in the PNW

We were able to take a short visit to the Pacific Northwest, specifically Portland, OR and Bellingham, WA, in early April. I know there is so much more to see than we were able to in our short time, but here are a couple of highlights of the trip.

I visited the Tom McCall Waterfront Park in Portland, OR. It is a beautiful park on the banks of the Willamette River. It was a gorgeous sunny day – perfect for taking a stroll and enjoying the cherry blossom trees in full bloom.

IMG_8328

A couple of the sites around downtown Portland…

We headed north to Bellingham, WA to spend a little time with some precious friends – family really! πŸ™‚

IMG_8241

Bellingham is so beautiful and we had so much fun! This is the Fairhaven Village Inn where we stayed during our visit. It was a great place – I highly recommend staying here if you ever find yourself in Bellingham…

So many fun and beautiful places in and near Bellingham…

Boulevard Park at sunset

Samish Overlook

And of course, these 2 little cuties and their parents were the best part of the trip!

We ate some wonderful food, had some great time with our friends, and only wish we could have stayed longer!! I’m sure we will find ourselves in that part of the country again…still so much to explore!!

Until next time…

IMG_8341

Thanks for stopping by,

Anita

Posted in Travel, Uncategorized | 2 Comments

Cute Bunny Card

This was one of the cards I made for Easter, but as I was looking at it, I thought that with just a little tweaking it would be great for other occasions too.Β 

Simply change the Easter egg ribbon to a flowered ribbon and it would make a great Spring card. Add a sentiment like “Happy Birthday” or “Thinking of You” for other great options. Or change the colors so it’s not quite so “Springy”.Β 


The stamp is Terra Cotta Bunny from Stampotique Originals. The embossing folder is Dotted Lattice from Taylored Expressions.

Stamp the bunny with black ink on white card stock and color with Copic markers. Emboss a panel of pink card stock and attach ribbon to the panel. Add 3 blue brads in the bottom right corner. Attach panel to a blue card. Attach stamped image with foam tape.Β 

Take another look at your stamps – you may be surprised at just how versatile they really are!

Thanks for stopping by,

Anita

Posted in Cards, Easter | Leave a comment