Polka Dot Christmas Stocking Ornaments

Hi friends,

Christmas in July continues with these adorable Polka Dot Christmas Stocking Ornaments. 🎄

I picked up these cute wood stocking ornaments at Dollar Tree last year. They came in a package of 5 – so just 20 cents each! Such a deal!

Dollar Tree usually starts filling their shelves with Christmas craft goodies around September. You’ll need to grab what you want quickly as they always sell out so fast! I have a plastic bin where I store my Christmas crafting supplies that I haven’t used so that 6 months later when I want to start crafting again I won’t forget what I bought. 😉

Disclosure: Some of the links on my site are affiliate links, meaning, at no additional cost to you, I will earn a small commission if you click through and make a purchase. As an Amazon Associate I earn from qualifying purchases.

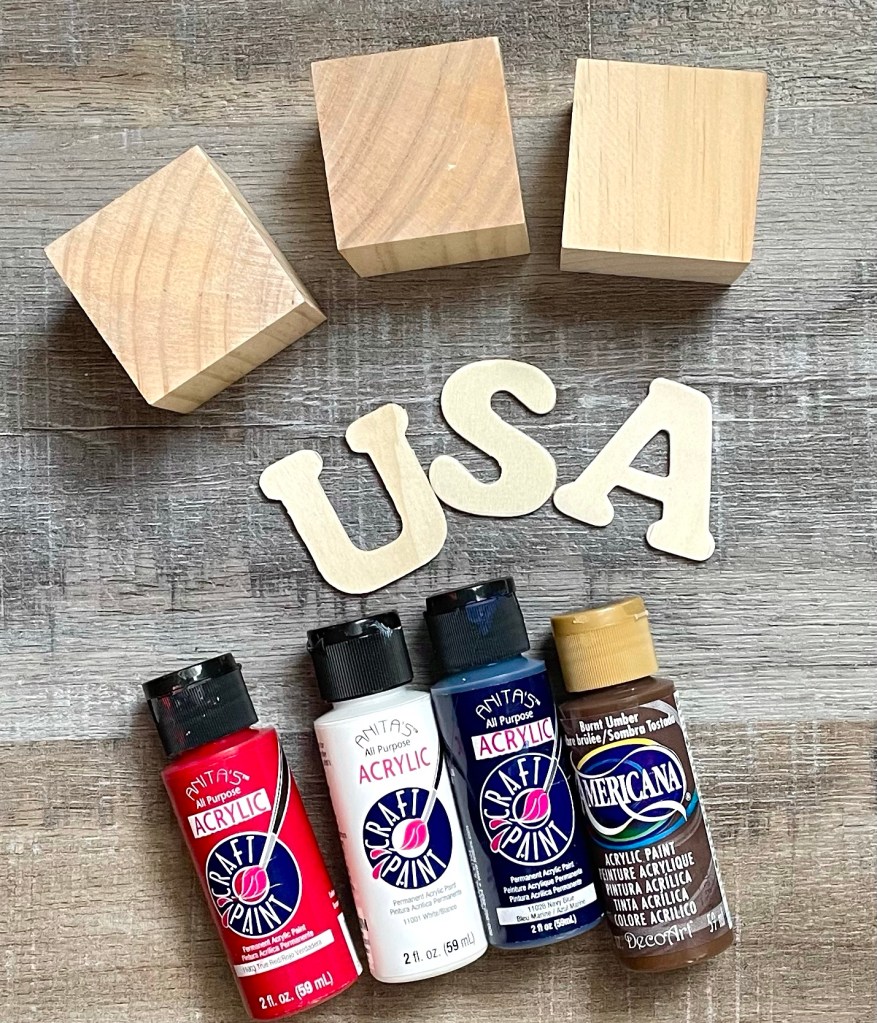
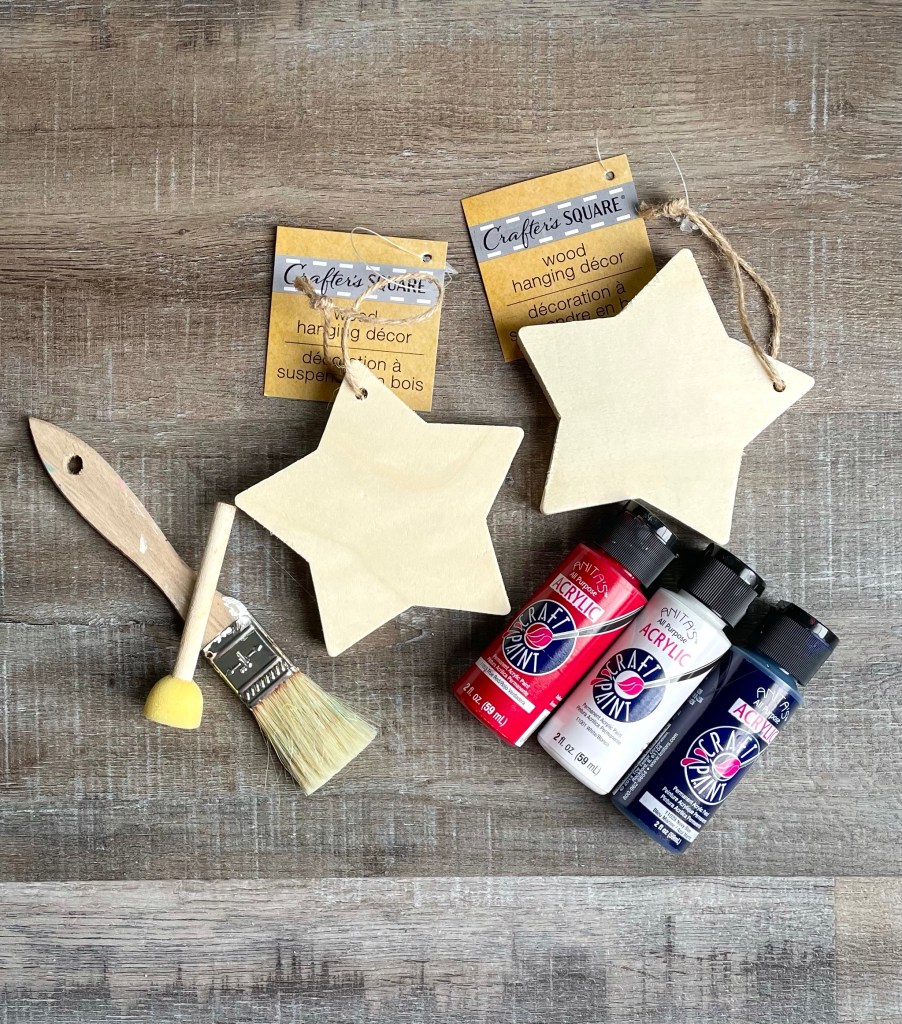
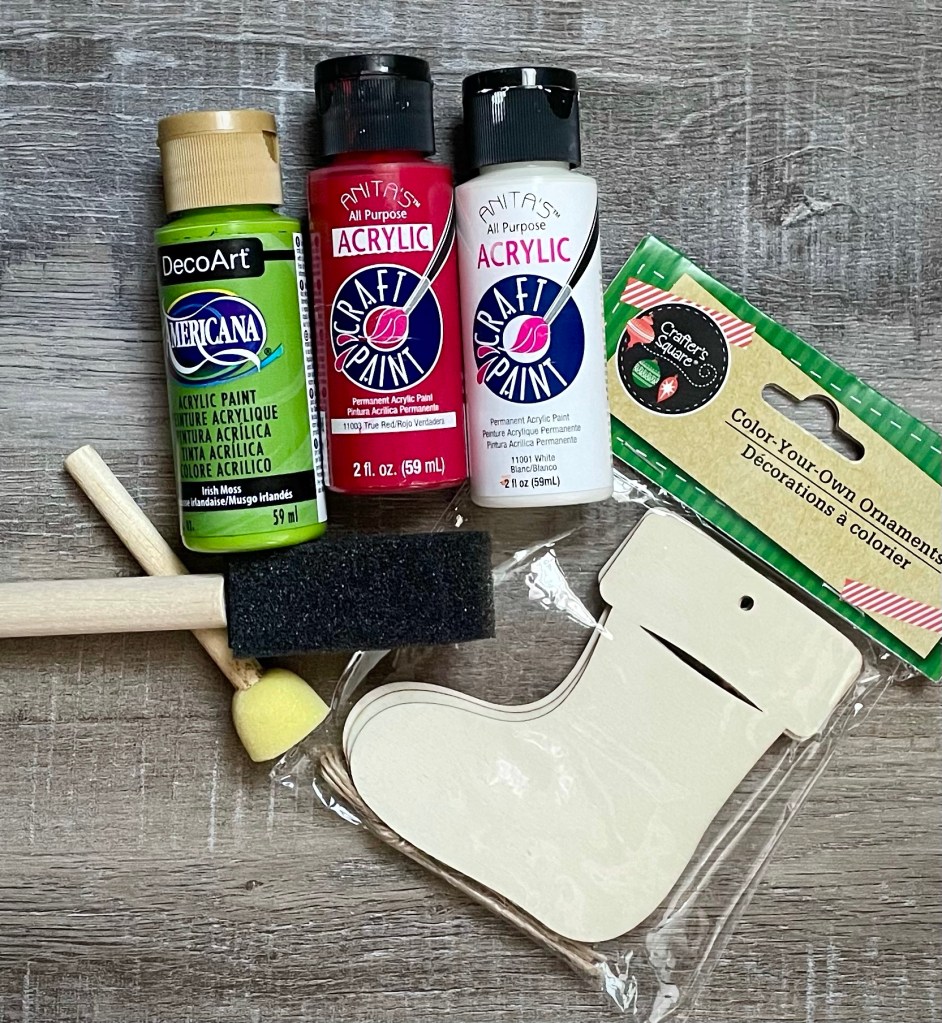
To make these cute Polka Dot Christmas Stocking Ornaments you’ll need red, green, and white acrylic paint (this is a great set to have on hand) and a foam brush or paint brush. You’ll also need a foam spouncer to add the polka dots.

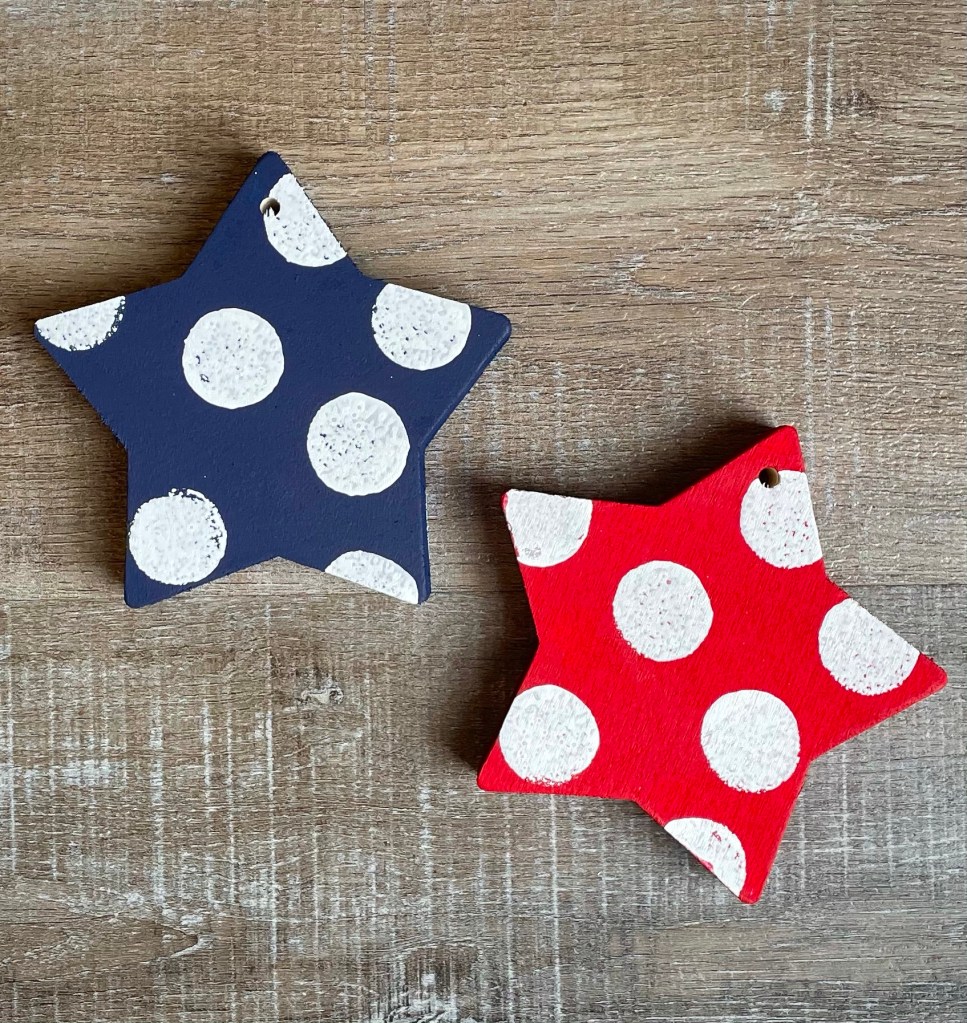
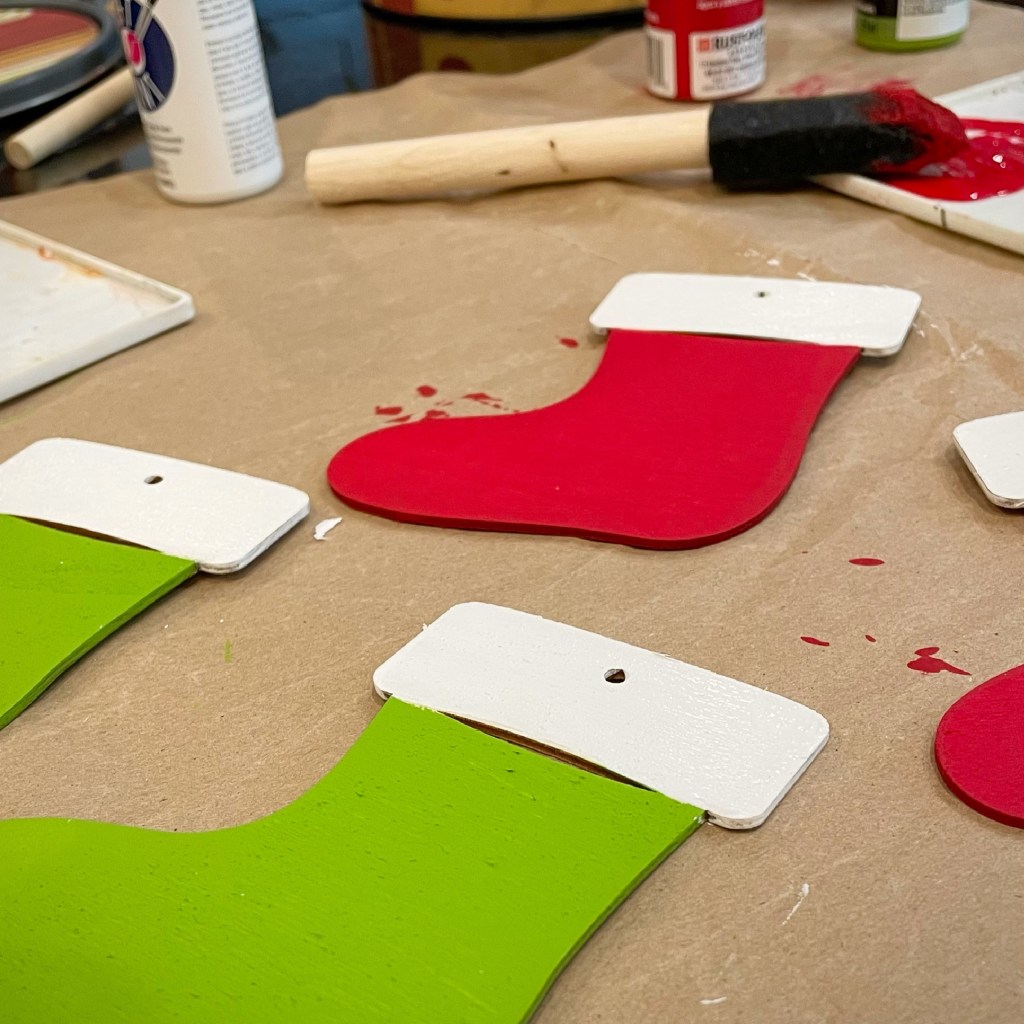
Paint the bottom of the stocking either red or green. I used a foam brush and painted both sides with 2 coats, letting it dry between coats. Then paint the cuff on both sides with 2 coats of white paint.

After the paint is dry, use your foam spouncer to apply white paint to randomly make the polka dots. I did this on both sides of my ornaments so it won’t matter which way they hang.

I finished my ornaments by using a foam brush to apply a thin coat of Matte Mod Podge on each side to seal them and add just a touch of shine. Make sure to let the first side dry completely before turning them over to do the other side.

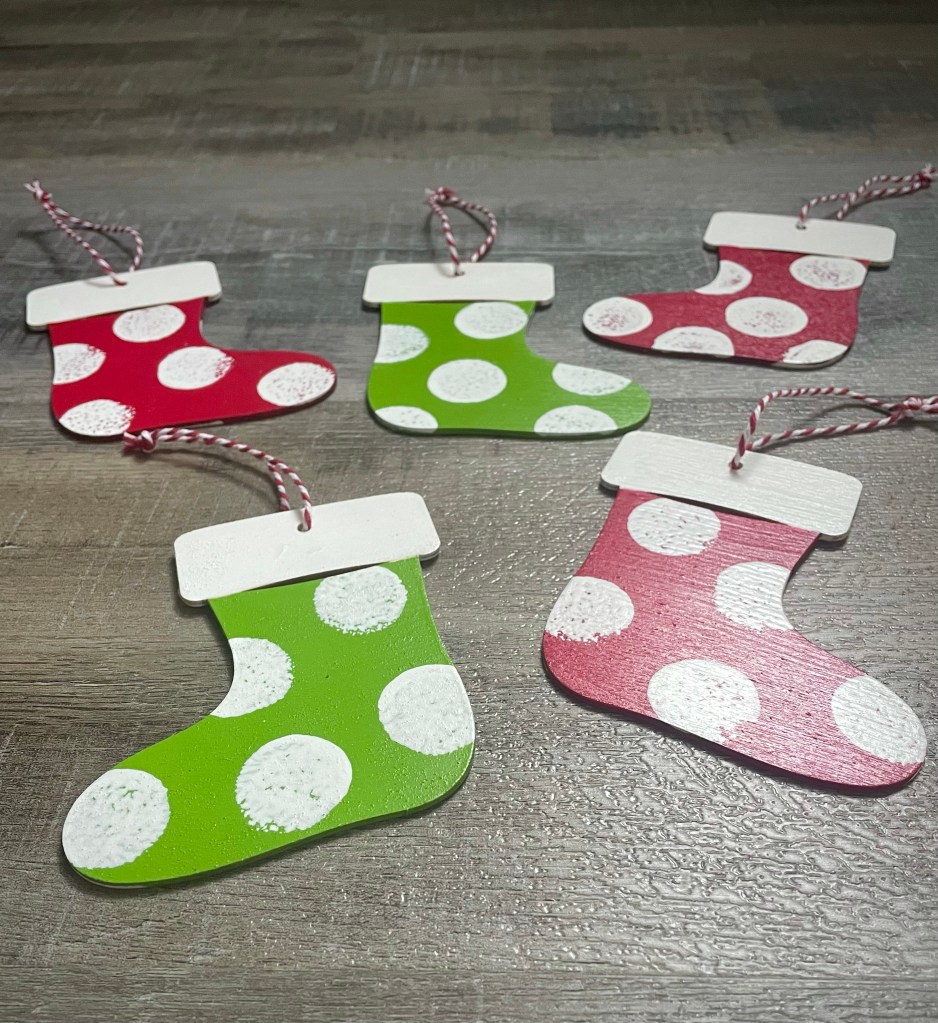
The ornaments came with twine that you can use for hanging or you can use red and white baker’s twine like I did.

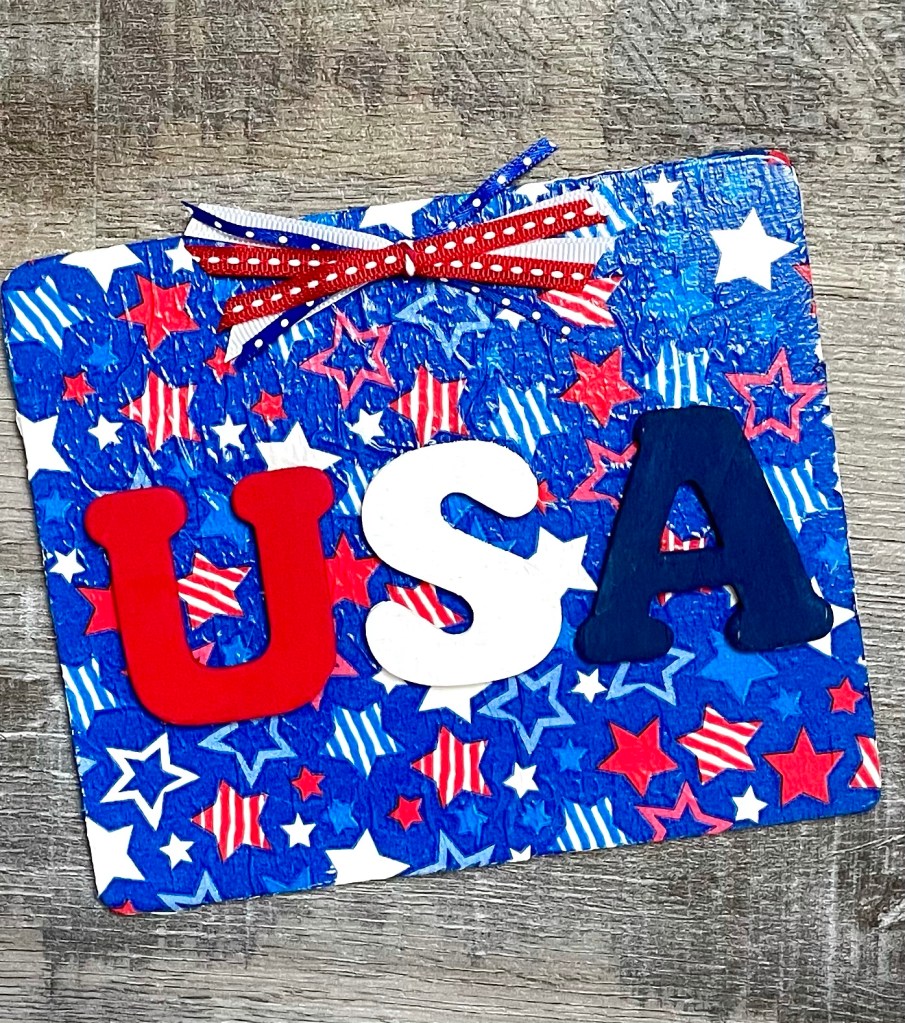
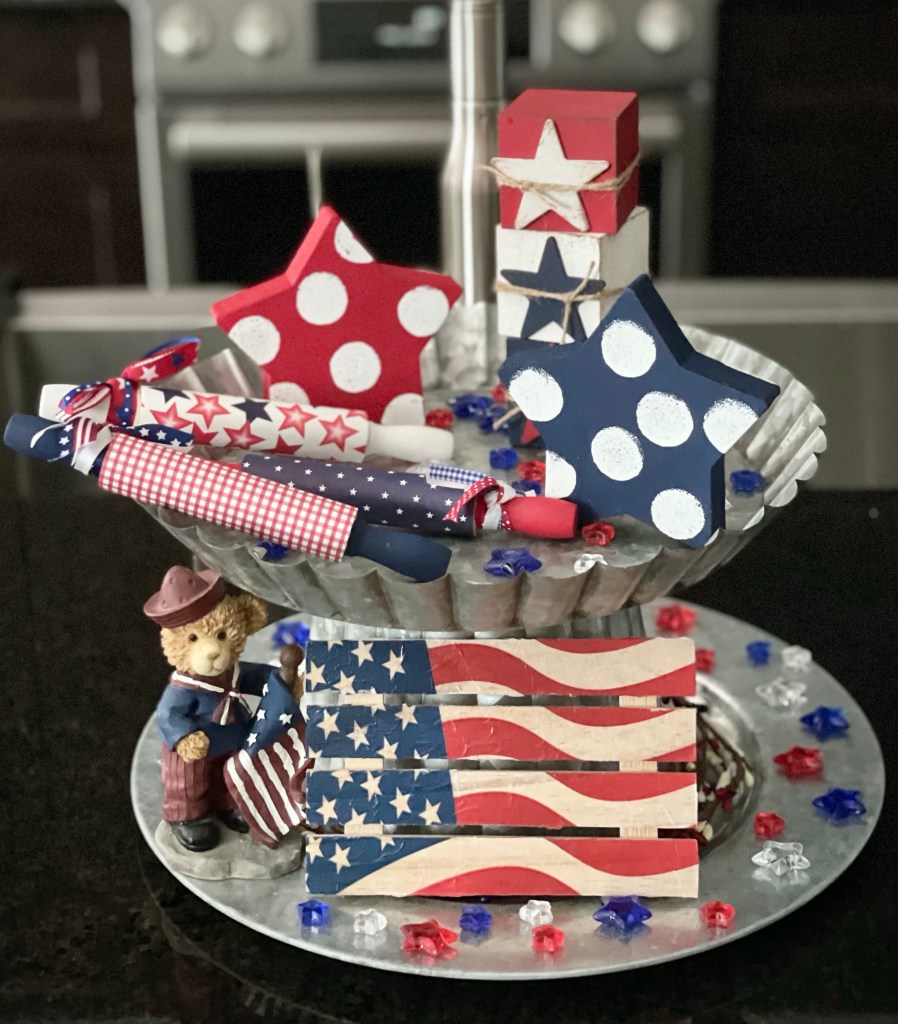
I think they turned out so fun and whimsical! They will look so cute on your tree or make a great package tie on. 🎁 You can also personalize them by putting a name on the cuff.

Happy Crafting! 🎄

Anita

Posted in Christmas, Decor | Tagged , , | Leave a comment

Crochet Gnome Towel Toppers

Hi friends,

It’s time for Christmas in July! 🎄Last year I had so much fun giving you inspiration to get started on your Christmas makes that I thought I would do it again this year! We all know how fast time flies and if you want to make things for the season the time to start is now. 🙂

Disclosure: Some of the links on my site are affiliate links, meaning, at no additional cost to you, I will earn a small commission if you click through and make a purchase. As an Amazon Associate I earn from qualifying purchases.

I wanted to make this adorable Crochet Gnome Towel Topper last year, but time got away from me. So this year, I decided it would be my first Christmas make. He is super quick and easy to stitch up – the free pattern can be found here at Nana’s Crafty Home. She also has a link to a paid printable PDF if that is something you would like to have.

I used Yarn Bee Soft & Sleek yarn in Red, Kale, White, and Blush to stitch up my Gnomes. I used a J/6mm hook. The pattern recommends an H/5mm hook but I found I needed to go larger to accommodate the plastic ring inside the Gnome. We all crochet a little differently, so just adjust hook size as you need to on any project you are working on. 🙂

These are the 3-inch plastic rings that I used to hang the towels from. You’ll need some flour sack towels to make his beard and 3/4-inch white buttons.

Once your Gnome is stitched up, you simply slip the towel through the ring inside and button him over your cabinet or oven handle for a cute – and useful – Christmas decoration. It’s so easy to take the towel out for washing without having to take your Gnome off the handle!

Of course these would be so cute any time of the year – just make them in colors to match your kitchen!

Happy Stitching!

Anita

Posted in Christmas, Crochet, Gifts | Tagged , , | 2 Comments

Patriotic Sugar Cookie Bars

Hi friends,

Are you bringing dessert to the 4th of July picnic this weekend? Looking for a quick but fun and festive recipe? These Patriotic Sugar Cookie Bars might be just what you are looking for! 🇺🇸

Disclosure: Some of the links on my site are affiliate links, meaning, at no additional cost to you, I will earn a small commission if you click through and make a purchase. As an Amazon Associate I earn from qualifying purchases.

I found the recipe here at Upstate Ramblings. The dough mixes up in just a few minutes and then you bake the whole batch of cookies at once in a 9 x 13 inch baking pan – I love that! After the cookies cool completely, you will frost them with yummy cream cheese icing and add plenty of fun patriotic sprinkles. Cut them into squares and enjoy!

Here’s the dough ready to go into the oven… It’s a thick sticky dough so I lightly sprayed my clean hands with cooking spray to spread it out and pat it in the pan that I lined with parchment paper.

And fresh out of the oven… It smells so yummy!

After they are cooled, frosted, and sprinkled…

The cream cheese in the dough and the icing adds a whole new level of flavor to these tasty sugar cookie bars. I stored my cookie bars in the refrigerator just to be safe due to the cream cheese icing. Simply take them out an hour or so before you want to serve them – or you can serve them cold right from the fridge, too!

These tasty Patriotic Sugar Cookie Bars are sure to be a hit – especially with the kids! 🙂

Happy Baking

Anita

Posted in Recipes, Summer | Tagged , | 3 Comments

Hello Sunshine Girl

Hi friends,

Oh my goodness! Unity Stamp Company has the best rubber stamps! This Hello Sunshine Girl is just perfect! I love her vintage vibe and she is so fun to color. 🙂 She also comes with 3 different sentiments.

Disclosure: Some of the links on my site are affiliate links, meaning, at no additional cost to you, I will earn a small commission if you click through and make a purchase. As an Amazon Associate I earn from qualifying purchases.

I stamped her with Memento Rich Cocoa ink on white card stock and colored her with Copic markers. I die cut the image using the Petite Scallop Mini Slim Stacklets dies from Taylored Expressions. I die cut a larger scalloped rectangle using the same die set from patterned paper and layered the image to it. These beautiful patterned papers are from the Kindness is Magic paper pack from Unity Stamp Company. I stamped the sentiment with Memento Rich Cocoa ink on white card stock, trimmed it, and layered it to yellow card stock.

To make the card, I attached a piece of patterned paper to the front of a white card. I attached the stamped image to the card using foam tape and added the sentiment strip over the image, using foam tape only on the edges so it lays flat along the top of the stamped image. I finished the card by adding 2 enamel dots.

Isn’t she just the sweetest?!?!?

This is my favorite adhesive for card making (you can find the refills here.) And I love this glue for adding small embellishments. I always add a dot of glue even if the embellishment has adhesive on it, just to be sure it won’t fall off the card.

What colors will your Hello Sunshine Girl wear? 🙂

Happy Stamping!

Anita

Posted in Cards, Stamping | Tagged , | Leave a comment

Crochet Ridged Baby Blanket

Hi friends,

It seems like I almost always have a crochet baby blanket on my hook – or at least I’m thinking about the next one I will be making. 🙂 There are literally thousands of patterns out there to choose from, and I’ve made a lot of them! Today I want to share a pattern I created. I hope you like it!

Disclosure: Some of the links on my site are affiliate links, meaning, at no additional cost to you, I will earn a small commission if you click through and make a purchase. As an Amazon Associate I earn from qualifying purchases.

The Crochet Ridged Baby Blanket is a simple repeat of double crochet with front post double crochet and back post double crochet stitches to create the “ridges”. I made this blanket using Yarn Bee Soft & Sleek yarn in Earthblossom and an H/5mm hook.

I decide to let the yarn just make whatever pattern it was going to make as I went along. Even though my skeins were all the same dye lot, you can see in the picture below that they didn’t all stitch up the same. But I kinda like the way it turned out! 🙂

Here’s a closer look at the border which is rounds of single crochet in the back loop only. You can find my free pattern below. I’ve also included a link to a free PDF if you’d like to easily print it.

Crochet Ridged Baby Blanket 


Yarn Bee Soft & Sleek in Earthblossom – 5 (4 oz) skeins


H/5mm hook


Stitches used US terms:

Chain – ch

Single Crochet – sc

Foundation Double Crochet – fdc

Double Crochet – dc

Front Post Double Crochet – fpdc

Back Post Double Crochet – bpdc

Slip Stitch – ss

Back Loop Only – blo


Note: ch 2 at beginning of row counts as 1st dc stitch.


Row 1: Work 89 fdc. Turn. (89 stitches)


Row 2: ch 2 (counts as 1st stitch). Skip 1st dc, dc in each stitch across. Turn. (89 stitches)


Row 3: ch 2 (counts as 1st stitch). Skip 1st dc, dc in next 3 stitches. fpdc in next stitch. *dc in next 4 stitches, fpdc in next stitch* Repeat from * to * across to last 4 stitches. dc in last 4 stitches. Turn. (89 stitches)


Row 4: ch 2 (counts as 1st stitch). Skip 1st dc, dc in next 3 stitches. bpdc in next stitch. *dc in next 4 stitches, bpdc in next stitch* Repeat from * to * to last 4 stitches. dc in last 4 stitches. Turn. (89 stitches)


Rows 5-64: Repeat Rows 3 and 4, ending with a repeat of Row 4. 


Row 65: ch 2 (counts as first stitch). dc in each stitch across. (89 stitches)


Do not turn after last row.


Border:


Begin working in Rounds. Do not turn at the end of each round.

 
Round 1: ch 1. sc crochet evenly around, working 3 sc in each corner. Join with ss to first sc.

Do not turn. 


Rounds 2-4: ch 1. sc in blo of each stitch around, working 3 sc in each corner. Join with ss to first sc. 


Fasten off and weave in ends.

Finished size is about 28 by 35 inches.

Here’s the link to the free PDF…

I think this pattern would work up beautifully in a solid color. Or maybe a solid color with a different color border.

What are your favorite colors for baby blankets?

Happy Stitching!

Anita

Posted in Baby, Crochet, Gifts | Tagged , | 4 Comments

Easy and Fun Birthday Cards

Hi friends,

I recently pulled out a few of my Unity Stamp Company stamp sets to make some easy and fun birthday cards. Our children’s pastor at church sends a card to each of our kids for their birthdays – I love that! – and I have the privilege of making the cards for him. It’s so fun!

Disclosure: Some of the links on my site are affiliate links, meaning, at no additional cost to you, I will earn a small commission if you click through and make a purchase. As an Amazon Associate I earn from qualifying purchases.

This card is made with the Cuddlebug Bunny set. Isn’t she adorable?!? I stamped her with Memento Tuxedo Black Ink on white card stock and colored her with Copic markers. Then I die cut my image with the Pinkfresh Studio Diagonal Stitched Square die. The sentiment is stamped with red ink on white card stock and punched with an oval punch (similar to this). I inked the edges of the oval with red ink. I attached a piece of patterned paper to a white card and then attached both the bunny image and the sentiment to the card using foam tape, overlapping the corner of the bunny image with the sentiment.

I made this next card in 2 different color combos. The set is called So Glad You Were Born. It’s a fun set with lots of birthday sentiments to choose from. I stamped the birthday cake image with Memento Tuxedo Black Ink on white card stock and colored them with Copic markers. I stamped the sentiment with black ink above the birthday cake. I used these Stitched Mini Slim Stacklet dies from Taylored Expressions to die cut the image and the mat layered behind the image. I attached a piece of patterned paper (these papers both came from Unity Stamp Company) to a white card. I attached the stamped image to the card with foam tape.

I also made this last card in 2 different color combos. This set is called Sweet Sprinkled Donut. Isn’t it fun!?! I stamped the donut image with Memento Tuxedo Black Ink and colored it with Copic markers. I die cut the image using dies similar to these and inked the edges with ink to match my color scheme. I stamped the sentiment with the matching ink, punched it with an older discontinued Stampin’ Up punch (this is similar), and inked the edges. I attached a piece of patterned paper to a white card and attached the stamped images with foam tape, overlapping the corner of the donut image with the sentiment. I finished the card by adding 3 sequins.

I love these larger stamps from Unity Stamp Company! They make it so easy and fun to make a quick card that still looks great – and you can make several in a short amount of time.

Which one is your favorite? 🙂

Happy Stamping!

Anita

Posted in Cards, Stamping | Tagged , | Leave a comment

Sheet Pan Oatmeal Butterscotch Bars

Hi friends,

Sometimes you just want a cookie! Bar cookies are the best thing ever to quickly satisfy your craving…you just mix up your cookie dough, spread in the pan, and bake. I like that your entire batch of cookies is finished at one time – I usually clean up my mess while the cookies are baking so that when the oven timer goes off the only thing left to clean is the pan the cookies are in. 🙂

Disclosure: Some of the links on my site are affiliate links, meaning, at no additional cost to you, I will earn a small commission if you click through and make a purchase. As an Amazon Associate I earn from qualifying purchases.

I found this yummy recipe for Sheet Pan Oatmeal Butterscotch Bars here at Six Sisters’ Stuff. The recipe is super quick and easy and it makes a ton of cookies – plenty to share! You probably have most everything you need right in your kitchen.

If you haven’t checked out Six Sisters’ Stuff, you should! Tons of tasty recipes and so much more!

Here’s my sheet pan ready to go into the oven…

Browned and cooling…You should smell my kitchen! 😋

I love butterscotch and oatmeal together! These Sheet Pan Oatmeal Butterscotch Bars are so yummy. You can pop them in the microwave for a few seconds a couple of days after you’ve baked them to have warm cookies – just like fresh out of the oven!

I wonder how these would be with chocolate chips? I may have to try that next time…🤔

Happy Baking!

Anita

Posted in Recipes | Tagged | Leave a comment

Americana USA Wood Blocks

Hi friends,

Last year I made these cute Americana Wood Blocks to add to my patriotic decor. I thought it would be fun to add some USA blocks this year. They are super quick and easy to make!

Disclosure: Some of the links on my site are affiliate links, meaning, at no additional cost to you, I will earn a small commission if you click through and make a purchase. As an Amazon Associate I earn from qualifying purchases.

Here’s what you’ll need…

Apply 2 coats of paint to your blocks – one block each of red, white, and blue – letting the paint dry between coats. Paint your “U” white, your “S” blue, and your “A” red. Once the paint is dry, dry brush your blocks and letters with brown paint to give them a vintage look.

Using E600 clear adhesive or another strong glue, glue your letters to the blocks – the “U” to the red block, the “S” to the white block, and the “A” to the blue block.

Next I glued my blocks together, slightly offsetting them. This step is totally optional – you may not want to glue them together. 🙂 You can either stack them like I did or put them side by side.

I added them to my tired tray along with my other fun patriotic decor. 🇺🇸

If you are interested, you can find the info for my Chunky Polka Dot Wood Stars here, my Mini Patriotic Rolling Pins here, and my Patriotic Mini Pallet here.

Happy Crafting!

Anita

Posted in Decor, Summer, Vintage | Tagged , , | Leave a comment

Mini USA Sign

Hi friends,

Need a little something extra to add to your 4th of July decor or to spruce up your picnic table for your backyard BBQ? This Mini USA Sign is super easy to make! It measures 5 by 6 inches so it’s the perfect size to tuck anywhere you want to. 🇺🇸

Disclosure: Some of the links on my site are affiliate links, meaning, at no additional cost to you, I will earn a small commission if you click through and make a purchase. As an Amazon Associate I earn from qualifying purchases.

You’ll need a thin wood rectangle (I found these at Hobby Lobby), 1.75 inch letters (these are what I used), red, white, and blue acrylic paints, a napkin printed with a patriotic design (I found mine at Dollar Tree), and some Mod Podge. You may also want some ribbon if you want to add a simple bow to the top of your sign.

The first thing you’ll need to do is to separate the very top printed layer of the napkin from the layers below it. You want to make sure that you only have one layer of the paper napkin.

I painted my rectangle with 2 coats of white paint using a foam brush, letting it dry between coats. I painted both the front and the back to give it a more finished look. Then I brushed a thin layer of Mod Podge with a foam brush onto the rectangle and carefully smoothed the napkin over the top. You’ll need to be gentle so the napkin doesn’t tear. There will be some small wrinkles, but I like the texture it adds. If you’d rather have a smooth surface, I’d suggest using scrapbook paper since it is thicker than a napkin. Let it dry for a few minutes and then trim the excess napkin from around the rectangle using sharp scissors (these are my favorite). Apply another thin layer of Mod Podge over the top.

While the Mod Podge is drying, paint your letters with 2 coats of paint. Attach your letters using a strong glue – I used E600 clear adhesive. I used red, white, and blue ribbon to make a small bow using the super easy Re-Fabbed bow method.

Here’s my finished Mini USA Sign! 😊

Super fun and easy to make! It will add a little patriotic touch wherever you decide to put it. 🇺🇸

Happy Crafting!

Anita

Posted in Decor, Summer | Tagged , | 2 Comments

Chunky Polka Dot Wood Stars

Hi friends,

I promised in this post that I would be sharing all the info on my Chunky Polka Dot Wood Stars…you can find the details on these fun stars below!

Disclosure: Some of the links on my site are affiliate links, meaning, at no additional cost to you, I will earn a small commission if you click through and make a purchase. As an Amazon Associate I earn from qualifying purchases.

I found my chunky wood stars in the craft section at Dollar Tree. The stars measure about 4.5 by 4.5 inches and are 3/4 inch thick. Dollar Tree has really stepped up their craft section – but if you see something you think you might want to use in future projects be sure and snap it up because things go fast!

You’ll need red, white, and blue acrylic paint (this is a great set), a paint brush, and a 3/4″ (or smaller) spouncer for making your polka dots. I like this set of spouncers because it has several different sizes to use on all your polka dot projects.

I removed the twine hanger from my stars and painted one star blue and one red. I used a chip brush to apply my paint, but a foam brush would work, too. I painted the stars with 2 coats, letting it dry completely between coats.

Then using my spouncer, I randomly applied polka dots with white paint. I did this on both sides of my star because they will be used on my tiered tray. If you want to hang them, you can tie the twine hanger back on. I just made sure that the hole is at the bottom of the star on my tray so it’s not so noticeable. You could also cover up the hole by tying the twine (or a ribbon) into a bow and glueing it onto the star.

Here they are on my tiered tray. I love how they turned out! 🇺🇸

The details on my Americana Wood Blocks is here. The info for my Mini Patriotic Rolling Pins is in this post and you can find my post about the Patriotic Mini Pallet here.

Decorating my tiered tray for July 4th has been so fun! What will you put on your tray?

Happy Crafting!

Anita

Posted in Decor, Summer | Tagged | 4 Comments