Handmade Fall Earrings

Hi friends,

It finally feels like Fall in Alabama! 🍁🍂 So that means new earrings! 😉

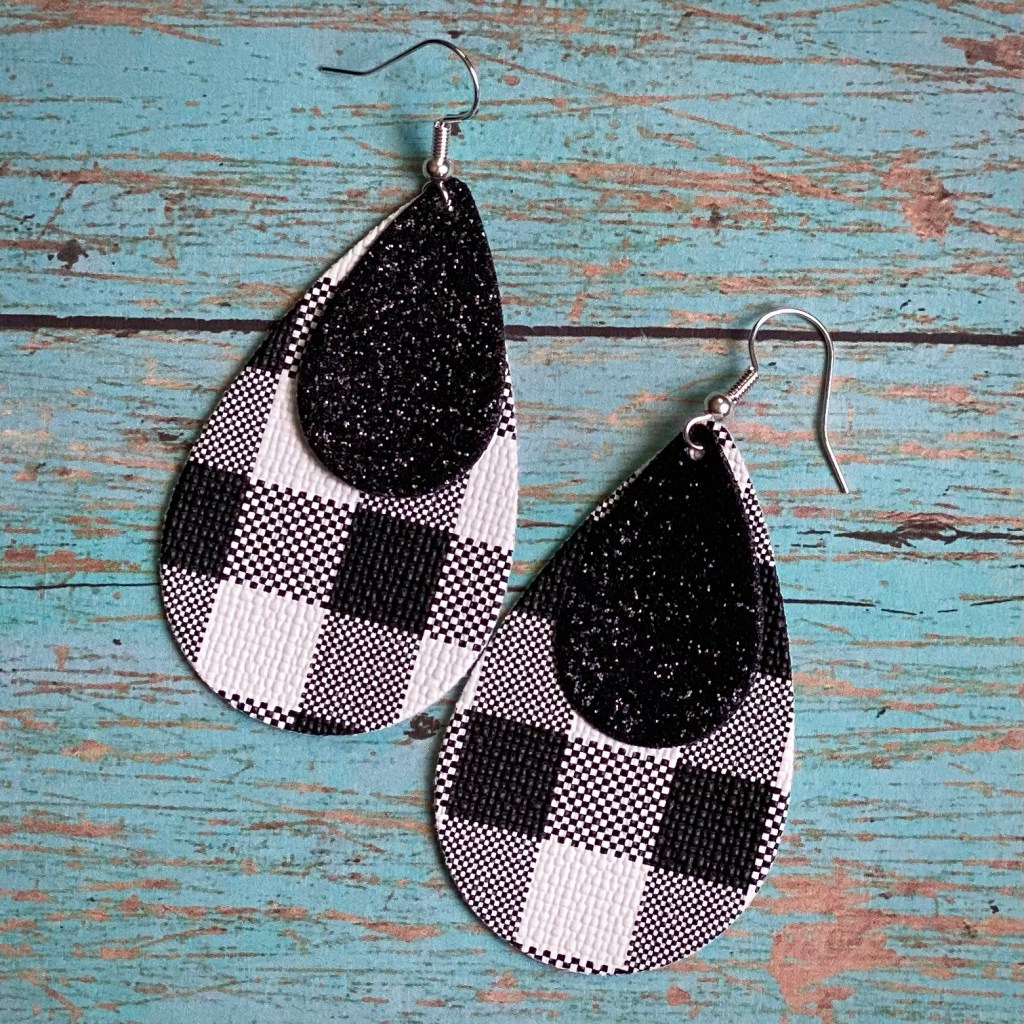
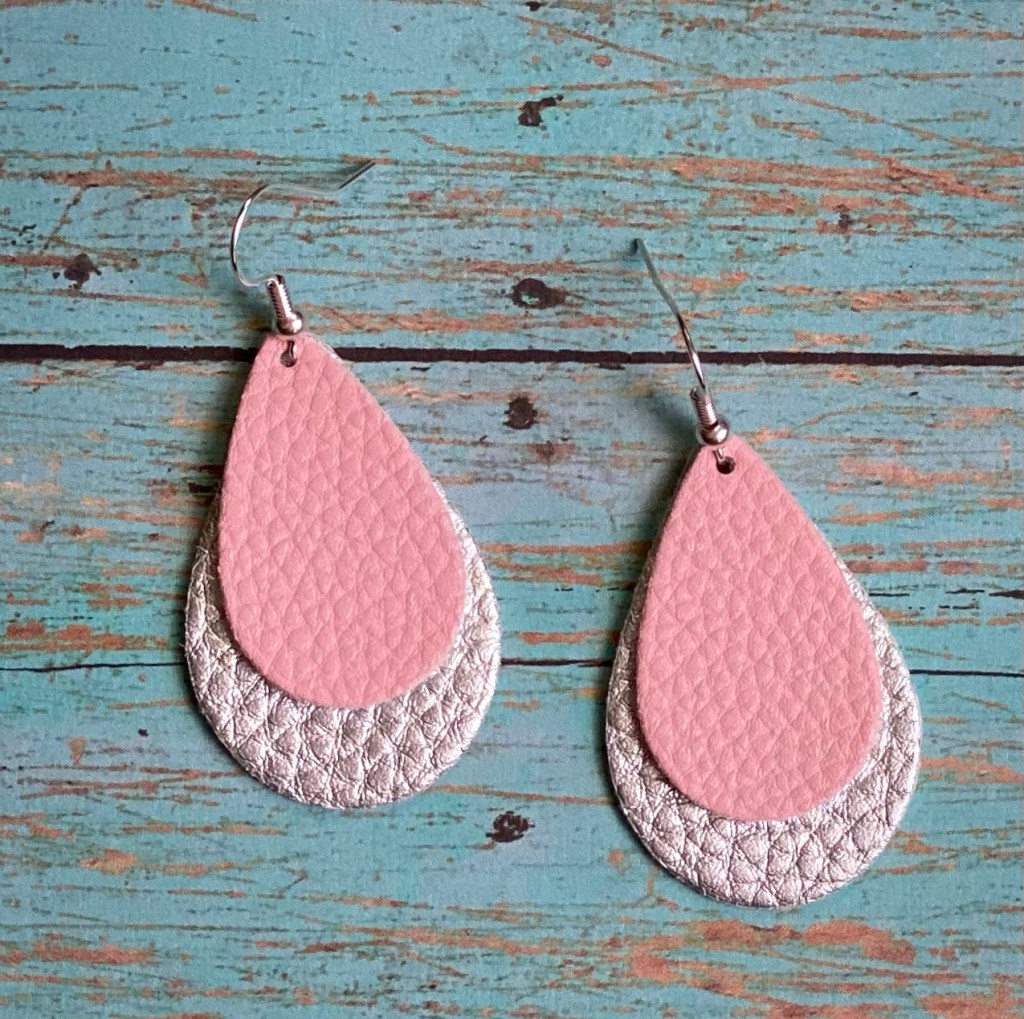
I love making these faux leather earrings. They come together so quickly and it’s so easy to make them to match every outfit in your closet. They are very lightweight – you won’t even remember that you are wearing them!

Disclosure: Some of the links on my site are affiliate links, meaning, at no additional cost to you, I will earn a small commission if you click through and make a purchase. As an Amazon Associate I earn from qualifying purchases.

I found all of my fun die shapes at Taylored Expressions. They have a line of earring dies called Designer Dangles that includes at least 17 different sets of dies for endless possibilities in designing your own earrings. They also carry several sets of faux leather sheets in lots of different patterns and solid colors.

Here are a few new pairs of earrings I made.

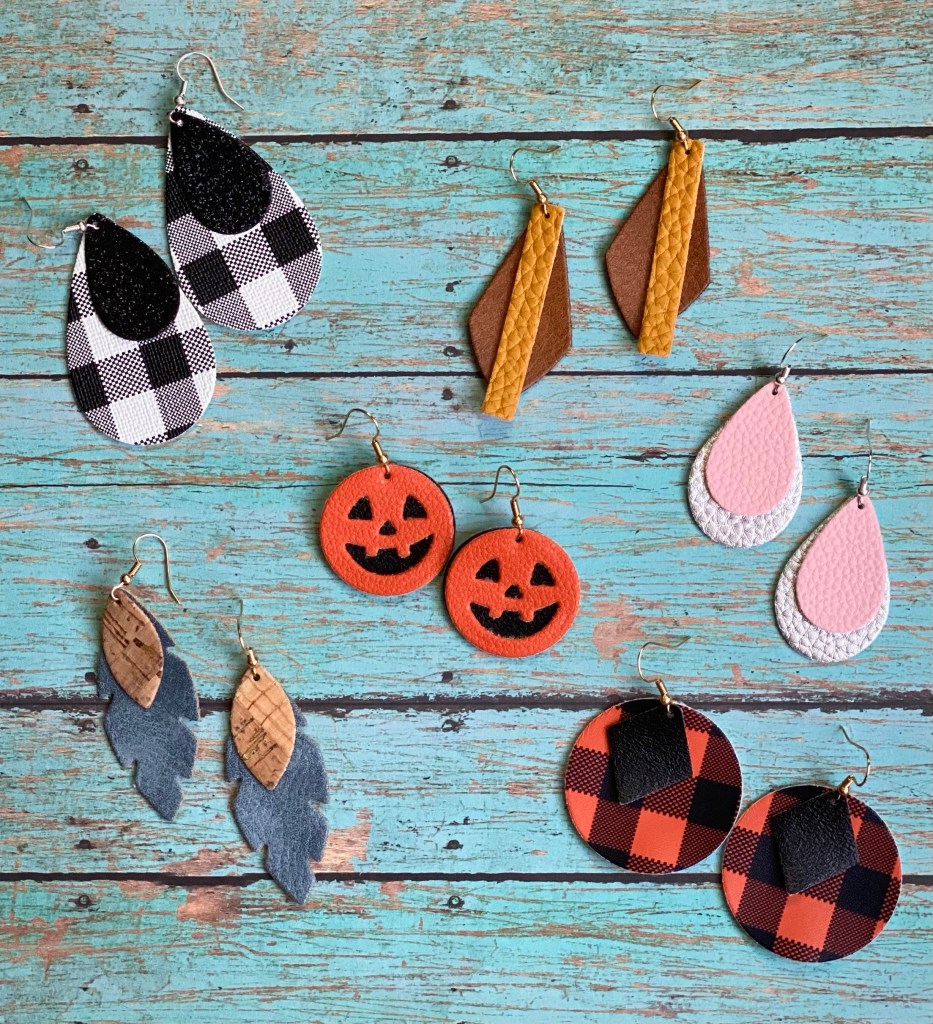
You can see each pair a little closer in the photos below.

You’ll need some earring wires to make your earrings. This is a great set of both silver and gold color fishhook earring wires – and it also includes silicone earring backs. This looks like a great little die cutting machine if you are interested in one. It cuts and embosses up to 6-inches wide and can also be used for paper crafting and card making.

If you want some more inspiration, you can see my Summer Faux Leather Earrings in this post and a little Faux Leather Handmade Jewelry here.

Earrings make great gifts and stocking stuffers! Christmas will be here before we know it, but you still have plenty of time to make lots of earrings!

Happy Crafting!

Anita

Posted in Fall, Gifts, Jewelry | Tagged , , | Leave a comment

Candy Corn Crochet Patterns

Hi friends,

I love Candy Corn! Yes, I said it! 🙂 I know it’s a love or hate kind of thing – there doesn’t seem to be an in-between. And Candy Corn along with dry roasted peanuts tastes just like a Payday candy bar! 😋

Disclosure: Some of the links on my site are affiliate links, meaning, at no additional cost to you, I will earn a small commission if you click through and make a purchase. As an Amazon Associate I earn from qualifying purchases.

In case you missed any of my patterns, I’ve put links to all of my Candy Corn Crochet patterns into one post. And they are all free!

If you are in need of some new crochet hooks to make all these fun patterns, this is a great set.

First up are my Candy Corn Coasters. You can find the pattern here.

This is a fun Candy Corn Dishcloth. The pattern is here.

Here’s a Candy Corn Cozy – and it’s adjustable because you can button it around any can or bottle. The pattern is here.

And a more traditional Candy Corn Can Cozy. You can find the pattern here.

Since we are all carrying hand sanitizer these days, here’s a cute Candy Corn Hand Sanitizer Holder. This quick pattern is here.

This Mini Candy Corn Treat Bag is perfect to give Halloween treats to those special little ones since traditional trick or treating probably won’t be a thing this year. You can find the pattern here.

I hope you enjoy these patterns!

Happy Fall!

Anita

Posted in Crochet, Fall | Tagged , | 1 Comment

Little Wood Acorns for Fall Decor

Hi friends,

I’m always looking for fun new Fall decorating ideas – just ask my husband how many pumpkins are scattered around our house right now! 😉

I found this package of 16 little wood acorns in the seasonal section at Hobby Lobby and thought they could make a fun addition to all of my pumpkins.

Disclosure: Some of the links on my site are affiliate links, meaning, at no additional cost to you, I will earn a small commission if you click through and make a purchase. As an Amazon Associate I earn from qualifying purchases.

I pulled out my acrylic paints in dark brown, orange, light blue, and cream (here’s a great set of paints to add to your craft room). I painted the bottom part of the acorns with 2 coats of either dark brown, orange, or light blue. Then I painted the tops with 2 coats of cream.

After the paint was dry, I brushed on some antique wax and immediately wiped the excess off with a paper towel. And here’s how they turned out…

I love them! They are perfect to add a little extra to my Fall decor. They would look so cute scattered on the Thanksgiving table, in a basket with pumpkins, or on a tired tray.

I don’t have a tiered tray, but I kind of made a small own of my own. 🙂 I picked up this galvanized cake stand at Hobby Lobby along with a galvanized charger to put under it. It gives me 2 levels for decor and since it’s not too big, it fits perfectly on my kitchen island. I’m still adding things to it for the season, but I love the acorns on it!

If you’d like the details on my Farmhouse Buffalo Plaid Pumpkin Plaque, you can find them in this post.

Happy Fall!

Anita

Posted in Decor, Fall, Uncategorized | Tagged , | 2 Comments

Mini Crochet Candy Corn Treat Bag

Hi friends,

I turned my Crochet Mini Gift Bag into a Mini Candy Corn Treat Bag! It’s the same pattern, just a change in the colors. It’s the perfect size to fill with Halloween or Fall treats – especially this year for the little ones who may not get to go Trick or Treating. 🎃

Disclosure: Some of the links on my site are affiliate links, meaning, at no additional cost to you, I will earn a small commission if you click through and make a purchase. As an Amazon Associate I earn from qualifying purchases.

Here’s the pattern…

Mini Crochet Candy Corn Treat Bag

Finished Gift Bag measures approximately 4.25 by 4.25 inches plus the handle

Worsted weight yarn in yellow, orange, and white (I used I Love This Cotton in Curry, Glowing, and White)

H/5mm hook

Stitches used US terms:

Chain – ch

Single Crochet – sc

Slip Stitch – ss

Back Loop Only – blo

Double Crochet – dc

Front Post Double Crochet – fpdc

Round 1: With yellow, ch 11. sc in 2nd ch from hook and in next 8 ch. Work 3 sc in last ch. Working in the other side of beginning ch, sc in next 9 stitches. Work 3 sc in last stitch. Join with ss to first sc. (24 stitches)

Round 2: ch 1. sc in same stitch as ss and next 9 stitches. Work 3 stitches in next stitch. sc in next 11 stitches. Work 3 sc in next stitch. sc in next stitch. Join with ss to 1st sc. (28 stitches)

Round 3: ch 1. Working in blo, sc in same stitch as ss and in each stitch around. Join with ss to first sc. (28 stitches)

Rounds 4-5: ch 2. Working in both loops, dc in same stitch as ss and in each stitch around. Join with ss to first dc. (28 stitches)

Change to orange.

Rounds 6-9: ch 2. dc in same stitch as ss. *fpdc in next stitch, dc in next stitch* Repeat from *to* around to last stitch, fpdc in last stitch. Join with ss to first dc. (28 stitches)

Round 10: ch 2. dc in same stitch as ss and in each stitch around. Join with ss to first dc. (28 stitches)

Change to white.

Round 11: ch 1. sc in same stitch as ss and in each stitch around. Join with ss to first sc. (28 stitches)

The next round will make the handles to the treat bag.

Round 12: ch 1. sc in same stitch as ss and in next 3 stitches. ch 20. Skip next 4 stitches. sc in next 10 stitches. ch 20. Skip next 4 stitches. sc in next 6 stitches. Join with ss to first sc. (2 sections of 10 sc each and 2 sections of 20 ch each)

Round 13: ch 1. sc in same stitch as ss and in next 3 stitches. sc in each of the 20 ch. sc in next 10 stitches. sc in each of the 20 ch. sc in next 6 stitches. Join with ss to first sc. (60 sc stitches)

Fasten off and weave in ends. 

Here’s a link to the free PDF for easy printing…

Need some new crochet hooks? This is a nice set – I have a couple of these hooks and really like them!

Happy Fall! 🎃🍁🍂

Anita

Posted in Crochet, Fall, Gifts | Tagged , , | 10 Comments

Jack-O-Lantern Door Hanger

Hi friends,

Looking for a quick and easy Halloween craft project? I have a fun Jack-O-Lantern Door Hanger for you today. 🎃

My pumpkin cutout came from Dollar Tree. It measures about 12-inches wide by 10-inches tall including the stem. The Jack-O-Lantern face pieces came from the Dollar Spot section at Target and were already painted black. 🙂

Disclosure: Some of the links on my site are affiliate links, meaning, at no additional cost to you, I will earn a small commission if you click through and make a purchase. As an Amazon Associate I earn from qualifying purchases.

You’ll need some orange, green and brown acrylic paint (here’s a great set if you need paints). I added some raffia to my Jack-O-Lantern so you’ll need a bit of that, too.

Using a foam brush, I painted 2 coats of orange paint on both sides and the edge of my pumpkin and green on the stem. Painting the back is optional depending on where you plan to hang your Jack-O-Lantern. I like to paint both sides to give it a more finished look.

After the paint was completely dry, I dry brushed some brown paint over the entire pumpkin and stem. (I used a chip brush with the bristles trimmed shorter for dry brushing.) I hot glued the Jack-O-Lantern face pieces to the pumpkin. Then I cut some raffia, tied it with natural jute twine in the center, and hot glued it to the pumpkin near the stem.

The pumpkin came with twine tied through the hole at the top for hanging. But if you accidentally cut it (like I did 🙄) while cutting off the tag, just tie on another piece of twine. 😉

I think he turned out so cute! 🎃

If you can’t find the Jack-O-Lantern face pieces, you could always paint a face onto your pumpkin or cut pieces from felt and glue them on.

Happy Halloween Crafting! 🎃

Anita

Posted in Decor, Fall | Tagged , | 4 Comments

End of Summer Beach Trip

Hi friends,

I wrote this post before hurricane Sally hit the gulf coast. My prayers are with all who have been affected by the storm.

We took an end of Summer trip to the gulf coast to celebrate my birthday…we were supposed to go to Scotland, but…Covid…so hopefully next year! I’m very thankful we were able to take this trip and relax while listening to the waves. Not much better than that in my book! Although I am willing to give Scotland a try! 😉

Disclosure: Some of the links on my site are affiliate links, meaning, at no additional cost to you, I will earn a small commission if you click through and make a purchase. As an Amazon Associate I earn from qualifying purchases.

We like to stay in Destin, Fl in the Florida panhandle. There are beautiful white sand beaches and the water colors range from a beautiful blue to a gorgeous emerald green. They call it the Emerald Coast and it certainly lives up to its name – even when storms are rolling in!

There was a beautiful full moon while we were there with amazing clouds surrounding it.

And of course sunset over the water is always incredible!

I hope you enjoyed a peek of our week at the beach. We really didn’t do much besides walking and relaxing on the beach! It was truly a great way to end the Summer. 🙂

Anita

Posted in Travel | Leave a comment

Buffalo Plaid Ribbon Tassel Necklace

Hi friends,

I’ve seen a lot of Ribbon Tassel Necklaces on Pinterest and thought it would be fun to make my own. I went “shopping” in my craft room to see what supplies I already had that I could use.

So here’s my version of a Buffalo Plaid Ribbon Tassel Necklace…

Disclosure: Some of the links on my site are affiliate links, meaning, at no additional cost to you, I will earn a small commission if you click through and make a purchase. As an Amazon Associate I earn from qualifying purchases.

You’ll need ribbon – I used 4 different ribbons. A split key ring – mine measures just over an inch in diameter. A small jump ring (this set has a variety of sizes) and a necklace chain that will fit through your jump ring. My chain was a premade one measuring about 30 inches that I had picked up at Michael’s. You can also buy chain in bulk on a spool, cut it to your desired length, and add your own jewelry findings to the ends to make your necklace chain.

I cut 2 pieces of the buffalo plaid ribbon, 2 of the black ribbon, and one each of the 2 different white ribbons for a total of 6 ribbons. Each piece measured about 12 inches long. I folded the ribbons in half and slipped the loop through my split key ring. Then I pulled the ends of the ribbon through the loop and pulled it tight.

Next, I attached the jump ring to the split key ring. You could also slide this onto the key ring before you tie the ribbon on – I realized I could do that after I already had my ribbon tied on. 🤦‍♀️

Then simply thread the necklace chain through the jump ring. Finally, trim the ends of your ribbon to your desired length. Super easy to make and so cute!

I made sure the the knot from my ribbons covered up the “split” part of my key ring – you can easily slide the tassel around the ring if you need to.

The sky is the limit when it comes to make these fun necklaces! You can use any ribbons in any colors. You can also use different size key rings and necklace chains. The key rings and chains also come in different colors and finishes – I just found these colorful rings on Amazon and they have the jump ring already attached! And here are some black ones! I need to go shopping. 🙂

Are you thinking of Christmas yet? These would make great gifts! Don’t forget to pin this post to your favorite Pinterest board using the button below so you’ll have it handy when you want to make some of these fun Ribbon Tassel Necklaces.

Happy Crafting!

Anita

Posted in Gifts, Jewelry | Tagged , | 4 Comments

Dollar Tree Christmas Craft Supplies are in the store!

Hi friends,

Dollar Tree is beginning to fill the aisles with Christmas craft supplies! I picked up a few things and I don’t even know what I will do with them yet. 😉

If you think you might want to do some Dollar Tree Christmas crafting, you’ll want to stop by your local store soon and stock up. You know they will sell out quickly!

Disclosure: Some of the links on my site are affiliate links, meaning, at no additional cost to you, I will earn a small commission if you click through and make a purchase. As an Amazon Associate I earn from qualifying purchases.

Here is what I picked up. The wood shapes in this picture are roughly 10-12 inches in size. How could I pass them up??

Each of these packages included 5 ornaments and the words Peace, Joy, and Believe are metal!

There was a lot more that I didn’t get and they were still unboxing Fall things so I suspect there might be more Christmas coming. But don’t wait! Because if you don’t get it when you see it, it will be gone!!

Stay tuned to the blog over the next few weeks to see what I do with some of this. 🎄

What will you make?

Anita

Posted in Christmas, Decor, Uncategorized | Tagged , | Leave a comment

Flower Thank You Card

Hi friends,

I have a simple and quick thank you card to share with you today. It comes together quickly using the Mother’s Day Daisies stamp set from Unity Stamp Company. The simple flower image is quick to color, and with a few extras, it makes a cute card.

Disclosure: Some of the links on my site are affiliate links, meaning, at no additional cost to you, I will earn a small commission if you click through and make a purchase. As an Amazon Associate I earn from qualifying purchases.

I stamped the image with Memento Rich Cocoa ink on white card stock, colored it with Copic markers, trimmed the image, and layered it to pink card stock.

I stamped “thank you” with the Rich Cocoa ink on white card stock, punched it with an oval punch (similar to this one), and layered it to a scalloped oval punched from green card stock (here’s a similar punch – it’s a little larger than the one I used). The sentiment is also from Unity Stamp Company, but I’m not sure what set it is from. I got it in one of their fabulous grab bags that they make available every now and then.

To make the card, I attached a pink ribbon to a panel of patterned paper and then attached the panel to a white card. I attached the stamped flower image to the card and then attached the sentiment to the card with foam tape. I finished the card off with 3 green sequins in the bottom left corner of the card. I used my Tombow Dots tape runner to adhere the paper layers together and Art Institute Glitter Glue to attach the sequins.

I chose to make this a thank you card, but by changing the sentiment it would also make a great birthday or thinking of you card. And, of course, the color scheme can be changed to any color combination.

Happy Stamping!

Anita

Posted in Cards, Stamping | Tagged , | 1 Comment

Crochet Jack-O-Lantern Tote Bag

Hi friends,

I shared this Crochet Snowman Tote Bag from Repeat Crafter Me that I stitched up a few weeks ago. In that post, I mentioned that she has several other tote bag patterns. And this cute Jack-O-Lantern is one of them! 🎃

It works up really quickly using 2 strands of yarn. I used Yarn Bee Soft & Sleek in Pumpkin Spice to stitch up my tote. I made his face using Red Heart Super Saver in Black because that’s what I had on hand. 😊

Disclosure: Some of the links on my site are affiliate links, meaning, at no additional cost to you, I will earn a small commission if you click through and make a purchase. As an Amazon Associate I earn from qualifying purchases.

You can find the free pattern from Repeat Crafter Me here. I added 3 extra rounds before I started the round to make the handles (so 36 rounds before starting the handles.)

I used a J/6mm hook (the pattern calls for an I/5.5mm hook). My finished tote measures about 10.5 inches wide by 14 inches tall including the handles. A great size for little ones to carry while Trick or Treating – if we get to do that this year!! Or it would be fun to use in your Fall decor in your home.

Happy Stitching! 🎃

Anita

Posted in Crochet, Fall, Gifts | Tagged , , | 3 Comments