Crochet Gift Bag

Our family is at the age where gift cards or cash are on everyone’s wish list. I like to be a little creative when giving them – the little envelope from the store just won’t do!!

I found the pattern for this cute gift bag here on Ravelry at Maki Crochet. It’s really fun and easy to make. You can easily adjust the size by the number of beginning chains and the number of rows you crochet.

img_9820

I used I Love This Yarn in mid green and Red Heart Super Saver Yarn in white and burgundy. I crocheted the bag with a G/4mm hook. For this bag I began by chaining 40. I crocheted the first 2 rows with green and then alternated white and burgundy for the next 11 rows, ending the pattern with white. The next 2 rows are done in white with the final row crocheted in green. I chained 80 to make the drawstring. The drawstring is woven through the first row of double crochet to cinch the bag closed.

img_9821

This finished bag measures about 5-1/2 by 6-1/2 inches (but you can make it any size you want 😊). Plenty of room for a gift card and some yummy sweets!

Thanks for stopping by,

Anita

Posted in Christmas, Crochet, Gifts | 2 Comments

Christmas Deco Mesh Wreath

Are you looking for a new Christmas wreath for your front door? This is such a fun and easy wreath to make – and it will only take a couple of hours from start to finish!

Here’s what you’ll need:

  • 5.5-inch wide deco mesh in your choice of colors (I chose lime green, red, and red/green combo)
  • Wire wreath form – this one is a 16inch form
  • Chenille stems to match your deco mesh
  • Some type of accent pieces like my glittery greenery stems with red ornaments
  • Wire cutters
  • You may also need thin wire or hot glue for attaching your accent pieces

You will need to cut 9-inch lengths of the deco mesh. I just measured and cut them with my scissors. There are 8 sections to the frame and I twisted 4 chenille stems around each section. Each chenille stem will hold 3 pieces of the deco mesh so I cut 32 pieces of each color.

I twisted the chenille stems around the wreath frame, alternating them by twisting around the 2 outer rings and then the 2 inner rings. Here’s a close up of  one of the sections of the frame.

img_9867

Be sure to twist them tight so they don’t slide easily on the frame. Here’s the wreath frame with all of the chenille stems twisted on.

Take a piece of the deco mesh and roll it up. I folded my ends to the center and then just folded it over so the ends were on the inside. Roll and stack 2 more pieces on top of your first one. Don’t worry about trying to make it perfect – it will look great once you are completely finished! Then place your stack of 3 pieces on the center of one of the chenille stems and twist the stems tightly several times to secure the mesh to the wreath.

Here’s a picture of one section of the wreath with mesh attached to each chenille stem.

I alternated my 3 colors of mesh in each little stack as I went around my wreath. After you have attached all the mesh, cut the chenille stems with wire cutters. Be careful to not cut too close – you don’t want them untwist!! Then just bend the ends of the stems down. Fluff up the deco mesh sections if you need to.

Attach your accent pieces using hot glue or wire – my glittery greenery stems had wire in them so I just wrapped that around the wreath frame and added a dab of hot glue to keep them in place.

And here it is all finished! 

It measures about 22 inches across – such a pretty way to greet your friends and family over the Christmas season!

Thanks for stopping by,

Anita

Posted in Christmas, Decor, Uncategorized | Leave a comment

Farmhouse-Style Tabletop Christmas Trees

It’s the day after Thanksgiving – the official start of the Christmas season! If you’re like me and not into all the crazy shopping today, this would be a great day to spend crafting…

I love farmhouse/vintage decor! The Christmas season is a perfect time to craft a little something farmhouse-y. 😉

These sweet little trees are so easy to make and will add the perfect touch to your table or shelf. All you need are some styrofoam cones (I got my little ones at the dollar store and the larger one at Hobby Lobby), some chunky yarn (I used Bernat Blanket Yarn in Vintage White), craft glue, and something for the tree topper. I used kraft card stock to make stars to top my trees.

img_9822

To make the trees, begin by putting a thin layer of glue on the top of the cone. Attach the end of the yarn in the center of the top and make a little coil until the top is covered. Add a little more glue on the sides and continue wrapping the yarn around the cone until you get near the bottom, no need to add glue to the entire cone. I added more glue before I wrapped the last couple of rows. Then just cut the yarn making sure to glue the end securely.

To make my stars, I used my star dies and cut 2 stars from kraft card stock for each tree. I glued them together with a toothpick sandwiched between them. Then I added a button to the center of each star. Once they were dry, I pushed the toothpick into the top of the tree. 

img_9823

I used this same soft, chunky yarn to make the wreath below – you can find the details on how to make it here. These trees look so great with it! (It really is the same yarn, just different lighting in the photos 😊)

And here are my completed Farmhouse-Style Christmas Trees! I love how they turned out!

This would be a fun craft to make with the kids! The styrofoam cones come in so many different sizes – you could make a whole forest! 😊

Thanks for stopping by,

Anita

Posted in Christmas, Decor, Gifts | Leave a comment

Happy Thanksgiving

It’s Thanksgiving in the USA today. Take a moment and be grateful for all your blessings.

Thankful for you!

Anita

Posted in Fall | Leave a comment

Cuddly Crochet Christmas Tree

This is another super cute pattern from Sarah at Repeat Crafter Me! It is the same basic pattern I used to make her sweet Candy Corn in this post

I used I Love This Yarn in Mid Green to make the tree. I used worsted weight yarn from my stash in yellow and brown for the star and the legs. I’m not sure what brand they are – they were leftovers from previous projects and the labels have long since disappeared. 😊  The eyes are 12mm safety eyes that I purchased from Amazon.

Sarah attached little Christmas lights to her tree and it looks so cute! I opted to leave them off for safety reasons due to little hands.

This cute Christmas Tree is sure to bring lots of cuddles! 🎄

Thanks for stopping by,

Anita

Posted in Christmas, Crochet, Gifts | 1 Comment

Crochet Adult Beanies

A few months ago my sister liked this beanie I made for a friend and said that maybe she would even wear one like it – she’s not much of hat person. 😊 I asked her what color she would like. She wasn’t sure and then promptly forgot she even mentioned it… 

About a month or so ago, I decided to make her not one beanie but two! She is a die-hard Purdue fan and goes to all the home games – which can get downright cold at times in Indiana!! So the first one is made with Red Heart Super Saver yarn in black and gold. Boiler Up!

And because I knew she wouldn’t want to wear that one all the time, I made her another beanie with Caron Simply Soft yarn in grey heather and white.

You can find the pattern for the beanie here. The beanie pattern includes instructions for newborn through adult sizes. I changed the last 2 rows to give it more of a ribbed pattern.  I crocheted 13 rows beginning with 2 rows of my starting color (gold or grey) and then alternating colors every row. After the 13 rows, I added 2 more rows of my starting color alternating the Front Post Double Crochet (fpdc) stitch with a regular Double Crochet stitch all the way around. The link to the pattern for the flower is in this Crochet Cloche Hat post – which is also a very cute hat!

You can change the flower out for a bow like I did on these baby beanies or leave it off completely for a boy’s hat. Or make them in a solid color instead of stripes.

These beanies work up very quickly. They would make great Christmas gifts! 🎄

Thanks for stopping by,

Anita

Posted in Crochet, Gifts | 2 Comments

Quick Fall Favor Box

Today I’m sharing a Quick Fall Favor that you can add to your Thanksgiving table or any other gathering you have coming up. It’s a little box that perfectly holds 4 Hershey Nuggets.

Each little box is made from a 6 x 6 inch piece of double-sided card stock, including wrapping the 4 nuggets. I found the tutorial here at The Paper Pixie.

Here is the box filled with the sweet nuggets…

After filling each box, I tied it with orange twine. I added a tag I stamped on kraft card stock. I used brown ink and an older stamp from Amuse Studios, trimmed it into a banner shape, and punched a hole to thread the twine through. Any sentiment stamp you have will work…blessings, for you, happy thanksgiving…just use what you have.

img_9788

We had some friends over for dinner a few weeks ago and I put one of these cute favors at each place setting. (If you are interested, you can find the link to the fun crochet pumpkin coasters in this post.)

These fun favor boxes are so quick and easy to make! Change the colors and sentiment and they would be great for any occasion…Christmas, birthday, Easter, baby or wedding showers…just about anything!

Thanks for stopping by,

Anita


Posted in Fall, Gifts, Stamping | Leave a comment

Caramel Apple Poke Cake

Caramel Apple just shouts Fall to me!! The flavors go so well together and just seem, well…Fallish! 🍎🍁🍂 🙂

This is an easy, tasty cake full of Caramel Apple flavor for all of your Fall gatherings. You can find the recipe here at Frugal Coupon Living.

This is how it looks after the cake is baked and the apple pie filling is spread on top…oh, and it has sweetened condensed milk poured over the warm cake!! This is not for the faint of heart! 😉

img_9743

The recipe calls for a tub of caramel frosting – I wasn’t able to find it anywhere!! So I used this recipe from Two Sisters to make my own from scratch. Super easy to make and so good!! Here is the cake after I frosted it.

And just look how yummy this is…

Just so you know, this cake needs time in the fridge so you’ll want to make it ahead. I made mine the day before I wanted to serve it so it would have plenty of chilling time.

Happy Fall Baking!

Anita

Posted in Recipes | Leave a comment

Give Thanks

Thanksgiving is just around the corner! 🦃 Here’s a card filled with Fall colors to say how thankful you are for all the wonderful people in your life.

The larger leaf stamps are from the Simply Stamped Leaves set by Taylored Expressions. (There is also a die set for the leaves you can find here.) The smaller leaf is one I’ve had in my collection for a long time and it didn’t have the company name on it. I stamped the leaves randomly on white card stock with brown, pumpkin, and gold ink. Then I lightly sponged the edges of the panel with brown ink. I layered the panel to brown card stock and attached the panel to a gold card.

I stamped the acorns from the Acorny Thank You set from Stampin’ Up with brown and pumpkin ink on white card stock and used the acorn builder punch to punch them out. They are attached to a circle of orange card stock – the top one is attached with foam tape. The entire circle is attached to the card with foam tape.

The sentiment is also from the Simply Stamped Leaves set. I stamped it with brown ink on white card stock, punched it out with an oval punch, and inked the edges with brown ink. It is attached to the card with foam tape.

Here’s a tip if you are stamping your own background paper like I did. Stamp an entire sheet of 8-1/2 by 11 card stock with your pattern. Then you can easily cut the card into panels the size you need for your cards. You’ll have enough for at least 4 cards – more if you’re using smaller strips of patterned paper.

I’m thankful for you! 💛

Thanks for stopping by,

Anita

Posted in Cards, Fall, Stamping, Uncategorized | Leave a comment

The Big Island of Hawai’i

We took a fantastic trip to Hawai’i late in the Summer! It was a 2 week adventure celebrating our 35th anniversary. We have been to Oahu before, but this time we planned time on 2 other islands. Our first stop was on the Big Island of Hawaii. 

We landed in Kona, HI around 8 pm and basically just checked into our hotel after a long day of travel. But this is what we woke up to in the morning…


After breakfast on the balcony, we left to drive to Hawai’i Volcanoes National Park and see the Kilauea Volcano. These are just a few of the sights along the way. 


We stopped at Punalu’u Beach, one of the amazing black sand beaches, on our way to Volcanoes National Park. Black sand and the Hawai’i sun means you keep your flip flops on!! ☀️😳 And wear sunglasses…and a hat! 😎🤠


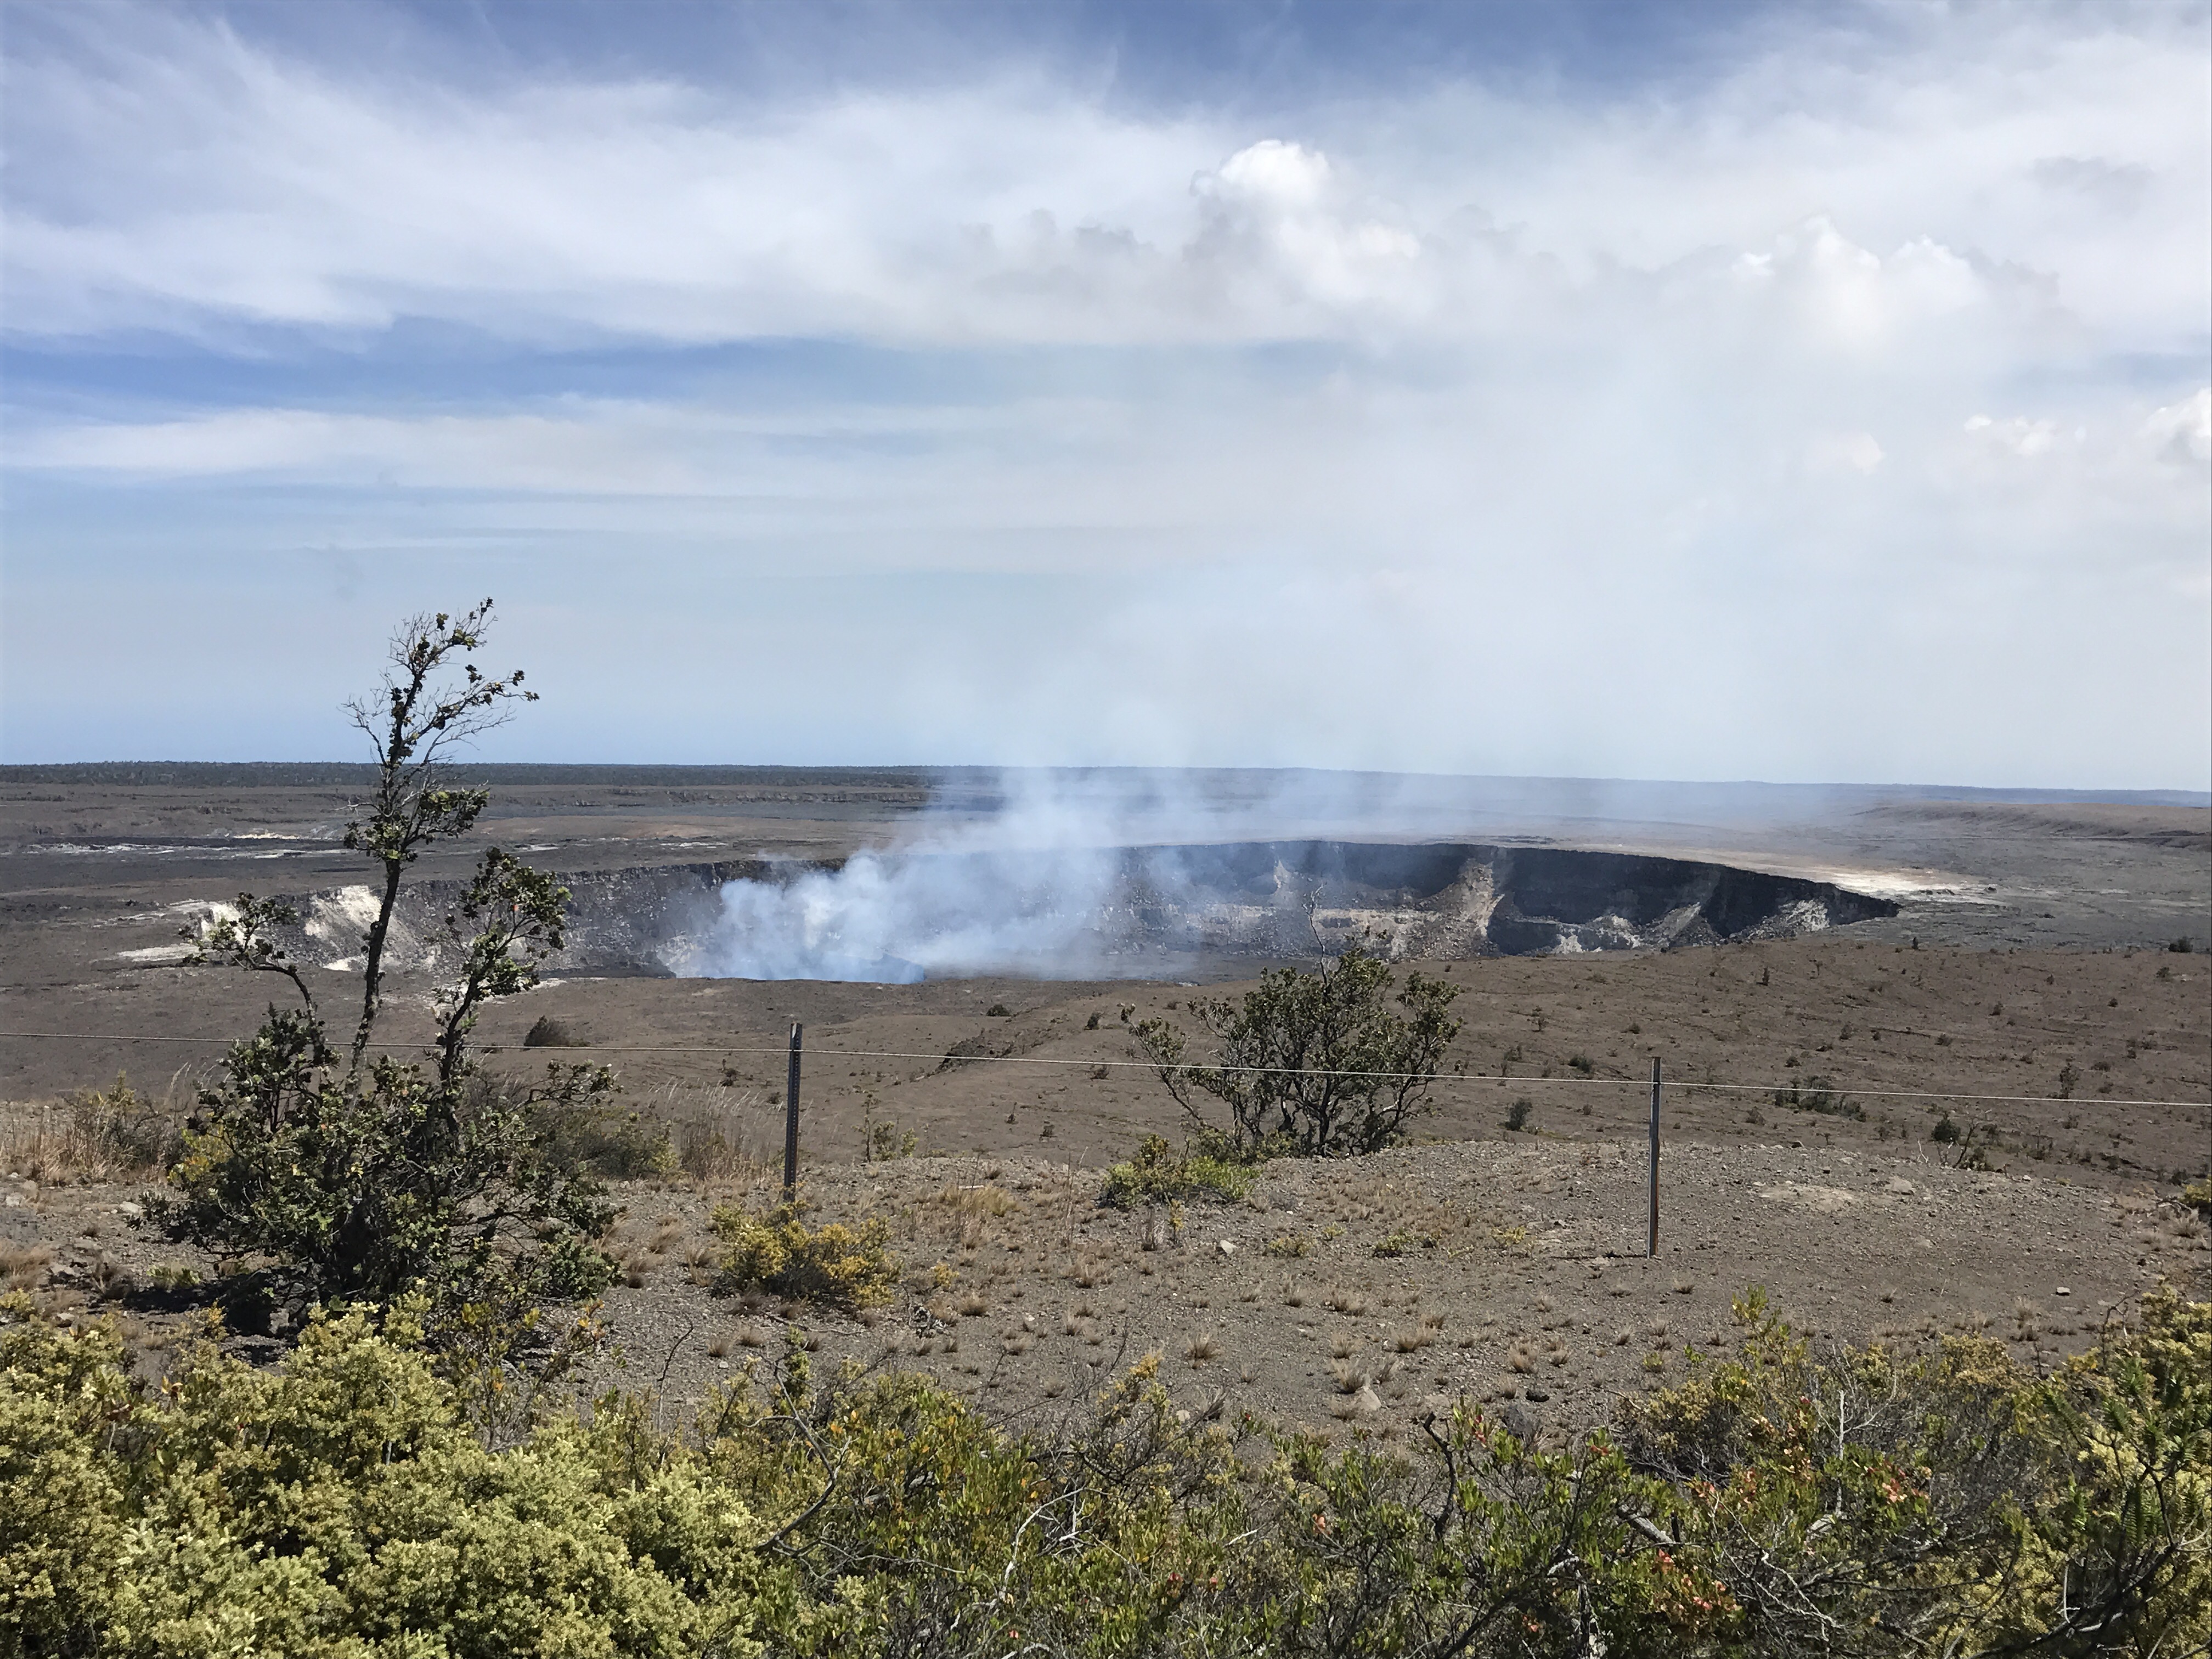
It was an incredible sight to see this amazing volcano during the day from the Halema’uma’u crater overlook at Jaggar museum in the park. It’s an easy drive to get to the museum and overlook. And the view of the volcano is spectacular!


We went back to see the volcano at night. I took a couple of pictures, but they don’t even begin to give justice to this amazing sight! 


The lava fields stretch for miles as you travel towards the ocean. Such an incredible sight to see! The island is ever-changing since the volcano is still active. 

The next day we headed over to Hilo. We spent a little time relaxing under the Banyan trees before starting the drive back across the island to Kona. 

We stopped by Rainbow Falls on the way. We didn’t see a rainbow because it was cloudy, but it was still so beautiful!

It didn’t take long as we were driving across the island to drive into the clouds and rain…but as soon as we started heading back down the mountain, the sun returned.

A drive to the tip of The Big Island gave us a great view of Maui under the clouds.

img_9134

Our last evening on The Big Island included this little guy – he kept trying to get close enough to eat our dinner. And, yes, he made me jump every time! He was so fast!! 😳

img_9141

Waiting for our flight to Kauai…

img_9147

I’ll share some of the highlights from our time on Kauai soon…spoiler alert – it was amazing!!!

Thanks for stopping by,

Anita


Posted in Travel | 2 Comments