Broccoli Slaw

A sweet friend shared this recipe with me years ago and it has become one of my favorite side dish recipes. It goes great with ham, turkey, chicken, and just about anything you want to pair it with. It comes together quickly – just make sure to mix it up a couple of hours before you are ready to serve it so the ramen noodles have a chance to soften a bit. 

IMG_8296

Recipe for Broccoli Slaw

  • 3 tablespoons soy sauce
  • 6 tablespoons vinegar
  • 1/3 cup vegetable oil
  • 1/2 cup sugar
  • dash Worcestershire sauce

Whisk the above ingredients together well.

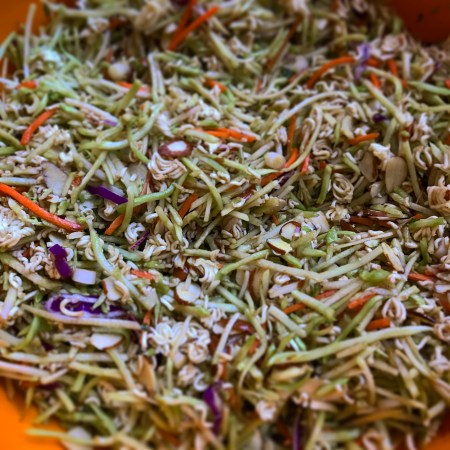
  • 10 – 12 ounce package broccoli slaw (in the produce department near the bagged salads)
  • 2 packages ramen noodles
  • 3/4 cup slivered almonds
  • 4 green onions, chopped

Break the ramen noodles while still in the package. (I hit them a few times with my meat tenderizer.) Discard the seasoning packet or save it for another use. Toss together broccoli slaw, broken ramen noodles, almonds, and onions. Pour dressing over all and mix well. Refrigerate and let it sit for a couple of hours for the noodles to soften.

I have also used Splenda in place of the sugar and it works wonderfully. And it’s a great recipe for your next potluck or those picnics that will be coming now that the weather is warming up. Easy to double, too! Enjoy!!

Thanks for stopping by,

Anita

Posted in Recipes | Leave a comment

Easy Blocks Baby Blanket

Seems like I am always crocheting a baby blanket. 😊 So it’s fun to find new patterns to work with. 

I made this one using this pattern from Lacy Crochet (lacycrochet.blogspot.com). It’s simply a coincidence that the blanket in the pattern is pink and so is mine! I had some pink worsted weight baby yarn in my stash and decided to use it before I chose the pattern to use. 😊


My blanket ended up with different dimensions than the one in the pattern. I used an H hook, but since I tend to crochet loosely, I ended up with a width of about 35 inches without the border. (The finished size of the blanket in the pattern in 40 x 31) So I decided to make my blanket square. I still followed the pattern, but stopped when my blanket measured 35 x 35 and then adddd the border according to the pattern directions. 

It turned out so pretty!! And the pattern is one of those that once you get started, it’s easy to crochet while watching your favorite movie. 

This blanket is going into my closet for the next sweet baby girl who enters our lives. 💕

Thanks for stopping by,

Anita

Posted in Crochet, Gifts | Leave a comment

Super Fast Easter Tag

There’s still time to make this super fast, super easy Easter tag to add to a special Easter basket or treat bag!

IMG_8008

This cute bunny is from the Sweet Thoughts of Spring set and the sentiment is from the Little Bunny for You set – both from Unity Stamp Company.

I stamped the bunny with black ink on a kraft tag. I used colored pencils to add a little color to the ears, heart, and flower. I stamped the sentiment with black ink and added some cute Easter egg ribbon. To finish it off, I tied it with some pink twine. 

And that’s it!! A cute tag in less than 5 minutes!! 🐰

I hope you enjoy a Happy, Blessed Easter!

Thanks for stopping by,

Anita


Posted in Cards, Easter | Leave a comment

Stamped Mini Muslin Bags

These cute little muslin bags were so fun to stamp on! I think they have a bit of vintage flair and work up so quickly. I found them at Hobby Lobby. They come in packs of 4 for $4.99. Get them when they are on sale for 50% off and they are a great deal! They measure about 3.5 inches by 4.5 inches – perfect size to fill with treats or a small gift. You can also find them here on Amazon if you need a larger quantity.

Cream Cotton Drawstring Bags

I used this Memento Luxe ink to stamp my images. It works great on the fabric and can be heat set if it is used on something that will be washed. Before I stamped on my bags, I put a small piece of card stock inside to make sure no ink would bleed through to the back of the bag.

IMG_8011

To add a little color to the stamped images, I used a small paint brush with my dye ink pads. You can also use brush markers to add color.

IMG_8012

Such cute images from Unity Stamp Company. The bunny above is Hunny Bunny. And the one below is Little Bunny for You. Seriously, they have the best stamps!! You need to check them out. 🙂

IMG_8013

I think I will be making more of these for other holidays, birthdays, and just because. The possibilities are endless and they are just so fun!!

Thanks for stopping by,

Anita

Posted in Easter, Gifts | 3 Comments

Happy, Hoppy Easter 

This little bunny is hopping by to wish you a Happy, Hoppy Easter!! 


The embossing folder and sentiment stamp are from Stampin’ Up (sadly both are discontinued). The bunny is also a discontinued die from A Muse Studio. The Stitched Circle Frame is from My Favorite Things. Companies change their products often – discontinuing some things so they can add new things. Get creative and use what you have!!

Die cut the bunny and use a black marker to add the eyes and nose. Using a sponge applicator, apply pink ink to the ears and around the edges. Using the circle frame die cut a circle from patterned paper and ink the edges with pink ink. Die cut the circle frame from white card stock. 

Emboss a panel of pink card stock with the embossing folder. Attach the ribbon and then attach the piece to a pink card. Attach the white circle frame to the card. Add the patterned paper circle to the card with foam tape. Attach the bunny to the circle with foam tape. Stamp the sentiment with pink ink on white card stock. Punch with a scalloped oval punch and attach to the card. 

This little card just makes me happy! 🐰

Thanks for stopping by,

Anita

Posted in Cards, Easter, Uncategorized | Leave a comment

Wood Bunny

I found this wood bunny at the Target Dollar Spot. I loved the shape of him, but the color…not so much.

IMG_8009

So I got out my chalk finish white paint and painted the entire bunny with 3 coats, making sure to let each coat dry before adding the next. Then I dry-brushed a bit of dark brown paint to add a little depth and distressing. I finished him off with a ribbon bow. He’s a perfect size – about 7 inches by 7 inches…

IMG_8010

I almost walked right by him when I first saw him, but I’m so glad I went back and scooped him up for only $3.00! A little paint, a little time and now I have a cute bunny to add a touch of Spring to my decor. 🙂

Thanks for stopping by,

Anita


Posted in Decor, Easter, Uncategorized | Leave a comment

Happy Easter Chick

Easter is just a couple of weeks away and this cute little chick is ready to send Easter greetings to those special people!

He’s from the Bringing Booty Back set by Unity Stamp Company.


I stamped him with brown ink on white card stock and colored the image with Copic markers. I used My Favorite Things Die-namics Single Stitch Line Circle Frames die to cut the circle for the chick. Then I lightly sponged the background with blue ink to create the sky. 

(A tip for you…the actual stamp includes 2 little clouds on the top right. Before inking the stamp, I placed a piece of scotch tape over the clouds. Then I inked the stamp as usual. Before stamping on the card stock, I removed the piece of tape. It’s an easy way to stamp just a portion of an image.)

I used the same My Favorite Things Die-namics Single Stitch Line Circle Frames die to cut the pink frame. To assemble the card, attach a pink ribbon to a strip of patterned paper and attach the paper to a green card. Attach the pink circle frame to the card. Attach the stamped chick to the card with foam tape. Stamp “Happy Easter” (stamp is an older one from A Muse Studio) with brown ink. 

This little chick is so versatile! You can see how I used him for a birthday card here

Thanks for stopping by,

Anita

Posted in Cards, Easter | Leave a comment

To My Crafty Friend

This Martha Girl stamp from Unity Stamp Company is so much fun! I made this card for one of my very best crafty friends – she has given me so much inspiration over the years,  not to mention her love and friendship!!

 img_7955

I stamped the image with black ink on white card stock and colored it with Copic markers. The image is layered to light turquoise card stock and then attached to a white card. The sentiment is stamped with turquoise ink on white card stock and punched with this label punch from Stampin’ Up. The edges are lightly sponged with the turquoise ink. The piece is attached to the card with foam tape. 

This is a great image to personalize for any of your crafty friends – change the hair color and color her outfit in your friend’s favorite colors! 

Thanks for stopping by,

Anita

Posted in Cards | Leave a comment

Mini Crochet Easter Baskets

These mini crochet Easter baskets are the perfect size for little treats! They work up very quickly and are great for using up your yarn scraps. You can find the free pattern here on CraftSanity


I filled each basket with chocolate eggs and tied a ribbon bow to the handle. 

Make these cute mini baskets in any color and give them as a special treat this Easter! 

Thanks for stopping by,

Anita

Posted in Crochet, Easter, Gifts | 2 Comments

Celebrate Today

This is a fun card to celebrate a birthday or a reminder to “Celebrate Today” just because.


The doily stamps are from Inkadinkado and the sentiment and embossing folder are both from Stampin’ Up

To make this card stamp the doilies with coral ink on white card stock and punch with a circle punch. Emboss a panel of turquoise card stock and attach it to a coral card. Stamp the sentiment with brown ink on the card below the embossed panel. Attach the stamped doilies with foam tape. Add enamel dots to the center of each doily. 

Make this card in your favorite colors and change the sentiment to fit any occasion. It’s a quick and easy card you can make in minutes!

Thanks for stopping by,

Anita

Posted in Cards, Uncategorized | Leave a comment