Let It Snow

We don’t get a lot of the white stuff in Alabama, but when we do there is major excitement. Schools and businesses close and the kids (and some adults!) have a ball playing in the snow. Since I grew up in Northern Indiana and am not a huge fan of the stuff, I like to sit at home and watch it from my warm, cozy living room.  It usually melts quickly and that is just fine with me! 😉

This little guy is all about the snow! He’s just waiting for the skies to open up and cover everything with a fluffy, white blanket. 

IMG_5424

This cute little snowman and sentiment are from Doodlebug Design Inc. I’m not sure where the snowflake background stamp is from, but a lot of stamp companies have their own version – just pick your favorite!

Stamp a kraft note card with the snowflake stamp in white ink. (I used Craft White from Stampin’ Up and heat set it with my heat gun.) Add a wide strip of patterned paper to the card. Attach 2 thin strips of brown card stock to slightly wider blue card stock and attach over patterned paper. Stamp snowman and sentiment with brown ink on white card stock. Trim, ink the edges with blue ink, and lightly sponge entire panel with blue ink. Add pink to snowman’s cheeks with chalk. Attach snowman panel to card with pop dots. Attach 2 small black gems for buttons.

He may be ready for the snow, but I still think I’ll be fine without it… 🙂

Thanks for stopping by,

Anita


Posted in Cards, Uncategorized | Leave a comment

Snowballs 10 cents

Here’s a cute little snowman to put a smile on your face and warm your heart during these cold January days.

IMG_5374

He’s one of the Snow Peeps from Unity Stamps. I’ve done a couple of other posts using more of these adorable snow people. You can find them here and here. 

To make this card, stamp the snow peep on white card stock with black ink and color with Copic markers. Trim the stamped piece and layer to red card stock. Emboss a blue square of card stock with the snowflake folder from Stampin’ Up and attach to a white card. Cut a banner from red patterned paper and attach to card. Attach stamped image to card with pop dots. Add clear glitter to snowflakes and the snowman to add a little bling.

Add a smile to someone’s dreary January by having this little guy show up in their mailbox just to say hi!

Thanks for stopping by,

Anita
Posted in Cards, Uncategorized | 1 Comment

Winter Candles

The Christmas decorations are packed away for another year and the house always seems a little empty when that happens. Since it’s January (and still very much winter), I decided to keep these simple winter candle decorations out for a while. Seriously, they couldn’t be any faster or easier to put together!

IMG_5501

All you need are your favorite glass containers, white pillar candles, and epsom salt for the “snow”. Simply pour some epsom salt into your containers and nestle the candles into the salt. That’s it! 

Here’s what the candle in the middle of the picture looked like during the Christmas season. A little greenery tucked on each side made a lovely centerpiece for a bridesmaid luncheon I hosted for my goddaughter’s winter wedding.

IMG_5502

Just a little change by removing the greenery and grouping them together and I can keep these winter candles out through January!

Thanks for stopping by,

Anita


Posted in Decor, Uncategorized | 3 Comments

Happy 3rd Birthday

A very special little girl turned 3 last month. She has brought love, laughter, and joy to my life in more ways than I can possibly mention. She has the most tender heart and seems to know intuitively when I need an extra hug or kiss on the cheek. Can you tell she has captured my heart?

IMG_5317

This photo of us was taken by her very talented Momma. If you are local, I highly recommend Amanda Powell (Photographer) if you are in need of a photographer. She is amazing!

Here is the card I made for this very special occasion 🙂

IMG_5289

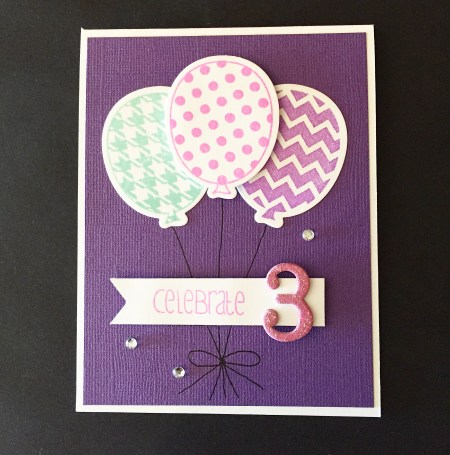
The balloon stamps and matching die are a set from Hero Arts. “Celebrate” is from Simon Says Stamp.

To make the card, stamp the balloons with 3 different colors of ink and die cut. Attach a panel of purple card stock to a white card. Attach balloons to card, using pop dots to attach the center balloon. Using a thin black marker, draw the strings for the balloons. Stamp “celebrate” on white card stock and trim into a banner. Attach to card with pop dots. The “3” is a chipboard die cut that I inked with pink ink and then added some clear glitter glue to add a little sparkle. Attach this to the banner. Add 3 little gems for the finishing touch.

Looking forward to many, many more birthday celebrations with this most special little lady!!!

Thanks for stopping by,

Anita
 

Posted in Cards, Uncategorized | Leave a comment

Happy New Year Snow Peeps

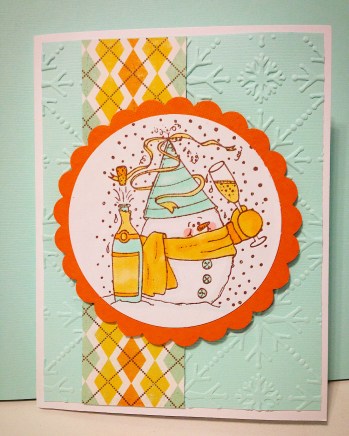
Unity Stamp Company has the best stamps!! I love these Snow Peeps – they are just so cute! This little guy had the best time ringing in the New Year. 🙂

IMG_5239

I stamped the snowman with brown ink on white card stock and colored him with Copic markers. I punched him out with a circle punch and then layered the image to an orange scalloped circle (you can find basic shape punches at your local craft store). I embossed a panel of light aqua card stock with the snowflake embossing folder from Sizzix, attached a strip of patterned paper, and attached the panel to a white card. The snowman is attached with pop dots.

Happy New Year!

Thanks for stopping by,

Anita

Posted in Cards, Uncategorized | 1 Comment

Yummy Peanut Clusters

Need a last minute yummy treat for your New Year’s celebration? These tasty Peanut Clusters are made in your slow cooker and are incredibly easy! A sweet friend gave me this recipe – so good!

IMG_5309

Here’s what you need:

Yummy Peanut Clusters

  • 16 oz jar salted peanuts
  • 16 oz jar honey roasted peanuts
  • 16 oz package chocolate bark
  • 16 oz package white chocolate bark
  • 11 oz bag butterscotch chips

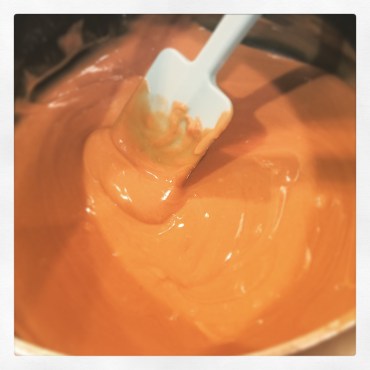
Put all ingredients in your slow cooker, breaking up the chocolate and white chocolate bark into squares. Cover and cook on low 2-1/2 to 3 hours. When melted, stir well. Drop by spoonfuls onto waxed paper and let cool.

Just a note: as this is melting, the chocolate squares may keep their shape even though they have become very soft. So check to see if they are melted and don’t just go by looks.

This makes a lot of candy! Plenty to share or you can freeze some if you’d like.

A little sweetness to start the New Year!

Thanks for stopping by,

Anita

Posted in Recipes, Uncategorized | Leave a comment

Merry Christmas

A quick post to wish you all a very Merry Christmas! May your day and the year to come be filled with the many blessings of Jesus!!

IMG_2271

Thanks for stopping by,

Anita

Posted in Christmas, Decor, Uncategorized | Leave a comment

Peanut Butter Bars

Every family has Christmas traditions. Those little things that make the season special. This is one that I have shared for several years with my “other” family. My 4 “kids” (well, now 5 since the oldest just got married 2 days ago😊) have decided it’s not Christmas without these yummy Peanut Butter Bars!

IMG_5292

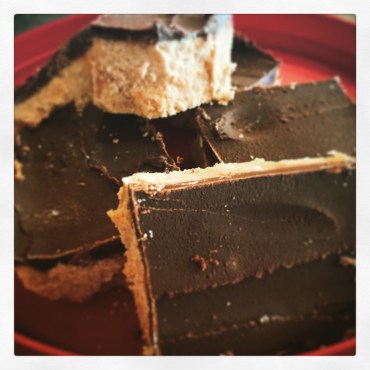
Years ago, a co-worker gave me this recipe. They are so good and taste just like a peanut butter cup – the recipe makes a 9 x 13 inch pan so there are plenty to share. 

Here’s what you’ll need…

Peanut Butter Bars

  • 1/2 cup plus 3 tablespoons margarine, divided
  • 2 cups peanut butter
  • 1 lb powdered sugar
  • 1 cup brown sugar
  • 1 tablespoon vanilla
  • 2 cups chocolate chips (I use a 12 ounce bag)

Melt 1/2 cup margarine in a large saucepan. Remove from heat and add peanut butter. Mix well. Add powdered sugar, brown sugar, and vanilla. Mix well and pat into a 9 x 13 inch pan. Place in refrigerator to cool.

While peanut butter mixture is cooling, melt chocolate chips with 3 tablespoons margarine over low heat. Spread over cooled peanut butter mixture. Let cool completely before cutting into squares. 

Just a couple of tips…

Everything will blend better if the peanut butter melts into the margarine like this – your saucepan should be warm enough to do this after you’ve melted the margarine.

IMG_5286

I use my small rolling pin to to smooth out the peanut butter mixture in the pan. It works well to pack down the mixture since it tends to be a little crumbly. 

IMG_5287

Our tradition is to have these for dessert after celebrating our Christmas. It’s getting a bit harder to get us all together – especially this year since the oldest is on her honeymoon. And my oldest “son” is now a Marine and away for training. But I made them anyway because, after all, it’s tradition!!

What are your favorite family Christmas traditions?

Thanks for stopping by,

Anita

Posted in Recipes, Uncategorized | Leave a comment

Spool Ornament

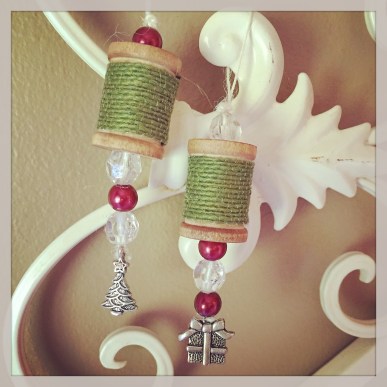
Do you need a quick and easy last minute gift? These little spool ornaments are simple to make and are so cute!

IMG_4450

I used unfinished wooden spools from my local craft store and lightly distressed them with brown ink using a sponge. The beads, charms, and ribbon also came from my local craft store. Glue a small piece of ribbon around the spool. Thread a loop of thin twine through the spool leaving long tails at the bottom. Then thread the loop of twine through a bead on the top and tie a small knot so the bead will not come off. On the bottom, thread the tails of the twine through 3 beads and tie a charm at the bottom. Trim the twine close to the knot on the charm. I added a small drop of glue to the knot to help keep it more secure.

Just an FYI – these floss threaders that are actually used for dental work or braces are the best thing for threading beads onto twine, thread, or thin ribbon. Work great for tying buttons, too. I don’t know what I’d do without them!

And there you have it! Cute little ornaments that come together quickly for those last minute gifts…

Thanks for stopping by,

Anita

Posted in Christmas, Decor, Gifts, Uncategorized | 2 Comments

Gift Card Holder

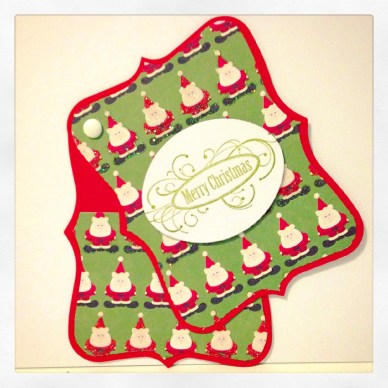
I am always looking for fun ways to give gift cards or cash – something just a little different than a regular card. Here is one way using the top note die from Stampin’ Up. Unfortunately, this die is discontinued – you may be able to find it on Ebay or other companies may have something similar. Any larger die will work to get the same effect.

IMG_5103

You’ll need red and white card stock, patterned paper, and a brad. Die cut 2 pieces from the red card stock and 2 pieces from the patterned paper. Trim the edges off the patterned papers so they are slightly smaller than the red pieces.  Cut one of the patterned pieces just above halfway. Attach this piece to one of the red pieces, leaving the top open to create a pocket. Attach the full patterned piece to the other red piece. Attach them together with the brad in the middle at the top, leaving it loose enough so the top piece can swivel open. Stamp “Merry Christmas” from Hero Arts (or your favorite sentiment) with green ink on white card stock and punch with an oval punch. Attach to the card with pop dots.

The pocket is perfect for holding a little cash or a gift card. Helps to make the gift a little more special.

Thanks for stopping by,

Anita

Posted in Cards, Christmas, Gifts, Uncategorized | Leave a comment