Jolly Santa – May 2023 Christmas Card

Hi friends,

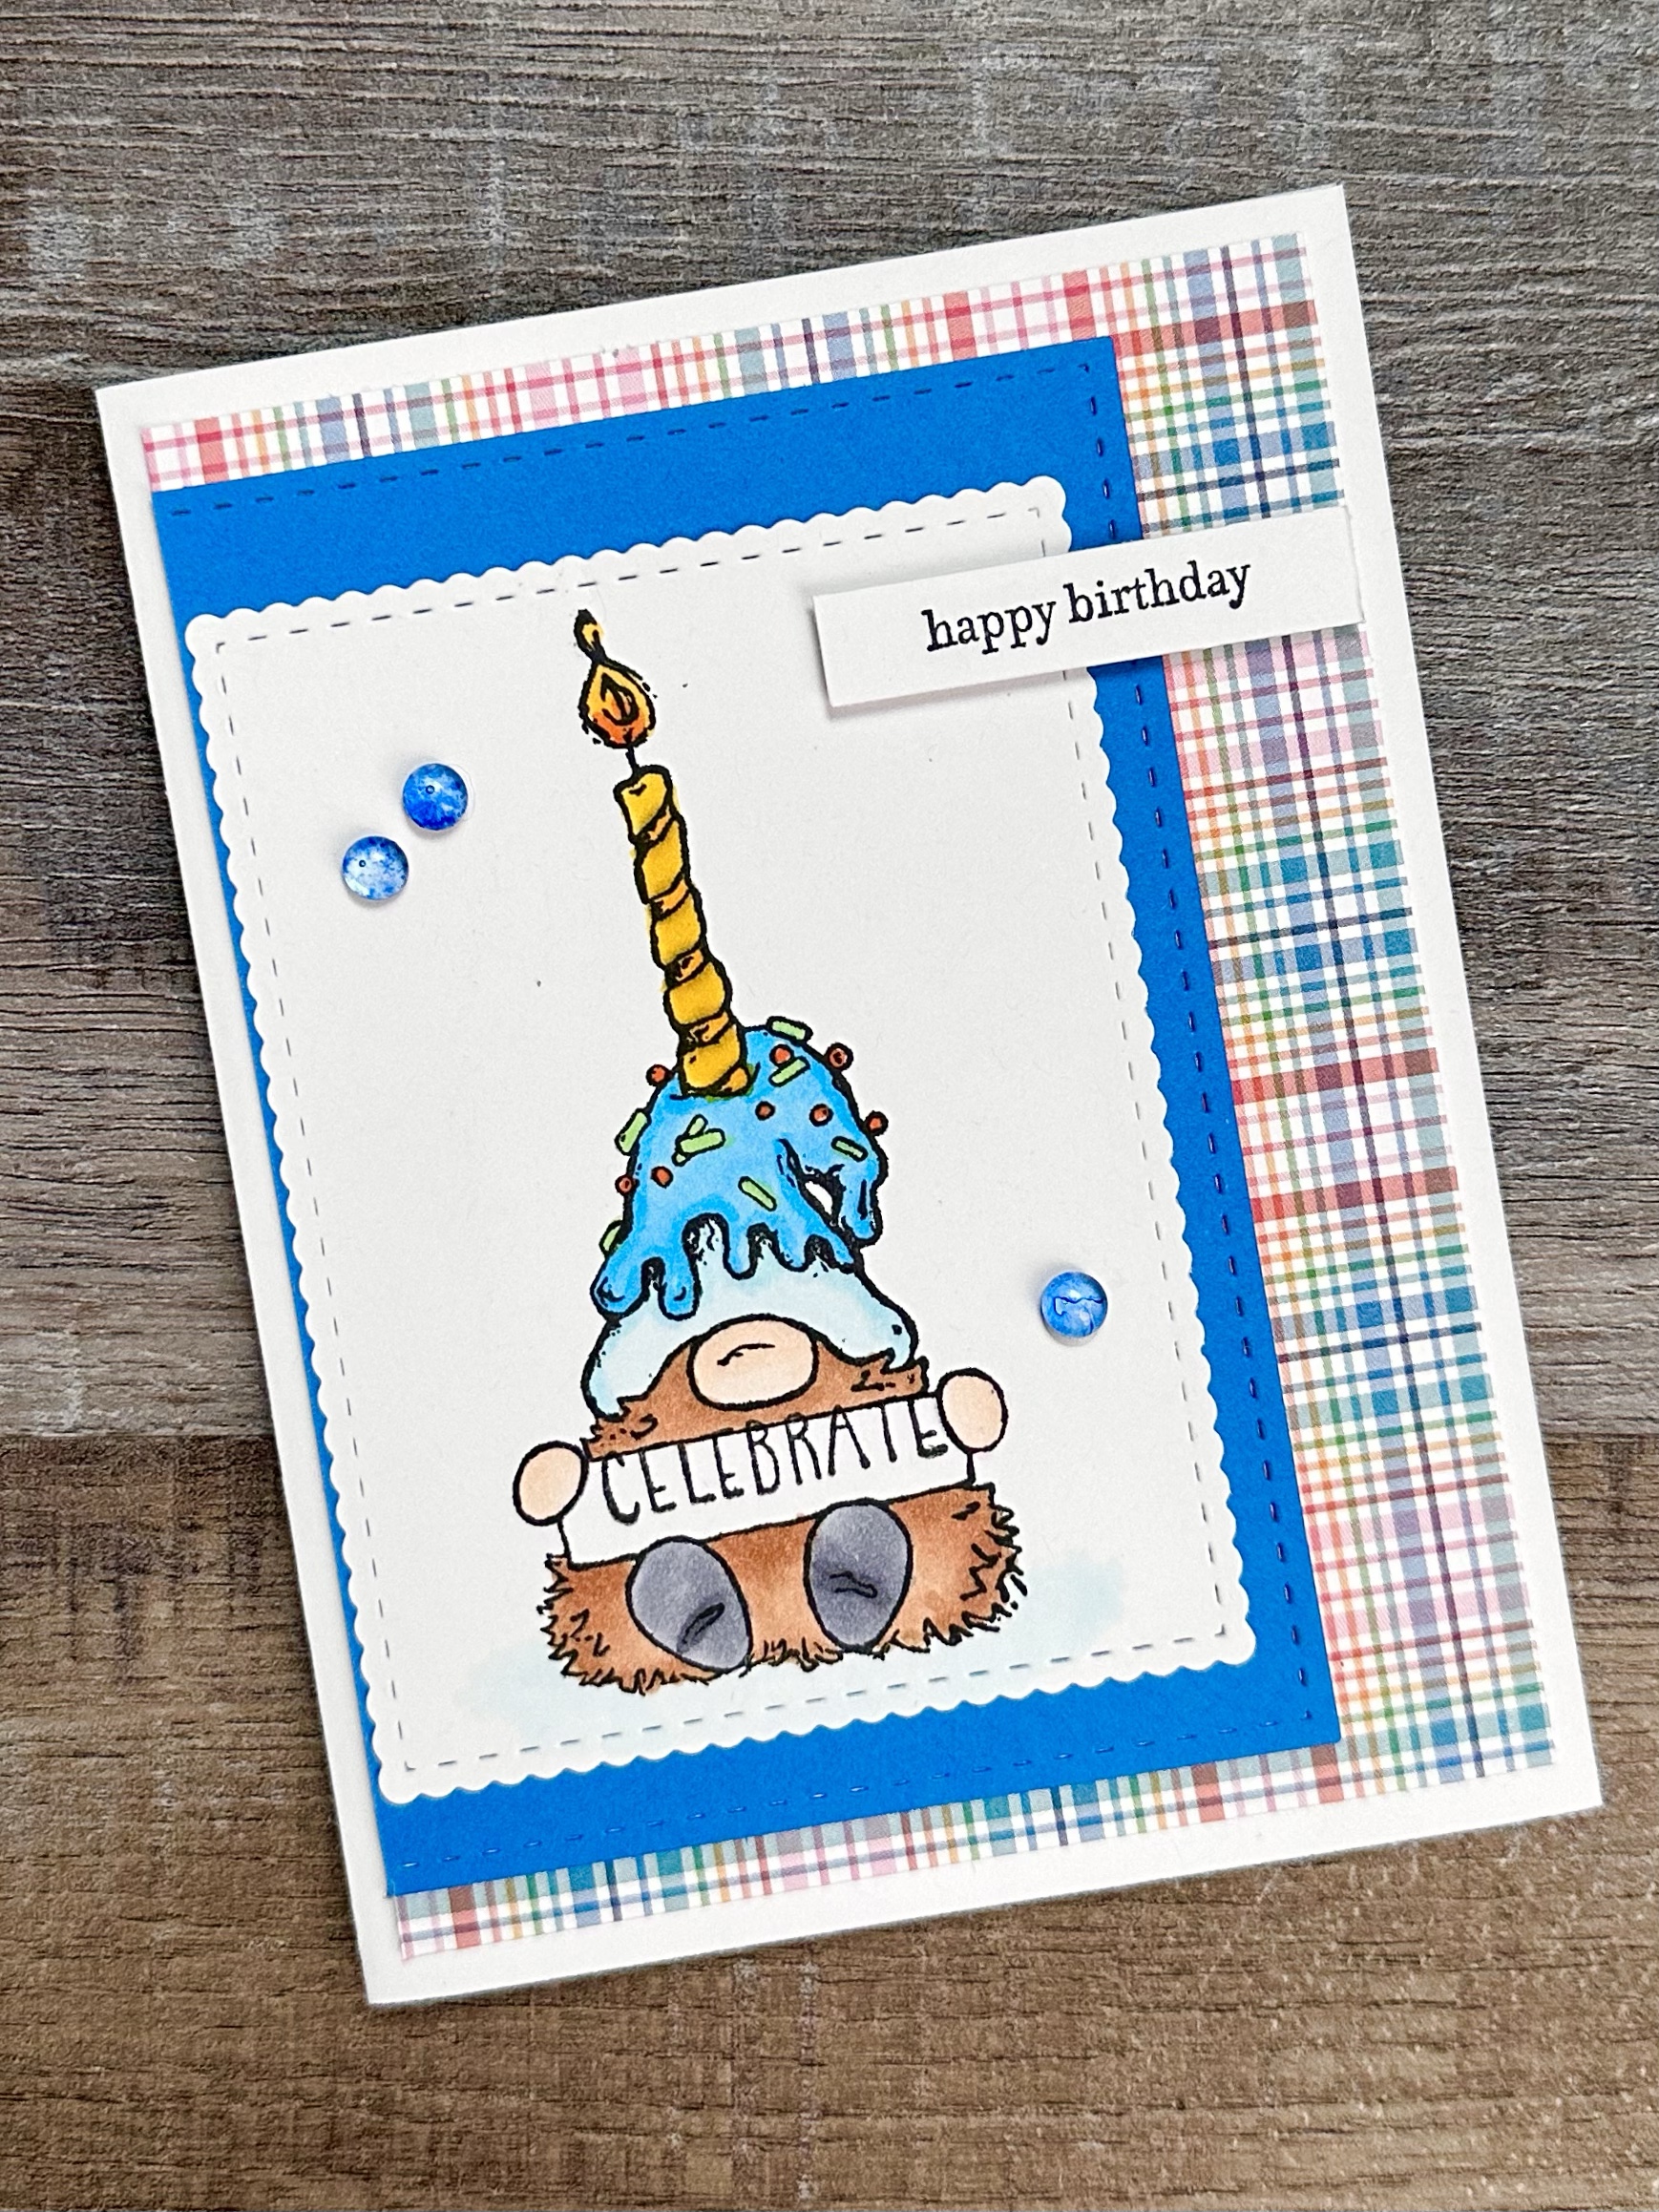
My inspiration for May’s Christmas card came from {BYSHC} Sketch Challenge 33 on their Facebook page. BYSHC stands for “Build Your Stash Holiday Cardmakers”. This is such a fun group of cardmakers! A sketch is released each month for inspiration to make Christmas cards to add to your stash and they randomly draw a winner from all the cards submitted for some fun Christmas goodies. πŸŽ…πŸΌπŸŽ„

You may remember that I’m designing a new Christmas card each month and making several of that design to add to my stash for later this year. The {BYSHC} Facebook page is a great place to find ideas! You can find the cards I’ve designed so far this year here- January, February, March, and April.

Disclosure: Some of the links on my site are affiliate links, meaning, at no additional cost to you, I will earn a small commission if you click through and make a purchase. As an Amazon Associate I earn from qualifying purchases.

I was the lucky winner in last month’s drawing and this Jolly Santa from Your Next Stamp was in my prize package. He’s so perfect for the focal point for this month’s card! Your Next Stamp is a new company to me and they have so many cute things – you should check them out! I’m not sure if the Jolly Santa is still available, but I’m sure you will find lots of fun cute stamps and supplies on their site.

I stamped Santa with Memento Tuxedo Black ink on white card stock, colored him with Copic markers, and trimmed him close.

To make the card, I used {BYSHC} Sketch Challenge 33 as a guide. I attached a piece of green patterned paper to a white card. Then I attached a smaller piece of red patterned paper to the center and a strip of another patterned paper over that. I attached Santa to the card with foam tape.

Creating Christmas cards throughout the year helps to make the holiday season a tiny bit easier. Check out the {BYSHC} Facebook page (and the links to my monthly cards above πŸ˜‰) for lots of inspiration. πŸŽ„

Anita

Posted in Cards, Christmas, Stamping | Tagged , , | 7 Comments

Patriotic Oversized Initial

Hi friends,

Do you know about these huge unfinished wood letters and numbers at Hobby Lobby? They measure 18 inches tall and are just waiting for your creative touch. 😊

Disclosure: Some of the links on my site are affiliate links, meaning, at no additional cost to you, I will earn a small commission if you click through and make a purchase. As an Amazon Associate I earn from qualifying purchases.

I picked up the β€œY” (our last name is Young πŸ˜‰) a few months ago during a sale not really knowing what I would do with it. (Hobby Lobby puts their unfinished wood items on sale every couple of weeks or so.) I finally decided to decorate it to add to my patriotic decor for the Summer. πŸ‡ΊπŸ‡Έ

I found some stars and stripes scrapbook papers at Hobby Lobby that were perfect to use on my initial. I turned my initial over and traced it on the back of the scrapbook paper and then cut out the pieces. I had to cut the red and white paper in 2 sections to fit the initial.

I painted the front, back, and sides of the initial with white acrylic paint to give it a more finished look. Then using Mod Podge with a foam brush, I adhered the paper pieces to the front of the initial. After it was dry, I brushed a thin layer of Mod Podge over the top of the paper and let it dry.

Using various coordinating ribbons, I created a bow the Re-Fabbed way and attached it to the initial using my hot glue gun. I finished off the bow by glueing on a white star button tied with red and white bakers twine.

This is a fun easy craft that you can make for any holiday. How fun would this be in a baby’s nursery using the initial of their first name? Or a child’s or teen’s room? You could even make it in colors to match your decor and prop it up on your mantel. Maybe add flowers instead of a bow or any other fun embellishment you can find. You’re only limited by your imagination! 😊 An oversized initial would make a great gift! How will you embellish yours?

Anita

Posted in Decor, Summer | Tagged , | 1 Comment

A Grand Adventure – Graduation Card

Hi friends,

It’s graduation time and Unity Stamp Company has the best Winnie the Pooh graduation stamp set! I just love the sentiment in this set – graduation can certainly lead to a grand adventure. πŸ˜ŠπŸŽ“

Disclosure: Some of the links on my site are affiliate links, meaning, at no additional cost to you, I will earn a small commission if you click through and make a purchase. As an Amazon Associate I earn from qualifying purchases.

To make this fun card, I stamped Pooh with Memento Tuxedo Black ink on white card stock and colored him with Copic markers. Then I trimmed around him using my favorite Cutterbee detail scissors.

I stamped the sentiment with black ink, die cut around it using the Elegant Rectangle STAX Die-namics from My Favorite Things, and layered it to black card stock die cut with the same die set.

To make the card, I embossed a piece of white card stock with a graduation cap embossing folder (this is similar) and layered it to black card stock. I attached the piece to a white card and attached the sentiment piece to the card. Winnie the Pooh is attached to the card using foam tape.

What a fun way to send the graduate on their Grand Adventure!! πŸ˜ŠπŸŽ“

I was also thinking that this sentiment would be great to add a little whimsy to a wedding card. What do you think?

Anita

Posted in Cards, Stamping, Uncategorized | Tagged , | 1 Comment

A Trio of Birthday Cards

Hi friends,

I have some fun birthday cards to share with you today! I used the same basic layout for all 3 cards, but by using different images and colors they look totally different.

Disclosure: Some of the links on my site are affiliate links, meaning, at no additional cost to you, I will earn a small commission if you click through and make a purchase. As an Amazon Associate I earn from qualifying purchases.

All 3 of my main stamped images are from Unity Stamp Company. The gnome is called Life’s A Party Gnome, the cupcake is Everyday Celebration, and the girl is Hip Hip Hooray. My sentiments are stamps I’ve had forever – use your favorite birthday greeting stamps to make your cards.

I stamped each image with Memento Tuxedo Black ink on white card stock and colored them with Copic markers. I die cut around each image and layered them to coordinating card stock. I attached the images to patterned paper, overlapping the left edge slightly and trimming off the excess. Then I attached the entire piece to a white card.

The dies I used are Scallops & Rectangles nesting dies from Unity Stamp Company (they are currently unavailable – these are similar) for the gnome, Wonky Stitched Rectangle STAX Dienamics from MFT Stamps for the cupcake, and Scallops and Circles nesting dies from Unity Stamp Company for the girl.

I stamped the sentiments on white card stock and on 2 of the cards, I layered it to matching card stock trimmed into a banner shape on one side. All of the sentiments are attached to the card with foam tape. I finished off the cards with 3 sequins or dew drops.

It was fun to start out with one layout and create 3 different cards just by changing images and colors. What will you create?

Anita

Posted in Cards, Stamping, Uncategorized | Tagged , | Leave a comment

Crochet Patriotic Wreath

Hi friends,

I found this cute Crochet American Flag Wreath on Pinterest and knew that I wanted to make it for my front door for the Summer season. The pattern is by Heather Corrinne Crochets and it’s free! So fun!

Disclosure: Some of the links on my site are affiliate links, meaning, at no additional cost to you, I will earn a small commission if you click through and make a purchase. As an Amazon Associate I earn from qualifying purchases.

I used an H/5mm crochet hook to stitch up the wreath and a G/4mm hook for the stars. My yarn is I Love This Yarn in Red, White, and Royal.

The pattern works up quickly. It’s a long rectangle and you don’t have to tie off your ends for each section! You just carry the yarn along the side and hide it when you sew the piece onto your wreath form. I love that!

The pattern is written for a 12 inch foam wreath. I made mine using a 14 inch wreath so I needed to adjust the pattern a little. I added one chain to the starting chain to fit around my wreath so I have 23 stitches across. I also added 2 extra rows to each red and white section – each section has 8 rows. The blue section has 50 rows. The total number of rows for my wreath is 154.

I tied a piece of ribbon around my wreath to use as a hanger. You can also tie a small piece of yarn to the back of the wreath between a few stitches if you want to have the hanger hidden.

Tip: I used stitch markers to hold my crocheted piece around my wreath while sewing up the seam. Made it so much easier!

This is a fun pattern to make and a great way to add a little patriotic color to your front door this Summer.

Anita

Posted in Crochet, Decor, Summer | Tagged , , | 2 Comments

It’s Your Birthday Card

Hi friends,

Do you have any of the Angie Girls stamps from Unity Stamp Company? There are so many to choose from and there is sure to be one to make the perfect card for any occasion.

Disclosure: Some of the links on my site are affiliate links, meaning, at no additional cost to you, I will earn a small commission if you click through and make a purchase. As an Amazon Associate I earn from qualifying purchases.

This Angie Girl is aptly called Birthday Girl. I love the size of this stamp – she measures 3 by 5.25 inches! My finished card measures 5 by 7 inches. I made my card base by cutting card stock to measure 7 by 10 inches and folding it in half.

Tip: if you want to have crisply creased cards, a Scor-Pal is a great tool to have in your craft room.

I stamped her with Memento Tuxedo Black ink on white card stock and colored her with Copic markers. Then I used a postage stamp die to die cut around her. My die is from a set that’s no longer available, but this is similar. I attached her to a turquoise card and finished the card by adding 3 enamel dots.

This Birthday Girl stamp is so fun to color! And of course she can be done in any color combo. She is perfect for sending special birthday wishes! 🩡

Anita

Posted in Cards, Stamping | Tagged , | Leave a comment

Crochet Rice Stitch Cotton Spa Cloth

Hi friends,

I have a fun, easy pattern for a Crochet Rice Stitch Cotton Spa Cloth for you! This is a simple pattern using Front Post Double Crochet and Back Post Double Crochet stitches in a one row repeat.

Disclosure: Some of the links on my site are affiliate links, meaning, at no additional cost to you, I will earn a small commission if you click through and make a purchase. As an Amazon Associate I earn from qualifying purchases.

This pattern creates such a great texture – perfect for light exfoliation! I used I Love This Cotton yarn in Sunset Seafoam with an H/5mm crochet hook to stitch up my spa cloths. And they only take about 1 ounce of yarn so you can get 3 spa cloths out of one 3 ounce skein – very cost effective. πŸ™‚

If you need a refresher on crocheting front and back post stitches, there is a video tutorial here. And for the foundation half double crochet, this tutorial is great.

You can find the pattern below and I’ve also included a link to a free PDF if you’d like to easily print it.

Crochet Rice Stitch Cotton Spa Cloth

I Love This Cotton Sunset Seafoam 

H/5mm crochet hook

Stitches used in US terms:

Foundation half double crochet – fhdc

Chain – ch

Double crochet – dc

Front post double crochet – fpdc

Back post double crochet – bpdc

Single crochet – sc

Row 1: work 21 fhdc. Turn. (21 stitches)

Row 2: ch 2. (counts as 1st stitch) Skip 1st stitch.  *FPDC in next stitch, BPDC in next stitch. Repeat from * to * across to last 2 stitches.  FPDC in next stitch, DC in last stitch. Turn. (21 stitches)

Rows 3-13: Repeat Row 2 for each row. (21 stitches) 

Do not turn after last row. 

Border – begin working in rounds. 

Round 1: ch 1. sc evenly around, working 3 sc in each corner. Join with ss to first sc. 

Round 2: ch 1. sc in each stitch around, working 3 sc in each corner. Join with ss to first sc. 

Fasten off and weave in ends.

Finished dishcloth measures approximately 6.5 by 6.5 inches.

Here’s the link to the free PDF…

Cotton Spa Cloths make such a great gift! Mother’s Day is just around the corner – stitch up a few of these, tie them with some pretty ribbon, and add her favorite body wash and some pretty flowers for a sweet gift for Mom. 🌸🌼🌸

Anita

Posted in Crochet, Gifts | Tagged , | 4 Comments

Big Birthday Wishes

Hi friends,

Sometimes pretty patterned paper is just the inspiration you need to make a great card! This paper is from the Kindness is Magic paper pack from Unity Stamp Company. It’s a 6×6 inch size with 8 different designs that have all the Spring feels.

Disclosure: Some of the links on my site are affiliate links, meaning, at no additional cost to you, I will earn a small commission if you click through and make a purchase. As an Amazon Associate I earn from qualifying purchases.

I pulled out some coordinating card stock and the Say It Big die set from Unity Stamp Company to make my card.

First, I tied some yellow ribbon into a knot and attached it to my patterned paper. Then I attached the piece to a yellow card.

I die cut the word β€œbirthday” from red card stock and glued it to the matching background die cut from blue card stock. I love this Quickie Glue Pen for adhering thinner die cut pieces.

I stamped the word β€œhappy” with red ink on yellow card stock, punched it with an oval punch (similar to this), and layered it to a larger oval punched from red card stock (similar to this). My β€œhappy” stamp is from the Oh Hello Spring stamp set from Unity Stamp Company.

Both the big birthday and happy pieces are attached to the card with foam tape.

The colors in this patterned paper are just so happy! What a fun way to wish someone special Big Birthday Wishes! 😊

Anita

Posted in Cards, Stamping, Uncategorized | Tagged , | Leave a comment

Crochet Chunky Cotton Facial Square

Hi friends,

I found this fun Yarn Bee Cotton XXL yarn on clearance at Hobby Lobby. It’s bulky weight (5), has a great texture, and is so soft! I thought it would work nicely for some type of facial/spa cloth and came up with this super easy to make Crochet Chunky Cotton Facial Square.

Disclosure: Some of the links on my site are affiliate links, meaning, at no additional cost to you, I will earn a small commission if you click through and make a purchase. As an Amazon Associate I earn from qualifying purchases.

I used an N/9mm crochet hook to stitch up my facial squares. It’s an easy beginner pattern that only takes a few minutes to make. The finished square measure about 4.25 by 4.25 inches so it’s a nice size – not too big, not too small. The pattern is below along with a link to a free PDF if you’d like to easily print it.

Crochet Chunky Cotton Facial Square

Yarn Bee Cotton XXL yarn

N/9mm crochet hook

Stitches used in US terms:

Chain – ch

Single Crochet – sc 

Slip Stitch – ss

Ch 10.

Row 1: sc in 2nd ch from hook, ch 1. *skip next ch, sc in next ch, ch 1* Repeat from * to * across to last 2 chains. Skip next ch, sc in last ch. ch 1 and Turn. (5 sc and 4 ch 1 spaces)

Row 2: sc in the 1st sc, sc in the next ch 1 space. *ch 1, sc in next ch 1 space.* Repeat from * to * last sc, sc in the last sc. ch 1 and turn. (6 sc and 3 ch 1 spaces)

Row 3: sc in the 1st sc. *ch 1, sc in next ch 1 space* Repeat from * to * to the last 2 sc . ch 1, skip 1 sc, and sc in the last sc. ch 1 and turn. (5 sc and 4 ch 1 spaces)

Repeat Rows 2 and 3 twice. 

Repeat Row 2 once more. 

Do not turn after last Row. 

Border

Round 1: ch 1. sc evenly around working 3 sc in each corner. Join with ss to first sc. 

Fasten off and weave in ends

Crochet Chunky Cotton Facial Square measures approximately 4.25 by 4.25 inches. 

Here’s the link to the free PDF…

I think the colors I used are discontinued since they were on clearance, but the website shows the yarn is available in 8 other colors. Any bulky weight cotton yarn will work to make the Crochet Chunky Cotton Facial Squares.

These facial squares would make a great gift! Tie a few together with a pretty ribbon and add them to a basket with her favorite face wash. I created a simple label that you can print and cut into strips to wrap around your facial squares for gifting.

Here’s the link to the label PDF…

I hope you enjoy this pattern!

Anita

Posted in Crochet, Gifts, Uncategorized | Tagged , | 2 Comments

Merry Little Christmas – April 2023 Christmas Card

Hi friends,

You may (or may not) have noticed that I haven’t posted for a couple of weeks. 😊 My husband and I were off on an amazing bucket list trip to Scotland!! 🏴󠁧󠁒󠁳󠁣󠁴󠁿 We just got back and I’m still trying to get back in the swing of things. I’ll do a post or two (three?) with some of the highlights of our trip in the coming weeks. Until then, I hope you’ll enjoy this month’s Christmas card.

April’s Christmas card features this cute little Santa that was a part of Unity Stamp Company’s 2022 Advent Calendar. (It looks like they may have a few left as of writing this post.) They have this cute box that has a little flap to open for each day from December 1st through December 24th. Inside each flap is a cute stamp that is only available in the Advent Calendar. They are perfect for all of your holiday cards and tags. I think they started it in 2020 – I missed that year, but I have 2021 and 2022. Such fun! I hope they do it again this year!

Disclosure: Some of the links on my site are affiliate links, meaning, at no additional cost to you, I will earn a small commission if you click through and make a purchase. As an Amazon Associate I earn from qualifying purchases.

You can find the other Christmas cards I’ve created so far this year in these posts – January, February, and March.

I stamped Santa with Memento Tuxedo Black ink on white card stock and colored him with Copic markers. I die cut around the image and layered it to patterned paper die cut with the same set. This particular die set is no longer available, but I think this die set would be so cute, too.

I embossed a piece of white card stock with the Dotted Lattice embossing folder from Taylored Expressions and attached it to a white card. I attached a piece of patterned paper over the embossed piece. The Santa image is attached to the card with foam tape.

I stamped my sentiment with green ink on a strip of white card stock and attached it to the card. This is an old stamp from A Muse Studios and is no longer available, but you can use any of your favorite Christmas sentiment stamps on your card.

In case you wondered πŸ™‚ , this is my favorite adhesive for card making and here are the refills.

This card would be really cute with any small Christmas image you may have in your stamp collection. I would love to see what you create!

Anita

Posted in Cards, Christmas, Stamping | Tagged , , | 7 Comments