Mini Crochet Christmas Stockings

Hi friends,

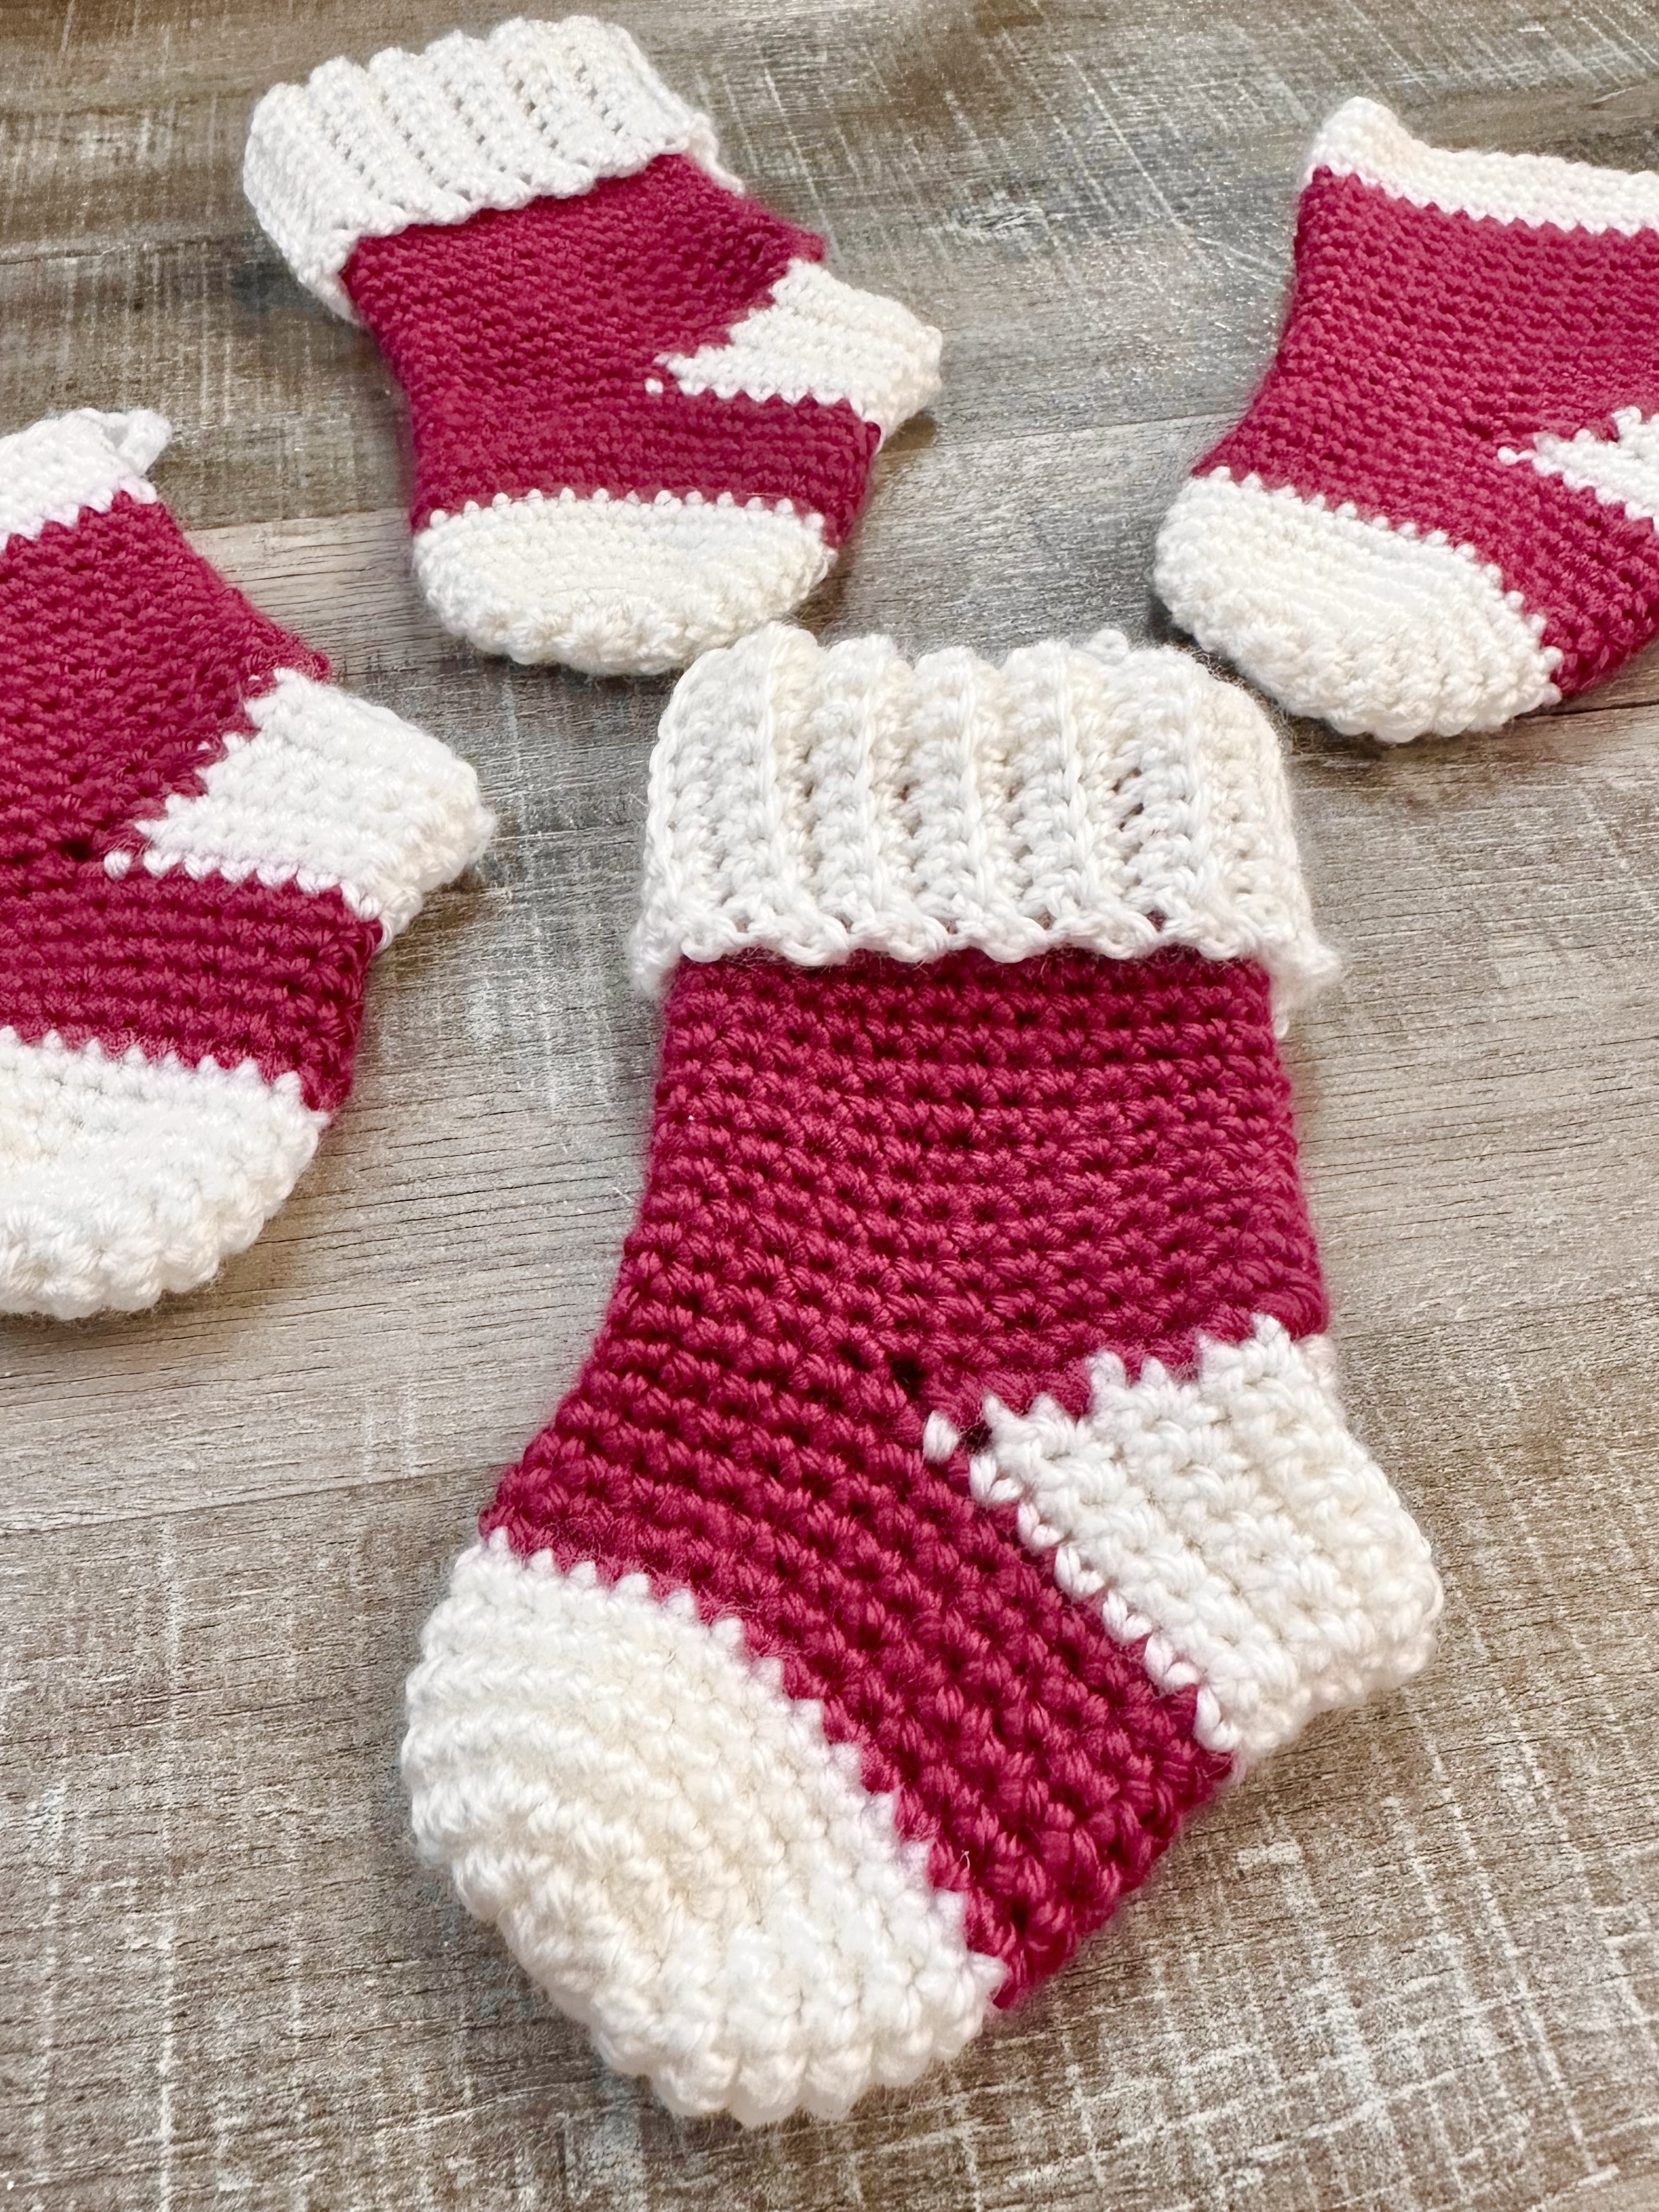
These Mini Crochet Christmas Stockings are so adorable! They are the perfect size for gift cards, cash, or small gifts. They work up fairly quickly and are a great stash buster.

Disclosure: Some of the links on my site are affiliate links, meaning, at no additional cost to you, I will earn a small commission if you click through and make a purchase. As an Amazon Associate I earn from qualifying purchases.

I found the patterns for these cute stockings here at Jen Hayes Creations. The pattern includes 4 different cuff options and they are all so cute! I only made 2 of the options because I didn’t have any Pipsqueak yarn for the fuzzy cuffs.

The stockings are made with worsted weight (4) yarn. I had some Caron Simply Soft yarn in my stash that I used to stitch up my stockings with a G-7/4.5mm hook. My stockings came out a little larger than the measurements in the pattern, but it’s not really important. I think it was basically the difference between the G-6/4mm listed in the pattern and the G-7/4.5mm hook I used. For some reason G hooks can be 2 different sizes…🤷🏼‍♀️

Anyway…they turned out great and will be so fun to use for gifts that can be added as an ornament to the tree! 🎄

You can make these in any color combo – or even just one color. And like I said earlier, they are a great stash buster! So look through your yarn basket and see what colors you can stitch up. 😊

Anita

Posted in Christmas, Crochet, Gifts | Tagged , , | 2 Comments

Candy Cane Yarn-Wrapped Christmas Trees

Hi friends,

Red and white are traditional Christmas colors that I am always drawn to. They are just so happy and festive! 😊 I have a fun and easy project using red and white to add a little whimsical touch to your Christmas decor.

Disclosure: Some of the links on my site are affiliate links, meaning, at no additional cost to you, I will earn a small commission if you click through and make a purchase. As an Amazon Associate I earn from qualifying purchases.

You’ll need some styrofoam cones, red and white bulky yarn, 1/2 inch white pom poms, and your glue gun. I found all of my supplies at Hobby Lobby, but you should be able to find everything at most craft stores.

Start by hot glueing the yarn at the bottom of the cone. Then simply wrap the yarn around the cone, keeping the yarn close as you are wrapping. I added a little hot glue every now and then to keep the yarn in place. Wrap all the way to the top and secure the end on the top of the cone.

I added the small pom poms randomly to the trees using hot glue. To finish the trees, I added a larger 1.5 inch white pom pom to the top.

You can find my Farmhouse Yarn Wrapped Christmas Trees here if you want something a bit less whimsical. I also made this cute tree for my kitchen using tiny cooking/baking charms in this post.

There are so many fun and creative ways to make these little yarn wrapped Christmas trees to go with any decorating theme. I would love to see what you make!

Anita

Posted in Christmas, Decor | Tagged , | Leave a comment

Autumn Blessings

Hi friends,

I’m sharing a simple Thanksgiving card with you today. The pumpkin stamp is from the Thankful & Blessed Pumpkins set from Unity Stamp Company and it is so fun to color! There was a die to match the stamp but I’m not sure it is still available. 😦

Disclosure: Some of the links on my site are affiliate links, meaning, at no additional cost to you, I will earn a small commission if you click through and make a purchase. As an Amazon Associate I earn from qualifying purchases.

The sentiment is from the Change Can Be Beautiful stamp set and the die from the Postage Stamp Nesting Dies – both are from Unity Stamp Company. I’ve had my scalloped oval punch forever and it’s no longer available, but this is similar.

To make the card, I stamped the pumpkins and sentiment with Memento Rich Cocoa ink on white card stock. I colored the pumpkin image with Copic markers and cut it out with the matching die. You can also cut around the image with detail scissors. I punched out the sentiment with the scalloped oval punch.

I added a piece of orange card stock to a white card and layered a piece of green patterned paper die cut using the Postage Stamps Nesting Dies. I attached the pumpkin image to the card with foam tape and then attached the sentiment to the card.

Sometimes all you need is a great focal point image to make a beautiful card. 🙂

Wishing you all Autumn Blessings! 🍂🍁🍂

Anita

Posted in Uncategorized | Leave a comment

It’s A Thankful Sort Of Day

Hi friends,

If you’ve followed me for a minute, you know I can’t resist the Winnie the Pooh stamps from Unity Stamp Company. 😉 Well this adorable Fall stamp set is no exception. It’s called Winnie the Pooh: Fallish Days and is perfect for this simple Thanksgiving card.

Disclosure: Some of the links on my site are affiliate links, meaning, at no additional cost to you, I will earn a small commission if you click through and make a purchase. As an Amazon Associate I earn from qualifying purchases.

I stamped the image and the sentiment with Memento Rich Cocoa ink on white card stock. I colored the image with Copic markers and then die cut it using the Scallops and Rectangles Nesting Dies from Unity Stamp Company. These dies aren’t available right now, but this is a similar die set.

Here’s the list of Copic markers I used: Pooh – Y08, Y15, Y11. Large Orange Pumpkin – YR27, YR68, YR15, YR21. Small Orange Pumpkin – YR15, YR21. Blue Pumpkin – BG11, BG10, BG000.

I used the same die set and cut 2 more pieces from coordinating card stock. I layered them to a white card and then attached my stamped image to the card with foam tape.

Super simple, but perfect for sending Thanksgiving wishes!

Anita

Posted in Cards, Fall, Stamping | Tagged , , | 1 Comment

Crochet Granny Square Cowl

Hi friends,

Granny Squares are everywhere right now! There are blankets, bags, sweaters, scarves…all kinds of pretty patterns and projects! I thought it might be fun to make a simple cowl using a basic granny square pattern and I love the way it turned out. 😊

Disclosure: Some of the links on my site are affiliate links, meaning, at no additional cost to you, I will earn a small commission if you click through and make a purchase. As an Amazon Associate I earn from qualifying purchases.

I used this basic granny square pattern from Hopeful Honey. This particular pattern turns at the beginning of each round – this keeps the square from getting a little wonky and crooked looking.

I used Yarn Bee Soft & Sleek yarn in Ivory, Viridescent, and Dark Gray with an H/5mm crochet hook to stitch up my granny squares. I started my square with 2 rows of Ivory, then I stitched 2 rows of Viridescent, and finished it with one row of Dark Gray. I made a total of 6 squares. My squares measured about 5.5 inches.

I connected my squares together with Dark Gray using single crochet to add a little texture to the cowl. Once all the squares were stitched together, I added a row of single crochet around both of the outside edges to give it a more finished look.

The Crochet Granny Square Cowl is super easy to make and works up quickly! If you want it to be longer, simply add more squares. And your color choices are endless! Crochet cowls make great gifts, too. 😊

Anita

Posted in Crochet, Gifts | Tagged , | Leave a comment

Tabletop Pumpkin Crate

Hi friends,

Did you pick up any of these little velvet pumpkins at Dollar Tree? I got them a couple of months ago when I shared this post with my Fall finds. I haven’t had a chance to do as much Fall crafting as I had hoped, but I pulled out these cute little pumpkins the other day and made a fun Tabletop Pumpkin Crate to add to my Fall decor.

Disclosure: Some of the links on my site are affiliate links, meaning, at no additional cost to you, I will earn a small commission if you click through and make a purchase. As an Amazon Associate I earn from qualifying purchases.

The pumpkins had clips glued to the back so I just pulled them off. (I forgot to take a picture.) I had my little square wood crate in my craft stash – I think I got it at Target – but you can find similar crates at craft stores.

I used white paint with a foam brush and painted a light coat on the inside and outside of the crate. I didn’t worry about completely covering the crate because I wanted it to have a more rustic look.

Then I used a stiff-bristled brush to dry brush brown paint onto the crate. A little tip for the stiff-bristled brush…I took a chip brush and trimmed the bristles to about 1-inch long. This makes them stiff enough to use for dry brushing.

I trimmed a piece of floral foam from Dollar Tree and hot glued it to the center of the crate to add some height. Then I hot glued Spanish moss, also from Dollar Tree, around and over the floral foam.

I hot glued the pumpkins into the crate and added a bit more Spanish moss.

The wood “Give Thanks” on the front of my crate came from Dollar Tree, too. It came in a package of 6 different Fall phrases. I painted it with one coat of orange paint and then dry brushed it with brown paint. It’s hot glued onto the crate.

This was a fun little project that probably only took 30 to 45 minutes to make. My crate measures about 6 inches square and about 2.75 inches tall. It’s the perfect size to tuck onto a table or mantel. And most of my supplies came from Dollar Tree so it’s very budget friendly! 😉

I hope this inspires you to look in your craft stash and create something fun!

Anita

Posted in Decor, Fall | Tagged , | Leave a comment

Halloween Greetings – Handmade Card

Hi friends,

Just popping in to say Happy Halloween! 🎃 I hope you get to eat all of your favorite Fall treats today!

Disclosure: Some of the links on my site are affiliate links, meaning, at no additional cost to you, I will earn a small commission if you click through and make a purchase. As an Amazon Associate I earn from qualifying purchases.

Here are the details for this sweet Halloween Greetings card. The cute cupcake is from the 31 stamp set and the sentiment is from the Cuddlebug Bat set, both from Unity Stamp Company. The cupcake is stamped with Memento Tuxedo Black ink on white card stock, colored with Copic markers, and cut out. I added a strip of patterned paper to a purple card and added a piece of green card stock embossed with the Cuttlebug Spots and Dots embossing folder. I punched a circle from orange card stock and attached it to the card. The cupcake is attached to the card with foam tape. The sentiment is stamped with black ink on white card stock, trimmed, and attached to the card.

Enjoy your day and all your sweet treats! 🎃

Anita

Posted in Cards, Fall, Stamping | Tagged , , | Leave a comment

A Merry Christmas To You – October Christmas Card

Hi friends,

I almost missed it – but I managed to get my Christmas card for October designed and made! 🎄

You can find the other cards I’ve created this year in these posts… January, February, March, April, May, June, July, August, and September.

Disclosure: Some of the links on my site are affiliate links, meaning, at no additional cost to you, I will earn a small commission if you click through and make a purchase. As an Amazon Associate I earn from qualifying purchases.

I used the Making Spirits Bright and Christmas Express stamp sets from Unity Stamp Company for this month’s card. I love the vintage look mailbox! We had one on the corner across the street from the house I grew up in (although it was blue 😉). I used to love mailing things for my mom when I was little. 🙂

I stamped the mailbox image with Memento Tuxedo Black ink on white card stock and colored it with Copic markers. I used the Wonky Stitched Rectangle Dies from My Favorite Things to die cut around the image. I inked the edges with blue ink using a Blender Brush from Taylored Expressions.

I randomly stamped 3 of the postmark images from the Christmas Express stamp set on white card stock. I added blue ink with a Blender Brush and attached the piece to a white card. I attached the mailbox image to the card with foam tape. I stamped the sentiment with black ink on white card stock, punched it with a label punch (my punch is discontinued, but here is a set of similar dies), and applied blue ink. I attached it to the corner of the mailbox image.

I love how these 2 stamp sets go perfectly together! They make such a cute Christmas card!🎄

Anita

Posted in Cards, Christmas, Stamping | Tagged , , | 2 Comments

Little Halloween Treat Bags

Hi friends,

You still have time to make up some Little Halloween Treat Bags for those special trick or treaters. 🎃 Pull out your favorite Halloween stamps and make some quick little tags to attach to small clear treat bags filled with yummy goodies.

Disclosure: Some of the links on my site are affiliate links, meaning, at no additional cost to you, I will earn a small commission if you click through and make a purchase. As an Amazon Associate I earn from qualifying purchases.

My adorable candy corn stamp is from the 31 stamp set from Unity Stamp Company. The set has 13 little Halloween stamps that are perfect for making tags. I’m sure you have some cute Halloween images in your stash that will work.

I stamped the image with Memento Tuxedo Black ink on white card stock, colored it with Copic markers, and punched it out with a circle punch. I attached the stamped image to a larger decorative circle punched from green card stock. (This is a similar punch.)

I used my Crop-A-Dile to punch a small hole in the tag. I tied the tags to small clear treat bags filled with treats using orange and white baker’s twine.

These fun little tags are so quick and easy to make! You can also make cute tags using stamps for any season – Thanksgiving, Christmas, Easter, or Birthdays. Any smaller images you have would work great for making tags. 🙂

Anita

Posted in Fall, Gifts, Stamping | Tagged , , | Leave a comment

Trick or Treat – Pooh & Piglet Card

Hi friends,

I couldn’t resist making another Halloween card using this adorable Winnie the Pooh: Trick or Treat stamp set from Unity Stamp Company! 🎃 You can find my first card using these cuties in this post.

Disclosure: Some of the links on my site are affiliate links, meaning, at no additional cost to you, I will earn a small commission if you click through and make a purchase. As an Amazon Associate I earn from qualifying purchases.

I stamped Pooh & Piglet with Memento Tuxedo Black ink on white card stock, colored them with Copic markers, and cut them out.

Using the Wonky Stitched Rectangle Dies from My Favorite Things, I die cut a piece of polka dot patterned paper and attached it to an orange card. Using a smaller die, I cut a wonky rectangle from white card stock. I applied black ink to the die cut piece with a Blender Brush from Taylored Expressions and attached it to the card at an angle. Then I stamped the sentiment with orange ink on white card stock, trimmed it, and attached it to the card.

Pooh & Piglet are attached to the card using foam tape. Aren’t they just the cutest?!?!?

I almost wish October would last longer so I could keep creating with these cuties! 🎃 But no worries – I have more Pooh stamps to ink up for other fun cards! 😉

Anita

Posted in Cards, Fall, Stamping | Tagged , , | Leave a comment