Quick and Easy Handmade Birthday Cards

Hi friends,

It’s great to have a few handmade birthday cards on hand so when those special days sneak up you’re not scrambling to get a card made at the last minute. I’m hoping to do better at that in 2022 to make life a tiny bit less stressful. 🙂

Disclosure: Some of the links on my site are affiliate links, meaning, at no additional cost to you, I will earn a small commission if you click through and make a purchase. As an Amazon Associate I earn from qualifying purchases.

I’ve got 3 quick and easy cards to share with you. They really are super easy to make! Here’s a tip I learned early on in my card making journey… If you’re making a card, go ahead and make 2 of the same design. You already have all the supplies out and making 2 cards only takes a few minutes longer.

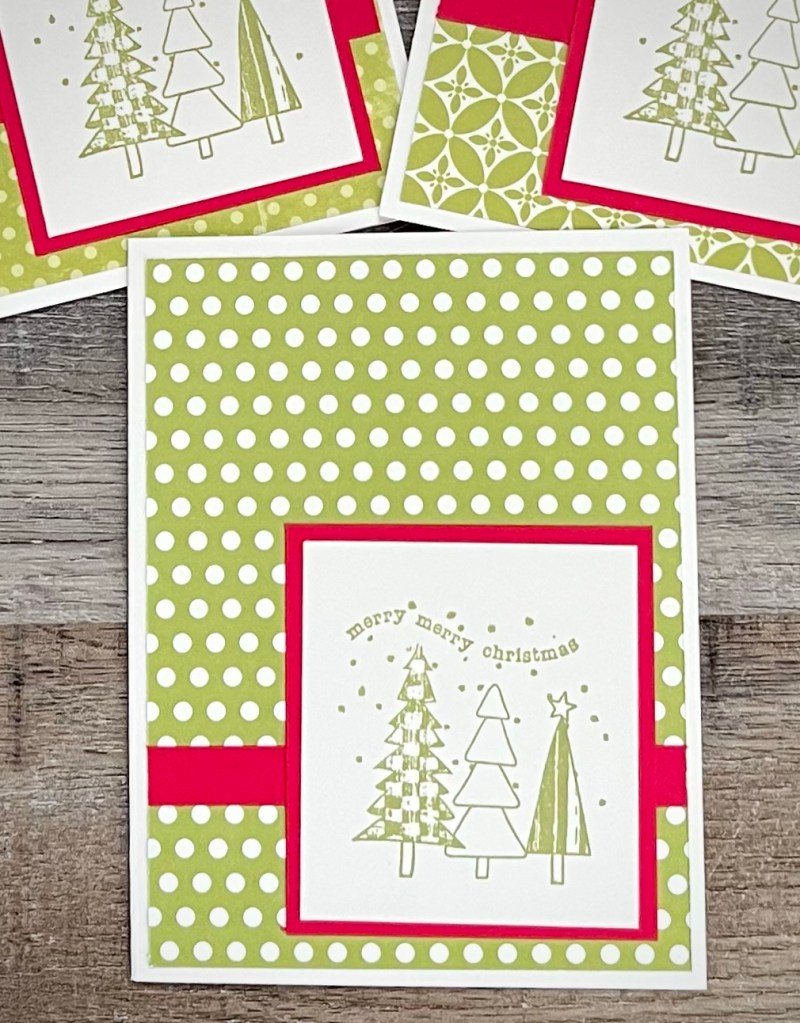
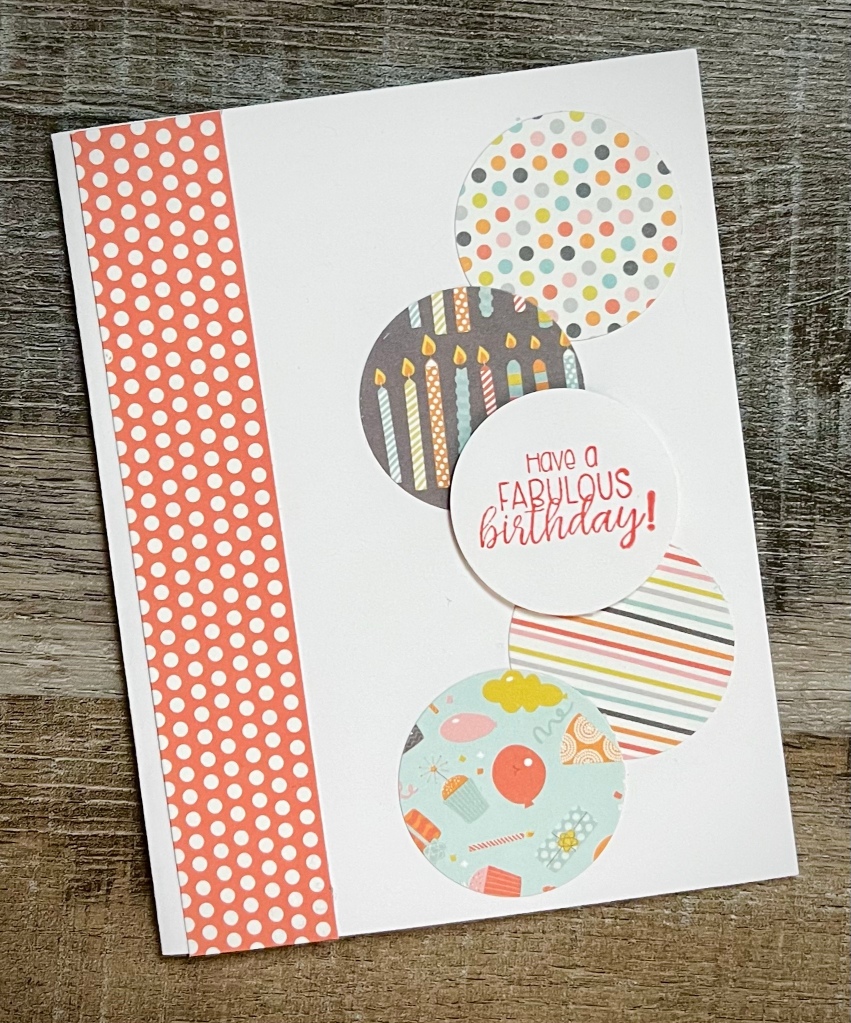
For the first card, all you need is patterned paper and your favorite birthday sentiment stamp (this one is from the Hugs, Kisses, and Birthday Wishes stamp set from Unity Stamp Company). Cut a strip of patterned paper and attach it to a white card. Using a 1.5-inch circle punch, punch circles from 4 different patterned papers and attach them to the card. Stamp your sentiment with coordinating ink and punch it out with the circle punch. Attach it to the card with foam tape.

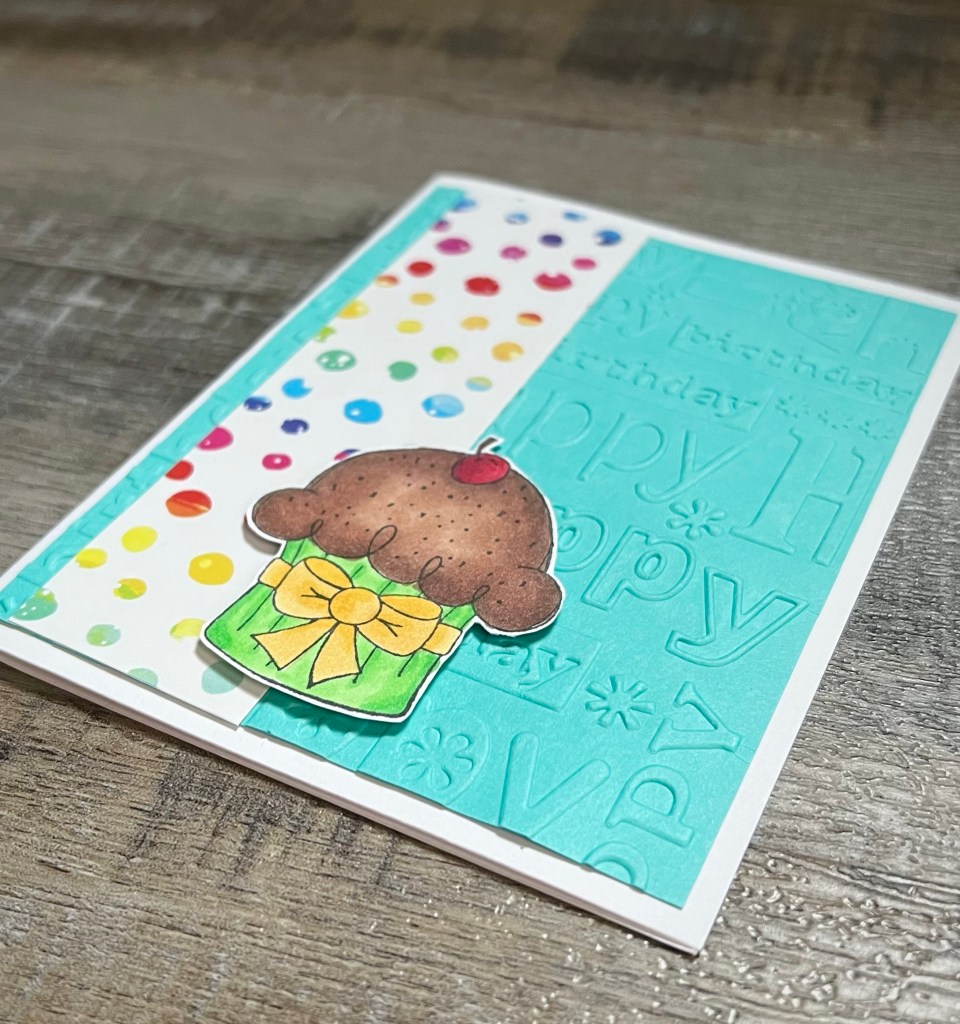
The next card is made with the cute cupcake from the More Than Cupcakes stamp set from Unity Stamp Company. I stamped the image on white card stock with Memento Tuxedo Black ink, colored it with Copic markers, and cut it out. I embossed a piece of turquoise card stock with a birthday embossing folder (similar to this or this) and attached it to a white card. I attached a strip of patterned paper and then added the cupcake using foam tape.

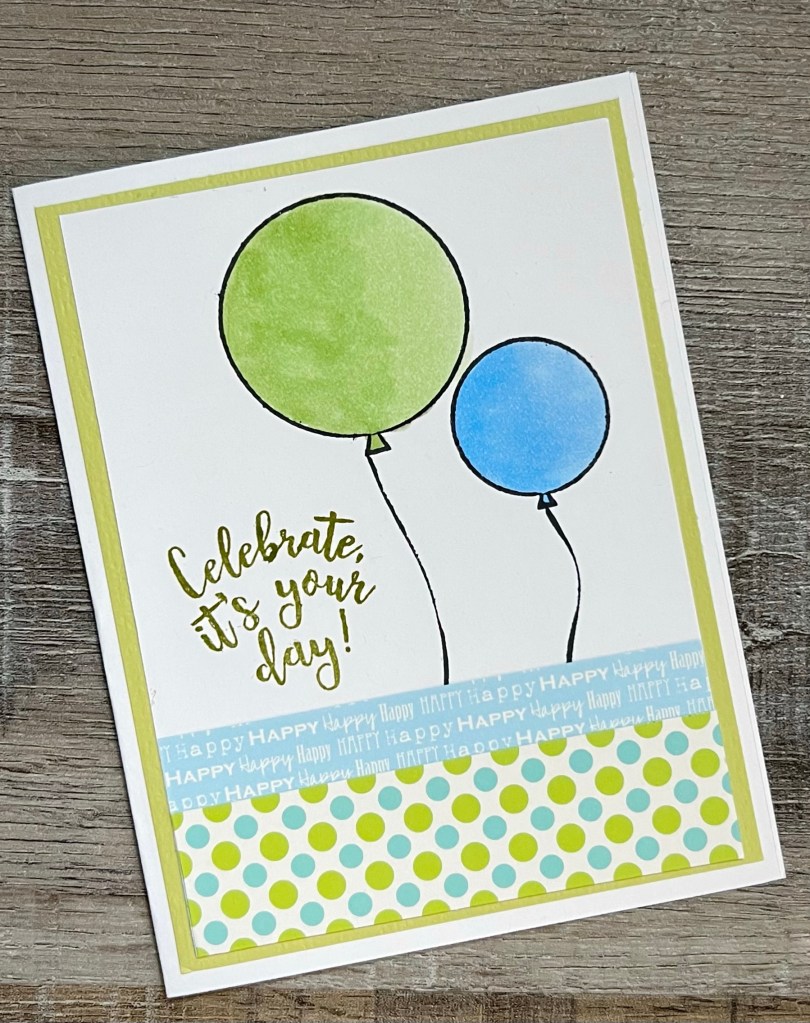
The stamp set for the last card is called Festive Balloon from Hero Arts. I stamped the sentiment and the balloons on white card stock with Memento Tuxedo Black ink and colored the balloons with Copic markers. Then I stamped the strings using the stamps in the set. I attached strips of 2 different patterned papers to the bottom of the panel. I attached a piece of green card stock to a white card and then attached the stamped panel to the card.

If you have 30 minutes or so, pull out your favorite birthday stamps and create a few quick and easy cards – you’ll be glad to have them on hand and ready to send to your favorite people!

Anita

Posted in Cards, Stamping | Tagged , | Leave a comment

Crochet Bobble Lap Blanket

Hi friends,

I hope you all had a wonderful Christmas! The New Year is just around the corner and I have a great crochet project for you. Now is the perfect time to work on a blanket! Not only is this a fun pattern to work on, it will also keep you warm on those chilly January nights while you stitch away. 😉

Disclosure: Some of the links on my site are affiliate links, meaning, at no additional cost to you, I will earn a small commission if you click through and make a purchase. As an Amazon Associate I earn from qualifying purchases.

I made this blanket at the request of my sweet friend for her daughter and grandson. Her daughter loves pandas so she decided on white with a black border as the color scheme. Since her little grandson is growing, she asked that I make it bigger than a baby blanket so he has plenty of room to snuggle in it – it’s also big enough for him to snuggle next to his mama under it.

I used Yarn Bee Soft & Sleek yarn in White and Black with an H/5mm hook to make the blanket.

You can find the pattern below along with a link to a free PDF for easy printing.

Crochet Bobble Lap Blanket 

Worsted Weight yarn – I used Yarn Bee Soft & Sleek in White and Black (approximately 25 ounces of White and 5 ounces of Black)

H/5mm hook

Stitches used in US terms:

Foundation Half Double Crochet – fhdc

Chain – ch

Half Double Crochet – hdc

Bobble Stitch – bobble

Single Crochet – sc

Slip Stitch – ss

Special stitch: Bobble Stitch – Yarn over, insert hook into stitch, and pull up a loop. Yarn over, pull through two loops. Repeat 4 times – there will be 6 loops on the hook. Yarn over and pull through all 6 loops. Sc in next stitch to complete the Bobble stitch.

Pattern repeat is multiple of 5 plus 3. 

Begin with White. 

Row 1: work 118 fhdc. Turn. (118 stitches)

Row 2: ch 1. hdc in first 3 stitches. *work bobble in next stitch, hdc in next 3 stitches* Repeat from * to * across. Turn. (23 bobbles, 72 hdc)

Rows 3-5: ch 1. hdc in each stitch across. Turn. (118 stitches) 

Repeat Rows 2-5 (32 times). (118 stitches)

Then work 1 bobble row (Row 2) and 1 hdc row (Row 3). The last row of the blanket (before adding the border) will be a row of hdc.

Your blanket should have a total of 34 bobble rows with 1 row of hdc at the beginning, 1 row of hdc at the end, and 3 rows of hdc between each bobble row.

Do not turn at the end of the last row. 

Change to Black.

Begin working in Rounds. 

Round 1: ch 1. sc evenly around blanket, working 3 sc in each corner. 

Rounds 2-5: ch 1. hdc in each stitch around, working 3 hdc in each corner. 

Note: If you’d like a larger border, add more rounds of hdc, working 3 hdc in each corner.

Fasten off and weave in ends. 

Finished blanket measures approximately 39 by 51 inches. 

You can easily adjust the size of your blanket by adding or subtracting rows or changing the amount of fhdc in the beginning row. Just make sure that your first row of fhdc is in multiples of 5 plus 3.  

Here’s the link to the free PDF…

The texture in this pattern is so amazing! I love how it looks. You can make this fun Crochet Bobble Lap Blanket in any color combo. You can see a smaller version of a blanket I made with this pattern here – it’s a Bobble Color Block Baby Blanket and I love how it turned out, too.

This blanket is a great lap blanket size as well as the perfect size for toddlers. It will keep whoever uses it toasty warm on a cold winter night. What color will you make yours?

Anita

Posted in Crochet, Gifts | Tagged , | Leave a comment

Merry Christmas!

Hi friends,

I just wanted to pop in and wish you all a very Merry Christmas! I hope your day is filled with all the things that make your heart happy. ❤️

Disclosure: Some of the links on my site are affiliate links, meaning, at no additional cost to you, I will earn a small commission if you click through and make a purchase. As an Amazon Associate I earn from qualifying purchases.

Today in the town of David a Savior has been born to you; he is the Messiah, the Lord. Luke 2:11

Celebrating the birth of our Savior and praying His blessings for you in 2022.

Anita

Posted in Christmas, Uncategorized | Tagged | Leave a comment

Christmas Thank You Notes

Hi friends,

This Planner Gal from Unity Stamp Company is just so cute! I thought she would be fun for some Christmas Thank You Notes. Her official name is Planner Gal: Get Your Jingle and she comes with a sentiment stamp that says “Get Your Jingle On” – she’s great for any last minute Christmas cards, too!

Disclosure: Some of the links on my site are affiliate links, meaning, at no additional cost to you, I will earn a small commission if you click through and make a purchase. As an Amazon Associate I earn from qualifying purchases.

I stamped her with Memento Tuxedo Black ink on white card stock and colored her with Copic markers. I die cut the image with a scalloped rectangle die (this is a similar die) and layered it to a larger scalloped rectangle die cut from red card stock. I stamped “thank you” (I like the font on this one) with red ink on white card stock and punched it out with an oval punch.

To assemble the card, I embossed a piece of turquoise card stock with a falling snow embossing folder (similar to this one) and attached it to a white card. I attached the Planner Gal to the card with foam tape and attached the sentiment to the corner of the image.

Such a fun way to say thank you! If you like this sweet gal, check out all the Planner Gals from Unity Stamp Company here.

Anita

Posted in Cards, Christmas, Stamping, Uncategorized | Tagged , , | Leave a comment

Last Minute Gift Card Holders

Hi friends,

Are you giving gift cards or cash for Christmas? 🎄 Although, you can usually pick up a sleeve or envelope to go with your gift cards when you purchase them, being the crafter that I am, I like to make my own. 😉

Disclosure: Some of the links on my site are affiliate links, meaning, at no additional cost to you, I will earn a small commission if you click through and make a purchase. As an Amazon Associate I earn from qualifying purchases.

These Last Minute Gift Card Holders can be made so quickly! You’ll need some double-sided card stock, a corner rounder punch, a 1-inch circle punch, a 1.5-inch circle punch, 1/4-inch Scor Tape (or other strong, thin, double-sided tape), and your favorite Christmas stamp.

Cut your card stock to measure 6 by 4.25-inches. Then measuring along the 6-inch side, score the card stock at 1.75-inches and again at 4.25-inches. (This is the scoring board I have and I love it!) Using the corner rounder, punch each corner. Using the 1-inch circle punch, insert one of the short ends half way into the punch to punch the notch as shown in the picture below.

Take the Scor Tape and put a piece on each side of the section of the holder with the notch. Remove the protective paper, fold up the bottom, and secure.

Using your favorite small Christmas stamp (this one came from Unity Stamp Company’s 2021 Advent Calendar), stamp the image on white card stock, color your image, and punch it out with the 1.5-inch circle punch. Attach it to the front of the holder, leaving half of it below the bottom edge of the flap.

Insert your gift card, put a little adhesive on the bottom half of the stamped circle, and seal the gift card holder. Super quick and easy!

This is a fun way to make giving gift cards or cash a little more festive! 🎄

Anita

Posted in Christmas, Stamping, Tags | Tagged , , | Leave a comment

Holiday Gifts From Your Kitchen

Hi friends,

Do you have some friends and neighbors that you’d like to remember with a little something this Christmas? Gifts from your kitchen can be just the thing to let them know you are thinking of them. 🎄🎁

Disclosure: Some of the links on my site are affiliate links, meaning, at no additional cost to you, I will earn a small commission if you click through and make a purchase. As an Amazon Associate I earn from qualifying purchases.

I have a few ideas for you that are tasty and easy to make. Click on each picture (or the link below them) and it will take you to each blog post which includes a link to any recipes that you’ll need.

Homemade Hot Cocoa Mix is always a yummy treat on a cold Winter day.

Homemade Hot Cocoa Mix

Package up some of these White Chocolate Peanut Butter Cookie Clusters in a Christmas cellophane bag tied with a cute ribbon for a tasty gift.

White Chocolate Peanut Butter Cookie Clusters

Chocolate lovers will enjoy these No-Bake Chocolate Oat Bars piled onto a pretty Christmas plate.

No-Bake Chocolate Oat Bars

You can make these Yummy Peanut Clusters in your slow cooker in just a couple of hours. Let them cool and package them up for gift giving.

Yummy Slow Cooker Peanut Clusters

Quick breads always make great gifts for the holidays and you may have everything you need to make this Cinnamon Swirled Banana Bread in your kitchen.

Cinnamon Swirled Banana Bread

Holiday Snack Mix is always fun! The mix in my blog post is for Easter – just substitute Christmas M&Ms for the chocolate eggs for a colorful Christmas treat. Cellophane bags of this make a great gift!

Holiday Snack Mix

Snickerdoodles are a traditional cookie that are easy to make and everyone loves them!

Snickerdoodle Cookies

There’s still time to whip up some of these easy recipes for any last minute gifts you may need – or even as treats for your family as you enjoy the holidays! 🎄

Anita

Posted in Christmas, Gifts, Recipes, Uncategorized | Tagged , , | Leave a comment

Easy Flaky Cinnamon Biscuits

Hi friends,

My husband has eaten these Easy Flaky Cinnamon Biscuits for most of his life. 😊 We used to make them a lot, but haven’t made them in a long time and he recently asked me to make them for Thanksgiving breakfast. They are super easy to make – prep time is just a few minutes and then you bake them for about 20 minutes.

Disclosure: Some of the links on my site are affiliate links, meaning, at no additional cost to you, I will earn a small commission if you click through and make a purchase. As an Amazon Associate I earn from qualifying purchases.

You’ll need a tube of refrigerated flaky biscuits – either regular size or jumbo size. The biscuits below are the jumbo size because that’s all my store had available.

First, mix up some cinnamon sugar in a small bowl – mix a couple of teaspoons of ground cinnamon into a cup of sugar. I don’t really measure the cinnamon, I just add it until the sugar mixture is a light brown color. You can add more or less to taste. Next, melt about 4 tablespoons of butter in a microwave safe bowl. Pop open your biscuits and dip them one at a time into the melted butter and then coat them with the cinnamon sugar mixture. Put your prepared biscuits into a round cake pan. It’s ok to scrunch them together so they will all fit in the pan – you want the edges of the biscuits to touch.

Bake them at the temperature listed on the biscuit package (I think it was 350 degrees), but you will probably need to bake them a few minutes longer than the directions to get a nice crunchy coating. I let mine bake for about 20 minutes until they were golden brown. When they are done, remove from the oven and immediately invert onto a serving plate (like in the picture below).

They will have a nice crunchy cinnamon sugar coating, but be soft and flaky inside. They are great for a special, but quick and easy, breakfast treat.

I had cinnamon tea with my biscuits because you can never have too much cinnamon! 😉 They are also great with a hot cup of coffee or a big glass of ice cold milk.

I hope you enjoy these Easy Flaky Cinnamon Biscuits!

Anita

Posted in Recipes | Tagged | 1 Comment

Last Minute Christmas Cards

Hi friends,

Are you like me and scrambling to get your Christmas cards out the door? I say every year that I’m not gonna do it this year…but then life happens and time passes too quickly!

I do have an idea that may help in 2022 – I’ll share that with you later. 😊 But in the meantime, I have a Christmas card for you that comes together very quickly. You can make lots of them in just a couple of hours for everyone on your card list.

Disclosure: Some of the links on my site are affiliate links, meaning, at no additional cost to you, I will earn a small commission if you click through and make a purchase. As an Amazon Associate I earn from qualifying purchases.

I used the Merry Christmas Treeline stamp from Unity Stamp Company to make my cards. I stamped it with bright green ink on white card stock and layered the stamped image to red card stock.

I looked through my stash of patterned paper to find papers to match my ink color. I attached a piece of the patterned paper to a white card. Then I added a 1/4” strip of red card stock and attached my stamped image over it. (This is my favorite adhesive for card making.)

Super fast and super easy! No coloring needed! And it’s an easy layout to make assembly-line style.

Look through your stamps to see what Christmas stamps you can use without having to color them. Add a little card stock and patterned paper and you’ll have your cards finished in no time! 🎄

Anita

Posted in Cards, Christmas, Stamping | Tagged , , | Leave a comment

The Easiest Christmas Decor Ever!

Hi friends,

Do you have a corner in your home that needs a little Christmas cheer? This idea is Easiest Christmas Decor Ever!

Disclosure: Some of the links on my site are affiliate links, meaning, at no additional cost to you, I will earn a small commission if you click through and make a purchase. As an Amazon Associate I earn from qualifying purchases.

All you need is a pretty glass bowl and some ornaments – that’s it! Just fill your bowl with the ornaments and you’re done. I told you it was easy. 😉

My glass bowl actually came from Dollar Tree and has a vintage look to it. I found my ornaments several years ago at a Christmas store in Alexandria, VA and I love that they look like the old glass ornaments I remember from my childhood.

I added my bowl of ornaments to my entry table along with my Mini Ornament Christmas Tree Plaque and my framed subway art. (If you search “Christmas subway art free printable” on Pinterest or Google you will find tons of printable ideas.)

You can find beautiful ornaments in any color and any style to match your Christmas decor. And they are probably on sale right now! Or you can fill your bowl with ornaments that have been treasured in your home for years. You can also add a little greenery to your bowl, too. It’s super easy and so festive!

Anita

Posted in Christmas, Decor | Tagged , | Leave a comment

Hand Stamped Christmas Tags

Hi friends,

Hand Stamped Christmas Tags are quick to make and add a special little touch to all your gifts. 🎄 I made some simple tags to share with you today. I hope they will inspire you to take a few minutes to make up some of your own tags.

Disclosure: Some of the links on my site are affiliate links, meaning, at no additional cost to you, I will earn a small commission if you click through and make a purchase. As an Amazon Associate I earn from qualifying purchases.

I used the Sweet Treat Christmas stamp set from Unity Stamp Company for the images on my tags. The tag die is from the Tag Stacklets 3 die set by Taylored Expressions.

I stamped the images with Memento Tuxedo Black ink on white card stock, colored them with Copic markers, and cut them out. (I love these detail scissors!) I die cut the tags from coordinating card stock and then attached the stamped images to the tags using my favorite adhesive.

I stamped “to and from” on the back of the tag. (Here’s a similar stamp.)

Pull out your favorite Christmas image stamps and make some of your own Hand Stamped Christmas Tags. You can use circles, scalloped circles, squares, or any tag shape for the base of your tags. Use your imagination and have fun!

Anita

Posted in Christmas, Stamping, Tags | Tagged , , | Leave a comment