Hope Your Fall Is A Hoot

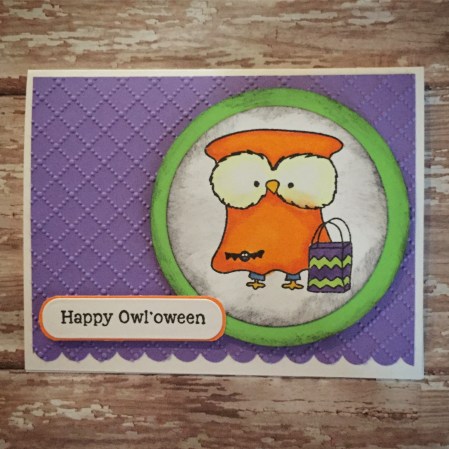
This little guy is dropping by to wish you a Happy Fall. He is just so adorable! You can find him here with a couple of his friends at Darcie’s Rubber Stamps.

img_6759

I stamped the owl with brown ink on white card stock, colored him with Copic markers, and punched him with a scalloped circle punch. I layered the stamped image to a circle punched from orange card stock.The sentiment is stamped with brown ink on white card stock and punched with an oval punch.

To assemble the card, emboss a panel of turquoise card stock with the Scattered Leaves embossing folder from Taylored Expressions. Attach to a kraft card. Attach owl and sentiment to the card with foam tape. Punch 2 tiny leaves and attach to the card with foam tape.

I think he is just a hoot! 😉

Thanks for stopping by,

Anita

Posted in Cards, Fall, Uncategorized | Leave a comment

Cherry or Pumpkin?

So which is your favorite pie, cherry or pumpkin? Here’s a sweet way to have both – without all the calories! 🙂

I made these cute pot holders/hot pads for my Mom for her birthday. They work up super quick using worsted weight cotton yarn. I found the free patterns on Pinterest. 

You can find the pattern for the Pumpkin Pie pot holder here… I used pumpkin orange and white cotton worsted weight yarn to make it. By using cotton, the pot holder can withstand the heat!

IMG_6629

The pattern for the Cherry Pie pot holder is available here… I used worsted weight cotton yarn in dark red and medium brown to make this yummy pot holder.

IMG_6630

A cute way to add some sweetness to your kitchen without the guilt! 😀

Thanks for stopping by,

Anita


Posted in Crochet, Fall, Gifts, Uncategorized | 2 Comments

Happy Owl’oween

Isn’t this little owl just the cutest?!?! He is from the Happy Owl’oween stamp set by Unity Stamp Company. As soon as I saw him I knew he had to find his way to my craft room. 🙂

img_6758

I stamped the owl with black ink on white card stock and colored him with Copic markers. I punched him out with a circle punch and distressed the edges with black ink. I punched a larger circle from green card stock, distressed the edges with black ink, and layered the owl image to the circle. The purple panel of card stock was punched with a scalloped edge punch, embossed with the Dotted Lattice embossing folder from Taylored Expressions, and then attached to a white card. I stamped “Happy Owl’oween” with black ink on white card stock, punched it out with a label punch, and layered it to orange card stock. Both stamped images are attached to the card with foam tape.

I think he is just a hoot! 😉  🎃

Thanks for stopping by,

Anita

Posted in Cards, Fall, Uncategorized | Leave a comment

Fall Wreath

I love having a seasonal wreath on my front door. But now, after painting my pantry door, I love having a wreath on that door as well. This is a fun and simple wreath to add a little Fall to my kitchen.

img_6754

It’s made with a styrofoam wreath form, burlap ribbon, leaf stems, and a pumpkin. Simply secure the ribbon with a couple of straight pins on the back of the wreath. Then wrap the ribbon around the wreath, overlapping the edges. When finished wrapping, secure the end of the ribbon with more straight pins. Using the tip of your scissors, start a small hole where you want to attach your leaf stems. Push the ends of the stems into the wreath. My pumpkin also had a stem on it so I attached it in the same way. You can also use a little hot glue to attach the pumpkin. I added contrasting ribbon attached with straight pins to hang my wreath.

Fast, easy, and pretty – a perfect little touch of Fall for any door in your home! 🍁🍂

Thanks for stopping by,

Anita

Posted in Decor, Fall, Uncategorized | Leave a comment

Candy Corn Decorations

One of the things I love about the Fall season is candy corn – either the real candy or fun decorations made to look like the candy.

I was inspired by this pin I found on Pinterest to make my own Candy Corn Decorations. I started with styrofoam cones that you can pick up at your local craft store. The small ones came in a package of 2.

img_6748

I used cotton yarn in orange, yellow, and white to wrap the cones.

img_6749

I started with the yellow yarn about 1/3 of the way up the cone. I wrapped the yarn around the end and continued wrapping in one layer until the bottom of the cone. When I got near the bottom, I spread thick white glue on the cone (I used Crafter’s Pick The Ultimate) before wrapping the last couple of rows to hold the yarn in place. Don’t cut the yarn yet! Continue wrapping the yarn haphazardly back up the cone so it doesn’t look so perfect. When you get to the top of the yellow section, cut the yarn and use a yarn needle to tuck the end under the wrapped section.

img_6750

Wrap the orange yarn in the same way as the yellow. To wrap the white yarn, I spread glue on the top of the cone. Then I wrapped the yarn beginning in the center of the top, making a tight circle until I got to the edges. I continued to wrap in the same way as the yellow and orange.

And here they are all finished!

img_6751

These were really fun and easy to make! I think I need to go to the store for the real thing now…

Thanks for stopping by,

Anita

Posted in Decor, Fall, Uncategorized | 4 Comments

Comfy Plush Crocheted Slippers

Oh My Goodness!! These are the most comfy slippers!! So soft and warm…and they work up so quickly! I found the pattern for these wonderful Cloud 9 Slippers here at The Lavender Chair while perusing Pinterest.

img_6728

They work up very quickly using Bernat Blanket Yarn (I got mine at Michael’s) and an N crochet hook. The yarn comes in solid colors as well as variegated color choices. You’re sure to find something you will love!

img_6729

These comfy plush slippers will keep your toes warm and toasty all winter long!

Thanks for stopping by,

Anita

Posted in Crochet, Gifts, Uncategorized | Leave a comment

Happy Fall

It’s now officially Fall!! I love this time of year – the cooler temps, beautiful colors, sweaters, and scarves (although we’re still waiting for the temps to drop to sweater weather here in Alabama 😉) Here’s a card to celebrate the season.

img_6726

The pumpkin and scalloped circle stamps are from Hero Arts. The sentiment is from Savvy Stamps. The swirl embossing folder is from Cuttlebug. The large scalloped circle punch is from Marvy Uchida. The small scalloped circle punch and ticket punch are from Stampin’ Up.

To make the card, emboss a panel of orange card stock and attach to a white card. Stamp the pumpkin with brown ink on white card stock, color with colored pencils, and punch with the large scalloped circle punch. Attach to the card with foam tape. Stamp the small scalloped circle with 2 different colors of green ink on white card stock. Punch with the small scalloped circle punch and attach to the card with foam tape. Tie 2 orange buttons with twine and attach to the small scalloped circles. Stamp “happy fall” with brown ink on white card stock, punch with the ticket punch, and attach to the card.

You could change the sentiment and add a face to the pumpkin to make this a Halloween card. Or change the sentiment to “Happy Thanksgiving” and you have a great Thanksgiving card.

Enjoy the Fall season and all its goodness!!

Thanks for stopping by,

Anita

Posted in Cards, Fall, Uncategorized | Leave a comment

Friends Card

Just sharing a fun little card with you today. It’s quick and easy and perfect for so many different occasions.

img_6727

The lattice background and flower stamps are both from Hero Arts. I’ve had them for a long time, so they may not be available any longer. But check out their website, they have great stamps and other products!

To make the card, stamp the lattice background on patterned card stock with orange ink and layer the panel to orange card stock. Attach a piece of grosgrain ribbon and tie it with a piece of twine. Attach the panel to a white card. Punch a scalloped circle from orange card stock, ink the edges with orange ink, and attach to the card. Stamp the flower with orange ink on white card stock, ink the edges with orange ink, and attach to the scalloped circle with foam tape. Add a tiny button to the center of the flower.

A great card for a birthday, thinking of you, or just a little encouragement for a friend…

Thanks for stopping by,

Anita


Posted in Cards, Uncategorized | Leave a comment

Mini Chalk-Painted Pumpkins

I wanted some white and turquoise mini pumpkins to fill up a lantern I have, but I couldn’t find any… So what do you do??? You paint your own! 🙂

I found these little pumpkin picks at my local Hobby Lobby (40% off, of course!). They are about 3-4 inches in diameter. Obviously not the colors I was looking for…

img_6713

I cut the picks off of the bottom and got out my chalk finish paints in white, turquoise, and brown. I painted 7 of the pumpkins white and 3 turquoise. All the stems are painted brown. I painted 2 coats of each color, making sure to let them dry thoroughly between coats – if it’s not dry, you will just rub off the previous coat (trust me 😉). Then I brushed on a light coat of clear wax. If you would like a more antiqued/distressed look, use antique wax and immediately wipe off the excess.

Here are my painted pumpkins…

img_6714

And here they are stacked in my lantern…

img_6715

It’s beginning to look a little like Fall around here!

Thanks for stopping by,

Anita

Posted in Decor, Fall, Uncategorized | Leave a comment

5 Minute Fall Centerpiece

Seriously!! This will take 5 minutes 🙂!

All you need are 3 glass hurricanes, three candles, raffia, and some popcorn kernels. Yes – popcorn kernels. Get the cheapest store brand bag you can find – no sense spending money on the gourmet stuff since you won’t be popping and eating it!! I found my candles at the Dollar Tree, I liked the look of the glass holder, but any pillar candle will work.

Put your candle in the middle of the hurricane, pour some popcorn kernels around it, and then tie the raffia around the hurricane. That’s it!! Told you it will only take 5 minutes 😉. Such a simple way to add a touch of Fall to your table.

img_6698

I have used these glass hurricanes all year to decorate my dining room table. You can find those posts here, here, and here.

Thanks for stopping by,

Anita


Posted in Decor, Fall, Uncategorized | Leave a comment